There are some dishes that just taste like home, aren’t there? For me, that’s my Grandma Elsie’s Chicken and Dressing casserole. It’s not just a meal; it’s a warm hug in a dish, a memory of Sunday dinners filled with laughter and the comforting aroma of something truly special baking in the oven. Every time I make it, I’m transported back to her kitchen, watching her stir a huge bowl, her hands dusted with flour. It’s the kind of recipe that’s been passed down, tweaked a little here and there over the years, but at its heart, it’s pure, unadulterated comfort. If you’re looking for something that feels like a classic, something that will make your whole house smell amazing and have everyone asking for seconds, then you’ve come to the right place. It’s more than just chicken and stuffing baked together; it’s an experience. It’s the unsung hero of holiday tables, but honestly, it’s just as perfect for a cozy weeknight when you need a little extra love.
Thank you for reading this post, don't forget to subscribe!What is chicken and dressing?
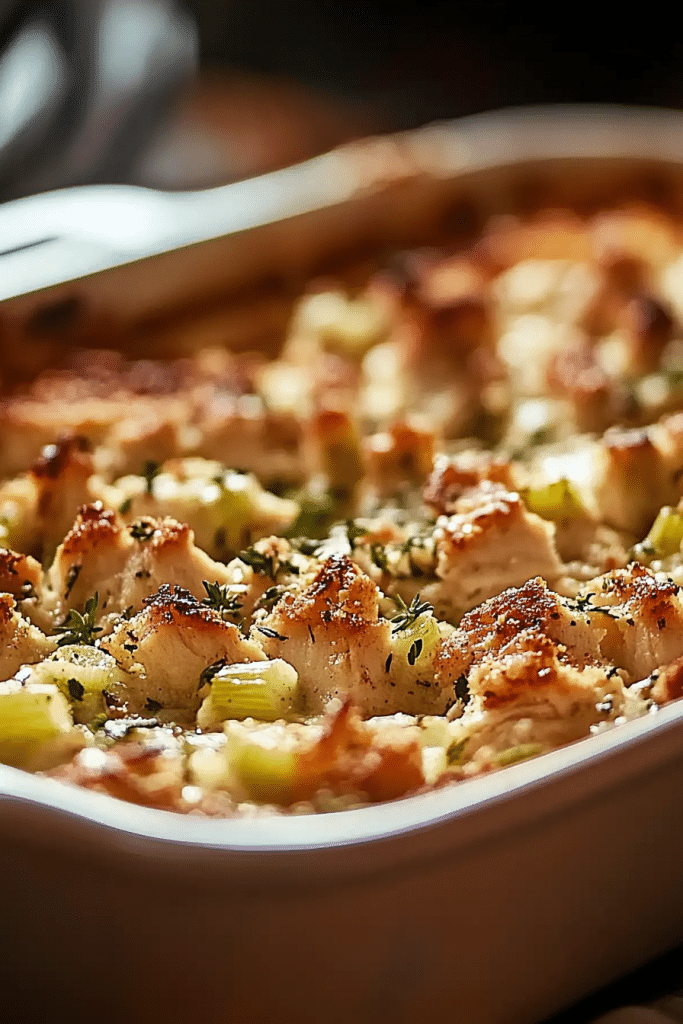
So, what exactly is this magical thing we call Chicken and Dressing? At its core, it’s a savory casserole that brings together tender pieces of cooked chicken, a fluffy, flavorful bread-based dressing, and a rich, creamy sauce. Think of it as a hearty, unified version of what you might get on your Thanksgiving plate, but all baked into one delicious, harmonious dish. It’s not a quick stir-fry, and it’s not a delicate pastry; it’s substantial, satisfying, and utterly delicious. The “dressing” part usually involves stale bread cubes or torn pieces that soak up all the wonderful flavors from the chicken broth and seasonings. My Grandma Elsie always insisted on using slightly day-old bread for the best texture – not too mushy, not too dry. It’s the kind of dish that makes you feel grounded and content, and the simplicity of its concept belies the depth of flavor you get from it.
Why you’ll love this recipe?
Honestly, there are so many reasons why this Chicken and Dressing Recipe has become a staple in my home, and I’m betting it will be in yours too. First off, the FLAVOR is just out of this world. The combination of the savory chicken, the herbaceous, slightly sweet dressing, and that creamy, binding sauce is pure bliss. It’s a symphony of textures and tastes that just works. Then there’s the SIMPLICITY. While it might sound like a lot is going on, it’s really straightforward. Most of the work involves just mixing ingredients in a bowl and letting the oven do the rest. It’s a lifesaver on busy days when you want something impressive without spending hours in the kitchen. And let’s talk COST-EFFICIENCY. This recipe is incredibly budget-friendly. It uses pantry staples and affordable ingredients that you probably already have on hand, making it a fantastic option for feeding a crowd without breaking the bank. Plus, it’s so VERSATILE! While it’s a classic on its own, you can easily dress it up or down. I often serve it as a hearty main course, but it also makes an amazing side dish for holidays or potlucks. It’s similar to a good cornbread stuffing or a savory bread pudding, but with that comforting chicken element that makes it feel like a complete meal. What I love most about this is how adaptable it is; it truly feels like a recipe that grows with you and your family’s tastes.
How do I make chicken and dressing?
Quick Overview
This recipe is all about bringing together simple, wholesome ingredients into one comforting casserole. We’ll start by cooking some chicken, then creating a delicious, savory dressing base. Everything gets mixed together with a luscious, creamy sauce and baked until golden and bubbly. It’s a straightforward process that yields incredibly rewarding results. You’ll find that the steps are logical and easy to follow, making it perfect even for beginner cooks. The magic happens in the oven as all those flavors meld together, creating that irresistible aroma that fills your home.
Ingredients
For the Chicken:
2 cups cooked chicken, shredded or cubed (rotisserie chicken is a lifesaver here!)
1 tablespoon Olive oil (optional, for sautéing if using raw chicken)
1/2 cup chicken broth (if cooking raw chicken)
For the Dressing Base:
8 cups cubed day-old bread (about 1-inch cubes – white, sourdough, or a mix works great!)
1 cup chopped yellow onion
1/2 cup chopped celery
1/4 cup unsalted butter
1 teaspoon dried sage
1/2 teaspoon dried thyme
Salt and freshly ground Black Pepper to taste
For the Creamy Sauce:
2 cups chicken broth
1 cup milk (whole milk or half-and-half for extra richness)
2 large eggs, lightly beaten
1/4 cup chopped fresh parsley (for color and freshness)
“Made the Chicken and Dressing tonight and wow — perfect weeknight dinner. Will definitely make again!”
Step-by-Step Instructions
Step 1: Preheat & Prep Pan
First things first, let’s get that oven preheated to 375°F (190°C). While it’s warming up, grab a 9×13 inch baking dish. You can grease it lightly with butter or cooking spray – I usually just give it a quick swipe with a paper towel dipped in oil. This is a simple step, but it’s crucial for preventing any sticking and making sure your beautiful casserole slides out perfectly when it’s done.
Step 2: Mix Dry Ingredients
In a large bowl, combine your cubed bread. If you’re using raw chicken, now’s the time to cook it. You can boil it in the 1/2 cup of chicken broth with a pinch of salt until cooked through, then shred or cube it. Or, for a quick sauté, heat 1 tablespoon of olive oil in a skillet over medium-high heat and cook bite-sized chicken pieces until browned and cooked through. Once your chicken is ready, add the shredded or cubed chicken to the bowl with the bread. Add your chopped onion, celery, dried sage, dried thyme, and a good pinch of salt and pepper. Give it all a gentle toss to distribute everything evenly. Don’t be afraid to get your hands in there – it’s the best way to make sure everything is mixed well!
Step 3: Mix Wet Ingredients
In a separate medium bowl, whisk together the 2 cups of chicken broth, 1 cup of milk (I love using whole milk for that extra creamy texture, but any milk works!), and the two lightly beaten eggs. Whisk until everything is well combined and you don’t see any streaks of egg white. This mixture is what’s going to bind everything together and create that wonderfully moist and tender dressing.
Step 4: Combine
Now for the magic! Pour the wet ingredients over the dry ingredients in the large bowl. Add the 1/4 cup of unsalted butter, cut into small cubes, over the mixture. Using a spatula or a large spoon, gently fold everything together until the bread cubes are moistened. Be careful not to overmix here; you don’t want to turn it into mush. Just ensure everything is coated and slightly softened. The butter will melt as it bakes, adding richness.
Step 5: Prepare Filling
This step is actually already done within the mixing! The chicken, onion, and celery are already integrated into your dressing mixture. If you prefer a more distinct “filling” that you swirl in, you could cook the chicken separately with the onions and celery, then gently fold it into the wet ingredients before combining with the bread. But in my Grandma’s version, it’s all part of the beautiful, unified casserole.
Step 6: Layer & Swirl
Pour the entire mixture into your prepared baking dish and spread it out evenly. You can gently press it down a bit to create a nice, compact layer. My Grandma Elsie didn’t really “swirl” anything in; her method was all about letting the flavors meld during baking. The butter cubes on top will melt and create those lovely pockets of richness as it bakes. The visual cue here is just a smooth, even layer ready for the oven.
Step 7: Bake
Pop that baking dish into your preheated oven. Bake for about 40-50 minutes, or until the top is beautifully golden brown and the casserole is set and bubbly around the edges. You can test if it’s done by inserting a knife into the center – it should come out clean. If the top is browning too quickly, you can always loosely tent it with aluminum foil for the last 10-15 minutes of baking.
Step 8: Cool & Glaze
This is perhaps the hardest part: letting it rest! Once it’s out of the oven, let the Chicken and Dressing sit for about 10-15 minutes before serving. This allows it to firm up slightly, making it easier to slice and ensuring all those delicious juices are reabsorbed. There’s no separate glaze in this traditional recipe; the moisture from the broth, milk, and eggs creates a wonderfully tender and slightly creamy texture throughout.
“Packed with flavor and so simple. Exactly what I wanted from this Chicken and Dressing!”
Step 9: Slice & Serve
Now for the best part! Carefully slice the Chicken and Dressing into squares. Serve it warm, straight from the dish. The aroma alone will have everyone gathered around the table, eager for a bite. It’s hearty, comforting, and absolutely delicious.
What to Serve It With
This Chicken and Dressing casserole is a star on its own, but it also plays wonderfully with other dishes. For a delightful BREAKFAST, I love serving smaller portions alongside some scrambled eggs and a side of fresh fruit. It’s surprisingly satisfying and gives you that cozy morning feeling. For BRUNCH, it feels a bit more elegant. I’ll pair it with a fresh green salad, some glazed carrots, and perhaps a light fruit compote. A mimosa or a nice cup of coffee is always a good addition! As a DESSERT, it might sound unusual, but a smaller, more delicate portion served with a dollop of cranberry sauce or a drizzle of warm APPLE CIDER reduction can be an interesting twist, playing on the sweet and savory notes. And for those COZY SNACKS, it’s perfect on its own, maybe warmed up with a glass of milk or a comforting cup of tea. My family has a tradition of serving it with a side of steamed green beans tossed with a little butter and lemon zest – it’s simple but adds a lovely freshness. Another tried-and-true combination is with a simple garden salad and a slice of crusty bread for scooping up any extra goodness.
Top Tips for Perfecting Your Chicken and Dressing
I’ve made this Chicken and Dressing more times than I can count, and along the way, I’ve picked up a few tricks that I think make a big difference. For the bread, always aim for day-old. Fresh bread will get too mushy; stale bread soaks up the liquid beautifully without disintegrating. If your bread is too fresh, you can always toast the cubes lightly in a low oven for about 10-15 minutes until they’re just a little dry. When it comes to sautéing your onions and celery, take your time! Cook them over medium heat until they’re soft and translucent. This really brings out their sweetness and deepens the flavor of the dressing. Don’t rush this step! Regarding the wet ingredients, using chicken broth that’s flavorful is key. If you have Homemade Chicken broth, that’s even better! I’ve experimented with using lighter milk, but honestly, whole milk or even half-and-half makes a noticeable difference in the richness and creaminess of the final dish. My personal trick for extra flavor is to add a pinch of poultry seasoning along with the sage and thyme, if you have it. When combining the wet and dry ingredients, remember the gentle hand. Overmixing can lead to a dense, gummy texture. You want a light and fluffy dressing, so just fold until everything is moistened. If you find your bread mixture seems a bit too dry after combining, you can always add another splash of chicken broth or milk, a tablespoon at a time. For baking, I find that placing the casserole in the center of the oven ensures even cooking. And that resting period after baking? It’s non-negotiable! It allows the casserole to set properly, making it much easier to slice and preventing it from falling apart. Trust me on this one!
Storing and Reheating Tips
Leftover Chicken and Dressing is honestly a gift that keeps on giving! If you happen to have any (which is rare in my house!), storing it properly is key to enjoying it later. For storing at ROOM TEMPERATURE, it’s best to do so for no more than two hours, especially if your kitchen is warm. The key is to cover it once it’s cooled down a bit. If you’re planning to keep it for a day or two, REFRIGERATOR STORAGE is your best bet. Let the casserole cool completely, then cover it tightly with plastic wrap or transfer it to an airtight container. It should stay fresh and delicious in the fridge for about 3-4 days. If you want to keep it for even longer, FREEZER INSTRUCTIONS are a lifesaver. Once completely cooled, wrap individual portions or the whole casserole tightly in plastic wrap, then in a layer of aluminum foil, or use freezer-safe containers. It can stay frozen for up to 2-3 months. When you’re ready to enjoy it again, the best way to reheat is in the oven. For refrigerated leftovers, bake at around 350°F (175°C) for 15-20 minutes, or until heated through. For frozen leftovers, thaw them in the refrigerator overnight if possible, then reheat as above. If you’re in a rush, you can reheat from frozen at a slightly lower temperature (around 325°F/160°C) for a longer period, covered with foil, until warmed through. This ensures it doesn’t dry out. I don’t typically add glaze after storage; the built-in moisture from the original baking usually suffices.
Frequently Asked Questions
Final Thoughts
There you have it – my Grandma Elsie’s famous Chicken and Dressing casserole! It’s more than just a recipe; it’s a tangible piece of my family history, a dish that evokes warmth, comfort, and happy memories. I truly believe that this recipe is one that everyone should have in their repertoire. It’s forgiving, incredibly delicious, and has a way of making any meal feel special. Whether you’re serving it for a holiday feast, a casual family dinner, or just because you need a little comfort food, it never disappoints. If you loved this recipe, you might also enjoy my other classic comfort food dishes, like my Creamy Chicken Pot Pie or my Slow Cooker Pot Roast. They have that same homestyle goodness that I know you’ll adore. I can’t wait to hear how yours turns out, so please leave a comment below and tell me all about your experience! And if you’ve tried any fun variations or have your own family twists, I’d love to know. Happy cooking, everyone!

Chicken and Dressing
Ingredients
Main Ingredients
- 1.5 pounds cooked chicken shredded
- 1 loaf day-old bread cubed
- 1 cup chopped yellow onion
- 0.5 cup chopped celery
- 0.5 cup melted butter
- 2 cups chicken broth
- 2 large eggs beaten
- 1 teaspoon dried sage
- 0.5 teaspoon dried thyme
- 0.25 teaspoon black pepper
- 1 teaspoon salt
Instructions
Preparation Steps
- Preheat your oven to 350°F (175°C). Grease a 9x13 inch baking dish.
- In a large bowl, combine the shredded cooked chicken, cubed bread, chopped onion, and chopped celery.
- In a separate bowl, whisk together the melted butter, chicken broth, beaten eggs, sage, thyme, salt, and pepper.
- Pour the wet ingredients over the dry ingredients and gently mix until everything is well combined.
- Transfer the mixture to the prepared baking dish and spread evenly.
- Bake for 30-40 minutes, or until the top is golden brown and the dressing is heated through.
- Let it rest for a few minutes before serving.


