You know, there’s something incredibly satisfying about making things from scratch, isn’t there? Especially when it comes to our furry family members. My house is usually buzzing with activity, and my dog, Buster, is always right there in the middle of it, tail wagging a mile a minute. He’s the sweetest boy, but he also has a nose for anything delicious, and I’ve always felt a little guilty handing him store-bought treats that I can barely pronounce the ingredients of. So, for years, I’ve been on a quest to find the *perfect* homemade dog treats. I’ve tried a ton, and some have been… well, let’s just say Buster politely sniffed them and walked away. But this recipe? Oh, this one is a game-changer. It’s simple, uses ingredients you probably already have, and the smell that fills my kitchen when these are baking makes Buster do his happy dance by the oven. If you’ve ever made Peanut Butter Cookies, think of this as their canine-friendly cousin – just as delightful, but made with love and a whole lot of dog-approved goodness. I always whip up a batch when I know we’ll have friends over with their pups, and they’re always a massive hit!
Thank you for reading this post, don't forget to subscribe!What are some good home made dog treats?
So, what exactly *are* these magical homemade dog treats I’m raving about? Think of them as wholesome, baked biscuits specifically designed for your canine companions. They’re essentially simple baked goods made with dog-safe ingredients, steering clear of anything that could be harmful or just generally unhealthy for them. The idea is to offer a delicious, nutritious snack that you can feel *good* about giving your dog. Instead of relying on processed biscuits loaded with artificial flavors and preservatives, we’re talking about real food that’s been put together with care. They can range from super simple, no-bake Energy Balls to more involved baked cookies like these. My version is essentially a hearty biscuit with a hint of sweetness and a texture that’s just right for a good chew. It’s a way to show your dog a little extra love, tailor-made for their taste buds and dietary needs. It’s about control over what goes into their bodies, and honestly, the joy of seeing them devour something you’ve made yourself is unmatched!
Why you’ll love this recipe?
Okay, let’s dive into why this particular recipe for homemade dog treats has earned a permanent spot in my recipe rotation. First off, the flavor! Even though it’s for dogs, I’ve always believed that if it smells good to me, it’s probably going to be a hit with them. These treats have this warm, slightly nutty aroma from the Peanut Butter and oats that’s just incredibly inviting. Buster goes absolutely nuts for them – he’ll sit, stay, and do all his tricks with an intensity I haven’t seen in ages when he knows a batch is fresh out of the oven. And the simplicity! I cannot stress this enough. If you’re busy, like I always seem to be, this is a lifesaver. You can whip up a batch in under 30 minutes, active time, and the rest is just oven time. No fancy equipment needed, just your basic mixing bowls and a baking sheet. Plus, it’s so cost-effective. The ingredients are pantry staples, meaning you’re probably not running to a specialty store. Compare that to the price of good-quality dog treats, and you’re saving a bundle. What I love most, though, is the versatility. You can easily adapt this recipe. Want to add a spoonful of pumpkin puree for extra fiber? Go for it! Need to swap out the peanut butter for sunflower seed butter because of allergies? Totally doable. It’s a fantastic base that you can customize to your dog’s specific needs and preferences. It’s just a no-fuss, high-reward kind of recipe that makes both me and my pup happy.
How do I make homemade dog treats?
Quick Overview
This recipe is all about simplicity and wholesome ingredients. We’re talking about combining a few dry ingredients, mixing in some wet ingredients, forming them into little shapes, and baking them until perfectly golden. The beauty of this method is that it requires minimal effort but yields incredibly tasty and healthy treats for your dog. You’ll be amazed at how quickly they come together, making it perfect for those spontaneous baking sessions when your dog gives you those pleading eyes!
Ingredients
For the Main Batter:
1 and 1/2 cups whole wheat flour (or oat flour for a gluten-free option)
1 cup rolled oats (not instant oats)
1/4 cup unsweetened natural Peanut Butter (make sure it doesn’t contain Xylitol, which is toxic to dogs!)
1/4 cup vegetable oil (or melted coconut oil)
1/2 cup water
1 teaspoon baking powder
For the Flavor Boost (Optional but Recommended!):
1/2 cup mashed banana (adds natural sweetness and moisture)
1 tablespoon finely chopped parsley (great for fresh breath!)
Step-by-Step Instructions
Step 1: Preheat & Prep Pan
First things first, let’s get that oven preheating to 350 degrees Fahrenheit (175 degrees Celsius). This ensures it’s nice and ready when your dough is. While the oven heats up, grab a baking sheet and line it with parchment paper. This is crucial! It prevents sticking, makes cleanup a breeze, and ensures your treats slide right off. I always use parchment paper for baking, for humans and for dogs. It’s just the best way to go.
“The Carrot Goodies for Your Pup Easy Homemade turned out amazing. My kids asked for seconds. Saving this one!”
Step 2: Mix Dry Ingredients
In a large mixing bowl, combine the whole wheat flour (or oat flour), rolled oats, and baking powder. Give it a good whisk or stir with a fork until everything is well incorporated. This step ensures that the baking powder is evenly distributed, which helps your treats get that nice, slight lift. You don’t want any surprises of one bite being too flat and another too cakey, right?
Step 3: Mix Wet Ingredients
In a separate, smaller bowl, whisk together the Peanut Butter, vegetable oil (or melted coconut oil), and water until you have a smooth, combined mixture. If you’re using the optional mashed banana, stir that in here too. The consistency should be pourable but still have some body to it. This is where all the yummy flavors start to meld!
Step 4: Combine
Now, pour the wet ingredients into the bowl with the dry ingredients. Add the optional chopped parsley at this stage if you’re using it. Mix everything together with a sturdy spoon or a spatula until a thick dough forms. Be careful not to overmix! Overmixing can lead to tough treats. Just mix until you don’t see any dry flour pockets. The dough will be a bit sticky, and that’s perfectly normal. I’ve learned that overworking dough is one of the fastest ways to a sad, tough baked good, so I always stop as soon as it comes together.
Step 5: Prepare Filling
Since these are simple drop biscuits rather than rolled-out cut-outs, there isn’t a separate “filling” to prepare in the traditional sense. The flavor is all integrated into the dough itself! The Peanut Butter and optional banana are what give these treats their irresistible taste for your dog.
Step 6: Layer & Swirl
This is the fun part! You can either drop spoonfuls of the dough onto your prepared baking sheet, spacing them about an inch apart, or you can gently roll small portions into balls and flatten them slightly with your hand or the bottom of a glass. For a nice texture and easier digestion, I like to flatten them to about 1/2 inch thick. If you want to get fancy, you can use a fork to create little score marks on top, but Buster doesn’t care about fancy; he just cares about taste!
Step 7: Bake
Pop the baking sheet into your preheated oven. Bake for about 20-25 minutes, or until the edges are golden brown and the treats are firm to the touch. The exact baking time will depend on the size and thickness of your treats, as well as your oven. They should sound hollow when tapped, and a toothpick inserted into the center should come out clean. Keep an eye on them towards the end to prevent burning; they can go from perfectly baked to a little too crisp in just a few minutes!
Step 8: Cool & Glaze
Once they’re baked to perfection, carefully remove the baking sheet from the oven. Let the treats cool on the baking sheet for a few minutes before transferring them to a wire rack to cool completely. This is crucial; if you try to move them while they’re too hot, they might crumble. They need to cool down entirely before you even think about giving one to your pup, or storing them. I usually resist the urge to give Buster one right away, though I know he’d love me even more if I didn’t! There’s no glaze on these because they’re perfect as is, but if you’re feeling adventurous, a very thin, dog-safe yogurt drizzle is an option.
Step 9: Slice & Serve
Once completely cool, these homemade dog treats are ready to be served! If you made larger treats, you might want to break them into smaller, bite-sized pieces for smaller dogs or for training rewards. They’re best served at room temperature. Buster usually gets one or two as a special afternoon pick-me-up, or when he’s been particularly good. Just watch their eyes light up – it’s the best reward!
“New family favorite! This Carrot Goodies for Your Pup Easy Homemade was so flavorful and ridiculously easy. Crowd-pleaser for sure.”
What to Serve It With
When it comes to serving these delightful homemade dog treats, it’s less about pairing them with human food and more about *how* and *when* you offer them to your furry friend. They truly shine as standalone rewards and special snacks. For breakfast, think of them as a little ‘good morning’ surprise after their regular meal, a gentle way to start their day with a taste of something special. During brunch gatherings, these are perfect for keeping your canine guest occupied and happy while the humans enjoy their meal – just make sure they don’t get into the avocado toast! As a dessert, they’re the ultimate ‘good boy’ treat after a long walk or a successful training session, a way to end the day on a sweet note for your pup. And for those cozy snack times, when you’re curled up on the couch and your dog is giving you those longing glances, a treat or two is the perfect way to share that moment of comfort. My family has a tradition of giving Buster a special treat after we’ve had a nice family meal together, and these are always his favorite. They’re also fantastic for rewarding good behavior during vet visits or when you return home after a long day. The key is moderation, of course, but knowing they’re packed with good stuff makes them a guilt-free pleasure!
Top Tips for Perfecting Your Homemade Dog Treats
Over the years of making these homemade dog treats, I’ve picked up a few tricks that I swear by. For the Peanut Butter, always, always, always double-check that it’s natural and absolutely Xylitol-free. Seriously, Xylitol is a big no-no for dogs, and it can be hidden in some ‘sugar-free’ options. If you’re ever unsure, stick to brands you know and trust or even make your own dog-safe peanut butter. When it comes to the oats, I prefer using rolled oats because they give a nice texture, but if you only have quick oats, they’ll work too; the treats might just be a bit softer. For the flour, whole wheat is fantastic, but if your dog has sensitivities or you’re aiming for a different texture, oat flour is a superb alternative. I’ve tested this with oat flour, and it makes them wonderfully tender. Baking powder is key for a slight lift; don’t skip it unless you want very dense treats. And don’t overmix the dough! I can’t stress this enough. Mix just until the ingredients come together. Overworking the gluten in the flour will result in tough treats that are hard for your dog to chew and digest. I learned this the hard way after a batch that could have probably broken a tooth! For shaping, I find that dropping spoonfuls and then gently flattening them with a fork is the easiest method and gives them a nice, rustic look. They bake up beautifully that way. Baking time can vary wildly, so my best advice is to start checking around the 18-minute mark. You want them golden brown and firm, not burnt. They should have a slight chew to them, but not be doughy in the center. They’ll continue to firm up as they cool. If you want to add little extras, mashed sweet potato or unsweetened applesauce can be used in place of some of the water for added nutrients and flavor, but always introduce new ingredients slowly to your dog’s diet.
Storing and Reheating Tips
Proper storage is key to keeping these homemade dog treats fresh and delicious for your pup. Once they are completely cool (and I mean *completely* cool, otherwise condensation can make them soggy), you have a few options. At room temperature, they’ll stay fresh in an airtight container for about 3-4 days. I usually make a batch and aim to get through them within that timeframe, especially if I’m not using any preservatives. If you want them to last a bit longer, the refrigerator is your best bet. Stored in an airtight container in the fridge, they can last for up to a week, sometimes even 10 days. They’ll be a little firmer straight from the fridge, but most dogs don’t mind that at all! For longer storage, or if you tend to make large batches like I do, the freezer is your best friend. Wrap them well in freezer-safe bags or containers. I like to wrap individual portions in plastic wrap first, then place them in a freezer bag to prevent freezer burn. They’ll keep beautifully in the freezer for about 2-3 months. To serve them from frozen, you can either let them thaw at room temperature for a few hours or pop them in the microwave for just a few seconds. They don’t really require “reheating” in the traditional sense, as they’re typically served at room temperature or slightly chilled. The key is always an airtight container, no matter where you store them, to keep them from drying out or picking up other smells.
Frequently Asked Questions
Final Thoughts
Honestly, making these homemade dog treats has been one of the most rewarding little projects I’ve undertaken in the kitchen. It’s such a simple way to show your dog how much you care, using ingredients you can trust. The fact that they’re so easy to make means you can whip them up even on a busy weeknight, and Buster’s excited tail wags are all the thanks I ever need. They’re hearty, healthy, and utterly irresistible to most pups. If you enjoyed this recipe and are looking for other fun ways to spoil your furry friend, you might also want to check out my recipe for [Link to another dog-friendly recipe, e.g., “No-Bake Doggy Energy Bites”] – they’re another quick win! Give these homemade dog treats a try, and I can almost guarantee your dog will be begging for more. I’d absolutely love to hear how your pup enjoys them, so feel free to leave a comment below or share your own variations!
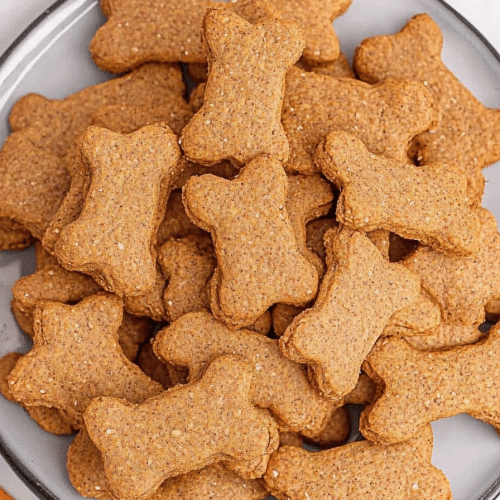
homemade dog treats
Ingredients
Main Ingredients
- 2 cups whole wheat flour Divided: 1.75 cups for dough, 0.25 cups for dusting
- 2.5 teaspoons baking powder
- 1.5 cups carrots washed, dried, and finely shredded (do not peel)
- 1 cup creamy peanut butter xylitol-free, dog-safe
- 0.25 cup water plus more as needed
- 2 large eggs
- 2 tablespoons honey
Instructions
Preparation Steps
- Preheat the oven to 325°F (160°C). Line 2 baking sheets with parchment paper.
- In a medium-sized bowl, whisk together 1.75 cups of whole wheat flour and baking powder.
- In a separate medium-sized mixing bowl, add the finely shredded carrots, creamy peanut butter, water, eggs, and honey. Stir to completely combine.
- Gradually stir the whole wheat flour mixture into the wet ingredients, mixing just until well incorporated. The dough should appear firm but not dry. Add a few more tablespoons of water, if needed, to reach the desired consistency.
- Dust your work surface and a rolling pin with the reserved 0.25 cup of whole wheat flour.
- Roll the dough out to about 0.25 inch thickness.
- Use a 3-inch dog bone-shaped cookie cutter (or any desired shape) to cut out the dough. Place the cutouts on the prepared baking sheets.
- Bake for 20 to 25 minutes, or until the edges are set and lightly golden brown. Transfer the treats to a cooling rack to cool completely before serving to your dog.


