Okay, so confession time: there are a few recipes that hold a special place in my heart, the ones I whip up when I need a serious dose of comfort, or when unexpected guests arrive and I want to impress them without breaking a sweat. This Chocolate Peanut Butter cake is absolutely, hands-down, one of those recipes. It’s not just a cake; it’s a hug in dessert form. It’s the kind of thing that makes my kitchen smell utterly divine, drawing everyone in like a magnetic force. I remember the first time I made it, my little niece took one bite and her eyes just lit up. From that moment on, it was officially declared “the best cake ever” in our family. It’s got that perfect balance – rich, fudgy chocolate meets creamy, dreamy peanut butter – and honestly, it’s surprisingly simple to pull off, even on a weeknight. If you’ve ever loved a classic chocolate cake or a gooey peanut butter cookie, prepare yourself, because this chocolate peanut butter cake is going to be your new obsession.
Thank you for reading this post, don't forget to subscribe!What is chocolate peanut butter cake?
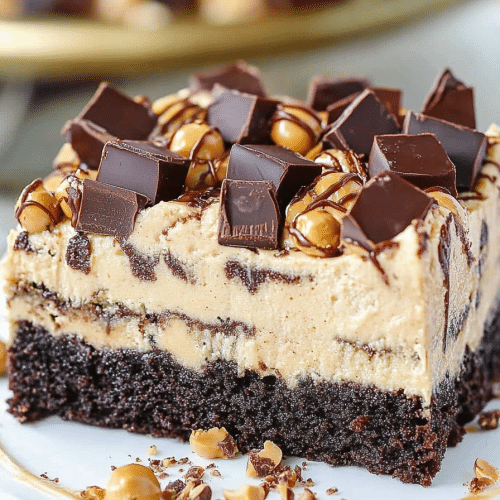
So, what exactly *is* this magical creation we’re talking about? Think of it as the ultimate mashup of two of the most beloved flavors on the planet. It’s essentially a moist, deeply chocolatey cake that’s been swirled with a luscious peanut butter mixture, creating these incredible ribbons of nutty goodness throughout every single slice. It’s not overly fussy, no fancy techniques required, just pure, unadulterated deliciousness. The name itself, “Chocolate Peanut Butter cake,” pretty much tells the whole story, right? It’s straightforward, it’s honest, and it delivers exactly what it promises: a phenomenal taste experience. It’s like your favorite childhood chocolate candy bar got an elegant upgrade into a beautiful cake form. It’s the kind of dessert that makes people pause, close their eyes, and just savor the moment. We’re talking layers of flavor and texture that are just… *chef’s kiss*.
Why you’ll love this recipe?
What are the best things about this Chocolate Peanut Butter cake?flavor. Oh, the flavor! It’s that perfect marriage of rich, dark chocolate and smooth, slightly salty peanut butter. The chocolate cake itself is incredibly tender and moist, never dry, and the peanut butter swirl adds this wonderful depth and creaminess that you just can’t get anywhere else. It’s not too sweet, which I really appreciate, allowing the chocolate and peanut butter to truly shine. Then there’s the simplicity. This is a lifesaver on busy nights when you’re craving something special but don’t have hours to spend in the kitchen. You can honestly have this mixed up and baking in under 20 minutes. No complicated creaming methods, no separating eggs – it’s all done in a couple of bowls. It’s incrediblycost-efficient too. You probably already have most of the ingredients in your pantry. Flour, sugar, cocoa powder, eggs, butter – all pantry staples. Peanut butter is usually on hand, and the little bit of vegetable oil keeps it super moist without breaking the bank. What I love most about this chocolate peanut butter cake is itsversatility. You can serve it warm with a scoop of vanilla ice cream for an epic dessert, or let it cool completely and enjoy it with a cup of coffee for a decadent afternoon treat. It’s perfect for birthdays, holidays, or just a Tuesday when you need a pick-me-up. Compared to a standard chocolate cake, this one has that extra layer of excitement from the peanut butter. It’s familiar yet exciting, comforting yet indulgent. It’s my go-to when I want to show someone I care, or when I just need a little slice of happiness myself.
How do I make chocolate peanut butter cake?
Quick Overview
This Chocolate Peanut Butter cake is a breeze to make. You’ll start by whisking together your dry ingredients, then combine your wet ingredients in a separate bowl. From there, it’s a simple matter of gently combining the two, preparing a quick peanut butter swirl mixture, and then layering it all into your prepared pan. A swirl on top, a bake until a toothpick comes out clean, and a beautiful glaze finishes it off. It’s the kind of recipe that makes you feel like a baking pro without any of the fuss. The result is a stunning cake that looks like you spent way more time on it than you actually did!
Ingredients
For the Main Batter:
You’ll need about 2 cups of all-purpose flour – make sure it’s fresh and not lumpy. Using a good quality unsweetened cocoa powder is key for that deep chocolate flavor; I love Dutch-processed cocoa if you can find it, but regular works beautifully too. Don’t skimp on the leavening agents: 1 ½ teaspoons of baking soda and ½ teaspoon of baking powder will give us that perfect lift. A pinch of salt (about ½ teaspoon) is crucial for balancing sweetness and bringing out the chocolate notes. For sweetness, we’ll use 1 ½ cups of granulated sugar. I always use a good quality granulated sugar, nothing fancy needed here. For richness, ½ cup of unsalted butter, softened but not melted, is perfect. And for that incredible moisture and tenderness, ½ cup of vegetable oil. I’ve experimented with other oils, but vegetable oil really lets the chocolate and Peanut Butter flavors shine without adding its own distinct taste. You’ll need 2 large eggs, at room temperature – this helps them incorporate better into the batter. And for that extra moistness and a hint of tang, ½ cup of buttermilk, also at room temperature. If you don’t have buttermilk, don’t worry! You can easily make your own by adding 1 tablespoon of white vinegar or lemon juice to ½ cup of regular milk and letting it sit for 5 minutes.
For the Filling:
This is where the magic happens! You’ll need 1 cup of Creamy Peanut Butter. I prefer creamy for the smoothest swirl, but crunchy works too if you like a little texture. Make sure it’s at room temperature so it’s easy to work with. To this, we’ll add ½ cup of packed light brown sugar for a lovely caramel note that pairs so well with peanut butter. And 2 tablespoons of unsweetened cocoa powder, to amp up that chocolatey goodness even further. A splash of milk, maybe just a tablespoon or two, will help loosen it up to the perfect drizzling consistency.
For the Glaze:
This glaze is optional but highly recommended! It adds an extra layer of chocolatey sheen. You’ll need 1 cup of powdered sugar, sifted to avoid lumps. Then, about 2 to 3 tablespoons of milk or heavy cream for richness. And for that classic chocolate flavor, 2 tablespoons of unsweetened cocoa powder. A tiny pinch of salt to balance the sweetness is a must. I also like to add a teaspoon of vanilla extract for an extra boost of flavor.
“Packed with flavor and so simple. Exactly what I wanted from this Candy Bar Cake Easy Chocolate Peanut Butter Bliss!”
Step-by-Step Instructions
Step 1: Preheat & Prep Pan
Alright, first things first, let’s get that oven preheating to 350°F (175°C). This is a pretty standard temperature for most cakes, and it allows everything to bake evenly. While the oven is doing its thing, grab a 9×13 inch baking pan. You want to grease it really well – I usually use butter or non-stick cooking spray, and then I like to lightly dust it with cocoa powder instead of flour. This prevents any white residue on your beautiful Chocolate Cake. Give it a good tap to get rid of any excess cocoa. Trust me, this step is crucial for easy removal later on.
Step 2: Mix Dry Ingredients
In a large mixing bowl, whisk together your flour, granulated sugar, unsweetened cocoa powder, baking soda, baking powder, and salt. Whisking them together really well ensures that all the leavening agents are evenly distributed, which means your cake will rise evenly. You want to see a nice, uniform mixture with no pockets of baking soda or flour. This also helps to break up any little lumps. Take your time here; a good mix of dry ingredients is the foundation of a great cake.
Step 3: Mix Wet Ingredients
In a separate medium bowl, whisk together the softened butter and vegetable oil until they’re well combined. Then, add in your room temperature eggs, one at a time, whisking well after each addition. Next, stir in the buttermilk and vanilla extract. Give it another good whisk until everything is smooth and emulsified. Having your wet ingredients at room temperature helps them blend seamlessly into the dry ingredients, preventing a dense or greasy cake. It’s all about gentle incorporation!
Step 4: Combine
Now for the magic moment! Pour the wet ingredients into the bowl with the dry ingredients. Using a whisk or a spatula, mix everything together until *just* combined. It’s super important not to overmix here. A few small lumps are totally fine; in fact, they’re often a good sign! Overmixing develops the gluten in the flour too much, which can lead to a tough cake. We want tender, moist goodness, so mix until you no longer see streaks of dry flour. That’s it. Easy, right?
Step 5: Prepare Filling
In a small bowl, combine the creamy Peanut Butter, brown sugar, and cocoa powder. Stir it all together until it forms a thick, paste-like mixture. If it seems too stiff to swirl, add a tablespoon or two of milk or cream, mixing until it reaches a thick but pourable consistency. You want it to be spreadable but not runny. This peanut butter mixture will create those amazing pockets of flavor throughout the cake. It smells absolutely divine on its own!
Step 6: Layer & Swirl
Pour about half of the chocolate cake batter into your prepared 9×13 inch pan and spread it out evenly. Now, dollop spoonfuls of the Peanut Butter filling mixture all over the batter. Don’t worry about making it perfect; uneven dollops are great for swirling. Pour the remaining chocolate batter over the peanut butter dollops, trying to cover them as much as possible. Then, take a knife or a skewer and gently swirl the peanut butter mixture into the chocolate batter. Make figure-eights or swirls, but don’t overdo it – you want distinct ribbons of peanut butter, not a muddy mess. This step is where you can really get creative and make your cake look unique!
Step 7: Bake
Pop that beautiful pan into your preheated oven. Bake for about 30 to 35 minutes. The best way to tell if it’s done is to insert a toothpick into the center of the cake. If it comes out clean or with a few moist crumbs attached, it’s ready! If there’s wet batter, give it a few more minutes. Ovens can vary, so keep an eye on it after the 30-minute mark. You don’t want to overbake this cake, as it will dry out.
Step 8: Cool & Glaze
Once it’s baked, carefully take the cake out of the oven. Let it cool in the pan for about 15 to 20 minutes. This allows the cake to set up properly before you try to glaze or cut it. While the cake is cooling, whisk together the powdered sugar, cocoa powder, salt, and vanilla extract for the glaze. Gradually add in your milk or cream, starting with 2 tablespoons, and whisk until smooth and thick but pourable. If it’s too thick, add a little more liquid; if it’s too thin, add a bit more powdered sugar. Once the cake has cooled a bit, drizzle or spread the glaze evenly over the top. It’s divine when the glaze is still slightly warm and gooey.
“I don’t know if I’ve ever eaten a better Candy Bar Cake Easy Chocolate Peanut Butter Bliss. The rub alone is wonderful, but the sauce??? Over the top!”
Step 9: Slice & Serve
Let the glaze set for about 10-15 minutes before slicing. This helps prevent the glaze from smearing too much. Use a sharp knife for clean cuts. Serve it warm, at room temperature, or even slightly chilled – it’s delicious all ways! I love serving this Chocolate Peanut Butter cake with a scoop of vanilla bean ice cream or a dollop of whipped cream. It’s also fantastic on its own, letting the rich flavors of chocolate and peanut butter really sing.
What to Serve It With
This chocolate peanut butter cake is so versatile, you can truly enjoy it any time of day and for any occasion. ForBreakfast, I sometimes cut a smaller, thinner slice and serve it with a strong cup of black coffee. It’s a decadent start to the day, for sure, but hey, you only live once! It feels like a special treat without being overly heavy. ForBrunch, it’s a showstopper. I’ll often arrange slices on a pretty platter with some fresh berries – raspberries or strawberries are fantastic with chocolate and peanut butter. A glass of chilled sparkling cider or a mimosa pairs beautifully. AsDessert, this is where it truly shines. A warm slice with a scoop of high-quality vanilla bean ice cream is my absolute favorite. The contrast of warm cake and cold ice cream is pure bliss. You could also serve it with a raspberry coulis for a pop of tartness, or even a dusting of powdered sugar and some chopped peanuts for extra crunch. And for thoseCozy Snacks moments, when you just need a little comfort? A simple slice on its own, maybe with a tall glass of cold milk, is pure perfection. My kids practically inhale it this way after school. It’s that perfect combination of familiar flavors that just makes you feel good. I’ve even seen people pair it with a stout beer – the chocolate and roasted notes complement each other wonderfully. It truly adapts to whatever mood or meal you’re creating.
Top Tips for Perfecting Your Chocolate Peanut Butter Cake
After making this chocolate peanut butter cake more times than I can count, I’ve picked up a few tricks that really elevate it. When it comes to the main batter, remember that overmixing is the enemy of tender cakes. Mix until you see no dry flour, but don’t go any further! A few little lumps are perfectly fine and actually desirable. For the peanut butter filling, consistency is key. You want it thick enough to hold its shape when swirled but not so stiff that it’s difficult to spread. If it feels too dry, add milk or cream a teaspoon at a time until it’s just right. When you’re layering and swirling, don’t aim for perfection. Those beautiful, rustic swirls are part of the charm! Just gently drag a knife or skewer through the layers to create ribbons of peanut butter and chocolate. Too much swirling will just muddle the flavors. For ingredient swaps, if you’re out of buttermilk, that homemade substitute works like a charm, or even plain yogurt thinned with a little milk can do the trick. For the oil, while vegetable oil is my go-to for neutrality, a light-flavored olive oil or even melted coconut oil (though it might add a subtle coconut note) can work in a pinch. When it comes to baking, always trust the toothpick test. Ovens are funny things, and the bake time can vary. Start checking around the 30-minute mark. I find baking it on the middle rack ensures even cooking. If you notice the top is browning too quickly, you can loosely tent it with foil for the last 10-15 minutes. For glaze variations, if you prefer a richer glaze, use heavy cream instead of milk. If you want something lighter, a simple dusting of powdered sugar and cocoa powder is also delicious. You can even add a touch of peanut butter to the glaze for an extra peanut butter punch! I once accidentally added a bit too much peanut butter to the swirl mixture and ended up with pockets that were almost like candy – my kids loved it, so don’t be afraid to experiment a little!
Storing and Reheating Tips
One of the best things about this chocolate peanut butter cake is how well it keeps. For Room Temperature Storage, if you’ve glazed it, it will stay lovely for up to 2-3 days, as long as it’s covered tightly with plastic wrap or a cake dome. This keeps it from drying out. If you haven’t glazed it, it’s best to use it within a day or two. For Refrigerator Storage, this cake can last even longer, usually up to 4-5 days. Make sure it’s in an airtight container to prevent it from absorbing other odors. When you take it out of the fridge, let it sit at room temperature for about 30 minutes to an hour to come back to its best texture and flavor. It’s still delicious chilled, but it’s particularly lovely when it’s not ice-cold. For Freezer Instructions, this cake freezes beautifully! Once it’s completely cooled, wrap it tightly in a double layer of plastic wrap, followed by a layer of aluminum foil. It can be stored in the freezer for up to 2-3 months. To thaw, unwrap it and let it come to room temperature on your counter for several hours. You can also reheat individual slices gently in the microwave for about 15-20 seconds if you prefer it warm. For Glaze Timing Advice, I highly recommend glazing the cake *after* it has cooled from baking, just before serving or storing. If you’re freezing the cake unglazed, that’s perfectly fine, and you can glaze it after thawing. If you glaze it before freezing, make sure the glaze is completely set before wrapping to prevent it from sticking.
Frequently Asked Questions
Final Thoughts
So there you have it – my absolute favorite chocolate peanut butter cake! I truly hope you give this a try. It’s more than just a recipe to me; it’s a little piece of joy that I love sharing. The way the rich chocolate and creamy peanut butter come together in every single bite is just pure magic, and the fact that it’s so easy to make makes it even better. It’s the kind of dessert that makes people happy, that brings back good memories, and that you’ll want to make again and again. If you love this cake, you might also enjoy my recipe for fudgy brownies or my classic chocolate chip cookies – they’re in a similar vein of comforting, crowd-pleasing goodness! I can’t wait to hear what you think! Please leave a comment below and let me know how your chocolate peanut butter cake turned out. I love seeing your creations and hearing your own kitchen stories!
chocolate peanut butter cake
Ingredients
For the Chocolate Cake
- 1.75 cups all-purpose flour
- 2 cups granulated sugar
- 0.75 cup unsweetened cocoa powder
- 2.25 tsp baking soda
- 0.5 tsp baking powder
- 1 tsp salt
- 1 cup whole milk
- 0.5 cup vegetable oil
- 1.5 tsp vanilla extract
- 2 large eggs
- 1 cup hot water
For the Peanut Butter Soak
- 0.5 cup sweetened condensed milk
- 0.5 cup creamy peanut butter melted slightly
For the Peanut Butter Whipped Cream Frosting
- 2 cups heavy whipping cream cold
- 1 cup powdered sugar
- 0.33 cup creamy peanut butter
- 0.5 tsp vanilla extract
For Garnish (Optional)
- 0.5 cup mini peanut butter cups chopped
- chocolate sauce for drizzling
Instructions
Preparation Steps
- Preheat your oven to 350°F (175°C). Grease and flour a 9x13 inch baking pan. Set aside.
- In a large mixing bowl, whisk together the all-purpose flour, granulated sugar, unsweetened cocoa powder, baking soda, baking powder, and salt until well combined.
- In a separate medium bowl, combine the milk, vegetable oil, vanilla extract, and large eggs. Whisk until smooth.
- Pour the wet ingredients into the dry ingredients and beat with an electric mixer on low speed until just combined. Gradually add the hot water, mixing on low speed until the batter is smooth and no lumps remain. Scrape down the sides of the bowl as needed.
- Pour the cake batter into the prepared 9x13 inch baking pan and spread evenly.
- Bake for 29-32 minutes, or until a toothpick inserted into the center of the cake comes out with a few moist crumbs. Do not overbake. Remove from oven and let cool for 10-15 minutes.
- While the cake is still warm, use the round end of a wooden spoon or a straw to poke holes all over the top of the cake, about 1 inch apart.
- In a small microwave-safe bowl or measuring cup, gently heat the sweetened condensed milk and 0.5 cup creamy peanut butter for about 30 seconds, or until the peanut butter is slightly softened. Whisk together until smooth and well combined.
- Pour the peanut butter soak mixture evenly over the warm cake, making sure it seeps into all the poked holes. Place the cake in the refrigerator to cool completely, about 1-2 hours.
- Once the cake is completely cooled, prepare the whipped cream frosting. In a large mixer bowl, combine the cold heavy whipping cream, powdered sugar, 0.33 cup creamy peanut butter, and vanilla extract. Beat on high speed until stiff peaks form.
- Spread the peanut butter whipped cream frosting evenly over the cooled cake. Garnish with chopped mini peanut butter cups and a drizzle of chocolate sauce, if desired.
- Refrigerate the cake for at least 30 minutes before serving to allow the frosting to set. Store any leftover cake in an airtight container in the refrigerator for up to 3-4 days.


