You know those mornings? The ones where you wake up with a craving so specific, so intense, that nothing else will do? For me, lately, it’s been all about a perfectly tender, subtly sweet treat that reminds me of the Absolute Best donut shop donuts, but without the fuss of deep frying. That’s where these buttermilk donut bars come in. Seriously, if you’ve ever loved a classic glazed donut, get ready, because these bars are about to become your new obsession. They’re everything you love about donuts – that airy crumb, the sweet glaze – but in a shape that’s just begging to be dunked in your morning coffee or enjoyed as a no-fuss afternoon pick-me-up. My family devours these so quickly, I’ve started making a double batch because they genuinely disappear before they even have a chance to cool down completely. It’s like a hug in bar form, and honestly, who doesn’t need more of that?
Thank you for reading this post, don't forget to subscribe!What is buttermilk donut bar?
So, what exactly are these magical things we’re calling buttermilk Donut Bars? Think of them as a delightful hybrid. They’re not quite cake, not quite a yeast donut, but somewhere beautifully in between. The magic comes from the buttermilk, which gives them an incredibly tender, moist crumb and a slight tang that balances the sweetness perfectly. They’re baked, not fried, which makes them surprisingly easy to whip up, especially on a busy weekend morning or even a weeknight when a sweet craving strikes hard. The name itself just conjures up images of warm, comforting flavors, right? It’s essentially a soft, cake-like bar infused with all the deliciousness of a traditional buttermilk donut, usually topped with a simple, sweet glaze. It’s the perfect way to get that donut fix without the mess and effort of frying, and it’s just as satisfying, if not more so!
Why you’ll love this recipe?
What is the secret behind this recipe?flavor is just out of this world. That subtle tang from the buttermilk pairs so beautifully with the sweetness of the glaze. The texture is unbelievably tender and moist; it practically melts in your mouth. Then there’s the simplicity. I’m talking about a recipe you can throw together with basic pantry staples in under an hour, start to finish. No yeast proofing, no hot oil splattering everywhere. It’s a lifesaver for those times you want something special but don’t have a lot of time. And let’s talk Cost-efficiency: What is the best way to measure cost-efficiency?. These are made with ingredients you likely already have, making them incredibly budget-friendly compared to a dozen fancy donuts from the shop. Plus, their versatility is a huge win. They’re fantastic for breakfast, a lovely addition to brunch, or even a simple, satisfying dessert. Honestly, what I love most is how forgiving this recipe is. I’ve made it countless times, sometimes with slightly different glazes or even a sprinkle of cinnamon in the batter, and it always turns out perfectly. It’s the kind of recipe that makes you feel like a baking pro, even if you’re just starting out.
How to Make Buttermilk Donut Bars
Quick Overview
Making these buttermilk donut bars is surprisingly straightforward. You’ll mix up a quick batter using common pantry ingredients, pour it into a prepared pan, bake until golden, and then drench it in a simple glaze. The whole process is designed to be easy and enjoyable, giving you that incredible donut flavor without any of the typical donut-making stress. It’s a one-bowl wonder for the batter, a quick bake, and a simple glaze pour – that’s it! You get all the deliciousness of a freshly made donut in a convenient bar form.
Ingredients
For the Main Batter:
2 ½ cups all-purpose flour: Make sure it’s fresh for the best results. You can also try a 1:1 Gluten-Free Flour Blend, though I haven’t tested it extensively yet!
1 cup granulated sugar: This gives us that classic sweet donut flavor.
2 teaspoons baking powder: This is what gives our bars that lovely lift.
½ teaspoon salt: Balances out the sweetness and enhances all the other flavors.
½ teaspoon ground nutmeg: My secret weapon! It adds a warm, cozy flavor that’s just essential for that donut-shop taste. You can skip it if you’re not a fan, but I highly recommend it.
1 cup buttermilk: This is non-negotiable for that signature tender crumb and tang. If you don’t have buttermilk, you can make your own by adding 1 tablespoon of white vinegar or lemon juice to 1 cup of milk and letting it sit for 5-10 minutes until it curdles. It works like a charm!
½ cup unsalted butter, melted: Make sure it’s cooled slightly so it doesn’t cook the eggs.
2 large eggs: At room temperature, if possible, for easier incorporation.
1 teaspoon vanilla extract: Always use good quality vanilla; it makes a difference!
For the Glaze:
2 cups powdered sugar: Sifted is best to avoid lumps.
¼ cup milk (or buttermilk for extra tang): Start with ¼ cup and add more, a teaspoon at a time, until you reach your desired consistency.
½ teaspoon vanilla extract: Just a touch to enhance the glaze flavor.
Step-by-Step Instructions
Step 1: Preheat & Prep Pan
First things first, let’s get our oven ready. Preheat it to 350°F (175°C). Then, grab a 9×13 inch baking pan. I like to grease mine well with butter or cooking spray, and then dust it with a little flour. This ensures our beautiful bars won’t stick. For extra insurance and easy removal, you can also line it with parchment paper, leaving a little overhang on the sides. This makes lifting the whole slab out so much easier!
“Packed with flavor and so simple. Exactly what I wanted from this buttermilk donut bars!”
Step 2: Mix Dry Ingredients
In a large bowl, whisk together the flour, granulated sugar, baking powder, salt, and nutmeg. Give it a good whisk until everything is well combined. This ensures that the leavening agents and seasonings are evenly distributed throughout the batter, which is super important for an even rise and consistent flavor in every bite.
Step 3: Mix Wet Ingredients
In a separate medium bowl, whisk together the buttermilk, melted and slightly cooled butter, eggs, and vanilla extract. Whisk until everything is smooth and well combined. Don’t worry if it looks a little separated; it will come together.
Step 4: Combine
Now, pour the wet ingredients into the bowl with the dry ingredients. Mix them together with a spatula or wooden spoon until *just* combined. It’s really important not to overmix here! A few lumps are perfectly fine. Overmixing develops the gluten in the flour too much, which can lead to tough bars, and we definitely don’t want that. We’re going for tender and delicate.
Step 5: Prepare Filling
Wait, filling? Yes! While the batter is simple, you can add an extra layer of flavor. You can absolutely skip this and have plain bars, which are still amazing. But if you want to elevate them, here’s a simple option: Mix 1 cup of Brown Sugar with 2 tablespoons of softened butter and 1 tablespoon of cinnamon. That’s it! You can also use a fruit jam or even a chocolate ganache if you’re feeling adventurous.
Step 6: Layer & Swirl
Pour about two-thirds of the batter into your prepared pan and spread it evenly. If you’re adding a filling, dollop spoonfuls of your chosen filling over the batter. Then, carefully pour the remaining batter over the top, trying to cover the filling as much as possible. If you used a cinnamon-sugar mixture, you can sprinkle the rest on top for a streusel effect, or just leave it plain. If you want a swirled effect with jam, use a knife or skewer to gently swirl it through the batter.
Step 7: Bake
Bake in your preheated oven for 25-35 minutes, or until a wooden skewer or toothpick inserted into the center comes out clean. The top should be golden brown and slightly springy to the touch. Keep an eye on it, as oven temperatures can vary!
Step 8: Cool & Glaze
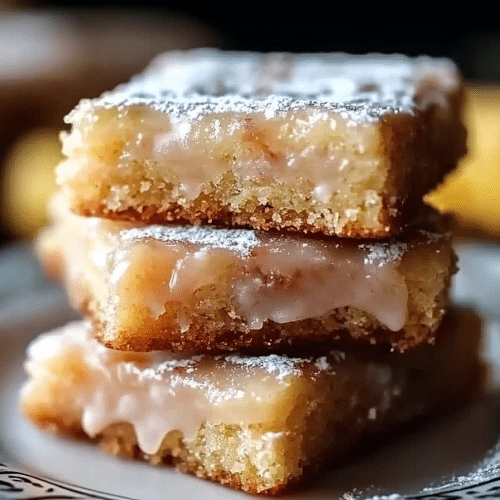
Let the bars cool in the pan on a wire rack for about 10-15 minutes. This allows them to set up properly. While they’re cooling, whip up your glaze. In a medium bowl, whisk together the sifted powdered sugar, ¼ cup of milk, and vanilla extract until smooth. Add more milk, a teaspoon at a time, if you prefer a thinner glaze. Once the bars have cooled slightly but are still warm, pour the glaze evenly over the top. It will melt slightly and create a beautiful, glossy finish.
Step 9: Slice & Serve
Let the glaze set up a bit – this is the hardest part! Once it’s mostly set, slice the bars into your desired size. They’re delicious warm, at room temperature, or even slightly chilled. I find they’re best served within a day or two for optimal freshness and texture.
“The buttermilk donut bars turned out amazing. My kids asked for seconds. Saving this one!”
What to Serve It With
These buttermilk donut bars are so wonderfully versatile, they fit into almost any meal or occasion. For breakfast, they’re just divine alongside a steaming mug of black coffee or a creamy latte. The simple sweetness is the perfect start to the day without being overwhelming. I sometimes serve them slightly warm with a dollop of whipped cream – makes it feel extra special! When it comes to brunch, these bars are a real crowd-pleaser. Arrange them on a pretty platter with fresh berries and maybe a small bowl of more whipped cream or a fruit compote. They look elegant and taste even better. For dessert, they can be served warm with a scoop of vanilla bean Ice Cream or a drizzle of caramel sauce. It’s a simple yet decadent end to any meal. And for those cozy snacks, like an afternoon pick-me-up or a late-night treat, they’re perfect on their own with a glass of cold milk. My kids absolutely love them with a glass of milk after school – it’s a little moment of happiness for them. I’ve also found that serving them with a side of yogurt and a sprinkle of granola makes for a slightly healthier, yet still indulgent, breakfast option.
Top Tips for Perfecting Your Buttermilk Donut Bars
I’ve made these so many times, and I’ve picked up a few tricks along the way that I think will help you achieve donut bar perfection. First, regarding the buttermilk: If you don’t have any on hand, the milk-plus-acid trick is a lifesaver! Just remember to let it sit for at least five minutes to really curdle. It makes such a difference in the tenderness of the crumb. For the dry ingredients, whisking them thoroughly is key. It’s not just about mixing them; it’s about aerating them and ensuring everything is evenly distributed. This prevents dense spots or areas that are too sweet. When it comes to combining the wet and dry, I cannot stress enough the importance of *not* overmixing. Seriously, just mix until you don’t see streaks of flour anymore. A few small lumps are absolutely fine and will actually contribute to a more tender texture. If you decide to add a filling, like jam or a cinnamon-sugar mixture, be gentle when spreading the top layer of batter to avoid mixing the layers too much, unless you’re intentionally going for a marbled effect. For baking, know your oven! Ovens can be finicky. I always recommend checking for doneness a few minutes before the recipe states. A clean toothpick is your best friend here. For the glaze, consistency is key. I like a glaze that’s thick enough to coat but thin enough to drizzle. Start with the lower amount of liquid and add more very gradually. If you accidentally make it too thin, just whisk in a little more powdered sugar. If you prefer a stronger vanilla flavor, you can add a touch more extract, but be careful not to add too much liquid. Finally, for ingredient swaps, I’ve found that a good quality 1:1 gluten-free baking flour works reasonably well, though the texture might be slightly different – a bit denser. I haven’t experimented with dairy-free milk in the glaze, but I suspect almond milk or oat milk would work, though the tanginess from buttermilk in the batter is hard to replicate perfectly with dairy-free options.
Storing and Reheating Tips
These buttermilk donut bars are best enjoyed fresh, but they store quite well, which is a huge plus. For room temperature storage, I like to keep them in an airtight container. They’ll stay fresh and delicious for about 2-3 days. Make sure they’ve completely cooled before sealing them up, otherwise, you risk getting condensation, which can make them soggy. If you’ve glazed them, this is especially important. If you need them to last longer, or if your kitchen is particularly warm, refrigerator storage is a good option. Place them in an airtight container, and they should keep well for up to 5 days. The texture might firm up a little in the fridge, but they’re still very enjoyable. For freezer instructions, these bars freeze beautifully, which is a lifesaver for stocking up! Once completely cooled, I like to cut them into individual portions. Then, I wrap each portion tightly in plastic wrap, followed by a layer of aluminum foil, or place them in a freezer-safe bag. They can be frozen for up to 2-3 months. To thaw, simply take them out of the freezer the night before and let them thaw in the refrigerator. If you want to reheat them, you can pop them in a toaster oven or a low oven (around 300°F or 150°C) for a few minutes until warmed through. Regarding glaze timing, if you plan to store them at room temperature or in the fridge for more than a day, I recommend glazing them just before serving or a few hours before. If you’re freezing them, it’s usually best to freeze them *without* the glaze and add it after thawing and reheating, or just dust them with powdered sugar for a simpler finish.
Frequently Asked Questions
Final Thoughts
There you have it – my go-to recipe for buttermilk donut bars! I truly hope you give these a try because they just bring so much joy. They’re the perfect balance of easy to make and incredibly delicious, and they’ve become a beloved treat in my home. They really do remind me of the best parts of a classic donut, but in a way that’s so much more accessible for everyday baking. If you loved these, you might also enjoy my recipe for [Link to another relevant recipe, e.g., “Easy Blueberry Muffins” or “Classic Cinnamon Swirl Bread”], which shares that same cozy, comforting vibe. Please, if you make these, come back and leave a comment letting me know how they turned out! I love hearing about your baking adventures and seeing your creations. And if you have any tips or variations you tried, please share them! Happy baking, everyone!
Buttermilk Donut Bars
Ingredients
Donut Dough
- 2.5 cups all-purpose flour
- 0.5 cup granulated sugar
- 2 teaspoons baking powder
- 0.5 teaspoon salt
- 0.5 cup buttermilk
- 1 large egg
- 4 tablespoons unsalted butter, melted
Glaze
- 1 cup powdered sugar
- 2 tablespoons milk or cream
- 0.5 teaspoon vanilla extract
Instructions
Preparation Steps
- Preheat oven to 375°F (190°C). Grease and flour a 9x13 inch baking pan.
- In a large bowl, whisk together the flour, granulated sugar, baking powder, and salt.
- In a separate bowl, whisk together the buttermilk, egg, and melted butter.
- Pour the wet ingredients into the dry ingredients and mix until just combined. Do not overmix.
- Spread the batter evenly into the prepared baking pan.
- Bake for 12-15 minutes, or until a toothpick inserted into the center comes out clean.
- Let the bars cool in the pan for 10 minutes before transferring them to a wire rack to cool completely.
- While the bars are cooling, prepare the glaze. In a small bowl, whisk together the powdered sugar, milk, and vanilla extract until smooth. Add more milk if needed to reach desired consistency.
- Once the bars are completely cooled, drizzle the glaze over the top.
- Cut the bars into desired shapes and serve.


