Oh, friends, do I have a treat for you today! It’s one of those recipes that just screams comfort and pure, unadulterated joy. I’m talking about Butterfinger Fudge. Yes, you read that right. Imagine that iconic, crunchy, peanut-buttery goodness you know and love from a Butterfinger Candy Bar, but transformed into a ridiculously creamy, melt-in-your-mouth fudge. It sounds almost too good to be true, doesn’t it? I remember the first time I tried to make something like this; it was a disaster. But after a *lot* of tinkering and a few kitchen mishaps (don’t ask about the time I accidentally used salt instead of sugar – we’ve all been there, right?), I finally landed on this version. It’s the kind of recipe that brings a smile to everyone’s face, from my notoriously picky kiddos to my sweet-toothed husband. If you’re a fan of no-bake desserts that are surprisingly simple but taste like they came from a fancy candy shop, then you are going to adore this Butterfinger Fudge. It’s like a hug in edible form, and honestly, what’s better than that?
Thank you for reading this post, don't forget to subscribe!What is butterfinger fudge?
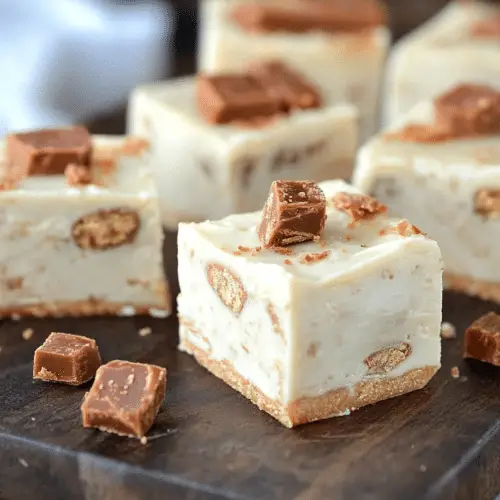
So, what exactly *is* Butterfinger Fudge? At its heart, it’s a rich, creamy fudge base swirled with the unmistakable flavor and texture of crushed Butterfinger Candy Bars. Think of it as taking all the best parts of a classic fudge – that smooth, dense, intensely sweet texture – and infusing it with the unique, crispy, peanut-butter-and-chocolate magic of a Butterfinger. It’s not just fudge *with* Butterfingers chopped into it; it’s a recipe designed to capture the *essence* of the candy bar, creating a harmonious blend of flavors and textures. The name itself is pretty straightforward, I think, but the result is anything but ordinary. It’s essentially a shortcut to candy bar nirvana, without any of the complicated tempering or candy-making fuss you might associate with traditional fudge. It’s the perfect marriage of two beloved treats!
Why you’ll love this recipe?
Let me count the ways! Seriously, this Butterfinger Fudge is a winner for so many reasons. First and foremost, the FLAVOR. Oh my goodness, the flavor. You get that deep, chocolatey richness from the fudge base, and then BAM! You hit those crispy, flaky bits of Butterfinger that deliver that signature sweet and slightly savory Peanut Butter Crunch. It’s a flavor combination that’s just incredibly satisfying. It’s also unbelievably SIMPLE to make. I’m talking about a minimal amount of ingredients and mostly hands-off time. This is a lifesaver for busy weeknights when you’re craving something sweet but don’t have hours to spend baking. And if you’re budget-conscious, you’ll be happy to know that the ingredients are all pretty standard pantry staples, making this a very cost-effective indulgence. I’ve even found myself making this when unexpected guests pop over, and it always gets rave reviews. It’s versatile, too – you can chop the Butterfingers finer for a more distributed crunch or leave some slightly larger pieces for bigger bursts of flavor. What I truly love most about this Butterfinger Fudge, though, is the pure joy it brings. It’s a nostalgic treat that feels both familiar and excitingly new. It’s the perfect recipe to whip up when you need a little pick-me-up or want to impress friends and family without breaking a sweat. It’s way easier than making traditional fudge and, dare I say, even more fun!
How do you make butterfinger fudge?
Quick Overview
Making this Butterfinger Fudge is surprisingly straightforward. We’ll be melting some key ingredients to create a smooth, luscious base, then gently folding in the star of the show – crushed Butterfinger bars. A quick set in the fridge, and you’ve got yourself a batch of decadent fudge. The beauty of this recipe is its simplicity; there’s no candy thermometer needed, and it comes together in a flash. It’s the perfect project for beginners or anyone who wants a quick, delicious treat.
Ingredients
For the Main Batter:
You’ll need about 12 ounces of good quality semi-sweet chocolate chips. I always opt for the ones that are meant for baking, as they melt smoother. You’ll also want one (14-ounce) can of Sweetened Condensed Milk. Make sure it’s sweetened condensed milk, not evaporated milk – they are totally different! A tablespoon of unsalted butter will add a lovely richness and help everything along. And for that extra zing, a teaspoon of vanilla extract is a must.
For the Filling:
This is where the magic happens! You’ll need about 5 to 6 standard-sized Butterfinger Candy Bars. I like to crush these myself rather than buying pre-crushed pieces; it gives me more control over the texture. I usually put them in a zip-top bag and give them a good bash with a rolling pin, or pulse them briefly in a food processor. We want some small pieces and some slightly larger chunks for texture.
For the Glaze:
This is optional, but I highly recommend it for that extra touch of indulgence! You’ll need about 1/4 cup of melted semi-sweet chocolate chips and about 1 tablespoon of Creamy Peanut Butter. This makes a simple, luscious drizzle that complements the fudge perfectly.
“New family favorite! This Butterfinger Fudge was so flavorful and ridiculously easy. Crowd-pleaser for sure.”
Step-by-Step Instructions
Step 1: Preheat & Prep Pan
First things first, grab an 8×8 inch baking pan. Line it with parchment paper, making sure to leave some overhang on the sides. This is your “sling” – it will make lifting the fudge out super easy later. You don’t need to grease the pan if you’re using parchment, but if you want extra insurance, a light spritz of non-stick spray won’t hurt. Set this prepared pan aside.
Step 2: Mix Dry Ingredients
While the fudge base will be made by melting, we do have one “dry” component to prep: our crushed Butterfingers! Take your 5-6 Butterfinger bars and place them in a sturdy plastic bag. Seal it up, and then use a rolling pin, the bottom of a heavy pan, or even a mallet to crush them into bite-sized pieces. You want a mix of fine crumbs and some slightly larger chunks – this is key for that perfect texture. Set these aside.
Step 3: Mix Wet Ingredients
In a medium, heavy-bottomed saucepan, combine the 12 ounces of semi-sweet chocolate chips, the entire can of Sweetened Condensed Milk, and the tablespoon of butter. Place this over low heat. Stir *constantly*. You don’t want this to scorch. Keep stirring gently until the chocolate is completely melted and the mixture is smooth and glossy. This usually takes about 5-8 minutes. Once it’s smooth, remove the pan from the heat.
Step 4: Combine
Now, stir in the teaspoon of vanilla extract into the melted chocolate mixture. Give it a good mix to ensure it’s evenly distributed. The aroma at this stage is already heavenly! We’re not really “combining” wet and dry in the traditional sense here, but this is the point where we have our luscious fudge base ready.
Step 5: Prepare Filling
We already did this in Step 2 by crushing the Butterfingers! So, your filling is ready and waiting.
Step 6: Layer & Swirl
Pour about two-thirds of your warm fudge mixture into the prepared parchment-lined pan. Spread it out evenly with a spatula. Now, sprinkle about two-thirds of your crushed Butterfinger pieces over this layer. Gently pour the remaining fudge mixture on top, spreading it to cover the Butterfingers. Finally, sprinkle the rest of the crushed Butterfingers over the top. You can gently press them in a little with your spatula if you like, or just let them sit on top for visual appeal. For a slightly more swirled look, you can drag a knife or skewer through the top layer a few times, but don’t overdo it – we want those distinct Butterfinger bits!
Step 7: Bake
You actually don’t need to bake this fudge! It’s a no-Bake Recipe. The magic happens as it cools and sets. So, skip the oven and move straight to chilling!
Step 8: Cool & Glaze
Place the pan in the refrigerator and let the fudge chill for at least 2-3 hours, or until it’s firm to the touch. Once it’s set, you can prepare the optional glaze. In a small microwave-safe bowl, combine the 1/4 cup of semi-sweet chocolate chips and the 1 tablespoon of Peanut Butter. Microwave in 30-second intervals, stirring between each, until smooth and melted. Drizzle this over the top of the chilled fudge. Pop the fudge back into the fridge for about 15-20 minutes to let the glaze set.
“I don’t know if I’ve ever eaten a better Butterfinger Fudge. The rub alone is wonderful, but the sauce??? Over the top!”
Step 9: Slice & Serve
Once the glaze is firm, use the parchment paper overhang to lift the entire block of fudge out of the pan. Place it on a cutting board. For clean cuts, I like to use a sharp knife that’s been warmed under hot water and then dried. Cut the fudge into squares. If it’s too firm, let it sit at room temperature for about 10-15 minutes before slicing. Enjoy your incredibly delicious Butterfinger Fudge!
What to Serve It With
This Butterfinger Fudge is pretty much a star all on its own, but if you’re looking for ways to elevate the experience or pair it with other goodies, I’ve got some ideas! For a morning pick-me-up, a slice of this fudge alongside a steaming mug of black coffee is surprisingly delightful. The bitterness of the coffee cuts through the sweetness of the fudge beautifully. If you’re hosting a brunch, imagine serving small squares of this alongside fresh fruit like berries or a light pastry. It adds a touch of indulgent fun without being too heavy. As a dessert, it’s simply divine. It pairs wonderfully with a scoop of vanilla bean ice cream, or even alongside a rich Chocolate Cake for a double dose of decadence. For cozy, casual snack times, I often just cut a few pieces and enjoy them with a glass of cold milk – it’s a classic combo that never fails. My kids absolutely love it with a glass of chocolate milk! One time, I served it at a potluck with some salted caramel brownies, and people couldn’t stop raving about the combination of flavors and textures. It’s really that versatile!
Top Tips for Perfecting Your Butterfinger Fudge
Over the years of making this (and many other fudge-related concoctions), I’ve picked up a few tricks that really make a difference. For the Butterfingers themselves, don’t aim for a perfectly uniform powder. A mix of textures, from fine crumbs to small chunks, is what gives this fudge its signature appeal. If they’re too fine, it can get a bit clumpy; too large, and you might get big pockets of just candy. My favorite method is the zip-top bag and rolling pin – it’s a great stress reliever, too! When you’re melting the chocolate and condensed milk, the low and slow method is your best friend. Seriously, resist the urge to crank up the heat. Scorch marks on the bottom of the pan are the enemy of smooth fudge, and it can impart a bitter flavor. Stirring constantly is key, and watching for that moment when it all becomes a uniform, glossy sheen is your cue. I’ve learned this lesson the hard way after a few batches that looked… less than appetizing. If your fudge seems too stiff or too soft, it’s usually because of the heat and stirring. Don’t overcook it! For the optional glaze, the consistency is everything. If it’s too thick, it will be hard to drizzle; too thin, and it will just run off. I’ve found that adding a tiny bit more peanut butter can thicken it up, and a splash more chocolate can thin it out, but always add sparingly and re-melt as needed. And my biggest tip: patience during the chilling phase! I know it’s tempting to dive right in, but letting it set properly is crucial for that perfect fudge texture. Resist the urge to rush it; your patience will be rewarded with beautifully firm, sliceable fudge. I once tried cutting into it too early, and let’s just say it was more of a delicious, spreadable chocolate mess than fudge. Lesson learned!
Storing and Reheating Tips
One of the best things about this Butterfinger Fudge is how well it keeps. If you have any leftovers (which is a big ‘if’ in my house!), you can store it at room temperature for about a week. Just make sure it’s in an airtight container. I usually keep it on the counter, away from direct sunlight or heat, and it stays perfectly fresh. If you live in a really warm climate, or if your kitchen tends to get a bit toasty, popping it in the refrigerator is a great option. In the fridge, it will last even longer – easily two to three weeks. Just make sure to store it in a well-sealed container to prevent it from absorbing any other fridge odors. Some people find that chilled fudge is a bit firmer, which I personally love! If you plan on making a big batch and want to freeze some for later, that’s totally doable too. Wrap individual squares or the entire block tightly in plastic wrap, then place it in a freezer-safe bag or container. It can stay frozen for up to 3 months. When you’re ready to enjoy it, the best way to thaw it is to move it to the refrigerator overnight. This allows it to slowly come back to temperature and prevents condensation from forming, which can make it soggy. If you added the glaze, it holds up beautifully through all storage methods. The key is an airtight seal to keep that delicious flavor locked in.
Frequently Asked Questions
Final Thoughts
So there you have it – my absolute favorite Butterfinger Fudge recipe! It’s a testament to the fact that you don’t need complicated steps or fancy equipment to create something truly special and incredibly delicious. This fudge is proof that simple ingredients, combined with a little bit of love and a whole lot of Butterfinger goodness, can result in pure magic. It’s the perfect treat for candy lovers, chocolate aficionados, or anyone who just needs a little something sweet to brighten their day. I really hope you give this a try. It’s been a hit in my kitchen countless times, and I have a feeling it’s going to become a favorite in yours too. If you’re already a fan of my Chocolate Peanut Butter Swirl Cookies or my No-Bake Peanut Butter Bars, I just know you’re going to fall head over heels for this fudge. I can’t wait to hear how yours turns out, so please leave a comment below and let me know your thoughts, or share any fun variations you tried! Happy baking (or, in this case, no-baking)!
Butterfinger Fudge
Ingredients
Main Ingredients
- 0.5 cup Butter unsalted
- 1 can Evaporated Milk 12 oz
- 3 cups Granulated Sugar
- 1 jar Marshmallow Creme 7 oz
- 1 teaspoon Vanilla Extract
- 12 Butterfinger Bars chopped, about 4 standard bars
Instructions
Preparation Steps
- Grease an 8x8 inch baking pan.
- In a large saucepan, combine butter, evaporated milk, and granulated sugar. Cook over medium heat, stirring constantly, until the mixture comes to a rolling boil.
- Boil without stirring for 5 minutes. Remove from heat.
- Stir in the marshmallow creme and vanilla extract until smooth.
- Stir in the chopped Butterfinger bars.
- Pour the fudge into the prepared pan and spread evenly.
- Let cool completely at room temperature, then cut into squares.


