You know those days? The ones where a craving hits, a sudden urge for something sweet and decadent, but the thought of preheating the oven, mixing batter, and waiting for a whole cake to bake feels like climbing Everest? Yeah, I’ve been there more times than I can count. And that, my friends, is precisely why this Brownie Refrigerator Cake holds such a special place in my heart (and my recipe binder!). It’s not just a dessert; it’s a solution. A magical, no-bake, fudgy, chocolatey masterpiece that’s surprisingly simple to whip up. Think of it as your shortcut to pure, unadulterated dessert bliss, bypassing all the usual baking fuss. My kids, bless their always-hungry hearts, practically demand this on a weekly basis, and honestly, who am I to argue? It’s the perfect antidote to a long day or a sudden sweet tooth emergency, and I can’t wait to share it with you.
Thank you for reading this post, don't forget to subscribe!What is a Brownie Refrigerator Cake?
So, what exactly *is* this glorious creation we’re talking about? Imagine the fudgiest, most intensely chocolatey brownie you’ve ever dreamed of, but instead of being baked into a solid slab, it’s broken down and layered with a creamy, dreamy filling, all chilled to perfection. The “refrigerator” in the name isn’t just for show; it’s key to how this dessert comes together, allowing the flavors to meld and the textures to become wonderfully cohesive. It’s essentially a deconstructed brownie, reimagined into a cool, satisfying cake-like treat. It’s like a brownie and an Icebox Cake had the most delicious baby. It’s the kind of dessert that looks impressive but is secretly ridiculously easy, which, as far as I’m concerned, is the sweet spot for any home baker. It’s less about precision baking and more about happy assembly, and that’s a philosophy I can definitely get behind.
Why you’ll love this recipe?
What are the reasons why this Brownie Refrigerator Cake is a staple in flavor. Oh. My. Goodness. We’re talking deep, rich chocolate flavor from the brownies, which are wonderfully moist and decadent, followed by a lusciously creamy, slightly sweet filling. Then there’s the surprise crunch from, well, we’ll get to that! It’s a symphony of textures and tastes that feels incredibly indulgent. But the real magic? The simplicity. Seriously, if you can crumble a brownie and stir a few things together, you can make this. There’s no complicated creaming of butter and sugar, no delicate folding of egg whites. It’s all about assembly and letting the refrigerator do the heavy lifting. And talk about Cost-efficiency: What is the best way to measure cost-efficiency! You likely have most of the ingredients already in your pantry, making this a budget-friendly way to create a showstopper. Plus, its versatility is a huge bonus. You can customize the filling, add different toppings, or even make it ahead of time for parties. What I love most about this is that it’s a lifesaver on busy nights. When unexpected guests pop over, or when that chocolate craving hits hard, this Brownie Refrigerator Cake is my secret weapon. It’s miles better than any store-bought treat and tastes like it took hours to prepare. It’s truly the best of all worlds.
How to Make Brownie Refrigerator Cake
Quick Overview
The process for making this delightful Brownie Refrigerator Cake is wonderfully straightforward. You’ll start by preparing or gathering your brownies, then whip up a simple, creamy filling, and finally, layer everything together before letting it chill. It’s a no-bake wonder that comes together in stages, with the hardest part being the waiting for it to set in the fridge. The beauty lies in its forgiving nature; it’s designed for home cooks who want maximum flavor with minimum fuss. This recipe truly shines when you need a quick yet impressive dessert without the stress of oven management.
Ingredients
For the Brownies:
You have a couple of options here, and both work wonderfully!
- Store-bought brownie mix or pre-made brownies: This is the ultimate shortcut! Look for a good quality brownie mix that bakes up fudgy rather than cakey. If you’re using pre-made brownies, simply grab a pan of your favorite kind from the bakery or make them ahead of time. Aim for about 16-20 brownies, depending on their size, to get enough crumble for your layers.
- Homemade Fudgy Brownies: If you have a go-to Fudgy Brownie recipe, now’s the time to shine! I often bake a batch specifically for this cake, making sure they are thoroughly cooled before crumbling. You’ll need enough to yield about 4-5 cups of crumbled brownies.
For the Creamy Filling:
This is where the magic happens, transforming those brownies into a cohesive, decadent dessert.
- Cream Cheese: 8 ounces, softened. Make sure it’s truly soft; this makes it easier to get a smooth filling. Full-fat will give you the creamiest texture.
- Sweetened Condensed Milk: 1 (14-ounce) can. This not only adds sweetness but also contributes to that irresistible creamy, smooth consistency.
- Heavy Cream: 1 cup, very cold. Whipping this will give the filling a lovely lightness while keeping it rich.
- Vanilla Extract: 1 teaspoon. A classic flavor enhancer that rounds out the sweetness and chocolate.
- Optional additions: A tablespoon of instant espresso powder dissolved in a teaspoon of hot water can intensify the chocolate flavor, or a bit of orange zest can add a lovely citrus note.
For the Optional Chocolate Ganache Glaze:
This is completely optional but highly recommended for that extra touch of indulgence and visual appeal.
- Semi-sweet Chocolate Chips: 1 cup. Good quality chips will melt beautifully.
- Heavy Cream: 1/2 cup.
Step-by-Step Instructions
Step 1: Preheat & Prep Pan
First things first, grab an 8×8 or 9×9 inch baking dish. You don’t need to grease it, as the layers will protect the dish. If you’re using store-bought brownies and they came in a liner, you can also use those as a guide to cut strips to line the dish, but it’s not strictly necessary. For this no-Bake Recipe, the “preheat” is actually a “chill” step, so pop your empty dish into the freezer for about 15-20 minutes while you prepare the other components. This helps the first layer set up nicely.
Step 2: Mix Dry Ingredients
This step is all about the brownies! If you baked your own, ensure they are completely cool. Break them into rough chunks and then crumble them. You’re looking for a mix of larger crumbles and finer crumbs – this texture is what gives the cake character. Don’t over-process them into dust; a little variation is good. If using store-bought brownies, you can gently break them apart with your hands or a fork. You should have about 4-5 cups of crumbled brownies for this recipe.
Step 3: Mix Wet Ingredients
In a medium bowl, combine the softened Cream Cheese and the sweetened condensed milk. Using an electric mixer (or a strong whisk and some elbow grease!), beat them together until they are completely smooth and well combined. There should be no lumps of cream cheese visible. This is the base for your creamy filling. Stir in the vanilla extract (and any optional flavorings like espresso powder or zest). Make sure everything is thoroughly incorporated.
Step 4: Combine
In a separate, larger bowl, pour the heavy cream. Using your electric mixer (cleaned from the Cream Cheese mixture), whip the heavy cream on medium-high speed until stiff peaks form. This means when you lift the beaters, the cream holds its shape and doesn’t droop. This step is crucial for a light and airy filling. Once whipped, gently fold about a third of the whipped cream into the cream cheese mixture to lighten it up. Then, carefully fold the remaining whipped cream into the cream cheese mixture until just combined. Be gentle; you don’t want to deflate all that lovely air!
Step 5: Prepare Filling
The “filling” is essentially the mixture you just created by combining the cream cheese, Sweetened Condensed Milk, and whipped cream. It should be thick, creamy, and luscious. Taste a tiny bit – it should be sweet but not overly so, with that lovely vanilla essence. This is the component that will bind your brownie crumbles together and create that cake-like texture as it chills. You can even add a few chocolate chips or chopped nuts to this filling if you like a bit of extra texture and flavor.
“I don’t know if I’ve ever eaten a better Brownie Refrigerator Cake. The rub alone is wonderful, but the sauce??? Over the top!”
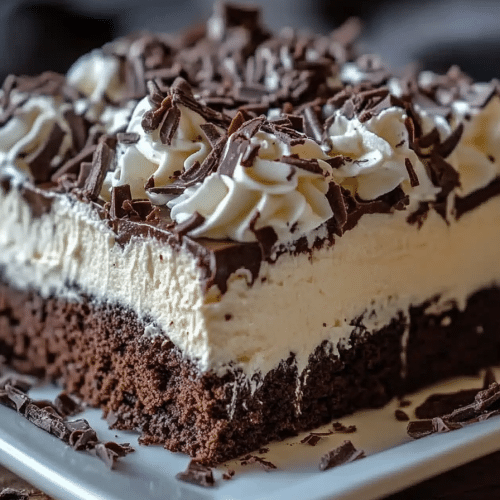
Step 6: Layer & Swirl
Retrieve your chilled baking dish from the freezer. Start by spreading about half of the crumbled brownies evenly across the bottom of the dish. Next, spoon about half of the creamy filling over the brownie layer, spreading it gently to cover the brownies completely. Repeat with the remaining brownie crumbles, creating a second layer, and then top with the rest of the creamy filling. Use an offset spatula or the back of a spoon to smooth the top layer of filling. For a decorative touch, you can gently swirl the top layer of filling with a knife or skewer, creating little peaks and valleys. This isn’t essential but adds a nice visual element.
Step 7: Bake
This step is the opposite of baking! Cover the dish tightly with plastic wrap or a lid. Place the assembled refrigerator cake into the refrigerator and let it chill for at least 4-6 hours, or preferably overnight. This is crucial for the cake to set properly and for the flavors to meld. Don’t be tempted to rush this step; the chilling time is what transforms it from loosely assembled ingredients into a firm, sliceable dessert.
Step 8: Cool & Glaze
Once your Brownie Refrigerator Cake has chilled and set, it’s time for the optional glaze! For the ganache, gently heat the 1/2 cup of heavy cream in a small saucepan over medium-low heat until it just begins to simmer around the edges (don’t let it boil). Pour the hot cream over the chocolate chips in a heatproof bowl. Let it sit for 5 minutes, then whisk gently until smooth and glossy. Let the ganache cool slightly until it’s pourable but not too hot. Carefully drizzle the ganache over the top of the chilled cake, letting it drip down the sides. You can spread it evenly with a spatula or leave it as is for a more rustic look. If you’re not glazing, you can skip this step entirely and just serve as is!
Step 9: Slice & Serve
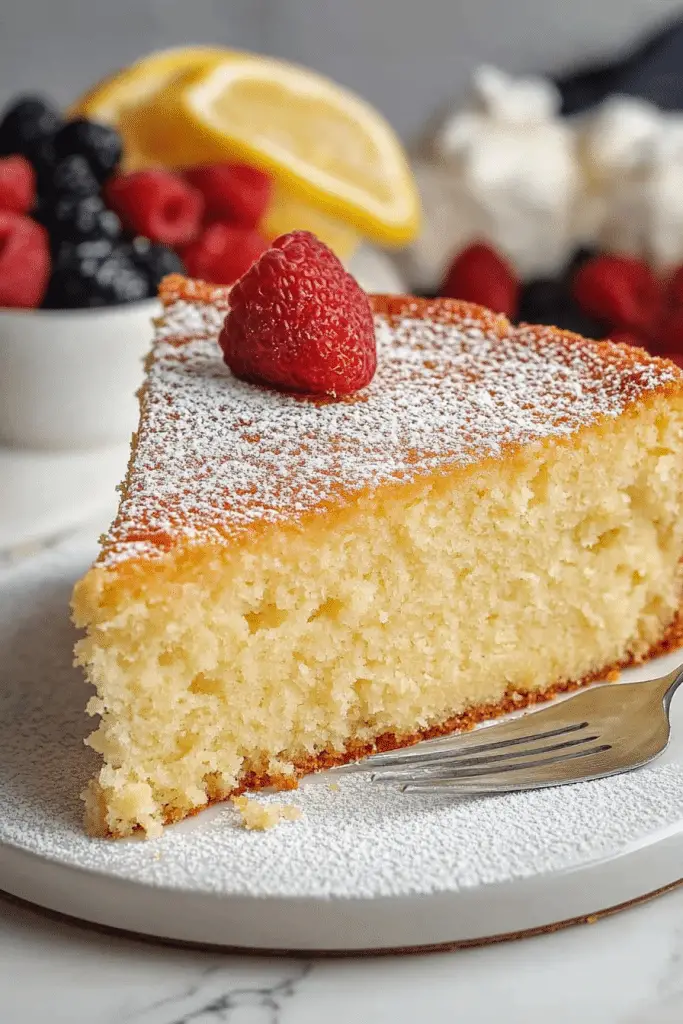
Once the glaze has set slightly (or if you skipped the glaze), it’s time to serve! For the cleanest slices, use a sharp knife that’s been dipped in hot water and wiped dry between each cut. This makes it so much easier to get those perfect, neat portions. Serve the Brownie Refrigerator Cake chilled, straight from the refrigerator. It’s wonderful on its own, but a dollop of whipped cream or a scoop of vanilla Ice Cream is always a welcome addition if you’re feeling extra decadent.
What to Serve It With
This Brownie Refrigerator Cake is so versatile, it can be the star of almost any occasion.
For Breakfast: Yes, you read that right! While it sounds like pure dessert, a small slice of this with your morning coffee can be a delightful treat. The less-sweet, more Fudgy Brownie base with the creamy filling offers a satisfying richness. Try it with a fresh cup of dark roast coffee for a decadent start to your day. It’s surprisingly good when you need something a little more substantial than just toast!
For Brunch: Elevate your brunch spread by slicing this into smaller, elegant squares. Plated alongside fresh berries like raspberries or strawberries, it adds a touch of indulgence without being too heavy for a midday meal. A glass of chilled sparkling cider or even a mimosa pairs beautifully.
As Dessert: This is its natural habitat! Serve generous slices after dinner, perhaps with a side of fresh whipped cream, a drizzle of extra chocolate ganache, or a scoop of high-quality vanilla bean ice cream. A small glass of Red Wine, like a port, can also complement the deep chocolate flavors wonderfully. It’s a guaranteed crowd-pleaser for any dinner party.
For Cozy Snacks: Sometimes, you just need a comforting treat. This cake is perfect for those moments. Grab a slice (or two!) and curl up with a good book and a warm mug of tea or hot chocolate. It’s the ultimate “me time” indulgence, or perfect for sharing with loved ones on a quiet afternoon. My family often requests this when we have a movie night, and it always disappears in minutes!
These are just a few ideas, and honestly, it’s delicious with almost anything, or nothing at all! The rich chocolate and creamy texture make it a complete treat.
Top Tips for Perfecting Your Brownie Refrigerator Cake
Over the years of making this dessert (and trust me, it’s been many!), I’ve picked up a few tricks that really make a difference. These aren’t strict rules, but rather helpful hints to ensure your Brownie Refrigerator Cake is nothing short of spectacular.
Brownie Prep: The key to great texture is the brownie crumble. Don’t aim for a uniform powder. You want a mix of textures – some larger, fudgy chunks, and some finer crumbs. This ensures that delightful contrast in every bite. If you’re baking your own, make sure they are fully cooled; warm brownies will turn mushy when crumbled and integrated into the filling. I’ve found that slightly older brownies (a day or two old) crumble a little better than super fresh ones, but either will work.
Mixing Advice: When you’re folding the whipped cream into the cream cheese mixture, be gentle! You’ve worked hard to get air into that cream, and you don’t want to lose it all. Use a spatula and a folding motion (lifting from the bottom and folding over the top) rather than vigorous stirring. This ensures a light, airy filling rather than a dense one. Stop mixing as soon as it’s just combined; overmixing can deflate the cream and make the filling heavy.
Swirl Customization: The swirl on top is purely decorative, but it adds a nice visual flair. If you want a more defined swirl, don’t overfill the dish with the brownie crumbles. Leave a little space at the top for the creamy filling to spread and swirl. Use a toothpick or the tip of a knife to gently drag lines through the top layer of cream. You can create simple wavy patterns or more intricate designs if you’re feeling artistic!
Ingredient Swaps: While this recipe is fantastic as is, don’t be afraid to experiment! For the cream cheese, you can use a dairy-free cream cheese alternative if needed. For the sweetened condensed milk, some people have had success with coconut condensed milk, though the flavor will change slightly. If you’re not a fan of vanilla, try almond extract or even a touch of coffee liqueur in the filling for a bolder flavor profile.
“New family favorite! This Brownie Refrigerator Cake was so flavorful and ridiculously easy. Crowd-pleaser for sure.”
Baking Tips: Since this is no-bake, “baking” really means “chilling” effectively! Ensure your freezer is at a good temperature. If your refrigerator isn’t super cold, you might need to let it chill for the longer end of the recommended time, or even a little extra, to ensure it’s firm enough to slice cleanly. I always give mine at least 6 hours, and overnight is truly best for maximum firmness and flavor melding.
Glaze Variations: If chocolate ganache isn’t your thing, or you want to switch it up, consider a simple dusting of powdered sugar right before serving. A raspberry coulis drizzled over the top also looks and tastes fantastic. You could even whip up a cream cheese frosting and spread that thinly over the top instead of the ganache for a richer, tangier finish. Another fun idea is to mix a little cocoa powder into your powdered sugar for a chocolatey dusting.
Storing and Reheating Tips
One of the things I adore about this Brownie Refrigerator Cake is how well it stores, making it perfect for making ahead. This means less stress when you need a dessert in a pinch!
Room Temperature: I honestly don’t recommend storing this cake at room temperature for extended periods, especially if you’ve included the creamy filling, as it contains dairy. It’s best kept chilled. If you’ve just finished glazing and want to serve it very soon, you can leave it out for about 30-60 minutes, but any longer and it’s best to keep it cool.
Refrigerator Storage: This is where it shines. Once assembled and chilled (and glazed, if using), cover the dish tightly with plastic wrap or an airtight lid. It will stay delicious in the refrigerator for up to 3-4 days. The texture might change slightly over those days – it tends to get even fudgier and more cohesive, which I find absolutely delightful. Make sure it’s well-covered to prevent it from absorbing other fridge odors.
Freezer Instructions: Yes, you can freeze this! It’s a great way to have dessert on hand for weeks. Wrap the *un-glazed* cake very tightly in a double layer of plastic wrap, followed by a layer of aluminum foil. It should keep well in the freezer for up to 2-3 months. To thaw, transfer the wrapped cake to the refrigerator overnight. Once thawed, you can add the glaze right before serving if you wish. Freezing might slightly alter the texture, making it a bit more crumbly upon thawing, but the flavor will remain excellent.
Glaze Timing Advice: If you plan to store the cake for more than a day or two, or if you’re freezing it, I highly recommend applying the glaze *just before serving*. The ganache can sometimes become a little too firm or even crack when chilled for too long or when frozen and thawed. If you do glaze it ahead, be prepared for the glaze to be quite hard when serving directly from the fridge or freezer. For best results with glazing, chill the cake until firm, then make and apply the ganache, letting it set for about 15-30 minutes in the fridge before slicing and serving.
Frequently Asked Questions
Final Thoughts
So there you have it – my absolute favorite Brownie Refrigerator Cake. I really hope you give this a try! It’s the kind of dessert that brings smiles without causing stress, a true testament to the fact that sometimes, the most delicious things don’t require a hot oven. It’s perfect for those moments when you need a sweet fix, a last-minute dessert, or just want to treat yourself and your loved ones to something incredibly comforting and chocolatey. If you love this recipe, you might also enjoy my No-Bake Cheesecake Bars or my Chocolate Peanut Butter Pie – they share that same “wow-factor, minimal-effort” vibe. I can’t wait to hear what you think! Please leave a comment below with your thoughts, and if you try it, share your photos! Happy chilling!
Brownie Refrigerator Cake
Ingredients
Brownie Base
- 0.5 cup butter
- 1 cup granulated sugar
- 0.5 cup all-purpose flour
- 0.25 cup unsweetened cocoa powder
- 0.5 teaspoon baking powder
- 0.25 teaspoon salt
- 2 large eggs
- 1 teaspoon vanilla extract
Creamy Filling
- 1 package cream cheese, softened
- 0.5 cup powdered sugar
- 1 cup heavy cream, whipped
- 0.5 cup chocolate chips divided
Instructions
Preparation Steps
- Preheat oven to 350°F (175°C). Grease and flour an 8x8 inch baking pan.
-
In a large bowl, cream together melted butter and granulated sugar.0.5 cup butter
-
Beat in eggs one at a time, then stir in vanilla extract.0.5 cup butter
-
In a separate bowl, whisk together flour, cocoa powder, baking powder, and salt.0.5 cup butter
- Gradually add dry ingredients to wet ingredients, mixing until just combined.
- Spread batter evenly into the prepared baking pan.
- Bake for 25-30 minutes, or until a toothpick inserted into the center comes out with moist crumbs.
- Let brownies cool completely in the pan.
-
While brownies cool, prepare the filling: In a medium bowl, beat together softened cream cheese and powdered sugar until smooth.0.5 cup butter
-
Fold in whipped heavy cream and half of the chocolate chips.0.5 cup butter
- Once brownies are completely cool, spread the cream cheese mixture evenly over the top.
-
Sprinkle the remaining chocolate chips over the top.0.5 cup butter
- Refrigerate for at least 2 hours before slicing and serving.


