Oh, you guys. I’ve been dreaming of sharing this recipe with you for ages. It’s not just *any* brioche loaf; this is the one that makes my kitchen smell like a little slice of heaven, the one my family devours before it’s even properly cooled, the one that’s become my absolute go-to for everything from fancy weekend brunches to a simple, comforting treat on a Tuesday evening. It’s a little bit of magic in bread form, and honestly, if you’ve ever been intimidated by the idea of making brioche at home, please, let me put your mind at ease. This brioche loaf is surprisingly straightforward, and the results? Well, they’re beyond anything you can imagine. Think of it as the most decadent, buttery, melt-in-your-mouth bread you’ve ever had, but with an approachable spirit that’ll make you feel like a baking pro from the very first try. It’s like a warm hug in edible form, and I just can’t wait for you to experience it.
Thank you for reading this post, don't forget to subscribe!What is Brio
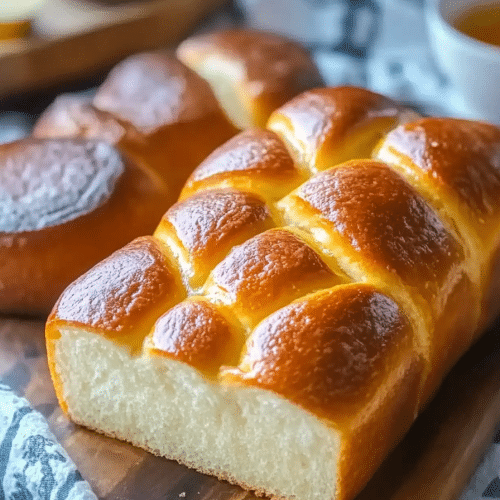
So, what exactly is this wonder of a bread? At its heart, a brioche loaf is a French Bread that’s enriched with butter and eggs, giving it a wonderfully tender crumb and a rich, slightly sweet flavor that’s just divine. Think of it as the “king” of enriched doughs! Unlike a typical sandwich bread that relies on just flour, water, yeast, and salt, brioche goes the extra mile with those decadent additions. The generous amount of butter and eggs is what gives it that signature golden hue and that impossibly soft, almost cake-like texture that sets it apart from everything else. It’s not quite a cake, not quite a pastry, but something truly special in its own right – a bread that feels both rustic and incredibly luxurious. It’s this beautiful balance that makes it so universally loved.
Why you’ll love this
Honestly, there are so many reasons why this particular brioche Loaf Recipe has earned a permanent spot in my recipe binder, and I’m betting it will in yours too! First and foremost, the flavor is just out of this world. It’s rich, buttery, and has this subtle sweetness that’s incredibly satisfying. It’s the kind of bread that needs very little adornment; a smear of good butter is often all it craves, but it’s also the perfect canvas for so many other delicious things. Beyond the taste, I have to sing praises for its simplicity. While it sounds fancy, the process is actually quite manageable, even for beginners. The ingredients themselves are relatively budget-friendly, making this a far more economical way to enjoy a truly gourmet bread. And the versatility! Oh my goodness, this brioche loaf can do it all. It’s incredible toasted for breakfast, piled high with jam or honey. It makes the most divine French toast. It’s fantastic as a base for savory dishes too, soaking up sauces beautifully. What I love most about this specific recipe is how forgiving it is. I’ve tested it with different brands of flour and even accidentally left it to rise a little longer than usual one time, and it still turned out beautifully. It’s a recipe that consistently delivers, and that, my friends, is pure gold in my kitchen. It’s also a bit of a showstopper without demanding hours of intricate work, which I truly appreciate when life gets busy.
How do you make a
Quick Overview
This brioche loaf is all about patience and good ingredients. We’ll start by mixing a simple dough, letting it rise to develop that incredible flavor, shaping it into that classic loaf form, and then baking it until it’s golden brown and beautifully puffed. The key is giving the dough enough time to do its thing – the yeast works its magic to create that airy, tender crumb we all adore. Don’t rush this process, and you’ll be rewarded with a loaf that’s far superior to anything you can buy in a store. It’s really that straightforward, and the steps are designed to build on each other for the best possible outcome.
Ingredients
For the Main Batter
This is where the magic begins! For the best brioche loaf, I always recommend using good quality ingredients. For the flour, a strong bread flour is ideal because it has a higher protein content, which gives the dough better structure and elasticity – essential for that lovely, airy texture. I usually use about 4 cups, but always have a little extra on hand just in case. Make sure your yeast is fresh; I prefer active dry yeast, and I’ll usually “proof” it first to make sure it’s alive and kicking. About 2 and a quarter teaspoons is perfect. For sweetness and richness, we’re using sugar – around half a cup works beautifully, but you can adjust that slightly to your preference. And the star of the show? Butter! Unsalted is best so you can control the salt content. You’ll need a good cup, softened to room temperature – this is crucial for it to incorporate properly into the dough. Don’t use melted butter here; it won’t give you the same texture. And of course, eggs! About 3 large ones, also at room temperature, add incredible richness and color. A teaspoon of salt is non-negotiable; it enhances all the flavors and helps control the yeast. I also like to add a splash of milk, maybe half a cup, but I sometimes experiment with almond milk for a slightly different creamy note – it worked surprisingly well!
For the Filling:
While this brioche loaf is stunning on its own, sometimes I love to add a little something extra. For a classic sweet brioche, I’ll often mix a quarter cup of softened butter with a quarter cup of Brown Sugar and a teaspoon of cinnamon. It’s simple, but it elevates the whole experience. You can also go wild with chocolate chips, a swirl of jam, or even some chopped nuts if that’s your jam. Preparation is easy: just make sure your butter is soft enough to mix smoothly with the sugar and any other additions.
For the Glaze:
For that irresistible sheen and a touch of extra sweetness, a simple glaze is a must. I usually whisk together about half a cup of powdered sugar with a tablespoon or two of milk or cream until I get a thick but pourable consistency. Sometimes, I’ll add a tiny splash of vanilla extract or even a bit of lemon zest for a brighter flavor. The key is to get it just right – not too thin that it runs off, and not too thick that it becomes hard to spread. If it’s too thick, add milk a drop at a time; if it’s too thin, add more powdered sugar.
“Made the Brioche Loaf tonight and wow — perfect weeknight dinner. Will definitely make again!”
Step-by-Step Instructions
Step 1: Preheat & Prep Pan
First things first, let’s get our oven ready. I usually preheat mine to 375°F (190°C). While that’s heating up, grab your Loaf Pan – a standard 9×5 inch pan is perfect. I like to grease it really well with butter or cooking spray and then give it a light dusting of flour. This step is super important to prevent our beautiful brioche loaf from sticking. I press the flour into the greased pan to ensure even coverage; no one wants a loaf stuck in the pan!
Step 2: Mix Dry Ingredients
In a large mixing bowl, I whisk together the flour, sugar, and salt. If I’m using active dry yeast, this is also where I’d add it. Giving these dry ingredients a good whisk ensures everything is evenly distributed, which is important for consistent rising and flavor. It’s a simple step, but it sets the foundation for a great loaf.
Step 3: Mix Wet Ingredients
In a separate, smaller bowl, I whisk the eggs until they’re well beaten. Then, I’ll add the softened butter to the bowl with the eggs and beat them together until they’re mostly combined. It might look a little curdled at first, and that’s totally fine. I also add the milk (or almond milk, if I’m feeling adventurous!) to this wet mixture. The room temperature ingredients are really key here; they help everything emulsify nicely and the butter to incorporate more smoothly into the dough later on.
Step 4: Combine
Now for the fun part – bringing it all together! I pour the wet ingredients into the bowl with the dry ingredients. Using a sturdy spoon or a stand mixer with a dough hook, I start to mix everything. This is where the dough will start to come together. At first, it will be shaggy and sticky. Keep mixing! It can take about 5-7 minutes of mixing. The dough will start to become smoother and more elastic. The key here is not to overwork it once the gluten has developed, but for this stage, we want to ensure everything is incorporated. If the dough feels too wet, I’ll add a tablespoon of flour at a time, but be careful not to add too much. It should be soft and slightly sticky but manageable.
Step 5: Prepare Filling
If you’re adding a filling, now’s the time to prepare it. If you’re going for the simple cinnamon-sugar swirl, just take your softened butter, Brown Sugar, and cinnamon and mix them together in a small bowl until it forms a paste. It’s really that simple. I like to make sure it’s well combined so it distributes evenly throughout the brioche loaf.
Step 6: Layer & Swirl
This is where we transform our dough into a beautiful loaf. First, let the dough rest for about 10-15 minutes. Then, turn it out onto a lightly floured surface. Gently pat or roll the dough into a rectangle, roughly about 9×12 inches. If you’re using a filling, spread it evenly over the surface of the dough, leaving a small border around the edges. Now, starting from one of the long sides, tightly roll up the dough. Pinch the seam to seal it. Then, gently place the rolled dough into your prepared loaf pan, seam-side down. If you want an extra swirl effect, you can gently push it into the pan so it fills the space nicely. The slight stickiness of the dough helps it hold its shape.
Step 7: Bake
Now, cover the loaf pan loosely with plastic wrap or a clean kitchen towel and let the dough rise in a warm place for about 1 to 1.5 hours, or until it has nearly doubled in size and is peeking over the top of the pan. This is the second rise, and it’s crucial for that light, airy texture. Once it’s puffed up beautifully, pop it into your preheated oven. Bake for about 30-40 minutes. You’ll know it’s done when the crust is a deep golden brown and it sounds hollow when you tap the bottom. If the top starts browning too quickly, you can loosely tent it with foil. I always give it a little tap to check for doneness – it’s a trick I learned years ago!
Step 8: Cool & Glaze
Once baked to perfection, carefully remove the brioche loaf from the oven and let it cool in the pan for about 10-15 minutes. This allows it to set up a bit. Then, gently invert it onto a wire rack to cool completely. This is the hardest part – waiting for it to cool! Once it’s mostly cooled, I’ll prepare the glaze. Drizzle or brush the glaze over the top, letting it drip down the sides. The warmth of the loaf will help the glaze spread beautifully. If you add the glaze too soon, it can get a bit messy.
“The Brioche Loaf turned out amazing. My kids asked for seconds. Saving this one!”
Step 9: Slice & Serve
And there you have it – your stunning homemade brioche loaf! I like to let it cool completely before slicing, but honestly, a warm slice with a pat of butter is pure bliss. Use a serrated knife for the cleanest slices. The aroma alone is enough to make you swoon. This is best enjoyed fresh, but I’ll get to storage tips in a bit!
What to Serve It With
This brioche loaf is so versatile, it’s practically a chameleon in the kitchen! For breakfast, I love it simply toasted and spread with creamy butter and a drizzle of local honey or a dollop of good quality jam. The sweetness of the brioche perfectly complements the tang of fruit preserves. For a truly decadent brunch, this brioche is a game-changer for French toast. Imagine thick slices soaked in an egg-custard mixture and then fried to golden perfection – it’s restaurant-quality at home! I pair it with fresh berries and a dusting of powdered sugar. As a dessert, it’s divine served warm with a scoop of vanilla bean ice cream, or even as a base for bread pudding – it takes bread pudding to a whole new level of richness. For cozy snacks, a simple slice with a cup of tea or coffee is just pure comfort. My kids love it with a smear of peanut butter, which is always a winner. I’ve even used it to make mini croutons for a salad, which adds a lovely buttery richness. The possibilities are truly endless, and it always feels a little bit special, no matter how you serve it.
Top Tips for Perfecting Your Brioche Loaf
Over the years, I’ve learned a few tricks that have really elevated my brioche loaf game, and I’m so excited to share them with you! When it comes to the flour, always use bread flour if you can. The extra protein makes a huge difference in the dough’s elasticity and the final crumb structure. Don’t be afraid of the sticky dough – it’s a sign of a well-hydrated dough, which leads to a softer loaf. If it’s truly unmanageable, you can add flour very gradually, but aim for that soft, slightly tacky texture. When you’re mixing the dough, especially if you’re using a stand mixer, be patient. It might seem like it’s not coming together at first, but keep going! That long mixing time is what develops the gluten, giving the brioche its signature chew and structure. For the second rise, finding a warm spot is key. I often turn my oven on for just a minute, then turn it off, and let the dough rise in the warm, steamy environment. It speeds up the process and ensures a beautiful, even puff. Don’t over-proof, though! You want it to be nicely puffed, but not so much that it collapses when you bake it. My biggest lesson learned was about the butter: make sure it’s softened, not melted, for the dough. Melted butter will just make your dough greasy and heavy. For the filling, if you’re going for something like chocolate chips, don’t go overboard; too much can weigh down the dough and prevent it from rising properly. And for the swirl, a light hand with the filling is often best for visual appeal and even distribution. Lastly, don’t be afraid to experiment with the glaze consistency. Sometimes a slightly thicker glaze is perfect for a more pronounced topping, while a thinner one allows for a more delicate sheen. Trust me on this one, a little practice goes a long way!
Storing and Reheating Tips
This brioche loaf is at its absolute best when it’s fresh, but lucky for us, it stores beautifully too! If you find yourself with leftovers (which rarely happens in my house!), you can keep it at room temperature for about 2-3 days. Just make sure it’s well-wrapped in plastic wrap or stored in an airtight container. This helps to keep it from drying out. If you think it might take longer than that to finish, I highly recommend popping it in the refrigerator. Wrapped tightly, it can last for up to a week in the fridge, though the texture might become a little firmer. To revive it, you can simply pop a slice in the toaster or briefly warm it in a low oven. For longer storage, freezing is your best friend! I like to slice the loaf first, then wrap each slice tightly in plastic wrap, and then place them in a freezer-safe bag or container. This way, you can just grab a slice or two as you need them. It will keep well in the freezer for up to 3 months. When you’re ready to enjoy a frozen slice, you can toast it directly from frozen, or let it thaw at room temperature for about 30 minutes. If you’ve glazed your brioche, it’s best to add the glaze *after* reheating if you’ve frozen it, as some glazes can become sticky or melty during freezing and thawing. For loaves stored at room temperature or in the fridge, the glaze usually holds up quite well.
Frequently Asked Questions
Final Thoughts
There you have it – my very own recipe for the most incredible brioche loaf. I truly hope you feel inspired to give it a try. It’s more than just a recipe; it’s a little piece of my kitchen, shared with yours. The aroma that fills your home as it bakes is simply unbeatable, and the taste… well, it’s pure joy. It’s that perfect balance of rich, buttery flavor and a tender, yielding crumb that makes it so special. It’s a reminder that sometimes, the most rewarding culinary experiences come from taking a little extra time and care with simple, quality ingredients. If you loved this, you might also enjoy my recipe for fluffy cinnamon rolls or my foolproof no-knead bread – they both share that same spirit of delicious, approachable baking. I can’t wait to hear about your brioche adventures! Let me know in the comments how yours turned out, and if you discovered any fun variations. Happy baking, everyone!
Brioche Loaf
Ingredients
Main Ingredients
- 4.5 cups all-purpose flour
- 0.25 cup granulated sugar
- 0.5 teaspoon salt
- 2.25 teaspoon active dry yeast
- 0.5 cup warm milk
- 4 large eggs at room temperature
- 0.75 cup unsalted butter softened, cut into cubes
Instructions
Preparation Steps
- In a large bowl, whisk together the flour, sugar, salt, and yeast.
- In a separate bowl, whisk the warm milk and eggs together. Pour this wet mixture into the dry ingredients.
- Mix with a dough hook on low speed until a shaggy dough forms. Increase speed to medium and knead for 5-7 minutes until the dough is smooth and elastic.
- With the mixer on low, gradually add the softened butter, one cube at a time, allowing each piece to incorporate before adding the next. Continue kneading for another 8-10 minutes until the dough is very smooth, elastic, and pulls away from the sides of the bowl.
- Transfer the dough to a lightly greased bowl, cover with plastic wrap, and let it rise in a warm place for 1.5 to 2 hours, or until doubled in size.
- Gently punch down the dough and shape it into a loaf. Place it in a greased 9x5 inch loaf pan.
- Cover the pan and let the dough rise for another 1 to 1.5 hours, or until it has risen above the rim of the pan.
- Preheat your oven to 375°F (190°C). Bake for 30-35 minutes, or until the loaf is golden brown and sounds hollow when tapped on the bottom.
- Let the brioche cool in the pan for 10 minutes before transferring it to a wire rack to cool completely.


