You know those recipes that just feel like a warm hug? The ones that make your kitchen smell incredible and bring a smile to everyone’s face? This blackberry cobbler is exactly that for me. It’s the kind of dessert that screams summer, even when I’m making it on a crisp autumn afternoon. My grandma used to make a version of this, and while mine isn’t an exact copy, it definitely captures that same comforting, homey magic. I remember sneaking tastes of the uncooked berry filling when I was little, and now my own kids do the same! It’s a simple pleasure, really, but the burst of sweet, slightly tart blackberries nestled under a tender, golden crust is just pure bliss. If you’re a fan of classic fruit desserts, especially something like APPLE CRUMBLE or a peach pie, you are going to absolutely adore this blackberry cobbler. It’s become my go-to when we have unexpected guests or when a serious sweet craving hits.
Thank you for reading this post, don't forget to subscribe!What is blackberry Cobbler?
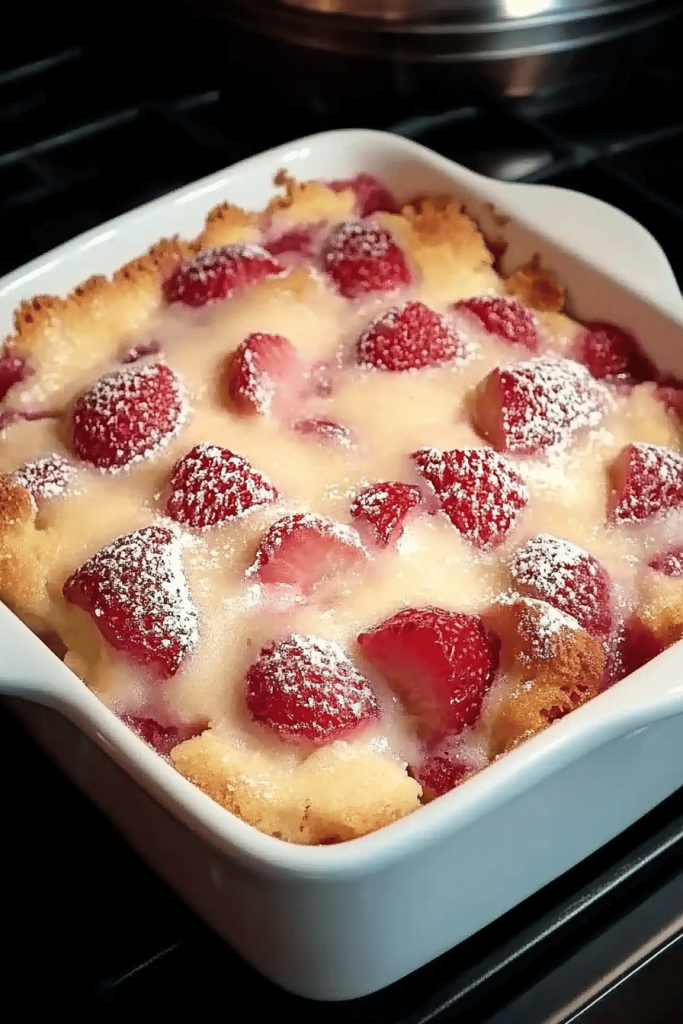
So, what exactly *is* Blackberry Cobbler? At its heart, it’s a beautiful dessert featuring a fruit filling topped with a biscuit-like or cake-like batter. The name “cobbler” itself is pretty descriptive; it’s said to resemble a cobblestone path because of the way the dough puddles and bakes over the fruit. Unlike a pie, it doesn’t have a bottom crust, making it a bit more forgiving and quicker to assemble. Some cobblers have a more crumbly topping, almost like a streusel, while others have a batter that bakes up into a soft, cakey layer. This particular recipe leans towards that delightful cake-like texture, which is precisely what I love about it. It’s rustic, charming, and utterly delicious. Think of it as a delightful, comforting mess of perfectly baked fruit with a sweet, tender blanket on top. It’s the kind of dessert that doesn’t require fancy presentation to impress; its natural beauty and incredible flavor do all the work!
Why you’ll love this recipe?
Honestly, if you’re looking for a dessert that ticks all the boxes, this blackberry cobbler is it. Let’s break down why it’s become such a staple in my kitchen. First, the FLAVOR. Oh my goodness, the flavor! You get that wonderful contrast between the juicy, slightly tart blackberries and the sweet, buttery topping. It’s just the right amount of sweet and tangy, a flavor combination that’s incredibly satisfying. Then there’s the SIMPLICITY. I can’t stress this enough – this recipe is shockingly easy. You don’t need any fancy techniques or a degree in pastry. The ingredients are mostly pantry staples, and the steps are straightforward. It’s the kind of dessert that’s perfect for a weeknight treat or when you need to whip something up quickly for a potluck. It’s also incredibly COST-EFFECTIVE. Blackberries are often abundant, especially when they’re in season, and the other ingredients are everyday items. This means you can create a truly spectacular dessert without breaking the bank. And let’s talk VERSATILITY! While this recipe is designed for blackberries, it’s fantastic with other berries too – raspberries, blueberries, or a mix! You can even swap out some of the berries for diced peaches or plums. What I love most about this recipe, beyond its deliciousness and ease, is how it makes everyone feel. It’s a crowd-pleaser, a comfort food classic, and a reminder of simpler times. It’s definitely a step above a basic fruit crumble and far more approachable than a complex pie. It’s just pure, unadulterated joy in a baking dish.
How do you make blackberry Cobbler?
Quick Overview
This recipe is a dream for busy home cooks. You’ll be making a quick, simple batter that gets poured right over a luscious blackberry filling, then baking it all until golden and bubbly. The magic happens as the batter bakes up, creating a tender, cakey topping that perfectly complements the juicy fruit. It’s designed to be fuss-free, with minimal steps and maximum deliciousness. You can even prep the filling and batter separately ahead of time if you’re really pressed for time.
Ingredients
For the Main Batter:
All-Purpose Flour: 1 ½ cups. I always use unbleached all-purpose flour for the best texture. It’s the backbone of our lovely, cakey topping.
Granulated Sugar: ¾ cup. This gives our topping a nice sweetness. You can adjust it slightly depending on how sweet your berries are, but this is a good starting point.
Baking Powder: 2 teaspoons. This is what gives our cobbler topping its lift and airy texture. Make sure it’s fresh!
Salt: ½ teaspoon. A little salt goes a long way in balancing the sweetness and bringing out all the flavors.
Unsalted Butter: ½ cup (1 stick), melted. Using melted butter makes the batter come together so quickly and contributes to a lovely tender crumb.
Milk: ½ cup. Whole milk is my preference for richness, but I’ve also tested this with 2% and it works beautifully. For a dairy-free option, a good quality unsweetened almond milk or oat milk works surprisingly well, making it even creamier!
For the Filling:
Fresh or Frozen Blackberries: 6 cups. If using frozen, there’s no need to thaw them first, which is a lifesaver on busy nights. Just make sure they’re good quality; I find wild blackberries have the best flavor if you can get your hands on them!
Granulated Sugar: ½ cup. This is for the filling, to sweeten the berries and help them release their juices. Adjust based on your berries’ tartness.
Cornstarch: 3 tablespoons. This is our secret weapon for thickening the filling so it’s not too watery. It creates that perfect, luscious consistency.
Lemon Juice: 1 tablespoon. A little bit of fresh lemon juice brightens up the berry flavor beautifully and cuts through the sweetness. Don’t skip this!
Vanilla Extract: 1 teaspoon. Just a touch adds wonderful warmth and depth to the berry flavor.
For the Glaze:
“Made the Blackberry Cobbler tonight and wow — perfect weeknight dinner. Will definitely make again!”
Powdered Sugar: 1 cup. For a smooth, sweet glaze.
Milk or Cream: 2-3 tablespoons. Just enough to reach your desired drizzling consistency. A splash of heavy cream makes it extra decadent!
Step-by-Step Instructions
Step 1: Preheat & Prep Pan
First things first, let’s get our oven nice and hot! Preheat it to 375 degrees F (190 degrees C). Grab a baking dish – a 9×13 inch baking pan or an 8×8 inch square pan works perfectly. I often use a shallow casserole dish, too. Lightly grease the inside of your pan with butter or cooking spray. This ensures nothing sticks and makes for easier cleanup, which we all appreciate, right?
Step 2: Mix Dry Ingredients
In a medium bowl, whisk together the all-purpose flour, ¾ cup of granulated sugar, baking powder, and salt. Giving them a good whisk ensures everything is evenly distributed, so you don’t end up with little pockets of baking powder or salt. This is a simple step, but it sets the foundation for a perfectly textured cobbler topping.
Step 3: Mix Wet Ingredients
In a separate, smaller bowl or liquid measuring cup, whisk together the melted butter and milk (or your milk substitute). Make sure the butter isn’t too hot when you mix it with the milk; you don’t want to cook the milk. Just melted and slightly cooled is perfect. This combination will then be added to your dry ingredients.
Step 4: Combine
Pour the wet ingredients into the bowl with the dry ingredients. Stir gently with a spatula or wooden spoon until just combined. It’s *really* important not to overmix here! A few small lumps are perfectly fine. Overmixing can develop the gluten too much, resulting in a tougher topping. We want it tender and cakey, not like a dense biscuit.
Step 5: Prepare Filling
In your baking dish (yes, you can mix the filling right in there!), gently toss the blackberries with the ½ cup of granulated sugar, cornstarch, lemon juice, and vanilla extract. Stir carefully so you don’t mash all the berries, but make sure they’re all coated. This step is where the magic starts to happen – the sugar draws out the juice, and the cornstarch will thicken it up into a glorious, syrupy filling as it bakes.
Step 6: Layer & Swirl
Now for the fun part! Spoon the batter evenly over the blackberry filling in the baking dish. You don’t need to spread it perfectly flat; let it naturally fall and puddle. Some prefer to dollop it on, and honestly, either way works! The batter will spread as it bakes. If you want to get fancy, you can gently swirl the batter into the berries with a butter knife or skewer for a marbled effect, but it’s totally optional. It looks beautiful no matter what!
Step 7: Bake
Place the baking dish in your preheated oven. Bake for 40-50 minutes, or until the topping is golden brown and a toothpick inserted into the center comes out clean (avoiding a berry pocket, of course!). The filling should be bubbly around the edges. If you notice the topping browning too quickly, you can loosely tent it with aluminum foil for the last 10-15 minutes of baking.
Step 8: Cool & Glaze
Once it’s out of the oven, let the cobbler cool for at least 15-20 minutes before glazing. This allows the filling to set up a bit more. While it’s cooling, whisk together the powdered sugar and 2 tablespoons of milk or cream in a small bowl until smooth. Add more milk, a teaspoon at a time, until you reach a drizzly consistency. Drizzle this sweet glaze over the warm cobbler. It adds another lovely layer of sweetness and a beautiful finish.
Step 9: Slice & Serve
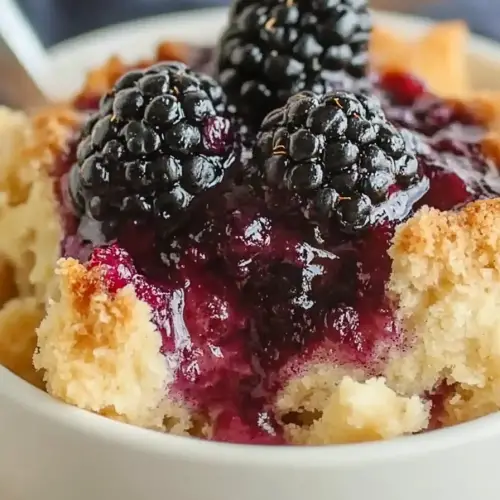
This is the best part! Cut into generous portions and serve warm. I highly recommend serving it with a scoop of vanilla Ice Cream or a dollop of whipped cream. The contrast of the warm cobbler with cold ice cream is just heavenly. My kids always ask for extra ice cream, and who am I to say no?
What to Serve It With
This blackberry cobbler is so versatile, it can honestly fit into any meal or occasion. For a delightful BREAKFAST treat, I love serving it warm with a strong cup of coffee. It feels decadent but still has that fruity goodness to start the day. Just a small dollop is perfect alongside a mug of hot joe.
“Packed with flavor and so simple. Exactly what I wanted from this Blackberry Cobbler!”
If you’re planning a BRUNCH, this cobbler is a showstopper. Serve it in individual ramekins for an elegant touch, or present it straight from the baking dish. It pairs wonderfully with mimosas or a sparkling rosé.
As a DESSERT, it’s a classic for a reason. After-dinner styling is easy – a scoop of good quality vanilla bean Ice Cream is non-negotiable for me. A drizzle of extra berry sauce or a scattering of fresh mint leaves can elevate it even further. It’s also divine with a dollop of crème fraîche for a tangier contrast.
And for those COZY SNACKS, this cobbler is pure comfort. Served warm, maybe with a glass of milk or a mug of hot chocolate, it’s the ultimate indulgence when you need a pick-me-up. My family loves this on movie nights; it disappears in minutes! One tested combination that’s a family favorite is serving it with a side of plain Greek yogurt for a little protein and a lighter feel. It really does fit every scenario!
Top Tips for Perfecting Your Blackberry Cobbler
I’ve made this blackberry cobbler more times than I can count, and over the years, I’ve picked up a few tricks that I think really elevate it. For the BLACKBERRIES, if you’re using fresh ones, give them a gentle rinse and pat them dry. If any look mushy or overripe, I usually pick those out and use them in the center of the dish where they’ll cook down more. For FROZEN BERRIES, don’t thaw them! Seriously, this is a game-changer. It prevents them from getting too mushy during the baking process and they still cook up beautifully. When it comes to MIXING ADVICE, remember my earlier point about not overmixing the batter. You want it to be tender. If you see a few streaks of flour, that’s okay. The batter is meant to be a bit rustic. The batter will puff up and bake around the berries, so don’t worry about covering every single berry. For SWIRL CUSTOMIZATION, if you want to swirl, do it gently. You’re not trying to incorporate the batter into the berries, but rather create pretty ribbons. A few passes with a knife or skewer is all you need. If you’re feeling adventurous, a sprinkle of coarse sugar on top of the batter *before* baking can add a lovely crunch and sparkle. For INGREDIENT SWAPS, if you don’t have blackberries, this recipe is fantastic with blueberries or a mix of berries. I’ve also had great success using sliced peaches or even sliced apples in the fall, though you might need to adjust the sugar slightly depending on the fruit’s natural sweetness. For BAKING TIPS, always keep an eye on your oven. Ovens can vary, so the 40-50 minute timeframe is a guideline. Look for that golden-brown color and bubbly filling. If your oven tends to run hot, you might want to start checking around the 35-minute mark. And for the GLAZE VARIATIONS, if you’re not a fan of powdered sugar, you can skip the glaze altogether. A dusting of powdered sugar once cooled is lovely, or serve it with a dollop of sweetened whipped cream or a spoonful of vanilla Ice Cream. I’ve also found that adding a tiny pinch of cinnamon to the glaze adds a wonderful warmth, especially if you’re serving this on a cooler day.
Storing and Reheating Tips
One of the best things about this blackberry cobbler is that it’s almost as good, if not better, the next day! If you happen to have any leftovers (which is rare in my house!), storing it properly is key. For ROOM TEMPERATURE storage, I’d say keep it covered loosely on the counter for no more than 2-3 hours, especially if it’s warm. It’s best enjoyed fresh, but if you’re just waiting a little while before serving more, that’s fine. For REFRIGERATOR STORAGE, this is where it really shines. Once the cobbler has cooled down completely, cover it tightly with plastic wrap or transfer it to an airtight container. It will stay delicious in the fridge for about 3 to 4 days. The topping might soften slightly, but the flavors meld beautifully. When it comes to FREEZER INSTRUCTIONS, this cobbler freezes remarkably well! Let it cool completely, then wrap the entire dish tightly in a couple of layers of plastic wrap, followed by a layer of aluminum foil. It should be good in the freezer for up to 2-3 months. To thaw, just remove the foil and plastic wrap and let it thaw in the refrigerator overnight. You can then reheat it. For reheating, I find the best method is to pop it back into a moderately warm oven (around 300-325 F or 150-160 C) for about 15-20 minutes, or until heated through and the topping is re-crisped a bit. If you’re reheating a single slice, a microwave works too, but it can make the topping a bit softer. I’ve found that adding the glaze *after* reheating, or just before serving, keeps it looking its best. If you’re freezing before glazing, just add the glaze fresh once it’s reheated.
Frequently Asked Questions
Final Thoughts
There you have it – my go-to recipe for the most wonderfully comforting blackberry cobbler. It’s more than just a dessert; it’s a feeling. It’s that little bit of sunshine on a plate, a taste of home, and a guaranteed way to make anyone feel special. I truly believe this recipe strikes that perfect balance of easy to make but impressive in flavor. The juicy, slightly tart blackberries mingling with that tender, golden topping, all brought together with a sweet glaze – it’s simply divine. Whether you’re a seasoned baker or just starting out, I really encourage you to give this blackberry cobbler a try. It’s a recipe that has brought so much joy to my table, and I hope it does the same for yours. If you enjoy this, you might also like my Classic Apple Crisp or my incredibly easy Peach Galette – both are fantastic fruit desserts that share that same comforting vibe. I can’t wait to hear how yours turns out! Please leave a comment below to share your experience, any variations you tried, or even just to say hello!
Blackberry Cobbler
Ingredients
For the Filling
- 6 cups fresh or frozen blackberries
- 0.75 cup granulated sugar adjust to taste
- 0.25 cup all-purpose flour
- 1 tablespoon lemon juice
- 0.5 teaspoon cinnamon
For the Topping
- 2 cups all-purpose flour
- 0.5 cup granulated sugar
- 2 teaspoons baking powder
- 0.5 teaspoon salt
- 0.5 cup cold unsalted butter cut into cubes
- 0.75 cup milk
Instructions
Preparation Steps
- Preheat oven to 375°F (190°C).
- In a large bowl, combine blackberries, 0.75 cup sugar, 0.25 cup flour, lemon juice, and cinnamon. Toss gently to coat.
- Pour the blackberry mixture into a greased 8x8 inch baking dish.
- In a separate bowl, whisk together 2 cups flour, 0.5 cup sugar, baking powder, and salt.
- Cut in the cold butter using a pastry blender or your fingertips until the mixture resembles coarse crumbs.
- Pour in the milk and stir until just combined. Do not overmix.
- Drop spoonfuls of the biscuit topping over the blackberry filling.
- Bake for 35-40 minutes, or until the topping is golden brown and the filling is bubbly.
- Let cool slightly before serving. Serve warm with vanilla ice cream or whipped cream.


