You know those desserts that just *hit different*? The ones that make you close your eyes with the first bite and hum in pure bliss? Well, this Biscoff cheesecake is absolutely one of those for me. It’s not just a dessert; it’s a warm hug in cake form, a little bit of magic conjured up in my own kitchen. Honestly, I think it might just be my favorite cheesecake ever. It started as a little experiment, a way to use up some Biscoff spread I’d become a little obsessed with (is there any other way to be with Biscoff spread?), and it turned into an instant family hit. My kids, who can be notoriously picky, ask for this specific Biscoff Cheesecake Recipe all the time. It’s creamy, it’s dreamy, and that hint of speculoos spice is just divine. If you’ve ever made a classic New York cheesecake, this has that same luxurious texture, but with an extra layer of spiced cookie goodness that makes it totally irresistible.
Thank you for reading this post, don't forget to subscribe!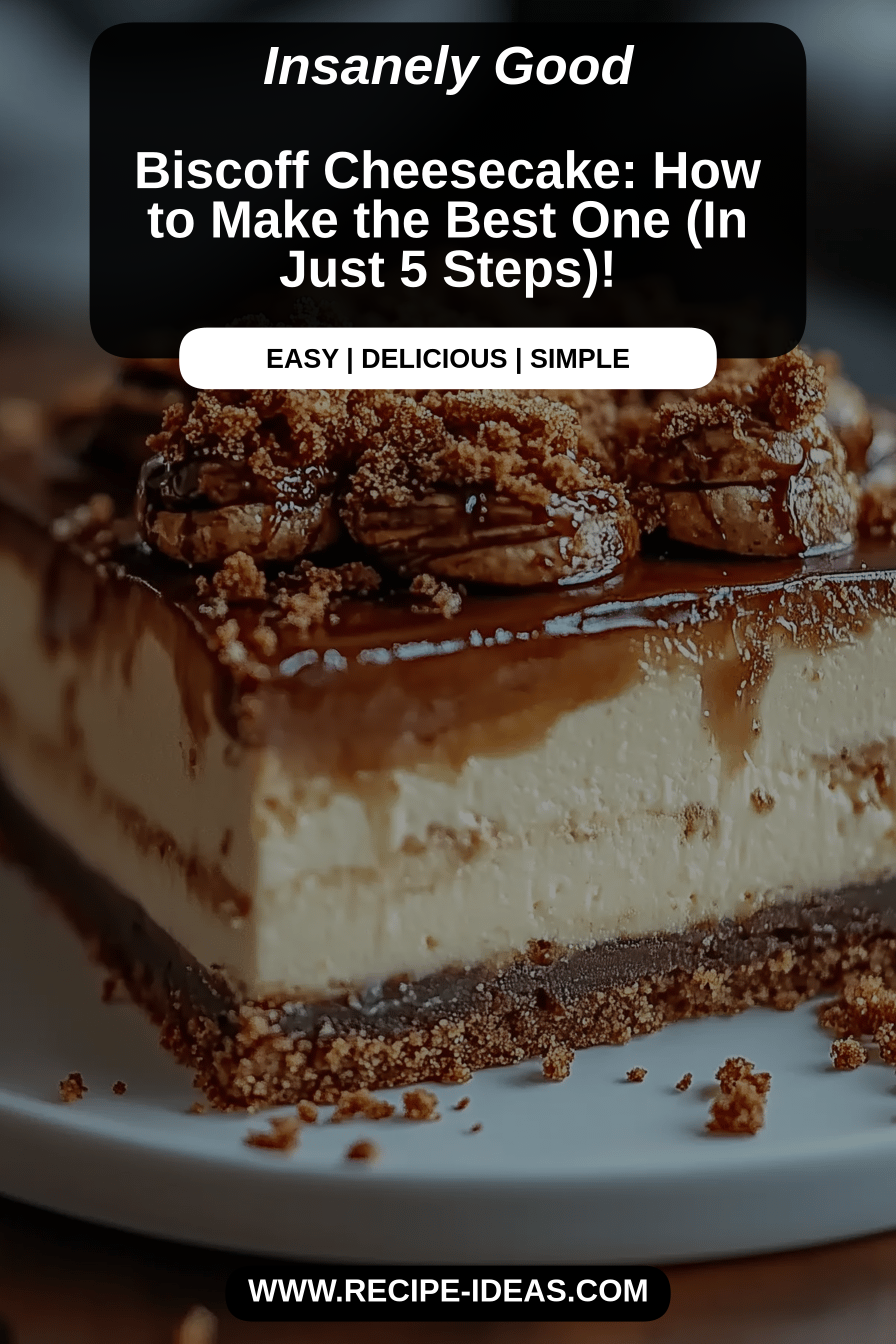
What is Biscoff cheesecake?
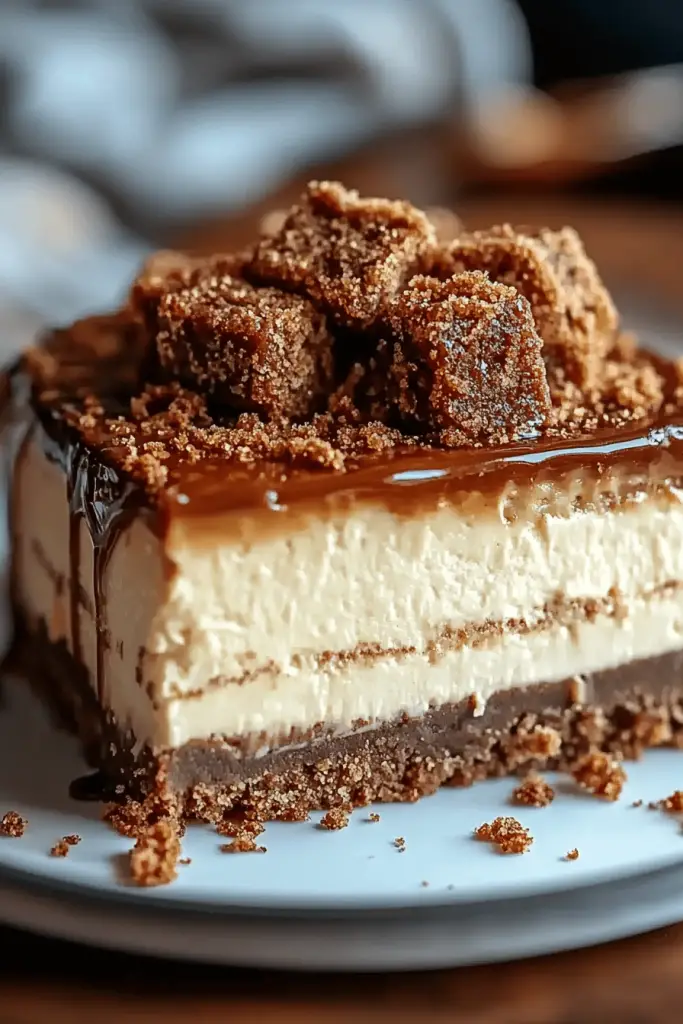
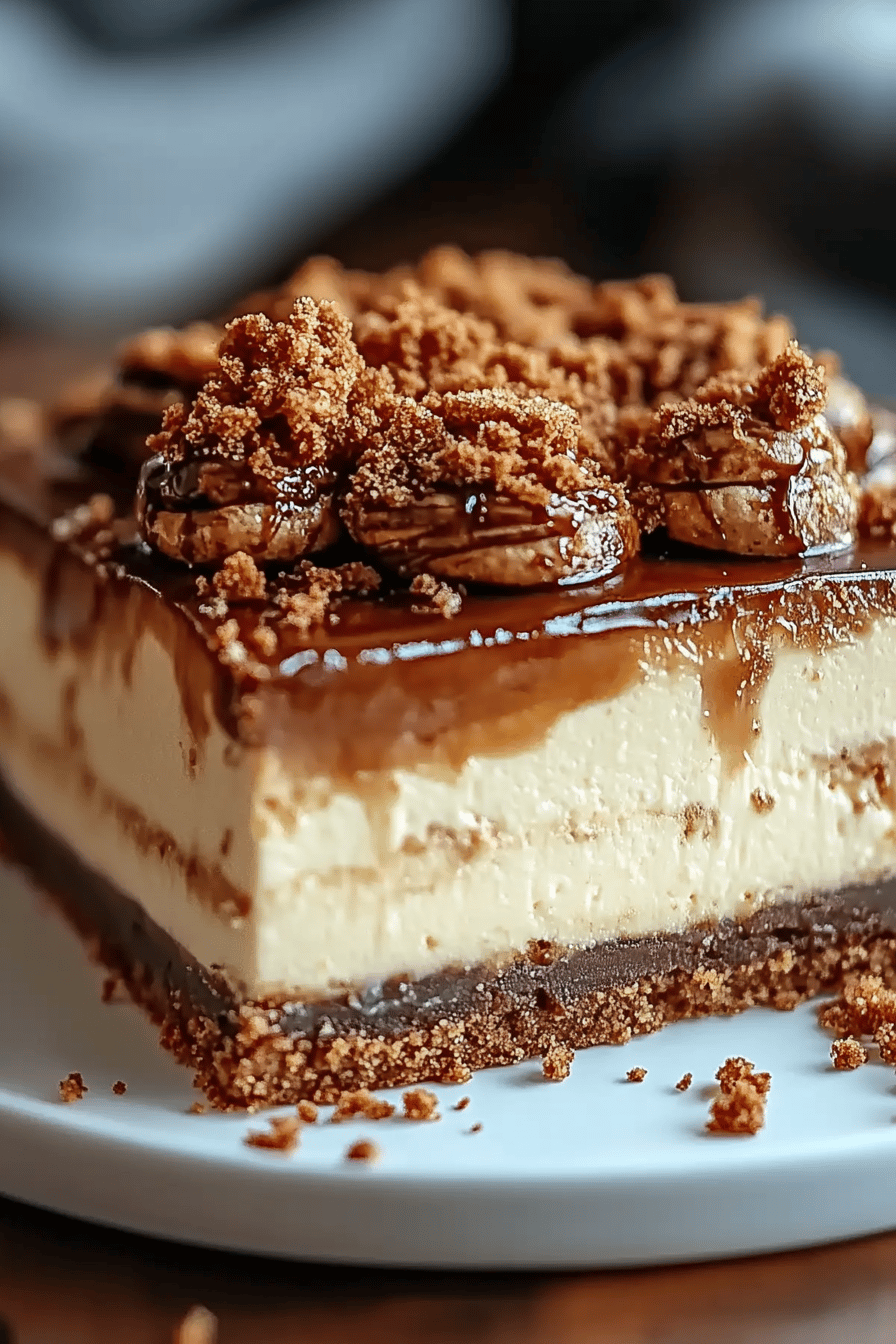
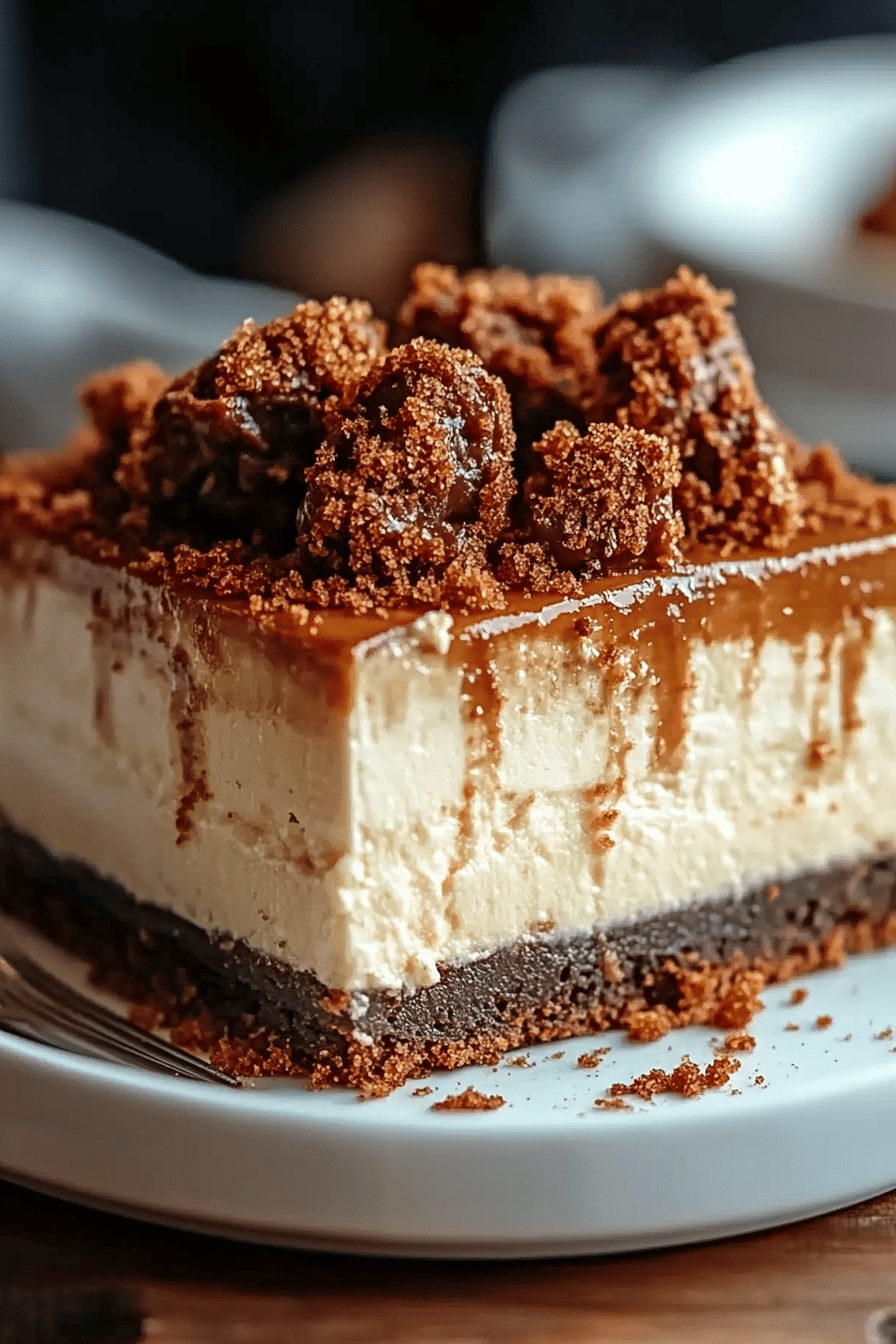
So, what exactly is Biscoff cheesecake? Well, it’s precisely what it sounds like – a glorious marriage between a classic, creamy cheesecake and the utterly addictive flavor of Biscoff cookies, also known as speculoos cookies. Think of your favorite rich, velvety cheesecake, but then imagine infusing every single component with that distinct, warm spice and caramel notes of Biscoff. We’re talking about a crumbly, buttery crust made from crushed Biscoff cookies instead of graham crackers, and a luscious, smooth filling that has a swirl or a generous dollop of Biscoff spread mixed right in. It’s essentially taking a beloved dessert and elevating it with a flavor profile that’s both comforting and excitingly new. It’s not just a topping; the Biscoff flavor is deeply embedded, making every single forkful an adventure in deliciousness.
Why you’ll love this recipe?
What are some of the reasons why Biscoff cheesecake is on my recipe rotation?flavor. Oh my goodness, the flavor! It’s this incredible balance of sweet, creamy, tangy cheesecake with the warm, cinnamon-spiced, slightly caramel notes of the Biscoff cookies. It’s familiar, yet exotic. It’s comforting, yet sophisticated. It’s the kind of dessert that gets rave reviews every single time. And honestly, the simplicity is a huge win for me. While it looks and tastes incredibly fancy, it’s surprisingly straightforward to make. I’ve learned that with a few key techniques, even a novice baker can whip this up and impress everyone. Plus, the Cost-efficiency: What is the best way to measure cost-efficiency? is a big deal in my book. Biscoff spread and cookies are readily available, and the other ingredients are pantry staples. You get a high-end dessert without a high-end price tag! What I love most about this Biscoff cheesecake, though, is its versatility. It’s perfect for a fancy dinner party, a cozy weekend treat, or even a special occasion dessert that your kids will devour. I’ve also found it pairs wonderfully with a strong cup of coffee or even a glass of dessert wine. It really stands out from a standard cheesecake because it has this unique, Spiced Cookie character that just makes it sing.
How to Make Biscoff Cheesecake
Quick Overview
Making this Biscoff cheesecake is a journey of deliciousness, and I promise it’s simpler than you think! We start by creating a wonderfully crisp crust from crushed Biscoff cookies. Then, we whip up a silky smooth, rich cheesecake filling that gets a generous swirl of Biscoff spread for that signature flavor. The magic happens in the oven, where it bakes to perfection, and then it needs a little patience to chill out and set up. The final touch is a luscious Biscoff glaze. It’s a straightforward process, and each step builds on the last to create something truly spectacular. You’ll be amazed at how easy it is to achieve such decadent results!
Ingredients
For the Crust:
2 cups Biscoff cookie crumbs (about 25-30 cookies, finely crushed)
1/4 cup granulated sugar
1/2 cup unsalted butter, melted
Tip: I find that using a food processor to crush the Biscoff cookies gives the most consistent crumb size, which makes for a sturdier crust. If you don’t have one, just pop them in a zip-top bag and get to work with a rolling pin – it’s a great stress reliever! Make sure your butter is fully melted and warm; it helps bind the crumbs together nicely.
For the Filling:
3 (8-ounce) blocks Cream Cheese, softened to room temperature
1 1/4 cups granulated sugar
1/4 cup all-purpose flour
“Made the Biscoff cheesecake tonight and wow — perfect weeknight dinner. Will definitely make again!”
1 teaspoon vanilla extract
1/2 cup sour cream, at room temperature
2 large eggs, at room temperature
1/2 cup Biscoff spread (creamy or crunchy, your preference!)
Tip: Softened Cream Cheese is non-negotiable here. If it’s too cold, you’ll end up with lumps, and nobody wants that in their cheesecake. I usually leave mine out on the counter for at least an hour, sometimes longer if it’s chilly in my kitchen. The flour might seem strange, but it helps prevent the cheesecake from cracking, which is a lifesaver for that smooth, perfect finish. And room temperature sour cream and eggs blend in so much better, giving you that incredibly smooth texture.
For the Glaze:
1/2 cup Biscoff spread
2 tablespoons milk or heavy cream
1/4 teaspoon salt
Tip: The glaze is super simple, but key to that extra Biscoff punch. If it’s too thick, add a tiny splash more milk or cream until it reaches a pourable consistency. If it’s too thin, pop it in the fridge for a few minutes to firm up slightly.
Step-by-Step Instructions
Step 1: Preheat & Prep Pan
First things first, let’s get our oven ready. Preheat it to 325°F (160°C). Now, grab a 9-inch springform pan. This is the best pan for cheesecakes because it makes releasing the finished product so much easier. You’ll want to lightly grease the bottom and sides of the pan. Sometimes, I even like to line the bottom with a circle of parchment paper just to be extra sure nothing sticks. Trust me, dealing with a stuck cheesecake is no fun!
Step 2: Mix Dry Ingredients
In a medium bowl, combine your Biscoff cookie crumbs and granulated sugar. Give them a good whisk together until they’re well combined. This is where the magic starts to happen for that crust!
Step 3: Mix Wet Ingredients
Pour the melted butter into the bowl with the dry ingredients. Stir everything together until the crumbs are evenly moistened and look like wet sand. This mixture will hold together when you press it.
Step 4: Combine
Press this crumb mixture firmly and evenly into the bottom of your prepared springform pan. I like to use the bottom of a glass or a measuring cup to get it really packed down. Make sure you bring it up the sides just a tiny bit, maybe about half an inch, to create a slight edge. Then, pop that crust into the freezer while you prepare the filling. This helps it set up so it doesn’t crumble when you slice into it later.
Step 5: Prepare Filling
Now for the star of the show: the filling! In a large bowl, beat the softened Cream Cheese with an electric mixer on medium speed until it’s completely smooth and creamy. This might take a couple of minutes. Gradually beat in the granulated sugar and flour until just combined and smooth. Don’t overmix here; we want to avoid incorporating too much air. Add the vanilla extract and sour cream and beat on low speed until just incorporated. Then, add the eggs, one at a time, beating on low speed until each is just blended in. Scrape down the sides of the bowl as needed to make sure everything is incorporated.
“I don’t know if I’ve ever eaten a better Biscoff cheesecake. The rub alone is wonderful, but the sauce??? Over the top!”
Step 6: Layer & Swirl
Take your chilled crust out of the freezer. Pour about two-thirds of the cheesecake filling into the crust. Dollop spoonfuls of the Biscoff spread over the filling. Then, carefully pour the remaining one-third of the cheesecake filling on top. Now comes the fun part: swirling! Take a knife or a skewer and gently swirl the Biscoff spread into the filling. Don’t overdo it; you want distinct ribbons of Biscoff, not a fully blended color. You can drag the knife through the batter in zigzags or swirl it around.
Step 7: Bake
Wrap the bottom of your springform pan tightly with a double layer of heavy-duty aluminum foil. This is crucial for a water bath, which helps the cheesecake bake evenly and prevents cracking. Place the foil-wrapped pan into a larger baking pan (like a roasting pan). Carefully pour hot water into the larger pan, coming about halfway up the sides of the springform pan. Bake for 60-75 minutes, or until the edges are set and the center is still slightly jiggly when you gently shake the pan. Once it’s done, turn off the oven, crack the door open slightly, and let the cheesecake cool in the oven for another hour. This gradual cooling is another key to preventing cracks!
Step 8: Cool & Glaze
After the hour in the oven with the door ajar, carefully remove the cheesecake from the water bath and remove the foil. Let it cool completely on a wire rack at room temperature. Once it’s fully cooled, cover it loosely with plastic wrap and refrigerate for at least 6 hours, but preferably overnight. This is where the flavors meld and the cheesecake firm up properly. About 30 minutes before you’re ready to serve, make the glaze. Gently warm the Biscoff spread with the milk or cream and salt in a small saucepan over low heat, stirring until smooth and pourable. Let it cool slightly.
Step 9: Slice & Serve
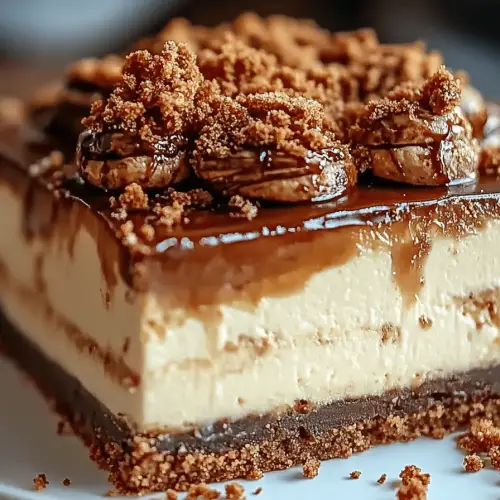
Once chilled, carefully run a thin knife around the edge of the cheesecake before releasing the sides of the springform pan. Drizzle the slightly cooled Biscoff glaze over the top. If you have any extra Biscoff cookies, you can crumble a few on top for decoration. For the cleanest slices, dip a sharp knife in hot water, wipe it dry, and then slice. Repeat with each slice. Enjoy the pure bliss!
What to Serve It With
This Biscoff cheesecake is honestly a star all on its own, but I love playing around with what to serve alongside it to make it even more special. For Breakfast, though it sounds indulgent, a thin slice with a strong, hot coffee is pure heaven. The spice in the cheesecake just wakes up your palate. Sometimes, if I’m feeling extra fancy, I’ll pair it with a small dollop of whipped cream and a few fresh berries for a pop of color and freshness. For Brunch, I like to elevate the presentation. Think of it as part of a beautiful spread. I’ll serve it on a pretty cake stand, perhaps with a side of Greek yogurt mixed with a tiny bit of honey and some toasted nuts for crunch. A mimosa or a sparkling cider is always a welcome companion. When it’s As Dessert, this is where it truly shines. After a nice dinner, I’ll serve a generous slice, maybe with a scoop of vanilla bean Ice Cream or a drizzle of chocolate sauce. A small glass of port or a sweet dessert wine is a lovely pairing. And for those For Cozy Snacks moments, when you just need a little something sweet after a long day? This cheesecake is your answer. I’ll have a slice with a warm cup of tea or even a glass of cold milk. It’s pure comfort food. My family tradition is to have it after our Sunday roast; it’s become a much-anticipated part of our weekend.
Top Tips for Perfecting Your Biscoff Cheesecake
I’ve made this Biscoff cheesecake more times than I can count, and through all those batches, I’ve picked up a few tricks that I think really make a difference. When it comes to the crust, really mixing the Biscoff crumbs properly with the melted butter is key. You want it to feel like damp sand that clumps together when you squeeze it. Pressing it firmly into the pan is also crucial for a crust that doesn’t fall apart. For the mixing advice on the filling, the biggest thing is to avoid overmixing once you add the eggs. Beat on low speed and just until they’re incorporated. Overbeating can lead to a soufflé-like texture and a cracked top. And speaking of cracks, the water bath is your best friend! It ensures a gentle, even bake, which is critical for preventing those dreaded fissures. If you’re feeling artistic, the swirl customization is where you can really play. Don’t over-swirl; you want those beautiful ribbons of Biscoff to stand out. For ingredient swaps, if you can’t find Biscoff cookies, graham crackers are a decent substitute for the crust, but you’ll miss that unique speculoos flavor. You can also use creamy or crunchy Biscoff spread interchangeably; it just adds a textural element. When it comes to baking tips, I always recommend using an oven thermometer if you have one, as oven temperatures can vary. Don’t be afraid to let it cool in the oven with the door ajar; that slow cooling is so important. For the glaze variations, while the simple Biscoff glaze is divine, you could also try a White Chocolate drizzle or even a caramel sauce if you want to mix things up. Just make sure the cheesecake is fully chilled before adding any toppings.
Storing and Reheating Tips
Storing this Biscoff cheesecake is pretty straightforward, but a few things will help keep it tasting amazing. For room temperature storage, it’s best to keep it covered loosely with plastic wrap for no more than 2 hours. After that, the dairy can start to spoil, and you don’t want to risk it. If you’ve already glazed it, keep it covered. For refrigerator storage, this is where cheesecakes really shine. Once it’s completely cooled and you’ve potentially glazed it, cover the entire cheesecake tightly with plastic wrap or aluminum foil. It should stay fresh and delicious in the fridge for up to 5 days. The flavors actually tend to deepen and meld beautifully over the first day or two! If you have leftover slices, store them in an airtight container. For freezer instructions, this cheesecake freezes surprisingly well, though I always prefer it fresh! If you’re going to freeze it, do it before adding the glaze. Wrap it very well in a double layer of plastic wrap, followed by a layer of aluminum foil. It can be kept in the freezer for up to 2 months. To thaw, remove it from the freezer and let it defrost in the refrigerator overnight. You can add the glaze once it’s thawed. The glaze timing advice is important: it’s best to add the glaze just before serving, or at least within a few hours of serving if it’s been refrigerated. If it sits too long on top, it can sometimes seep into the cheesecake or become a bit sticky.
Frequently Asked Questions
Final Thoughts
There you have it – my absolute favorite Biscoff cheesecake recipe! It’s a dessert that truly brings joy, whether I’m making it for a special occasion or just because. The blend of creamy cheesecake and that distinctive Biscoff spice is just pure magic, and the ease with which it comes together means you can enjoy this decadent treat more often than you might think. If you love this recipe, you might also enjoy my classic New York cheesecake or my no-bake chocolate raspberry cheesecake for more dessert inspiration. Don’t be afraid to make this your own – maybe add some extra Biscoff cookie crumbles on top, or try a different swirling technique! I can’t wait to hear how yours turns out. Let me know in the comments below if you try it, or if you have any amazing variations to share! Happy baking, everyone!
Biscoff cheesecake
Ingredients
Crust
- 200 grams Biscoff cookies crushed
- 75 grams unsalted butter melted
Cheesecake Filling
- 900 grams cream cheese softened
- 200 grams granulated sugar
- 3 large eggs
- 120 ml heavy cream
- 1 teaspoon vanilla extract
- 150 grams Biscoff spread melted
Topping
- 100 grams Biscoff spread
- 50 grams Biscoff cookies crumbled, for garnish
Instructions
Preparation Steps
- Preheat oven to 160°C (325°F). Line the bottom of a 23cm (9-inch) springform pan with parchment paper.
-
For the crust, combine crushed Biscoff cookies and melted butter. Press the mixture firmly into the bottom of the prepared springform pan.200 grams Biscoff cookies
- Bake the crust for 10 minutes. Remove from oven and let cool while preparing the filling.
-
In a large bowl, beat the softened cream cheese and granulated sugar until smooth and creamy.200 grams Biscoff cookies
-
Add the eggs one at a time, beating well after each addition. Stir in the heavy cream and vanilla extract.200 grams Biscoff cookies
-
Gently fold in the melted Biscoff spread until just combined. Do not overmix.200 grams Biscoff cookies
- Pour the filling over the prepared crust and spread evenly.
- Bake for 50-60 minutes, or until the edges are set and the center is still slightly jiggly. Turn off the oven and let the cheesecake cool in the oven with the door ajar for 1 hour.
- Remove from oven and let cool completely on a wire rack. Chill in the refrigerator for at least 4 hours, or preferably overnight.
-
To serve, gently warm the Biscoff spread for the topping until pourable. Drizzle over the chilled cheesecake. Garnish with crumbled Biscoff cookies.200 grams Biscoff cookies


