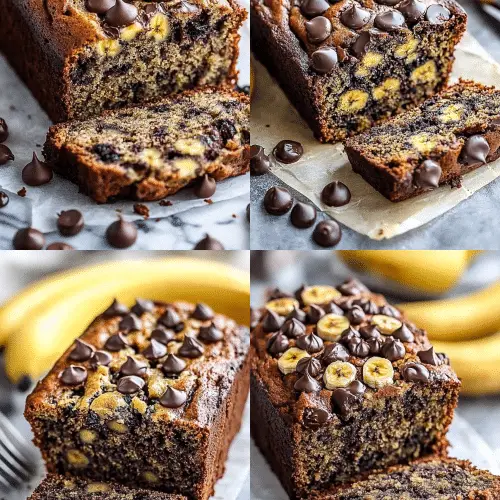
There are some recipes that just feel like home, you know? The ones that fill your kitchen with the most incredible, comforting aromas, the kind that make everyone wander in from wherever they are, sniffing the air with happy anticipation. For me, that recipe is my zucchini Banana Bread. It’s not just a quick bread; it’s a little piece of edible happiness, perfect for those moments when you need something sweet but don’t have hours to spend in the kitchen. Honestly, it’s even better than a regular banana bread because the zucchini makes it unbelievably moist and just a touch more wholesome, without ever tasting like, well, zucchini. My kids, who are notorious picky eaters, gobble this up without a second thought. It’s become our weekend ritual, and sometimes, on a Tuesday afternoon when things feel a bit hectic, it’s exactly what we need to hit the reset button.
Thank you for reading this post, don't forget to subscribe!What is Zucchini Banana Bread?
So, what exactly is this magical thing we’re talking about? Think of it as your favorite, super-Moist banana bread, but with a secret ingredient that makes it even better: zucchini! Don’t let that fool you; you won’t taste the zucchini at all. Instead, it lends an incredible tenderness and moisture to the bread, making it melt-in-your-mouth delicious. It’s essentially a way to use up those extra zucchinis from the garden (or the grocery store sale rack!) and transform them into something utterly delightful. It’s not a cake, it’s not a pie, it’s that perfect in-between that’s hearty enough for breakfast but decadent enough for dessert. It’s the ultimate comfort food, baked into a portable, shareable loaf that makes everyone feel a little bit special.
Why you’ll love this recipe?
There are so many reasons why this zucchini Banana Bread has become my absolute favorite, and I’m pretty sure it’ll become yours too. First off, the flavor is just out of this world. You get that classic, sweet banana goodness, but it’s perfectly balanced. Then, there’s the texture – oh, the texture! It’s impossibly moist and tender, thanks to the star ingredient, zucchini. It’s the kind of bread that doesn’t need much fuss, making it incredibly simple to whip up. Seriously, even if you’re new to baking, you can totally nail this. Plus, it’s super cost-effective. Bananas, flour, sugar, and a zucchini are pretty budget-friendly staples, making this a treat that won’t break the bank. What I love most about this is its versatility. It’s fantastic on its own, of course, but it’s also a perfect base for a little something extra. We’ll get into some ideas later, but trust me, it handles additions like a champ. It’s honestly a lifesaver when I have overripe bananas staring at me from the fruit bowl and I want to make something special without a huge commitment. It’s the kind of recipe that makes you feel like a baking wizard, even on your busiest days. Forget those dry, crumbly quick breads you might have tried in the past; this one is a game-changer.
How do you make Zucchini Banana Bread?
Quick Overview
The process is delightfully simple. You’ll mash your ripe bananas, mix them with wet ingredients, then stir in your dry ingredients until just combined. The grated zucchini gets folded in, and then it’s into the oven for a magical transformation. The key is not to overmix, which is a mantra for most quick breads, and a little trick I learned after a few less-than-perfect loaves years ago. The result is a moist, flavorful loaf that smells like pure heaven as it bakes. It’s truly as easy as that!
Ingredients
For the Main Batter:
3 very ripe bananas, mashed (the spottier, the better! They’re sweeter and easier to mash)
1/2 cup unsalted butter, melted (or your favorite neutral oil like canola or vegetable oil)
2 large eggs, at room temperature (this helps them incorporate better)
1 teaspoon vanilla extract (don’t skimp on this, it adds so much warmth!)
1 and 1/2 cups all-purpose flour (I use unbleached, but bleached works too)
3/4 cup granulated sugar (you can adjust this slightly depending on how sweet your bananas are)
1 teaspoon baking soda (essential for that lift!)
1/2 teaspoon salt (enhances all the flavors)
1/2 teaspoon ground cinnamon (optional, but it adds such a cozy note)
For the Filling (Optional, but highly recommended!):
1 cup finely chopped walnuts or pecans (or chocolate chips if that’s more your style!)
1 tablespoon Brown Sugar
1/2 teaspoon ground cinnamon
For the Glaze:
1 cup powdered sugar
2-3 tablespoons milk (any kind will do, even water in a pinch!)
1/4 teaspoon vanilla extract (optional, for a little extra flavor)
“Packed with flavor and so simple. Exactly what I wanted from this banana bread!”
Step-by-Step Instructions
Step 1: Preheat & Prep Pan
First things first, get that oven preheated to 350°F (175°C). While it’s warming up, grab a standard 9×5 inch Loaf Pan. I like to grease it really well with butter or baking spray, and then dust it lightly with flour, tapping out any excess. This ensures your beautiful bread won’t stick. If you have parchment paper, you can also line the bottom and sides of the pan with it for extra insurance – that’s my secret weapon for perfectly easy removal!
Step 2: Mix Dry Ingredients
In a medium-sized bowl, whisk together the flour, baking soda, salt, and cinnamon (if you’re using it). Give it a good whisk to make sure the baking soda and salt are evenly distributed. This step is important for an even rise and a consistent flavor throughout the bread. Nobody wants a pocket of unmixed baking soda, right?
Step 3: Mix Wet Ingredients
In a larger bowl, mash your ripe bananas with a fork until they’re mostly smooth. A few small lumps are totally fine! Then, pour in the melted butter (or oil) and whisk it in. Crack in your eggs, one at a time, whisking after each addition until they’re well combined. Finally, stir in the vanilla extract. You should have a lovely, smooth, banana-y wet mixture.
Step 4: Combine
Now, it’s time to bring the wet and dry ingredients together. Pour the dry ingredients into the wet ingredients. Using a spatula or wooden spoon, gently fold them together until *just* combined. I can’t stress this enough: do NOT overmix! A few streaks of flour are okay; they’ll disappear during baking. Overmixing develops the gluten too much, which can lead to a tough, dense bread. We want tender, fluffy, and moist!
Step 5: Prepare Filling
If you’re adding the optional filling, now’s the time to mix it up. In a small bowl, combine the chopped nuts (or chocolate chips!), brown sugar, and cinnamon. Give it a quick stir. This little bit of sweetness and spice layered in will make your bread extra special.
Step 6: Layer & Swirl
Now for the fun part! Add about half of your batter to the prepared loaf pan and spread it evenly. Sprinkle about half of your nut/chocolate chip mixture over the top. Then, add the remaining batter and sprinkle the rest of the filling on top. If you’re feeling fancy, you can run a knife or skewer through the batter in a swirl pattern to get a beautiful marbling effect. This is purely for looks, but it does make it extra pretty!
Step 7: Bake
Pop the loaf pan into your preheated oven. Bake for about 50-65 minutes. The exact time can vary depending on your oven, so keep an eye on it. You’ll know it’s done when a toothpick inserted into the center comes out clean (or with a few moist crumbs attached, but no wet batter). If the top starts to brown too quickly, you can loosely tent it with aluminum foil for the last 15-20 minutes.
Step 8: Cool & Glaze
Once baked, carefully remove the loaf pan from the oven and let the bread cool in the pan for about 10-15 minutes. This allows it to set up a bit. Then, gently turn it out onto a wire rack to cool completely. While it’s cooling, whisk together the powdered sugar, milk, and vanilla extract for the glaze. Start with 2 tablespoons of milk and add more, a teaspoon at a time, until you reach your desired drizzling consistency. Once the bread is completely cool, drizzle the glaze over the top. Don’t glaze it while it’s warm, or it’ll all just melt off!
“New family favorite! This banana bread was so flavorful and ridiculously easy. Crowd-pleaser for sure.”
Step 9: Slice & Serve
Once the glaze has set slightly, it’s time to slice and enjoy! Use a sharp knife for clean cuts. This banana bread is absolutely divine served slightly warm or at room temperature. It’s wonderful with a cup of coffee or tea. Trust me, the smell alone will have people gathering!
What to Serve It With
This zucchini banana bread is a star all on its own, but it also pairs beautifully with so many things! For a relaxed breakfast, a thick slice alongside a steaming mug of coffee or a creamy latte is pure bliss. I sometimes toast it lightly and spread a thin layer of butter – it’s divine. For a more elaborate brunch spread, I love to serve it with a fruit salad and perhaps some yogurt. It adds a touch of homemade goodness that guests always rave about. As a simple dessert, it’s fantastic warm, maybe with a tiny scoop of vanilla ice cream or a dollop of whipped cream. My family often requests it as a cozy snack after school or in the evening. A glass of cold milk is the perfect accompaniment for that. Sometimes, I’ll spread a little cream cheese on a slice, and it’s like a whole new level of deliciousness. It’s just one of those versatile treats that fits into any part of your day.
Top Tips for Perfecting Your Zucchini Banana Bread
Over the years, I’ve learned a few tricks that make this zucchini banana bread absolutely perfect every single time. For the zucchini, I always grate it on the large holes of a box grater. Then, I give it a good squeeze with my hands to get out as much excess moisture as possible. This step is crucial! Too much water from the zucchini can make the bread soggy. For mixing, remember the mantra: gentle and just combined. Seriously, resist the urge to beat the batter into submission. When you fold in the dry ingredients, stop as soon as you don’t see large pockets of dry flour. A few small lumps are your friends here. For the swirl, don’t overthink it! A simple zigzag with a knife looks great and ensures you get some of that yummy filling in every bite. If you’re feeling adventurous with the filling, try adding a tablespoon of cocoa powder to half the batter for a marbled chocolate-banana effect, or some shredded coconut for a tropical twist. When it comes to baking, know your oven. If you find your loaves often brown too quickly on top, don’t hesitate to loosely tent them with foil. A simple toothpick test is the best way to gauge doneness – moist crumbs clinging to it mean it’s ready. For the glaze, if it’s too thick, just add a tiny bit more milk; if it’s too thin, add a bit more powdered sugar. It’s very forgiving! I’ve even experimented with using a blend of almond flour and all-purpose flour, and while it changes the texture slightly, it’s a delicious gluten-free option if needed. The key is to embrace the process and not be afraid to tweak things a little to your preference.
Storing and Reheating Tips
This zucchini banana bread is so delicious, it rarely lasts long in my house, but when it does, I’ve got a few go-to storage methods. For short-term storage, keeping it at room temperature is perfectly fine for about 2-3 days. Just wrap it tightly in plastic wrap or place it in an airtight container. If you’ve already glazed it, make sure the glaze has hardened completely before wrapping. If you think you’ll need it for longer, pop it in the refrigerator. It will stay fresh for up to a week in an airtight container. The moisture from the zucchini actually helps it stay quite good in the fridge. For long-term storage, freezing is your best friend! Wrap the cooled loaf tightly in plastic wrap, then in a layer of aluminum foil, or place it in a heavy-duty freezer bag. It’ll keep beautifully for up to 3 months. To thaw, simply unwrap it and let it sit at room temperature for a few hours, or gently warm it in a low oven (around 300°F / 150°C) for about 10-15 minutes. If you’re freezing it unfrosted, you can apply the glaze after it’s thawed and slightly warmed. It reheats really well and still tastes fantastic!
Frequently Asked Questions
Final Thoughts
This zucchini banana bread is more than just a recipe for me; it’s a little taste of home, a quick hug in loaf form that I can share with my favorite people. It’s the perfect example of how simple ingredients, treated with a little bit of care, can create something truly magical. The fact that it’s incredibly moist, packed with flavor, and surprisingly easy to make makes it a winner in my book, every single time. If you’re looking for a way to use up those overripe bananas and a few extra zucchinis, or just craving a comforting treat, I truly hope you give this a try. It’s a recipe that’s stood the test of time in my kitchen, and I’m so excited for you to make it your own. Let me know in the comments below how yours turns out, or if you have any fun variations you love to add! Happy baking!
banana bread
Ingredients
Main Ingredients
- 3 large ripe bananas
- 0.5 cup unsalted butter melted
- 0.75 cup granulated sugar
- 1 large egg
- 1 teaspoon vanilla extract
- 1.5 cup all-purpose flour
- 1 teaspoon baking soda
- 0.25 teaspoon salt
- 0.5 cup chopped walnuts optional
Instructions
Preparation Steps
- Preheat oven to 350°F (175°C). Grease and flour a 9x5 inch loaf pan.
- In a large bowl, mash the ripe bananas with a fork. Stir in the melted butter and sugar.
- Beat in the egg and vanilla extract until well combined.
- In a separate bowl, whisk together the flour, baking soda, and salt.
- Gradually add the dry ingredients to the wet ingredients, mixing until just combined. Do not overmix.
- Fold in the chopped walnuts, if using.
- Pour the batter into the prepared loaf pan and spread evenly.
- Bake for 55-65 minutes, or until a toothpick inserted into the center comes out clean.
- Let the banana bread cool in the pan for 10 minutes before inverting it onto a wire rack to cool completely.