There’s nothing quite like the smell of something baking in the oven, especially on a busy weeknight when I’m juggling work, kids, and a million to-dos. My all-time favorite go-to is this little marvel I call the Sheet Pan pie. It’s basically my secret weapon — a cozy, flaky crust filled with whatever’s in the fridge, baked to golden perfection on a single sheet pan. I’ve made this countless times, and honestly, it never fails to bring smiles around the table. Sometimes I add sweet cherries, other times I go full savory — think roasted veggies and cheese. It’s surprising how simple ingredients can come together into something so crowd-pleasing. Plus, it’s a one-pan wonder, which means less cleanup and more time to enjoy the moment. My kids ask for this all the time — they say it’s like a giant slice of comfort food. Trust me, once you try this sheet pan pie, it’ll become a staple in your kitchen too!
Thank you for reading this post, don't forget to subscribe!What is a sheet pan pie?
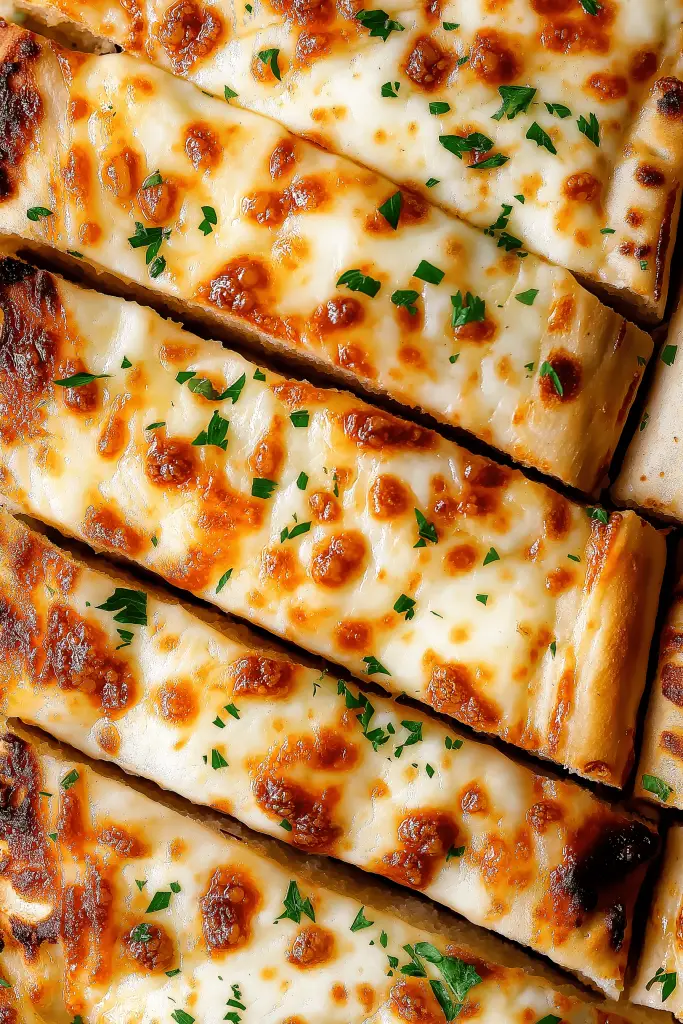
Think of a Sheet Pan pie as a rustic, freeform pie baked directly on a baking sheet. It’s essentially a cross between a classic pie and a savory or sweet tart, but without the fuss of individual crusts or complicated shaping. The name comes from the simplicity — no fancy pie dish needed! You start with a generous layer of crust, pile on your filling, and then fold or swirl the edges, giving it that charming, homemade look. It’s perfect for cozy family dinners, casual weekend brunches, or even a quick dessert when you’re craving something sweet but don’t want to turn on the oven for hours. Essentially, it’s a flexible, stress-free way to enjoy the flaky, buttery goodness of a pie with way less mess, and a little more personality. And because it’s baked on a sheet pan, you get that crispy, golden crust all around—no soggy bottoms here!’
Why you’ll love this recipe?
What I love most about this sheet pan pie is how it combines ease with incredible flavor. The smell alone when it’s baking is enough to bring everyone rushing into the kitchen — that warm butter, the mingling of sweet and savory aromas. It’s a total crowd-pleaser, and honestly, it’s like the hug you never knew you needed after a hectic day. Plus, this recipe is budget-friendly because you can use pantry staples or leftovers – a bit of cheese, some veggies, a splash of fruit jam, or anything that’s calling your name. It’s so versatile, too. My family loves it as brunch, but it makes a perfect dinner side or even a fancy-ish dessert with a scoop of ice cream. What I really love is that you can customize it endlessly. Switch up the fillings, make it vegetarian or add in some cooked sausage — it’s totally forgiving. And because it’s baked in One Pan, cleanup is a breeze, which makes it a lifesaver on busy nights. Honestly, there’s something so satisfying about slicing into this warm, flaky masterpiece and seeing all those layers of flavor ooze out just right. Plus, it’s a great way to impress guests without any stress — rustic, pretty, and totally delicious.
How do I make a sheet pan pie?
Quick Overview
This Sheet Pan pie is a little bit rustic, a little bit fancy — perfect for when you want that homemade vibe without hours of prep. You start with a simple flaky crust, spread your filling in the center, and then fold the edges over, creating a freeform look. Pop it in the oven and bake until the crust is golden and bubbly. It’s amazingly forgiving; even if you’re new to baking, you’ll find that this comes together quickly and easily. I love that you can prep this in under 30 minutes, and the oven does all the heavy lifting. The best part? You get a gorgeous, hot pie with crispy edges and tender filling that slices up beautifully.
Ingredients
For the main battery or crack: For the main battery or crack: For the main battery or crack:
– 2 ½ cups all-purpose flour (or a gluten-free blend if you prefer)
– 1 teaspoon salt
– 1 teaspoon sugar (adds a touch of sweetness in savory versions)
– 1 cup cold unsalted butter, cut into cubes (trust me on this — cold butter makes a flakier crust)
– 4-6 tablespoons ice water (add gradually, you don’t want it too wet or dry)
For the Filling:
– 1 ½ cups chopped vegetables (think zucchini, bell peppers, cherry tomatoes — whatever’s in season)
– 1 cup shredded cheese (cheddar, mozzarella, feta — I love a mix)
– 1 cup cooked protein (optional, like cooked chicken, ham, or sautéed tofu)
– 1-2 tablespoons Olive oil or melted butter
– Salt and pepper to taste
– Herbs, spices, or even a splash of balsamic vinegar for extra flavor
For the Glaze or Finish:
– 1 egg beaten (for a shiny, golden crust)
– Optional: a drizzle of honey or a sprinkle of coarse sea salt for finishing touches
“Made the Baked Pie Perfection How Easy It Is tonight and wow — perfect weeknight dinner. Will definitely make again!”
Step-by-Step Instructions
Step 1: Preheat & Prep Pan
Preheat your oven to 400°F (200°C). Line a large baking sheet — I use parchment paper or a silicone mat for easy cleanup. Lightly dust your work surface with flour. This is the fun part — take your butter out of the fridge and get ready to cut in! If you’re making your own crust, I always do this first so it has plenty of time to chill.
Step 2: Mix Dry Ingredients
In a big bowl, whisk together the flour, salt, and sugar if using. If you prefer a super flaky crust, make sure your butter is cold and cut into small cubes before tossing it in. Use a pastry cutter or your fingers to mix until the mixture resembles coarse crumbs — kinda like damp sand. This step is crucial because it’s what makes your crust light and flaky rather than dense.
Step 3: Mix Wet Ingredients
Slowly add the ice water, one tablespoon at a time, mixing gently with a fork or spatula after each addition. The goal is to bring the dough together without overworking it — you want it just moist enough to hold together when pressed. When it starts to come together and isn’t crumbly, you’re good to go.
Step 4: Combine
Flatten the dough into a disk, wrap it in plastic wrap, and chill in the fridge for about 20-30 minutes. This helps hydrate the flour and makes rolling easier. While it chills, prep your fillings — chop veggies, grate cheese, and get everything ready for assembly.
Step 5: Prepare Filling
Mix your veggies and protein with a drizzle of olive oil, a seasoning splash, and herbs if you’re feeling fancy. Think of this as the flavor centerpiece. It’s okay to get creative here — I’ve even thrown in sliced apples with cinnamon for a sweet version that disappeared in minutes at my house.
Step 6: Layer & Swirl
Roll out your chilled dough on a lightly floured surface into a roughly 12×12-inch square. Transfer it to your prepared pan. Spread your filling in the center, leaving about an inch border. Fold the edges over, pinching slightly to seal or just crimping for a rustic look. Use a fork or your fingers to press down the edges and create a pretty border.
Step 7: Bake
Brush the crust edges with beaten egg for that gorgeous shine. Bake for about 25-30 minutes, or until the crust is a deep golden brown and the filling is bubbling. Keep an eye on it toward the end — every oven is a little different. If the edges brown too quickly, tent them with foil.
Step 8: Cool & Glaze
Let your sheet pan pie cool just a few minutes before slicing. If you want a shiny top, brush lightly with more beaten egg or honey. This helps keep the crust crispy and adds a touch of sweetness or extra flavor. My secret: I always add the glaze right before serving for that perfect shiny finish.
Step 9: Slice & Serve
Use a sharp serrated knife — I love a good bread knife here — to cut big, satisfying slices. Serve warm with a side salad or a dollop of sour cream or yogurt. It’s just so comforting, especially on chilly evenings or when you’re craving something satisfying but not overly complicated.
“New family favorite! This Baked Pie Perfection How Easy It Is was so flavorful and ridiculously easy. Crowd-pleaser for sure.”
What to Serve It With
This sheet pan pie is remarkably versatile! For breakfast, serve with some fresh fruit and coffee — think of it as a savory-sweet start to the day. At brunch, throw in a side of crispy bacon or a fresh green salad with vinaigrette. As a dinner, pair it with a simple arugula salad with lemon and olive oil — the bright acidity cuts through the richness of the crust and cheese. And for dessert, skip the savory fillings and go wild with berries, apple slices, or even a smear of jam beneath a sweet glaze. Or, just grab a scoop of vanilla ice cream and call it a night. It’s honestly a crowd-pleaser at any meal and a great way to clean out your fridge in the most delicious way. I’ve even taken slices on picnics — it travels beautifully and warms up quick in a toaster oven or microwave.
Top Tips for Perfecting Your Sheet Pan Pie
Over the years, I’ve gathered a few lessons learned that make each attempt better than the last. Here are my top tips:
- Zucchini Prep: Be sure to sprinkle zucchini with a little salt and let it sit for 10 minutes then pat dry. It keeps the filling from getting soggy and helps the veggies stay crisp.
- Mixing Advice: Don’t overmix your dough or batter — I’ve learned that gentle mixing creates flakier crusts. Overworking it, and your crust gets tough.
- Swirl Customization: For a pretty marbled effect, use a toothpick or skewer to swirl slightly after layering the filling. Don’t overdo it — just enough for that stunning look.
- Ingredient Swaps: Tried it with coconut oil or vegan butter? Works beautifully! Just adjust the amount since different fats behave differently in baking.
- Baking Tips: Place your sheet pan on the middle rack for even baking. If the edges brown too fast, cover with foil or rotate halfway through baking.
- Glaze Variations: Experiment with honey, maple syrup, or a dash of vanilla in the glaze for different flavor profiles. Always brush the crust last — the heat helps the glaze set beautifully.
Honestly, I’ve learned that patience — and a little practice — make all the difference. Trust your instincts, and don’t be afraid to get a little messy in the process. The flaky layers and burst of flavor are so worth it, and every mistake is a stepping stone to perfection.
Storing and Reheating Tips
This dish tastes just as good the next day, if you’re lucky enough to have leftovers! For storing, I prefer to keep slices in an airtight container in the fridge for up to 3 days. To reheat, pop it in the toaster oven or oven at 350°F until warm. Be careful not to overheat, or the crust might lose its crispness. If you want to keep the crust crispy, reheat without covering — the steam can make the bottom soggy. If freezing, wrap slices tightly with plastic wrap and then foil, and store for up to a month. Thaw in the fridge overnight and reheat as above. I find that the flavors actually deepen overnight, making it even more delicious the next day. Just wait to add any glaze or finishing touches until just before serving — that keeps everything shiny and fresh-looking!
Frequently Asked Questions
Final Thoughts
Honestly, this sheet pan pie has become a household favorite in my family. It’s the kind of recipe that makes me feel like a hero in the kitchen — minimal effort for maximum flavor. Whether I’m craving something savory after a long day or want a little dessert that’s surprisingly indulgent, this pie always delivers. It’s forgiving enough for weekend experimenting, but reliable enough to pull out of the hat on busy weeknights. I love how versatile it is — you can swap out fillings, add herbs or spices, and make it your own. Plus, seeing that golden crust come out of the oven, bubbling and flaky, is just the best feeling. If you give this a try, I’d love to hear what fillings you loved most or any tweaks you made. Happy baking — and get ready for everyone asking for seconds!
sheet pan pie
Ingredients
Main Ingredients
- 3 pcs store-bought pie crusts
- 42 oz canned blueberry pie filling
- 1 tbsp fresh lemon juice
- 1 tsp lemon zest
- 0.5 tsp almond extract
- 1 pcs egg room temperature
- 1 tsp water
- 2 tsp sanding sugar large crystals
Instructions
Preparation Steps
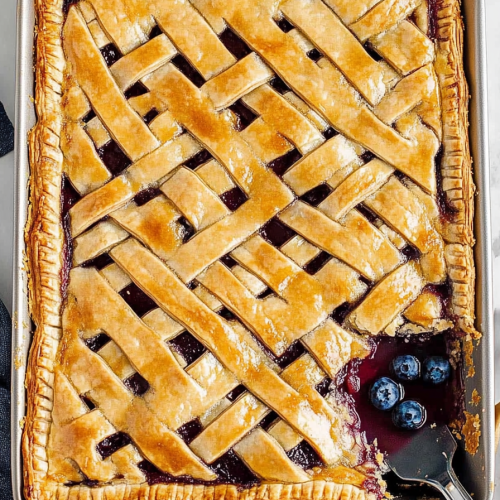
- Preheat oven to 425°F. Prepare a 10 x 15 inch jelly roll pan.
- Let the pie crusts come to room temperature as per package directions, then unroll and place two overlapping in the pan, making sure about 2-3 inches of overhang. Lightly flatten if needed.
- Trim excess dough from the shorter ends with a sharp knife.
- Place excess dough on the longer sides to fill gaps; face rounded edge towards the center. Seal seams with fingers and tuck border edges under.
- On parchment, roll out the third crust into a roughly 11x13 inch rectangle and cut strips ½ to ¾ inch wide. Set aside.
- Mix canned blueberry pie filling, lemon juice, lemon zest, and almond extract in a large bowl.
- Spread the blueberry mixture evenly in the prepared pan.
- Create a lattice top by placing crust strips from the center outward, pressing edges to seal and crimp with a fork.
- Whisk egg and water to make an egg wash. Brush over crust.
- Sprinkle sanding sugar over the crust.
- Bake for 30-35 minutes until golden and filling bubbles.
- Cool completely before slicing and serving.


