Oh, friends, do I have a treat for you today! This isn’t just any recipe; it’s the one I pull out when I need a guaranteed win, the dish that makes everyone in the room smile, and honestly, the one that disappears faster than I can say “more cheese, please!” It all started with a craving a few years back, a desperate need for something warm, gooey, and utterly comforting. I’d tried a few other cheesy concoctions, but they were either too complicated or just… meh. Then, this gem popped into my life, and it’s been a staple ever since. It’s like a hug in a bowl, and the best part? It’s ridiculously easy. Forget those fussy appetizers that require a degree in culinary arts; this baked Cheese Dip is the real deal, a simple yet sophisticated answer to all your cheesy desires. If you’ve ever felt intimidated by making a show-stopping appetizer, this is your sign to dive in!
Thank you for reading this post, don't forget to subscribe!What is Baked Cheese Dip?
So, what exactly is this glorious baked Cheese Dip? Think of it as the ultimate melting pot of deliciousness. It’s a warm, creamy, and incredibly savory dip that’s baked until it’s bubbly and golden brown. At its heart, it’s a celebration of cheese, softened and enriched with a few simple flavor boosters that really make it sing. It’s not a fondue, and it’s definitely not a cold cheese ball. It’s that magical in-between, the perfect consistency for scooping up with crackers, bread, or even veggies. The “baked” part is key – it transforms the ingredients, melding them into a cohesive, irresistible whole that’s far greater than the sum of its parts. It’s basically pure comfort food, elevated just enough to feel special, but grounded enough to be your go-to for any casual gathering or even a cozy night in. Seriously, it’s the kind of food that makes people ask, “What *is* that?” before they’ve even taken a bite!
Why you’ll love this recipe?
There are so many reasons why this baked cheese dip has earned a permanent spot in my recipe collection, and I’m betting you’ll fall just as hard for it. First and foremost, the FLAVOR. Oh, the flavor! It’s a symphony of savory goodness. You get the creamy richness of the cheese, a subtle tang from a secret ingredient (more on that later!), and a hint of garlic and herbs that just makes your taste buds do a happy dance. It’s incredibly satisfying without being heavy. Then there’s the SIMPLICITY. Honestly, this recipe is a lifesaver on busy nights when you need to whip up something impressive with minimal effort. You can practically make it with your eyes closed, and the few steps involved are super straightforward. I’ve made it dozens of times, and it’s never failed me. It’s also wonderfully COST-EFFECTIVE. The ingredients are all pantry staples or easily found at any grocery store, meaning you can create a gourmet-tasting appetizer without breaking the bank. This is a huge win when you’re entertaining a crowd. And let’s talk VERSATILITY! This baked cheese dip is a chameleon. It’s perfect for Game Day, holiday parties, potlucks, or just because you’re craving something amazing. I’ve even served it as a side dish with a hearty stew. What I love most about this recipe is how it bridges the gap between casual and elegant. It feels special enough for guests, but it’s so easy that it’s perfect for a spontaneous get-together or even just a treat for yourself. It’s hands-down one of my favorite ways to use up those random cheeses in the fridge, too, turning them into something spectacular.
How do I make this dreamy baked cheese dip?
Quick Overview
Making this baked cheese dip is a breeze, I promise! The whole process boils down to a few simple steps: prepping your ingredients, mixing them together in a bowl, pouring into a baking dish, and letting the oven work its magic. You’ll be amazed at how quickly you can go from having raw ingredients to a bubbling, golden-brown masterpiece. It’s the kind of recipe that lets you do other things while it bakes, like setting the table or mixing a pitcher of drinks. The minimal fuss and maximum flavor payoff are exactly why I’ve made it my go-to. It’s truly uncomplicated, designed for real life.
Ingredients
For the main creamy base: For the Creamy Base: For the Creamy Base: For the Creamy Base: For the Creamy Base:
This is where the magic really starts to happen. I like to use a combination of cheeses for the best flavor and texture. Cream Cheese is non-negotiable for that super-creamy, luxurious base that holds everything together beautifully. Then, I add a good amount of sharp cheddar – it brings a wonderful tang and that classic cheesy flavor we all crave. For an extra layer of depth, a bit of Monterey Jack or even Gouda works wonders. You want about 8 ounces of cream cheese, softened to room temperature (this is important for smooth blending!), and then about 2 cups of shredded sharp cheddar. If you can, shredding your own cheese from a block makes a *huge* difference in meltability and avoids that chalky texture you sometimes get with pre-shredded cheese. Trust me on this one!
For the Flavor Boosters:
Here’s where we elevate it from good to *unforgettable*. A couple of cloves of garlic, minced, add a pungent kick that’s just divine. I also love to add a dollop of sour cream or Greek yogurt; it adds a lovely tanginess and extra creaminess without making it greasy. And my secret weapon? A teaspoon of Dijon mustard. It sounds odd, but it adds this subtle complexity and a bit of sharpness that cuts through the richness of the cheese perfectly. You can also add a pinch of red pepper flakes for a little warmth if you like things with a tiny bit of a kick. A little sprinkle of salt and Black Pepper to taste is essential, too. Don’t be afraid to experiment here with your favorite herbs like chives or a touch of smoked paprika!
For the Optional Toppings (But Highly Recommended!):
While this baked cheese dip is amazing on its own, a little something extra on top can really make it shine. I often sprinkle a little more shredded cheddar on top before baking for an extra-gooey crust. Sometimes, I’ll add a few finely chopped chives or green onions just before it goes into the oven for a pop of color and fresh flavor. Other times, I’ll finish it with a drizzle of Hot Honey after it bakes, which is absolutely divine. A few crispy bits of cooked bacon are also never, ever a bad idea if you’re feeling decadent.
“Packed with flavor and so simple. Exactly what I wanted from this baked cheese dip!”
Step-by-Step Instructions
Step 1: Preheat & Prep Pan
First things first, let’s get that oven nice and toasty! Preheat your oven to 375 degrees Fahrenheit (about 190 degrees Celsius). While the oven is heating up, grab a small-to-medium-sized oven-safe baking dish. A 7×7 inch or an 8×8 inch dish works perfectly. I usually give mine a quick spritz of non-stick cooking spray, or you can just lightly butter it. This prevents any cheesy goodness from sticking to the pan and makes for much easier cleanup, which is always a win in my book!
Step 2: Mix Dry Ingredients
This step is super simple because we don’t really have “dry” ingredients in the traditional sense for the base. We’ll incorporate the cheeses and flavorings all together in the next step. The key here is ensuring your Cream Cheese is softened, as I mentioned before. If it’s still cold and hard, it’s going to be difficult to get a smooth, creamy consistency, and you might end up with lumps. I usually take my cream cheese out about an hour before I plan to start mixing.
Step 3: Mix Wet Ingredients
In a medium mixing bowl, add your softened Cream Cheese. Then, toss in your shredded cheddar and Monterey Jack (or whichever cheeses you’re using). Add your minced garlic, the dollop of sour cream or Greek yogurt, the Dijon mustard, salt, and pepper. If you’re adding any other spices or herbs to the base mixture at this stage, now’s the time! Use a sturdy spoon or a spatula to mix everything together. It might feel a bit stiff at first, but keep at it. You want to combine everything until it’s well incorporated and starting to look like a cohesive, cheesy mass.
Step 4: Combine
Now, we’re essentially combining everything into one glorious mixture. Continue mixing the ingredients in the bowl until they are thoroughly combined. You’re looking for a thick, creamy, and uniform consistency. There shouldn’t be any big streaks of plain Cream Cheese or separate clumps of shredded cheese. If it feels a *little* too stiff, you can always add another tablespoon of sour cream or even a splash of milk to loosen it up slightly. But remember, it’s going to get even more melty and spreadable once it’s in the oven.
Step 5: Prepare Filling
In this particular recipe, the “filling” is essentially the main cheesy mixture we’ve already combined. However, if you wanted to add extras *into* the dip before baking, this is when you’d do it! For instance, you could stir in some cooked, crumbled bacon, finely diced jalapeños, or even some artichoke hearts. Just make sure anything you add is cooked or prepared as needed. For the basic version, though, our “filling” is ready to go!
Step 6: Layer & Swirl
This step is less about layering and swirling and more about getting our delicious cheesy mixture into the prepared baking dish. Spoon the cheesy mixture evenly into your greased or buttered baking dish. Use your spatula or the back of a spoon to spread it out so it fills the dish evenly. If you’re adding any of those optional toppings like extra shredded cheese, chives, or red pepper flakes, sprinkle them over the top now. This is also where you can create a pretty pattern with some reserved cheese if you like!
Step 7: Bake
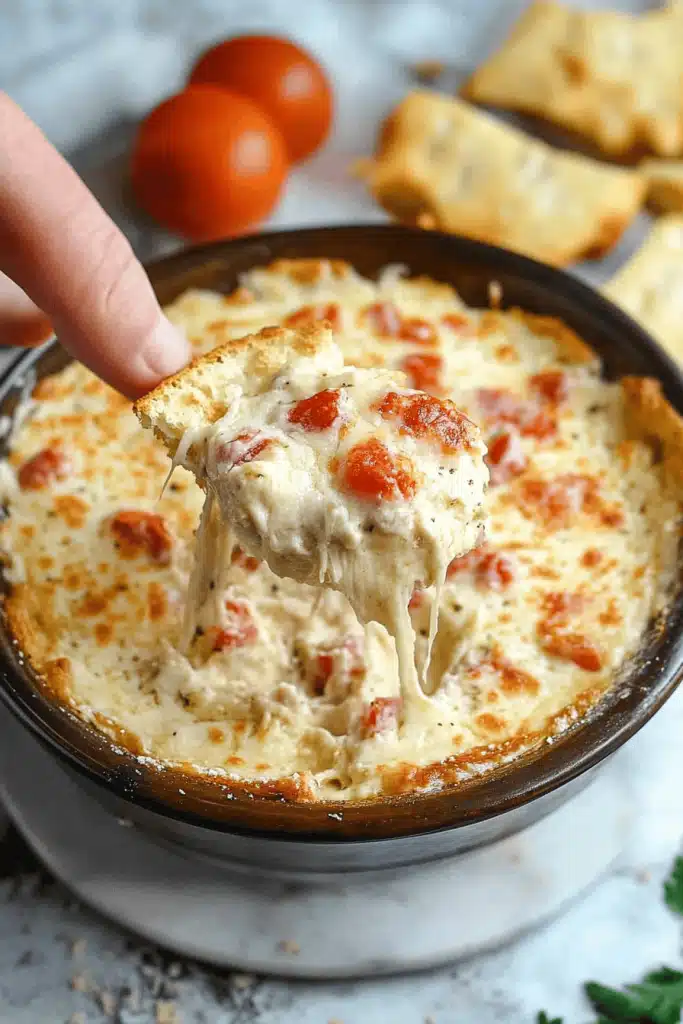
Pop that dish into your preheated oven. You’ll want to bake it for about 20-25 minutes, or until it’s wonderfully hot, bubbly around the edges, and the cheese on top is golden brown and irresistible. Keep an eye on it during the last few minutes, as ovens can vary. You’re looking for that delightful bubbling action – that’s how you know it’s ready to go!
Step 8: Cool & Glaze
Once it’s out of the oven, resist the urge to dive in immediately! Let the baked cheese dip sit for about 5-10 minutes. This allows it to set up just a bit, making it easier to scoop and preventing you from burning your tongue on molten cheese (which, trust me, has happened!). If you’re using a glaze like hot honey, this is the perfect time to drizzle it over the top while it’s still warm. The warmth will help the glaze spread beautifully.
“The baked cheese dip turned out amazing. My kids asked for seconds. Saving this one!”
Step 9: Slice & Serve
Now for the best part! Serve your gorgeous baked cheese dip warm. Provide plenty of dippers like crusty baguette slices, tortilla chips, pita bread, crackers, or an assortment of fresh vegetables like bell pepper strips, carrot sticks, and cucumber slices. I usually place the baking dish right in the center of the table so everyone can dig in. The aroma alone will have people gathering around!
What to Serve It With
This baked cheese dip is incredibly versatile, and pairing it with the right accompaniments can take it from delicious to an absolute showstopper! For a delightful BREAKFAST, I love serving it alongside some fluffy scrambled eggs or alongside a hearty breakfast hash. It adds such a luxurious touch to a weekend morning meal. For BRUNCH, think elegant plating. It’s fantastic alongside mini quiches, fresh fruit platters, and perhaps some smoked salmon. A mimosa or a good cup of coffee is a must! As a decadent DESSERT option (yes, really!), I’ll sometimes add a touch of sweetness to the cheese base, maybe some caramelized onions, and serve it with apple slices or cinnamon-dusted crackers. For those cozy SNACK moments, it’s all about comfort. Serve it with a big bowl of popcorn, some warm pretzels, or even some sturdy potato chips. My kids absolutely love it with chicken tenders dipped in it – don’t knock it till you try it! I’ve also found it’s amazing piled onto baked potatoes or even used as a topping for loaded nachos. The possibilities really are endless, and it’s one of those dishes that can adapt to any meal or occasion.
Top Tips for Perfecting Your Baked Cheese Dip
Over the years, I’ve learned a few tricks that help make this baked cheese dip consistently amazing. When it comes to your CHEESES, like I mentioned, shredding your own from a block is the absolute best way to go. Pre-shredded cheeses often have anti-caking agents that can affect how smoothly they melt. I aim for a blend that offers good meltability (like Monterey Jack or mild cheddar) and good flavor (sharp cheddar is my go-to). For the CREAMY BASE, always make sure your cream cheese is truly softened. It makes a world of difference in achieving a smooth, lump-free texture. If you’re in a hurry, you can microwave it in 10-second bursts, but be careful not to let it get too hot or greasy. When it comes to MIXING, don’t overmix, but do ensure everything is well combined. You want the flavors to meld, but you don’t want to break down the cheese too much. I’ve learned that a gentle, thorough mix is key. For BOLD FLAVOR, that touch of Dijon mustard is non-negotiable for me, but don’t be afraid to play with spices! A pinch of smoked paprika, a dash of cayenne, or even some finely chopped fresh herbs like rosemary can add a whole new dimension. I tested this with a bit of roasted garlic once, and it was divine! For BAKING, keep an eye on it. Ovens vary, and you’re looking for that bubbly, golden-brown perfection. If the top is browning too quickly, you can loosely tent it with foil. For SERVING, always let it rest for a few minutes after it comes out of the oven. That crucial resting period allows the dip to set up slightly, making it easier to scoop and preventing that initial lava-like flow. I’ve found that serving it in a warmed dish also helps keep it at the perfect temperature for longer.
Storing and Reheating Tips
The good news is that leftovers of this baked cheese dip are a real treat! If you happen to have any (which is rare in my house!), let it cool completely first. Once cooled, you can store it in an airtight container in the refrigerator for up to 3-4 days. It will firm up considerably when chilled. To REHEAT, the best method is in a small oven-safe dish in a preheated oven at around 300 degrees Fahrenheit (150 degrees Celsius) for about 10-15 minutes, or until it’s heated through and bubbly again. You can also reheat it gently on the stovetop over low heat, stirring frequently, or even in the microwave, though you might lose a bit of that lovely baked texture. If it seems a little too thick after chilling, you can stir in a tiny splash of milk or cream when reheating to get it back to that perfect dippable consistency. I always recommend reheating just what you plan to eat, as repeatedly heating and cooling can affect the texture and flavor. For GLAMOROUS REHEATING, I sometimes add a fresh sprinkle of cheese on top before popping it back in the oven to get that fresh-baked look and taste!
Frequently Asked Questions
Final Thoughts
So there you have it – my absolute favorite baked cheese dip recipe! It’s a testament to the fact that sometimes, the simplest things are the most satisfying. This dip has brought smiles to countless faces at my table, and I truly hope it does the same for you. It’s proof that you don’t need a ton of fancy ingredients or complicated steps to create something truly memorable and delicious. It’s perfect for cozy nights in, lively game days, or any occasion where good food and good company are on the agenda. If you loved this recipe, you might also enjoy my recipe for the ultimate spinach artichoke dip or my creamy garlic bread bites! They’re all about that comforting, shareable vibe. I can’t wait to hear how yours turns out, or if you have any fun twists you’ve tried! Let me know in the comments below – your feedback always makes my day! Happy baking and happy dipping!

Baked Cheese Dip
Ingredients
Main Ingredients
- 453.592 ounces cream cheese softened
- 226.796 ounces sour cream
- 113.398 ounces shredded cheddar cheese
- 113.398 ounces shredded Monterey Jack cheese
- 3 cloves garlic minced
- 0.5 teaspoon salt
- 0.25 teaspoon black pepper
Instructions
Preparation Steps
- Preheat oven to 350°F (175°C).
-
In a medium bowl, combine softened cream cheese, sour cream, minced garlic, salt, and pepper. Mix until well combined.453.592 ounces cream cheese
-
Stir in the shredded cheddar and Monterey Jack cheeses until evenly distributed.453.592 ounces cream cheese
- Spread the mixture evenly into a small oven-safe baking dish (approximately 8x8 inches or similar).
- Bake for 20-25 minutes, or until the dip is hot and bubbly and the cheese is melted.
- Serve immediately with your favorite dippers such as tortilla chips, crackers, bread, or fresh vegetables.


