
Air Fryer Chicken: Crispy, Juicy, and Ready in Minutes
You know that feeling when you’re craving something crispy and golden, but the thought of heating up the oven or dealing with splattery oil makes you want to order takeout instead? I’ve been there—more times than I’d like to admit. But then I discovered how perfectly an Air Fryer can turn humble chicken pieces into something truly special: juicy inside, shatteringly crisp outside, and ready faster than you can set the table. This isn’t just another weeknight hack—it’s become one of those recipes I come back to again and again, whether I’m feeding my family, impressing friends, or just treating myself after a long day. The best part? It’s so simple, you’ll wonder why you didn’t try it sooner.
Thank you for reading this post, don't forget to subscribe!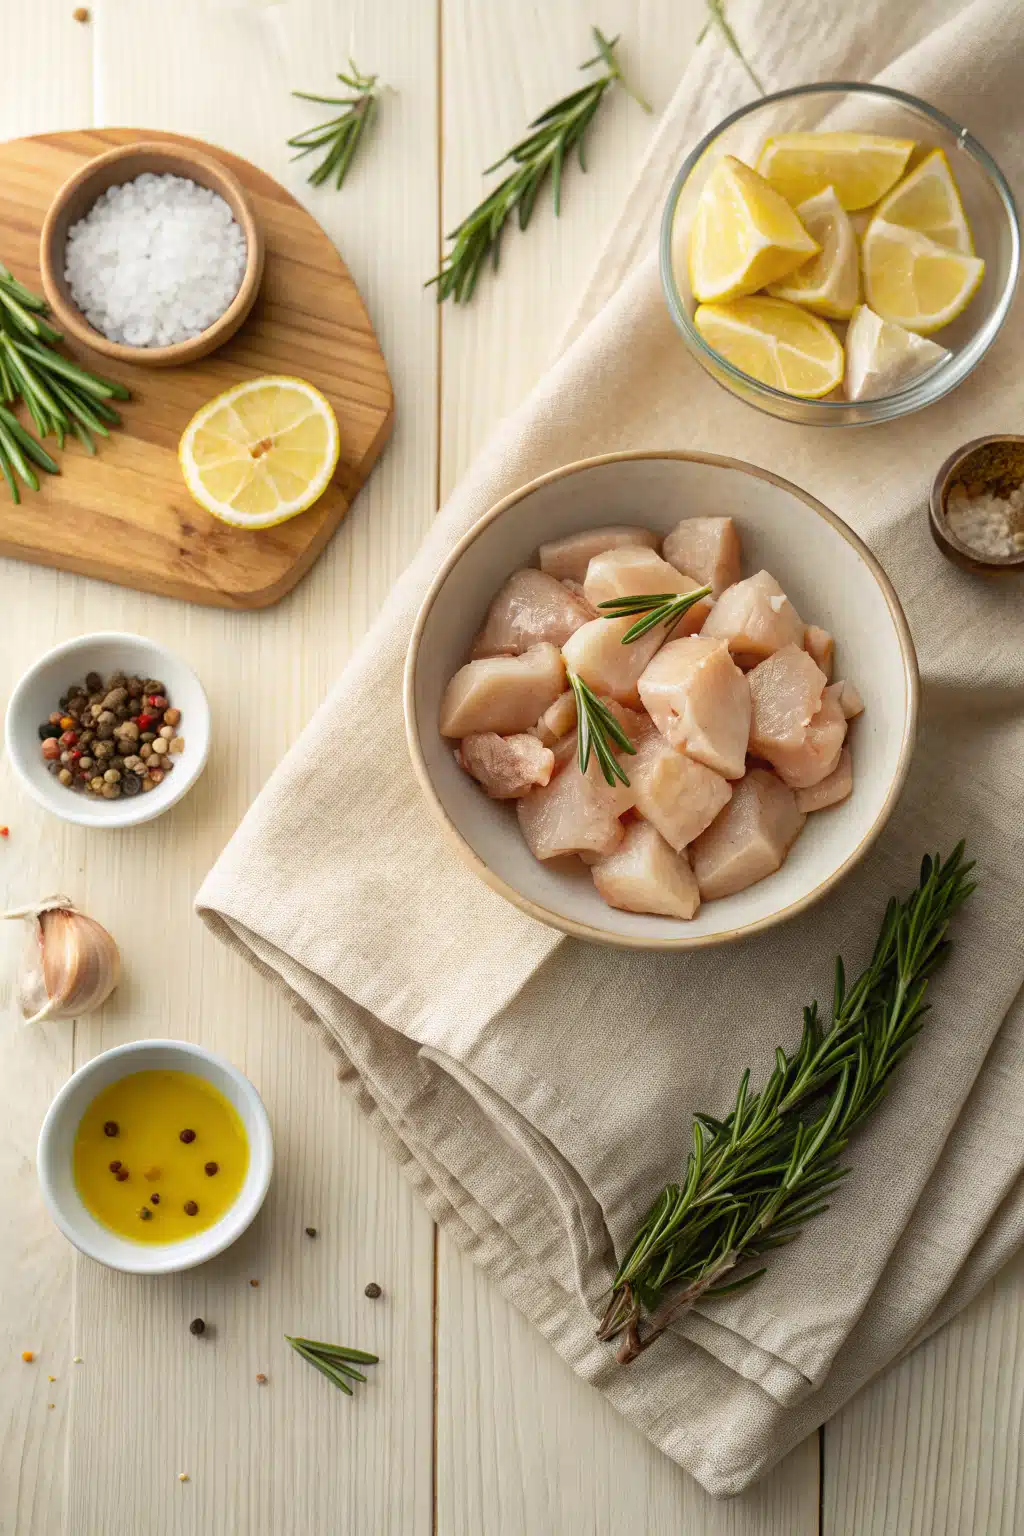
What Is Air Fryer Chicken?
Air Fryer Chicken is exactly what it sounds like—chicken cooked in an air fryer—but the magic lies in how it’s done. Using rapid hot air circulation, the air fryer mimics the deep-fried texture we all crave without submerging the meat in oil. The result? A golden-brown crust that crackles under your fork, while the inside stays tender and full of flavor. Whether you’re using thighs, breasts, or drumsticks, this method delivers consistent results every time. It’s not just a shortcut; it’s a smarter way to cook chicken that’s healthier, cleaner, and surprisingly versatile. Think of it as your oven’s cooler, quicker cousin who always shows up with the best snacks.
Why You’ll Love This Recipe
This Air Fryer Chicken has earned its permanent spot in my weekly rotation—and here’s why it might just become your go-to too. First, it’s incredibly forgiving. Even if you’re new to air frying, you won’t end up with dry or rubbery meat. The high heat seals in moisture while crisping the outside, so every bite is satisfying. Second, it’s fast. No preheating for 20 minutes—just toss the seasoned chicken in, set the timer, and walk away. In under 25 minutes, you’ve got dinner-ready protein that pairs with almost anything. Third, cleanup is a breeze. No greasy stovetop, no splattered pans—just one basket to wipe down. And finally, it’s endlessly customizable. Stick with classic salt-and-pepper seasoning, or go bold with garlic powder, smoked paprika, or a splash of lemon zest. It’s comfort food made modern, and honestly, once you taste how good it is, you’ll wonder why you ever cooked chicken any other way.
How to Make Air Fryer Chicken
Quick Overview
This recipe uses bone-in, skin-on chicken thighs for maximum juiciness and flavor, but you can easily adapt it for boneless cuts. After a quick dry brine (which makes all the difference!), the chicken gets a simple seasoning rub and cooks in the Air Fryer until perfectly crisp. No flipping required—just set it and forget it.
Ingredients
You only need a handful of pantry staples: 4–6 bone-in, skin-on chicken thighs (about 2 lbs), 1½ tsp kosher salt, 1 tsp Black Pepper, 1 tsp garlic powder, ½ tsp onion powder, and ½ tsp smoked paprika (optional, but adds great depth). If your chicken is fresh (not pre-brined), let it sit with the salt for 15–30 minutes before cooking—this step locks in moisture and boosts flavor.
“Packed with flavor and so simple. Exactly what I wanted from this Air Fryer Chicken!”
Step-by-Step Instructions
Step 1: Preheat & Prep Pan
Preheat your air fryer to 380°F (193°C) for 3–5 minutes. While it heats, pat the chicken thighs completely dry with paper towels—this is key for crispiness! Rub them evenly with all the seasonings, making sure to get under the skin if you can.
Step 2: Air Fry to Perfection
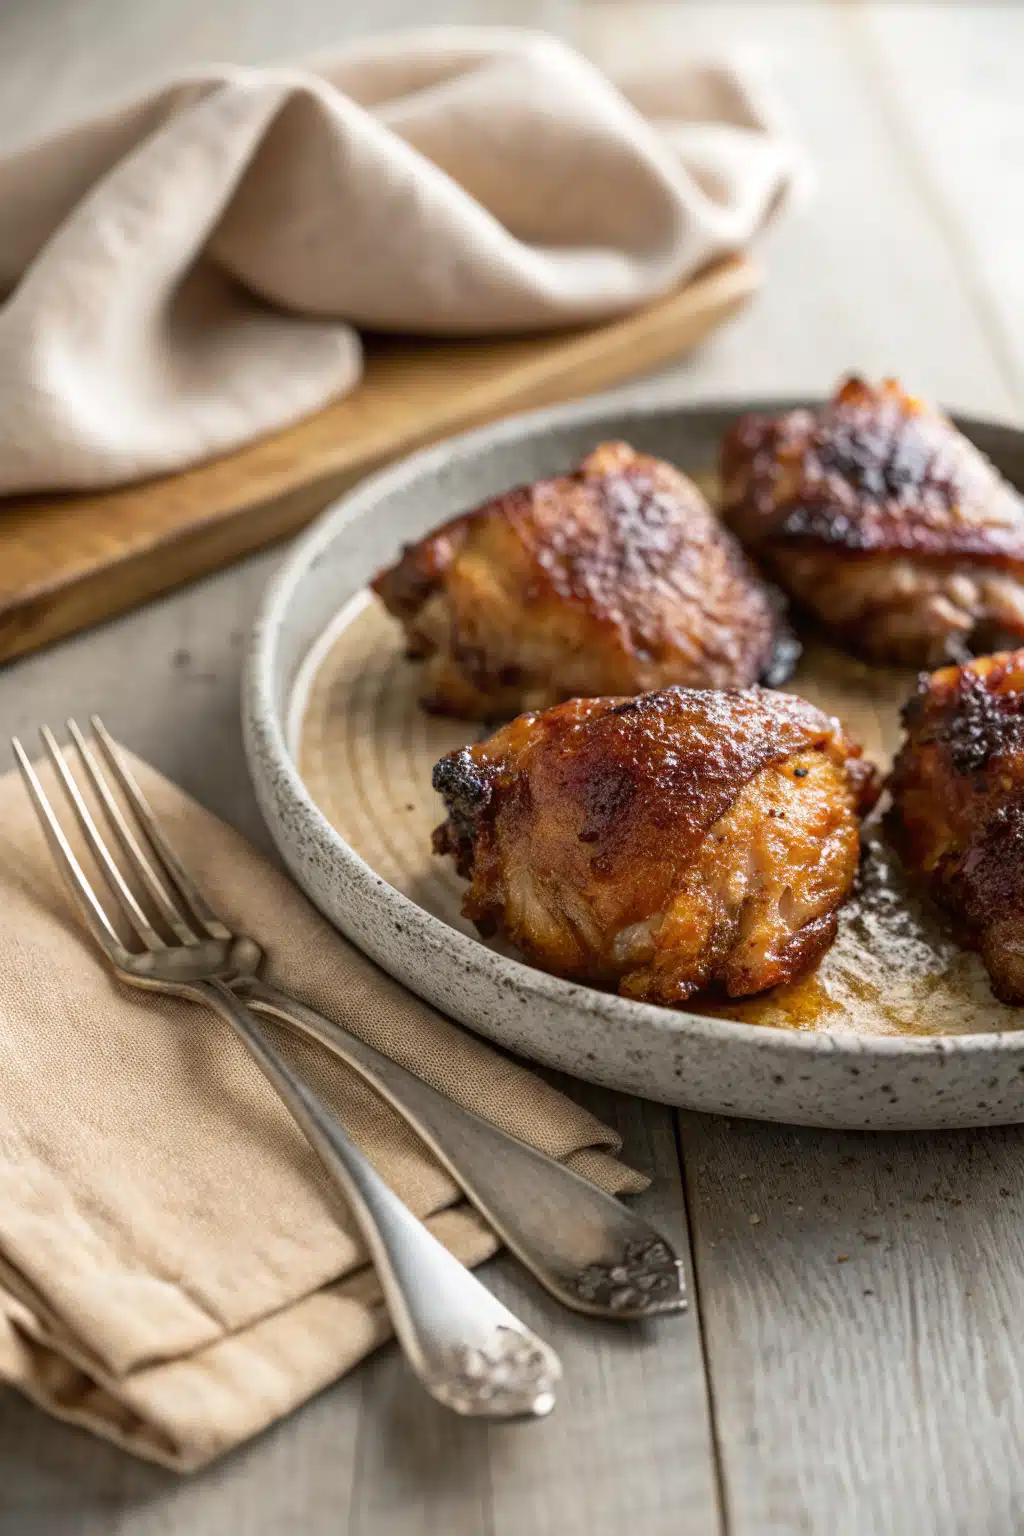
Place the thighs in the basket in a single layer, skin-side up, leaving space between each piece. Cook for 20–25 minutes, flipping halfway through if your model recommends it (many don’t need it). The chicken is done when the internal temperature reaches 165°F (74°C) and the skin is deeply golden and crispy.
Step 3: Rest and Serve
Let the chicken rest for 3–5 minutes before serving. This keeps all those delicious juices right where they belong—inside the meat.
What to Serve It With
This chicken plays well with pretty much everything. I love pairing it with a bright cucumber salad, roasted sweet potatoes, or a simple arugula salad tossed in lemon vinaigrette. For a cozy meal, serve it over creamy mashed potatoes or with a side of garlic butter rice. And if you’re keeping it light, steamed broccoli or grilled zucchini are perfect companions. Honestly, it’s hard to go wrong—whatever you’re craving, this chicken will elevate it.
Top Tips for Perfecting Your Air Fryer Chicken
First, don’t skip the dry brine—even 15 minutes makes a noticeable difference in juiciness. Second, avoid overcrowding the basket; give each piece room so the hot air can circulate properly. Third, if you’re using boneless chicken breasts or thinner cuts, reduce the cooking time by 5–7 minutes and check the temperature early. Fourth, for extra crispiness, lightly spray the skin with oil before air frying—just a light mist does the trick. And finally, resist the urge to peek constantly! Opening the basket too often drops the temperature and slows crisping.
Storing and Reheating Tips
Store leftovers in an airtight container in the fridge for up to 3 days. To reheat, pop them back in the air fryer at 350°F (175°C) for 3–5 minutes until warmed through and crispy again. Avoid the microwave if you can—it tends to make the skin soggy. If you must use it, place a paper towel underneath to absorb excess moisture.
Frequently Asked Questions
“I don’t know if I’ve ever eaten a better Air Fryer Chicken. The rub alone is wonderful, but the sauce??? Over the top!”
Final Thoughts
There’s something deeply comforting about biting into a piece of chicken that’s both crispy and juicy—and knowing you made it yourself with minimal effort makes it even better. This air fryer method has saved me on countless busy nights, turned mealtime stress into mealtime joy, and reminded me that great food doesn’t have to be complicated. Whether you’re cooking for one or feeding a crowd, I hope this recipe brings as much warmth and satisfaction to your table as it has to mine. Give it a try, and let me know how it turns out—you might just find your new favorite way to cook chicken.

Air Fryer Chicken
Ingredients
Main Ingredients
- 4 pieces boneless, skinless chicken breasts (about 6 oz each)
- 1 tablespoon olive oil
- 1 teaspoon garlic powder
- 1 teaspoon paprika
- 1 teaspoon onion powder
- 0.5 teaspoon dried oregano
- 0.5 teaspoon salt
- 0.25 teaspoon black pepper
Instructions
Preparation Steps
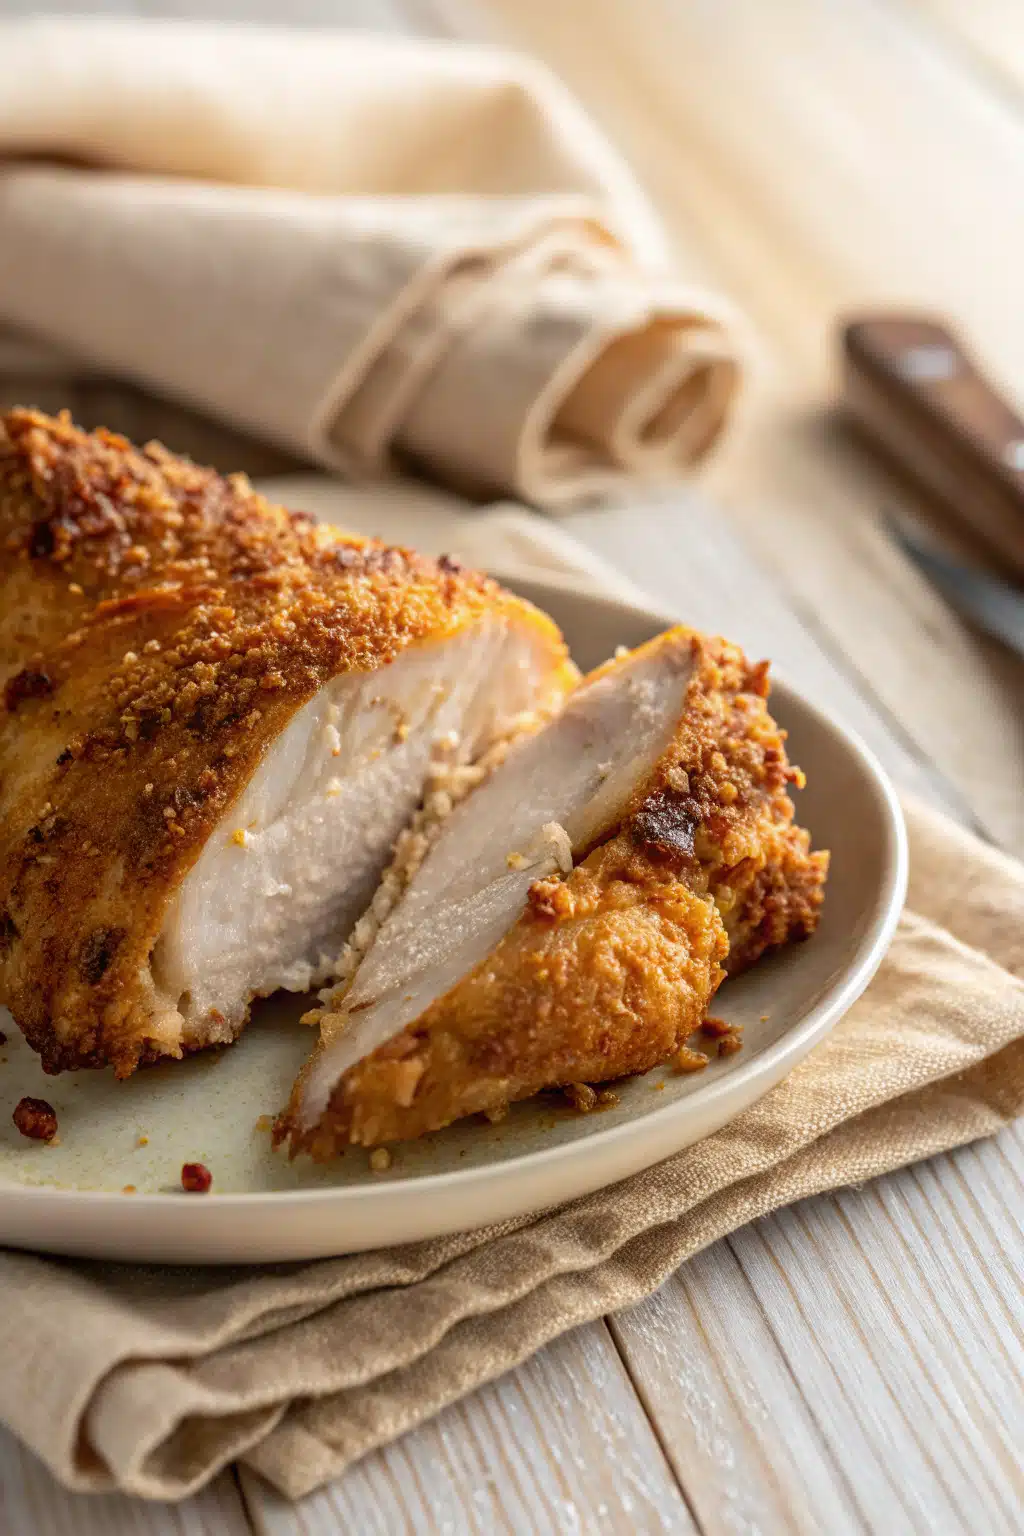
- Pat chicken breasts dry with paper towels. If thicker than 1 inch, pound to even thickness for uniform cooking.
- In a small bowl, mix garlic powder, paprika, onion powder, oregano, salt, and pepper.
- Brush both sides of chicken with olive oil, then rub evenly with the spice mixture.
- Preheat air fryer to 375°F (190°C) for 3 minutes.
- Place chicken in a single layer in the air fryer basket, leaving space between pieces.
- Cook for 10 minutes, then flip chicken and cook for another 8–10 minutes, or until internal temperature reaches 165°F (74°C).
- Let rest for 3–5 minutes before slicing and serving.


