You know, there are some recipes that just feel like a warm hug. They’re the ones you turn to on a busy Tuesday night, the ones that impress guests without stressing you out, and the ones that instantly transport you back to a happy memory. For me, that recipe is classic hummus. Not the stuff that tastes vaguely like chalk or has a weird, grainy texture, but the kind of hummus that’s so unbelievably smooth and bursting with flavor, you’ll want to eat it with a spoon. Seriously, I’ve lost count of how many times my kids have hovered around the food processor, begging for just one more taste before it even makes it into a serving bowl. It’s that good, and honestly, it’s ridiculously simple to make. Forget those store-bought tubs that can be hit-or-miss; this homemade version is truly in a league of its own. If you love a good dip, and who doesn’t, this classic hummus is about to become your new best friend.
Thank you for reading this post, don't forget to subscribe!What is hummus?
So, what exactly *is* classic hummus? At its heart, it’s a beautiful, simple mash-up of cooked chickpeas, tahini (that’s sesame paste, if you’re new to it!), lemon juice, garlic, and a little bit of ice water, all blended until impossibly smooth. Think of it as the ultimate chickpea dip, a staple in Middle Eastern cuisine that has absolutely taken the world by storm, and for good reason! It’s incredibly versatile, wonderfully nutritious, and just plain delicious. The name itself, “hummus,” actually comes from the Arabic word for “chickpeas.” So, when you say “classic hummus,” you’re really just talking about the purest, most traditional form of this beloved dip. It’s the foundation upon which all other hummus variations are built, and mastering this one is key to unlocking a whole world of tasty possibilities.
Why you’ll love this recipe?
There are so many reasons why this classic hummus recipe has earned a permanent spot in my recipe rotation, and I just know you’re going to adore it too. First off, the flavor is just out of this world. It’s bright, nutty, slightly tangy, and deeply satisfying, with that unmistakable savory depth that you just can’t get from a jar. What I truly love most, though, is how incredibly easy it is. You literally dump everything into a food processor and let it do its magic. It’s a lifesaver on busy weeknights when you need a quick appetizer or a healthy snack. And talk about cost-effective! A few cans of chickpeas and pantry staples will get you a huge batch of hummus for a fraction of what you’d pay at the grocery store. Plus, the versatility is a huge win. Need something to dip pita bread into? Check. Looking for a spread for your sandwiches? Absolutely. Want to add a dollop to your roasted vegetables or grain bowls? Perfect. This recipe is essentially a blank canvas for deliciousness. While I love experimenting with flavors like roasted red pepper or spicy jalapeno, there’s just something so pure and comforting about a really, really good classic hummus. It’s a taste of home for me, and I’m so excited for you to experience it too.
How do I make Hummus?
Quick Overview
Making this classic hummus is as straightforward as it gets. We’re talking about whizzing a few humble ingredients together until they transform into something truly magical. The key is really just letting your food processor work its magic, and adding a touch of ice water at the end to achieve that unbelievably creamy texture. It’s so simple, you can practically make it with your eyes closed (though I don’t recommend that!). In just a few minutes, you’ll have a vibrant, flavorful dip that’s worlds away from anything you can buy pre-made. Trust me, this method is a game-changer.
Ingredients
For the Main Batter:
2 cans (15 ounces each) chickpeas, drained and rinsed very well. I always look for low-sodium options if I can find them. It’s important to rinse them thoroughly to get rid of that canned flavor. Some people swear by peeling the chickpeas for extra smoothness, but honestly, I find it takes too long and doesn’t make *that* much of a difference if you process it long enough.
1/2 cup tahini. This is your secret weapon for that rich, nutty flavor. Make sure you give it a good stir in its jar before measuring, as the oil can separate.
1/4 cup fresh lemon juice. Don’t use the bottled stuff! Freshly squeezed lemon juice is crucial for that bright, zesty kick that makes hummus sing.
2-3 cloves garlic, minced. I like to start with two, but if you’re a garlic lover like me, feel free to add a third. Mincing it finely before adding it to the food processor helps it break down better.
1/2 teaspoon salt, or to taste. You can always add more at the end, so start with this and adjust.
“New family favorite! This classic hummus was so flavorful and ridiculously easy. Crowd-pleaser for sure.”
1/4 cup ice water. This is the secret to ultra-creamy hummus! The ice-cold water emulsifies the tahini and lemon juice, giving it that luscious texture. You might need a little more or less, so have some extra on hand.
For Serving (Optional but highly recommended!):
Extra virgin Olive oil, for drizzling. A good quality olive oil makes all the difference.
Smoked paprika or sumac, for dusting. Adds a lovely pop of color and flavor.
Fresh parsley, chopped, for garnish. Adds freshness and a beautiful green touch.
Pita bread or vegetable sticks, for dipping.
Step-by-Step Instructions
Step 1: Preheat & Prep Pan
This step isn’t really about preheating a pan for this recipe, but rather getting your ingredients ready! Make sure your chickpeas are well-drained and rinsed. Mince your garlic and squeeze your lemon juice. Having everything prepped and ready to go makes the actual blending process super quick and seamless.
Step 2: Mix Dry Ingredients
In the bowl of your food processor, combine the drained and rinsed chickpeas, minced garlic, salt, and lemon juice. Give it a quick pulse or two to start breaking down the ingredients. This just helps everything get acquainted before the tahini joins the party.
Step 3: Mix Wet Ingredients
Now, add the tahini to the food processor. This is where the magic really starts to happen. The tahini will make the mixture look a bit pasty and thick at this stage, which is totally normal. Don’t worry, we’ll get to that smooth texture in a moment.
Step 4: Combine
With the food processor running, slowly stream in the ice water, about a tablespoon at a time, through the feed tube. You’ll see the mixture start to transform, becoming lighter in color and much creamier. Continue processing for about 3-5 minutes, scraping down the sides of the bowl as needed. You’re looking for a super smooth, almost whipped consistency. If it seems too thick, add another tablespoon or two of ice water until you reach your desired creaminess.
Step 5: Prepare Filling
This step isn’t applicable for a basic classic hummus. The “filling” is really just the wonderful texture and flavor we’ve created!
Step 6: Layer & Swirl
Again, for classic hummus, we’re not really layering or swirling. The beauty is in its uniform, creamy perfection. We’ll get to the beautiful presentation in the serving section.
“Made the classic hummus tonight and wow — perfect weeknight dinner. Will definitely make again!”
Step 7: Bake
Hummus is not baked! It’s a no-cook recipe, which makes it perfect for quick snacks or appetizers.
Step 8: Cool & Glaze
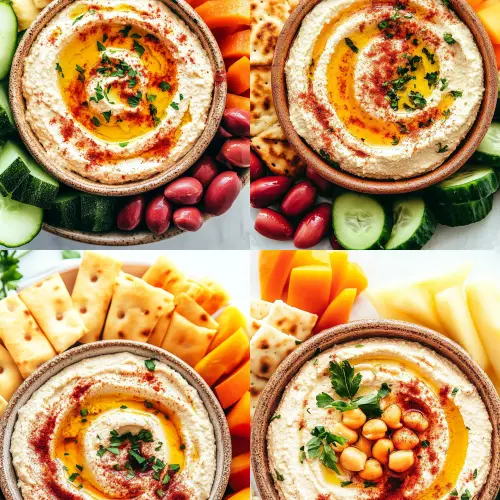
Hummus doesn’t need to cool in the traditional sense, but it’s best served at room temperature or slightly chilled. After you’ve achieved the perfect texture, taste and adjust the salt and lemon juice if needed. Then, transfer it to a serving bowl. This is where you can add your optional “glaze” – a generous drizzle of good quality extra virgin olive oil!
Step 9: Slice & Serve
Spoon the hummus into your serving bowl. Use the back of a spoon to create a little swirl or well on top. Drizzle generously with extra virgin olive oil. Sprinkle with smoked paprika or sumac, and a little chopped fresh parsley. Serve immediately with warm pita bread, crunchy vegetable sticks (carrots, cucumbers, bell peppers are great!), or even crackers. It’s ready to be devoured!
What to Serve It With
Oh, the possibilities are truly endless when it comes to serving this glorious classic hummus! For a simple breakfast, I love spreading a thin layer on some toasted sourdough and topping it with a sprinkle of red pepper flakes and a sliced hard-boiled egg. It’s surprisingly satisfying and gives you a great start to the day. For brunch, it’s a must-have on any mezze platter. Imagine a beautiful spread with olives, feta cheese, sliced tomatoes, and of course, a big bowl of this creamy hummus with warm pita. It’s always a crowd-pleaser and feels so elegant. As a dessert? Okay, hear me out! While not a traditional dessert, a tiny bit of hummus can be surprisingly good with some chocolate drizzled on top, especially if you’ve got a slightly sweeter batch. But where it really shines is as a cozy snack. After a long day, there’s nothing better than a bowl of this hummus with some crunchy carrot sticks and maybe a few pretzel crisps. My kids also love it as a sandwich spread instead of mayonnaise, and it’s a healthier option that they actually enjoy!
Top Tips for Perfecting Your Classic Hummus
After making this classic hummus more times than I can count, I’ve picked up a few tricks that I think really make a difference in getting that perfect, restaurant-quality texture and flavor. First, about the chickpeas: while peeling is an option for extreme smoothness, I find the real key is getting them really, really well-drained and rinsed. This removes any residual liquid that can make your hummus taste ‘off.’ Also, don’t be afraid to process it for a good few minutes! The longer you let that food processor run, the creamier it gets. It might look like it’s not going to happen at first, but just keep going, scraping down the sides, and you’ll see it transform. When it comes to the tahini, good quality tahini is a must. It’s the backbone of the flavor. If yours is old or has been sitting for ages, it might taste a bit bitter. Give it a good stir before measuring to ensure the oils are well combined. My biggest game-changer, though, has been the ice water. Using ice-cold water helps to emulsify the tahini and lemon juice, creating that unbelievably smooth, almost whipped texture that’s just divine. I usually add it slowly, tablespoon by tablespoon, until I get the consistency I’m after. It’s better to add too little and then add more than to make it too watery from the start. And please, for the love of all that is delicious, use fresh lemon juice! Bottled just doesn’t have that bright, vibrant flavor. Finally, taste and season at the end. You might need a little more salt, or a squeeze more lemon juice, depending on your ingredients. It’s all about making it perfect for *your* taste buds. I’ve also found that if my tahini is particularly thick, I might need a tiny bit more lemon juice to help balance the richness.
Storing and Reheating Tips
One of the best things about this classic hummus is how well it keeps, making it perfect for meal prep or just having on hand for spontaneous snacking. When I have leftovers, I like to transfer the hummus to an airtight container. If I’ve already drizzled it with olive oil, I’ll make sure the oil forms a nice seal over the top. This helps to prevent it from drying out. Stored like this in the refrigerator, it’ll stay wonderfully fresh for about 4-5 days. I’ve even pushed it to 6 days and it was still perfectly good! If you find it’s gotten a little stiff from being in the fridge, just give it a good stir with a spoon, or even a quick blitz back in the food processor with a tiny splash of water or olive oil if it’s looking really dry. It’s rarely necessary to reheat hummus, as it’s typically served cold or at room temperature, but if you prefer it slightly warm (which I don’t recommend for classic hummus, but hey, you do you!), you could gently warm it in a small saucepan over low heat, stirring constantly, or microwave it in very short intervals. I haven’t personally tried freezing hummus, as I find it can sometimes affect the texture and make it a bit watery upon thawing, but if you wanted to try, I’d recommend using a freezer-safe container, ensuring it’s well-wrapped, and expecting a slight change in consistency. The glaze (olive oil) is best added right before serving, so if you’re planning on storing for a few days, it’s a good idea to leave it off until you’re ready to dip.
Frequently Asked Questions
Final Thoughts
There you have it – my absolute favorite recipe for classic hummus! It’s such a simple pleasure, and I truly believe everyone should have a foolproof way to make this incredible dip at home. The creamy texture, the bright, zesty flavor, the sheer ease of it all – it just ticks all the boxes for me. It’s one of those foundational recipes that just makes life a little bit better, and a lot more delicious. If you love this classic version, you might also enjoy my recipes for smoky baba ghanoush or a vibrant beet hummus. They’re all part of the same wonderful family of dips that I can’t get enough of. Give this classic hummus a try, and I promise you, you won’t be disappointed. I can’t wait to hear how yours turns out and what you end up serving it with! Don’t forget to leave a comment below and share your experience, or even your own tips and tricks!
Classic Hummus
Ingredients
Main Ingredients
- 0.42 grams canned chickpeas drained and rinsed
- 0.06 grams tahini
- 0.06 grams lemon juice freshly squeezed
- 2 cloves garlic minced
- 0.03 grams salt to taste
- 0.015 grams cumin optional
- 0.03 grams olive oil for drizzling
- 0.005 grams paprika for garnish
Instructions
Preparation Steps
- In a food processor, combine the drained chickpeas, tahini, lemon juice, minced garlic, salt, and cumin (if using).
- Process until smooth and creamy. You may need to scrape down the sides of the bowl a few times.
- If the hummus is too thick, add a tablespoon or two of cold water and process again until desired consistency is reached.
- Transfer the hummus to a serving bowl. Drizzle with olive oil and sprinkle with paprika.
- Serve with pita bread, vegetables, or as desired.