You know those nights when a serious craving hits? Not just a little sweet tooth, but a full-blown, “I need something rich and decadent, but I absolutely cannot face the oven” kind of craving? Yeah, me too. That’s exactly when this chocolate parfait recipe swoops in like a superhero. It’s layers of pure bliss – creamy chocolate pudding, a delightful crunch, and a whisper of something fresh. Honestly, it’s my go-to for making any evening feel a little bit special, without the fuss. I remember my grandma making something similar for us on summer afternoons, and the memory of that cool, sweet goodness always makes me smile. This chocolate parfait recipe is my grown-up, slightly more sophisticated take on that childhood magic. It’s incredibly forgiving, ridiculously delicious, and something I find myself whipping up at least twice a month. If you’re anything like me and love the idea of a fancy-looking dessert that practically makes itself, then you’re going to adore this.
Thank you for reading this post, don't forget to subscribe!What is chocolate parfait?
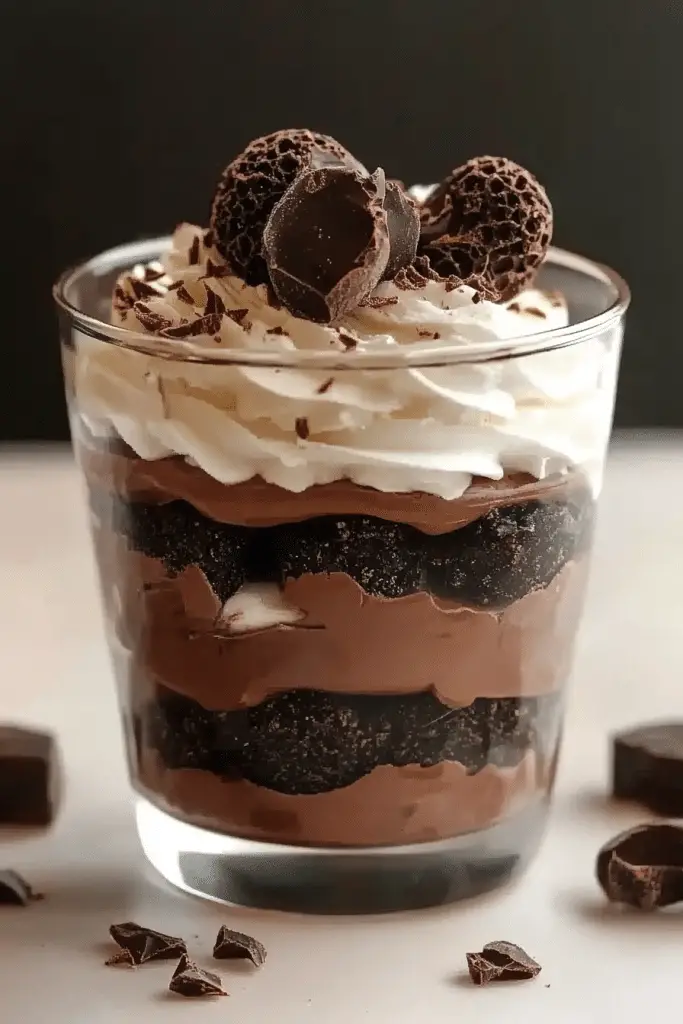
So, what exactly *is* a parfait? At its heart, it’s a dessert made by layering different elements in a tall glass. The name itself comes from the French word “parfait,” meaning “perfect,” and honestly, I think it lives up to its name! Traditionally, it might involve layers of fruit, custard, and perhaps some whipped cream. But when my craving strikes, it’s always for a chocolate parfait. Think of it as a deconstructed chocolate cake or a super-luxe chocolate pudding with amazing textures. It’s not baked, which is a huge win in my book. Instead, it’s all about bringing together a few key components – usually a creamy chocolate base, something for crunch like crumbled cookies or granola, and maybe a whipped topping or fresh fruit. It’s essentially edible art in a glass, and the beauty is, you can totally play with the layers and flavors to make it your own.
Why you’ll love this recipe?
There are so many reasons why this chocolate parfait recipe has earned a permanent spot in my recipe rotation, and I have a feeling you’ll fall in love with it too. First and foremost, the flavor is just out of this world. We’re talking deep, rich chocolate that’s not too sweet, balanced perfectly with a creamy texture that feels utterly indulgent. It’s the kind of dessert that tastes like it took hours to make, but shhh, we don’t have to tell anyone that part! The simplicity is another huge draw. Honestly, if you can stir a few ingredients together and layer them, you can make this. It’s a lifesaver on busy weeknights when you want something impressive but have zero time. Plus, it’s surprisingly budget-friendly! Most of the ingredients are pantry staples, making it an affordable way to satisfy those sweet cravings. What I love most, though, is its versatility. While this version is my absolute favorite, you can easily swap out ingredients to suit your mood or what you have on hand. I’ve made it with different kinds of cookies, added a swirl of raspberry sauce, or even used a dark chocolate pudding for an extra intense flavor. It’s just one of those recipes that feels both comforting and sophisticated, and it always gets rave reviews from my family and friends. It’s a far cry from a complicated chocolate cake, and in my opinion, it’s even more satisfying because of its effortless charm.
How do I make chocolate parfait?
Quick Overview
This chocolate parfait recipe is all about creating beautiful layers of texture and flavor with minimal effort. We’re essentially whipping up a rich chocolate pudding, adding a delightful crunchy element, and then assembling it all in glasses. It’s straightforward: mix the pudding, prepare your crunch, and then start layering! The beauty of this method is that it requires no baking, making it incredibly quick and accessible. You can even prep some of the components ahead of time, which is a lifesaver for entertaining or just having a treat ready to go.
Ingredients
What is the recipe for Creamy Chocolate Layers?
– 1/2 cup unsweetened cocoa powder (use a good quality one, it makes a difference!)
– 1 cup granulated sugar
– 1/4 cup cornstarch (this is our magic thickener!)
– 1/2 teaspoon salt (just a pinch to balance the sweetness)
– 3 cups whole milk (you can use 2%, but whole milk gives it that extra creamy luxuriousness)
– 2 tablespoons unsalted butter, cut into pieces
– 1 teaspoon vanilla extract (don’t skip this!)
– 4 ounces semi-sweet chocolate, finely chopped (optional, but it adds another layer of chocolatey goodness)
For the Crunchy Layers:
– 1.5 cups crushed chocolate cookies (Oreos are fantastic here, but any chocolate biscuit will do!) OR granola for a slightly healthier crunch
– 1/4 cup melted butter (if using cookies, this helps them clump just a bit and stay delicious)
For the Whipped Cream Topping (Optional but highly recommended!):
– 1 cup heavy whipping cream, very cold
– 2 tablespoons powdered sugar
– 1/2 teaspoon vanilla extract
“I don’t know if I’ve ever eaten a better chocolate parfait recipe. The rub alone is wonderful, but the sauce??? Over the top!”
Step-by-Step Instructions
Step 1: Prepare Your Glasses & Crunchy Layer
Grab your favorite serving glasses – parfait glasses, wine glasses, or even just pretty tumblers work perfectly. We want to have them ready to go. Now, let’s get that delicious crunch ready. If you’re using chocolate cookies, place them in a zip-top bag and give them a good bash with a rolling pin until they’re crumbly. Don’t aim for dust; some nice little chunks are great for texture. In a small bowl, mix the crushed cookies with the melted butter and stir until everything is nicely coated. If you’re using granola, you can use it as-is or give it a quick toast in a dry pan for extra flavor. Set both the glasses and the crunchy mixture aside.
Step 2: Whisk Dry Ingredients for Pudding
In a medium saucepan (make sure it’s large enough to hold everything comfortably!), whisk together the unsweetened cocoa powder, granulated sugar, cornstarch, and salt. Whisking them together now, before adding any liquid, is key to preventing lumps later on. You want a smooth, evenly combined dry mixture. I usually give it a good swirl for about 30 seconds to make sure everything is thoroughly mixed.
Step 3: Gradually Add Milk & Cook Pudding Base
Now, slowly whisk in the whole milk, a little bit at a time, making sure to incorporate all the dry ingredients from the bottom and sides of the pan. Once about half the milk is in and you have a smooth, thick paste, you can gradually whisk in the remaining milk. Place the saucepan over medium heat. Stir constantly with a whisk, scraping the bottom and sides of the pan. This is where the magic happens, and patience is your friend! Keep stirring and don’t let it boil vigorously. You’re looking for the mixture to thicken. It will start to feel heavier on the whisk, and you’ll see it coat the back of a spoon. This usually takes about 8-10 minutes. Once it’s thickened to your liking, remove it from the heat.
Step 4: Finish the Chocolate Pudding
While the pudding is still hot, stir in the pieces of unsalted butter until they are completely melted and incorporated. This adds a wonderful richness and glossy finish. Then, stir in the vanilla extract and the finely chopped semi-sweet chocolate, if you’re using it. Stir until the chocolate is completely melted and the pudding is smooth and luscious. Taste it now – if it’s not chocolatey enough for you (is that even possible?!), you can stir in another teaspoon of vanilla or a tiny bit more cocoa powder. Let it cool slightly, stirring occasionally to prevent a skin from forming.
Step 5: Whip the Cream (If Using)
If you’re adding that lovely whipped cream topping, now’s the time. Make sure your heavy cream is very cold. In a clean, chilled bowl, whip the cream with an electric mixer on medium-high speed. As it starts to thicken, gradually add the powdered sugar and vanilla extract. Continue whipping until stiff peaks form – meaning when you lift the beaters, the cream stands up straight. Be careful not to over-whip, or you’ll end up with butter!
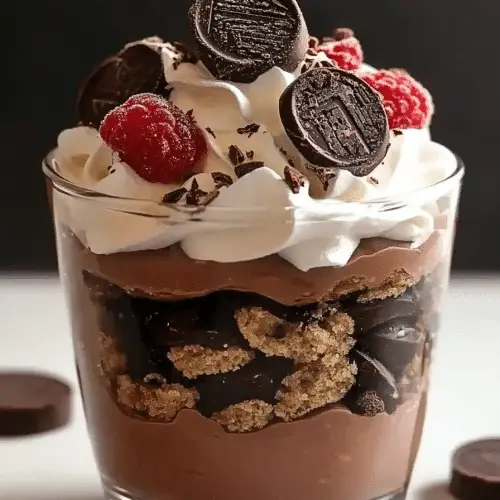
Step 6: Layer Your Parfaits
This is the fun part! Grab your prepared glasses. Start with a layer of your crunchy cookie or granola mixture at the bottom. Then, spoon or pipe a generous layer of the slightly cooled chocolate pudding over the crunch. Add another layer of your crunchy mixture on top of the pudding. Repeat these layers, alternating between the chocolate pudding and the crunch, until your glasses are nearly full. You want to end with a layer of pudding.
Step 7: Chill the Parfaits
Once assembled, cover the parfaits with plastic wrap. I like to gently press the plastic wrap directly onto the surface of the top pudding layer to prevent a skin from forming. Pop them into the refrigerator for at least 30 minutes to an hour. This allows the pudding to set up a bit more and the flavors to meld beautifully. This chilling step is crucial for the best texture!
Step 8: Top and Serve
Just before serving, remove the plastic wrap. Dollop or pipe your homemade whipped cream generously on top of each parfait. You can also add a sprinkle of extra cookie crumbs, a few chocolate shavings, or even a fresh berry for a pop of color. Serve immediately and enjoy the delightful layers of chocolatey goodness!
“The chocolate parfait recipe turned out amazing. My kids asked for seconds. Saving this one!”
What to Serve It With
This chocolate parfait recipe is so wonderfully versatile, it truly shines in many different settings. For a delightful breakfast that feels like a treat, I love serving a smaller portion alongside a strong cup of coffee. The richness of the chocolate is surprisingly invigorating in the morning, and it makes even a rushed weekday feel a little more luxurious. It’s also fantastic for brunch! Imagine a spread of pastries, some fruit salad, and then these elegant parfaits. I’ll often top them with a few fresh raspberries or a dusting of cocoa powder for an extra touch of class. When it comes to dessert, well, it’s a no-brainer! It’s perfect after a hearty meal, especially something like a roasted chicken or a comforting pasta dish. I like to serve it with a small espresso or a glass of red wine to complement the deep chocolate flavor. And for those cozy nights when you just need a little something sweet to curl up with, this is it. I’ll often make a batch, grab a good book, and savor every spoonful. My family also loves them after a big Sunday dinner; it’s a guaranteed crowd-pleaser that doesn’t require me to spend precious time in the kitchen while everyone else is relaxing.
Top Tips for Perfecting Your Chocolate Parfait
Over the years, I’ve learned a few tricks that can really elevate this chocolate parfait recipe from good to absolutely spectacular. For the pudding, it’s all about the cornstarch and constant stirring. Make sure you’re using enough cornstarch – it’s what gives you that beautifully thick, spoonable texture without being gloopy. And *really* stir! Getting into all the nooks and crannies of the saucepan prevents scorching and ensures a silky smooth consistency. Don’t be afraid to let it simmer gently for a minute or two after it thickens; this helps cook out any starchy flavor. When it comes to the crunchy layers, I’ve found that mixing the crushed cookies with a touch of melted butter is a game-changer. It makes them slightly more cohesive, so you get that satisfying crunch without having the crumbs disappear into the pudding. If you’re using granola, toasting it first really brings out its nutty flavor, which pairs beautifully with the chocolate. For layering, don’t be afraid to get a little creative! I sometimes use a piping bag for the pudding to get cleaner layers, but a spoon works just fine. Just aim for relatively even layers so you get a bit of everything in each bite. And for the whipped cream, make sure your bowl and whisk attachments are chilled; it really helps the cream whip up faster and become fluffier. If you want to add a different flavor dimension, try adding a pinch of espresso powder to the chocolate pudding while it’s cooking; it intensifies the chocolate flavor without making it taste like coffee. Another personal favorite modification is to add a layer of fresh berries, like raspberries or sliced strawberries, between the pudding and cookie layers – the tartness cuts through the richness beautifully. Trust me, a few simple tweaks can make this already amazing recipe even more divine!
Storing and Reheating Tips
This chocolate parfait recipe is fantastic because it holds up so well, making it perfect for make-ahead treats. If you plan on eating them within a day or two, storing them in the refrigerator is your best bet. Make sure to cover them tightly with plastic wrap, ideally pressing it directly onto the surface of the pudding to prevent that unappetizing skin from forming. They’ll stay wonderfully fresh and delicious for about 2-3 days. If you’re making them for a party or just want to have them on hand for longer, you can absolutely freeze them! The best way to do this is to assemble them *without* the whipped cream topping. Once assembled and covered, pop them in the freezer for a couple of hours until firm, then wrap them individually and tightly in plastic wrap, followed by a layer of aluminum foil. They can stay frozen for up to a month. To thaw, transfer them from the freezer to the refrigerator the night before you plan to serve them. They should thaw beautifully. When it comes to reheating, these parfaits aren’t really “reheated” in the traditional sense. They are best served chilled. If they’ve been in the fridge, they’re usually good to go. If they’ve been frozen and thawed, they might be a little softer than fresh, but still absolutely delicious. The key is that they are served cold. I always add the whipped cream topping just before serving, whether they’ve been refrigerated or thawed from frozen, to ensure it stays light and fluffy. You can also add any extra garnishes right before serving.
Frequently Asked Questions
Final Thoughts
Honestly, I could talk about this chocolate parfait recipe all day because it’s just that good. It’s more than just a dessert; it’s a little moment of pure joy that’s accessible to everyone. The combination of creamy, decadent chocolate pudding and the satisfying crunch from the cookie layers is a match made in heaven. It’s proof that you don’t need a lot of complicated steps or fancy ingredients to create something truly special. Whether you’re making it for a quiet evening in, a family gathering, or even to impress guests, this chocolate parfait never disappoints. If you love rich, chocolatey flavors and appreciate a dessert that looks as good as it tastes, you absolutely have to give this a try. It’s one of those reliable recipes that I know will turn out perfectly every single time, and that’s a rare treasure. I’m always so curious to hear about your culinary adventures, so if you make this, please let me know in the comments below how it turned out! I’d also love to hear about any delicious variations you come up with. Happy layering, and enjoy every single spoonful!
chocolate parfait recipe
Ingredients
Chocolate Mousse
- 0.5 cup heavy cream
- 0.25 cup granulated sugar
- 0.3 ounce unsweetened cocoa powder
- 0.5 cup milk
- 1 large egg yolk
- 4 ounce bittersweet chocolate chopped
Whipped Cream
- 1 cup heavy cream
- 2 tablespoon powdered sugar
- 0.5 teaspoon vanilla extract
Garnish (Optional)
- chocolate shavings
- fresh berries
Instructions
Preparation Steps
- For the chocolate mousse: In a medium bowl, whisk together 0.5 cup heavy cream, 0.25 cup granulated sugar, and 0.3 ounce cocoa powder until well combined.
- In a small saucepan, whisk together 0.5 cup milk and 1 egg yolk. Cook over medium-low heat, stirring constantly, until the mixture thickens slightly and coats the back of a spoon (about 5-7 minutes). Do not boil.
- Remove the milk mixture from heat and immediately pour it over the chopped bittersweet chocolate in a heatproof bowl. Let stand for 5 minutes, then whisk until smooth and melted.
- Gently fold the melted chocolate mixture into the cream mixture until just combined.
- For the whipped cream: In a separate bowl, beat 1 cup heavy cream, 2 tablespoons powdered sugar, and 0.5 teaspoon vanilla extract until stiff peaks form.
- To assemble the parfaits: Spoon a layer of chocolate mousse into the bottom of each serving glass. Top with a layer of whipped cream. Repeat layers until the glasses are full.
- Chill for at least 30 minutes before serving. Garnish with chocolate shavings and fresh berries if desired.