Oh, where do I even begin with these pistachio wedding cookies? They’re more than just a cookie to me; they’re sunshine in edible form, a little bite of pure joy that always brings a smile to my face. I remember the first time I tasted something similar, at my cousin’s wedding years ago. It was this delicate, melt-in-your-mouth cookie, subtly sweet with this unexpected, wonderful nutty flavor. I was instantly smitten. For years, I tried to recreate that magic, experimenting in my own kitchen, often with less-than-stellar results. There were batches that were too dry, some that spread too much, and a few that were just… well, bland. But I was determined. I wanted that whisper of pistachio, that tender crumb, that perfect little cookie that just felt special. And after what felt like a hundred tries, I finally landed on this recipe. It’s the one that gets rave reviews every single time, the one my friends beg me to bring to potlucks, and the one that makes even a Tuesday feel like a celebration. If you’re looking for a delightful treat that’s surprisingly easy to make, these pistachio wedding cookies are your answer. They’re a world away from a typical chocolate chip, offering a unique elegance and a flavor profile that’s simply divine.
Thank you for reading this post, don't forget to subscribe!What are pistachio wedding cookies?
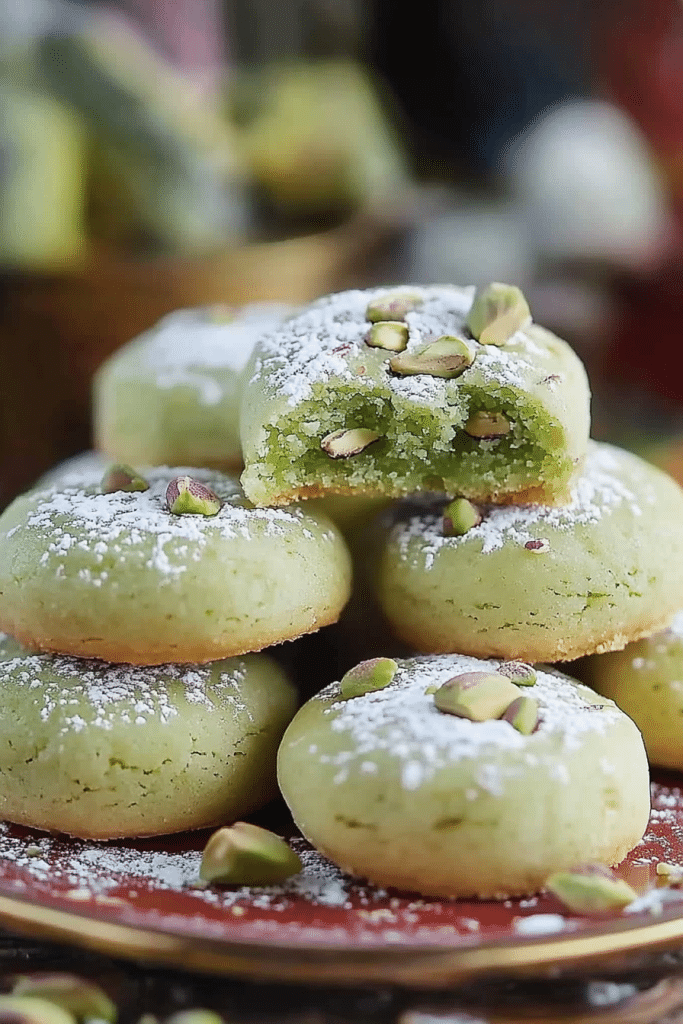
So, what exactly are these enchanting little morsels? Think of them as the sophisticated cousin of a shortbread or a delicate drop cookie. Pistachio wedding cookies are known for their incredibly tender, almost crumbly texture that just melts on your tongue. They get their distinctive flavor and beautiful pale green hue from finely ground pistachios, often mixed right into the dough. Sometimes they have a delicate glaze or a dusting of powdered sugar, adding just a touch more sweetness and charm. The “wedding” in the name isn’t just for show; these cookies are often found gracing dessert tables at celebrations because they’re so elegant and universally loved. They’re not overly sweet, which I think is part of their charm. It allows the subtle, nuanced flavor of the pistachios to truly shine. They’re the kind of cookie you can enjoy with a cup of tea, coffee, or even a glass of wine, and they feel incredibly special without being fussy. It’s essentially a butter cookie elevated with the star power of pistachios.
Why you’ll love this recipe?
Let me tell you why this particular recipe for pistachio wedding cookies has become my absolute go-to. First and foremost, the flavor is just out of this world. It’s not an overpowering pistachio punch; it’s more of a gentle, nutty whisper that dances with the buttery sweetness of the cookie. It’s sophisticated and comforting all at once. What I adore most, though, is how surprisingly simple these are to whip up. I know, I know, “wedding cookies” sounds fancy, but trust me, this recipe is totally manageable, even on a busy weeknight. You don’t need any fancy equipment, and the steps are straightforward. Plus, they’re incredibly cost-effective! Pistachios can sometimes feel like a splurge, but when you break it down per cookie, they’re really quite budget-friendly, especially when you compare them to other specialty cookies or store-bought treats. And the versatility! While they’re perfect for a formal event, they’re also just as wonderful for a simple afternoon tea or when you’re craving something a little bit elegant without a lot of fuss. They’re a delightful change from the usual chocolate chip or sugar cookies, offering a unique flavor and texture that people really appreciate. I’ve found they’re fantastic paired with a light almond extract, too, which just amplifies the nutty goodness. It’s these little details that make this recipe a true winner in my book.
How do I make pistachio wedding cookies?
Quick Overview
This recipe is wonderfully straightforward! We’ll start by creaming butter and sugar, then gently incorporate our dry ingredients, including those star pistachios. After a quick chill, we’ll form them into little mounds, bake them until they’re just kissed with golden edges, and then finish them with a delicate glaze. The beauty of this method is its simplicity, ensuring you get those tender, melt-in-your-mouth results every time. It’s truly a no-fuss approach to creating something spectacular.
Ingredients
For the Main Batter:
You’ll need unsalted butter, softened (about 1 cup, or 2 sticks). Using unsalted butter gives you more control over the saltiness of your cookies, which is important here. Make sure it’s truly softened – not melted, but yielding easily to the touch. This is key for getting that light, creamy texture when you cream it with the sugar. I also use granulated sugar (1 cup) and a touch of powdered sugar (1/2 cup) for sweetness and to help achieve that tender crumb. For the pistachio flavor, you’ll want about 1 cup of finely ground pistachios. I usually buy shelled, unsalted pistachios and grind them myself in a food processor until they’re almost a flour-like consistency, but with a tiny bit of texture still remaining. This is important; if they’re too coarse, you’ll have chunks, and if they’re too fine, they can become oily. A large egg, at room temperature, helps bind everything together. And of course, a teaspoon of pure vanilla extract and a half teaspoon of almond extract will really make the pistachio flavor sing. Don’t forget a pinch of salt (about 1/2 teaspoon) to balance the sweetness, and 2 1/2 cups of all-purpose flour, sifted, for that perfect cookie structure. I always sift my flour, even when it’s not specifically called for, as it really makes a difference in the lightness of baked goods.
For the Glaze:
This is optional, but I highly recommend it for that extra touch of elegance! You’ll need about 1 cup of powdered sugar. For the liquid, you can use a few tablespoons of milk (whole milk or even a non-dairy alternative like oat milk works well) or a little bit of lemon juice for a subtle tang. I sometimes add a tiny drop of green food coloring to enhance the color, but it’s entirely up to you. A splash of vanilla extract in the glaze is lovely too.
Step-by-Step Instructions
Step 1: Preheat & Prep Pan
First things first, let’s get our oven ready. Preheat it to 350°F (175°C). This is a pretty standard baking temperature that works well for most cookies. While the oven is heating up, grab a couple of baking sheets and line them with parchment paper. Parchment paper is your best friend here – it prevents sticking and makes cleanup a breeze. You don’t need to grease the pans if you’re using parchment paper.
“I don’t know if I’ve ever eaten a better pistachio wedding cookies. The rub alone is wonderful, but the sauce??? Over the top!”
Step 2: Mix Dry Ingredients
In a medium bowl, whisk together your sifted all-purpose flour, the finely ground pistachios, and the salt. Whisk them really well to ensure everything is evenly distributed. You want those pistachios to be mixed in so you get that lovely flavor in every bite. Set this bowl aside for now.
Step 3: Mix Wet Ingredients
In a large bowl, using an electric mixer (or a whisk and some serious arm power!), cream together the softened butter, granulated sugar, and powdered sugar until the mixture is light, fluffy, and pale yellow. This usually takes about 3-5 minutes on medium speed. Scrape down the sides of the bowl a couple of times to make sure everything is incorporated. Then, beat in the egg, vanilla extract, and almond extract until well combined. The mixture should look smooth and emulsified.
Step 4: Combine
Now, we’re going to add the dry ingredients to the wet ingredients. It’s best to do this gradually. Add about half of the flour-pistachio mixture to the butter mixture and mix on low speed just until it’s mostly combined. Then, add the remaining dry ingredients and mix again on low speed until just combined. Be careful not to overmix here! Overmixing can develop the gluten in the flour, leading to tough cookies. We’re looking for a soft, slightly sticky dough. If the dough seems too sticky to handle, you can cover the bowl and chill it in the refrigerator for about 15-20 minutes. This makes it much easier to work with.
Step 5: Prepare Filling
This step isn’t for a separate filling, but rather for preparing the cookie dough itself for shaping. I find that chilling the dough for at least 30 minutes (or up to 2 days) really helps with the texture and makes the cookies hold their shape better during baking. So, cover the bowl with plastic wrap and pop it into the fridge.
Step 6: Layer & Swirl
This step is where the magic happens for shaping! Once the dough is chilled and easier to handle, you’ll scoop out portions of the dough. I like to use a small cookie scoop (about 1 tablespoon) or just roll about 1-inch balls between my palms. Place these balls onto your prepared baking sheets, leaving about 2 inches between them, as they will spread a little. If you want to get fancy, you can gently flatten them slightly with the bottom of a glass or your hand. For a beautiful finish, I often lightly press a fork onto the top of each cookie to create a crosshatch pattern, which looks lovely after baking.
Step 7: Bake
Pop those baking sheets into your preheated oven. Bake for 10-14 minutes, or until the edges are just beginning to turn a very light golden brown. The centers should still look pale and slightly soft. These cookies are meant to be pale, so don’t overbake them! They’ll continue to cook a little on the hot baking sheet after you take them out. My oven runs a little hot, so I usually start checking around the 10-minute mark.
Step 8: Cool & Glaze
Once baked, let the cookies cool on the baking sheets for about 5 minutes. This is important because they are delicate when hot. Then, carefully transfer them to a wire rack to cool completely. While they’re cooling, you can prepare the glaze. In a small bowl, whisk together the powdered sugar, a tablespoon or two of milk (or lemon juice), and the vanilla extract until you have a smooth, pourable glaze. If it’s too thick, add a tiny bit more liquid; if it’s too thin, add a bit more powdered sugar. Once the cookies are completely cool, you can drizzle the glaze over them, or dip the tops into the glaze. Let the glaze set before serving or storing.
Step 9: Slice & Serve
These cookies are typically served whole, with the glaze setting firm. They’re delightful served slightly chilled or at room temperature. For presentation, you can arrange them on a platter, perhaps with a few whole pistachios scattered around, or dusted with a little extra powdered sugar if you skipped the glaze.
“The pistachio wedding cookies turned out amazing. My kids asked for seconds. Saving this one!”
What to Serve It With
These pistachio wedding cookies are wonderfully versatile! For breakfast, they’re a delightful little treat alongside a strong cup of coffee or a steaming mug of tea. I love having one with my morning latte; it’s just a little bit of luxury to start the day. For brunch, they elevate any spread. Imagine them arranged beautifully on a tiered stand with fresh fruit, mini quiches, and perhaps a mimosa. They add a touch of elegance that guests always appreciate. As a dessert, they’re simply divine. They pair beautifully with a light, creamy dessert like panna cotta or a fruit tart, offering a contrasting texture and flavor. They’re also fantastic served after dinner with a digestif or a rich espresso. And for cozy snacks? Oh, this is where they truly shine in my house! They’re perfect with a glass of milk for the kids or a cup of herbal tea for me when I need a little pick-me-up. My family loves them with hot chocolate on a chilly afternoon. We’ve also discovered they’re wonderful with a mild fruit salad, like melon and berries, as the sweetness of the fruit complements the nutty cookie perfectly.
Top Tips for Perfecting Your Pistachio Wedding Cookies
Over the years, I’ve picked up a few tricks that I think make all the difference in getting these pistachio wedding cookies just right. First, when it comes to the pistachios themselves, the grind is key. I always pulse mine in a food processor until they’re fine, but not a paste. A few tiny, almost powder-like bits with a slight texture are ideal. If they get too oily, they can make the cookies greasy. For the butter, it absolutely needs to be softened, not melted. If it’s melted, your cookies will spread too much and lose that tender, crumbly texture. Creaming the butter and sugars until they’re super light and fluffy is also crucial; this incorporates air, which helps with the cookie’s texture and prevents them from being too dense. Don’t rush that step! When you combine the wet and dry ingredients, mix just until combined. Overmixing is the arch-nemesis of tender cookies. It develops gluten, which makes them tough and chewy instead of delicate and crumbly. If the dough feels too soft or sticky to handle after mixing, don’t hesitate to chill it for 20-30 minutes. It makes scooping and shaping so much easier and helps the cookies keep their shape better. I learned this the hard way after a few batches that spread into one giant cookie! For baking, keep an eye on them. They bake pretty quickly and are meant to be pale. The moment the edges just start to show the faintest hint of golden color, they’re usually done. They’ll continue to set up on the hot baking sheet. If you’re making the glaze, consistency is important. You want it pourable but not watery. Start with less liquid and add more a teaspoon at a time until you get it just right. And if you’re feeling adventurous with ingredient swaps, I’ve found that adding a tiny bit of orange zest to the dough can be absolutely divine with the pistachio flavor, or you can swap some of the vanilla extract for a floral one like rose water for a different kind of elegance. Experimenting is part of the fun!
Storing and Reheating Tips
Storing these delicate pistachio wedding cookies is pretty straightforward, and they keep reasonably well, which is always a bonus! At room temperature, they’re best stored in an airtight container. If they have a glaze, make sure the glaze is completely set before you put them in the container. They should stay fresh and delicious for about 3-4 days. After that, they can start to get a little dry. For longer storage, the refrigerator is your friend. Place them in an airtight container, and they’ll be good for up to a week. I find that sometimes the texture can become a bit firmer when refrigerated, so you might want to let them sit out at room temperature for about 15-20 minutes before serving them if you’ve stored them this way. Freezing is also a great option, especially if you want to make a big batch ahead of time. Once the cookies are completely cooled and the glaze is set (or if you’re not glazing them), wrap them tightly in plastic wrap, then transfer them to a freezer-safe airtight container or a heavy-duty freezer bag. They can be stored in the freezer for up to 2-3 months. To thaw, simply remove them from the freezer and let them come to room temperature in their packaging. For the glaze timing, if you plan to glaze them before freezing, ensure it’s fully hardened. If you prefer to glaze them after thawing, that’s perfectly fine too, just make sure the cookie is at room temperature before you dip or drizzle.
Frequently Asked Questions
Final Thoughts
There you have it – my cherished recipe for pistachio wedding cookies. I truly hope you’ll give these a try. They’re more than just a dessert; they’re a little taste of elegance, a moment of quiet indulgence, and a reminder that the simplest ingredients can create something truly magical. They’re perfect for any occasion that calls for a little bit of special, whether it’s a grand celebration or just a Tuesday afternoon that needs a bit of brightening. If you love these, you might also enjoy my recipe for Almond Biscotti or my Lemon Lavender Shortbread, which also offer a delicate and sophisticated flavor profile. I can’t wait to hear how yours turn out! Please, leave a comment below and let me know your thoughts, any variations you tried, or how they were received. Happy baking, and enjoy every delightful bite!

Pistachio Wedding Cookies
Ingredients
Main Ingredients
- 2.5 cups all-purpose flour
- 0.5 cup finely ground pistachios
- 1 cup unsalted butter, softened
- 0.5 cup powdered sugar, plus more for dusting
- 1 teaspoon vanilla extract
- 0.25 teaspoon salt
Instructions
Preparation Steps
- In a large bowl, whisk together the flour, ground pistachios, and salt.
- In a separate bowl, cream together the softened butter and powdered sugar until light and fluffy.
- Beat in the vanilla extract.
- Gradually add the dry ingredients to the wet ingredients, mixing until just combined. The dough will be crumbly.
- Using your hands, form the dough into 1-inch balls.
- Place the balls on a baking sheet lined with parchment paper.
- Preheat oven to 325°F (160°C).
- Bake for 10-12 minutes, or until the edges are lightly golden. The centers should still be soft.
- Let the cookies cool on the baking sheet for a few minutes before transferring them to a wire rack to cool completely.
- Once cooled, dust generously with powdered sugar.