Oh, homemade soft pretzels. Just saying the words brings back a flood of memories. I can practically smell the warm, yeasty goodness wafting from my childhood kitchen. My grandma used to make these for Saturday morning cartoons, and let me tell you, they were pure magic. Forget those stiff, flavorless ones you sometimes get from the grocery store – these are the real deal. Chewy on the inside, with that perfect golden-brown crust, and just the right amount of saltiness. They’re surprisingly simple to whip up, which is a huge bonus when you’re craving something utterly delicious but don’t have all day. If you’ve ever tried making your own bread and it felt a little intimidating, I promise you, these soft pretzels are your gateway. They’re way easier than you think, and the payoff is just immense.
Thank you for reading this post, don't forget to subscribe!What are homemade soft pretzels?
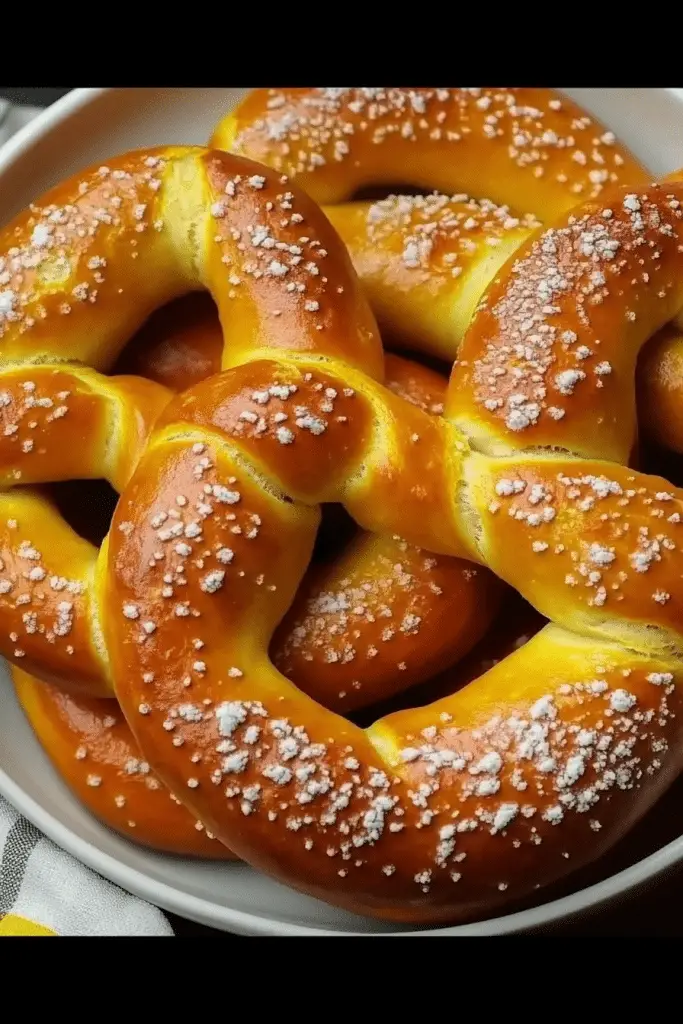
So, what exactly are we talking about when we say “homemade soft pretzels”? Think of them as the ultimate comfort food, elevated. They’re essentially a simple yeast dough, shaped into that iconic twisted knot, and then given a quick dip in a baking soda bath before they hit the oven. That baking soda bath is the secret sauce, my friends. It’s what gives them that wonderfully chewy texture and that beautiful, shiny, deep golden-brown exterior. They’re a far cry from the hard, crunchy pretzels you might find in a snack bag. These are soft, pillowy, and incredibly satisfying. They’re less of a snack and more of an experience, really. A warm, doughy hug in edible form!
Why you’ll love this recipe?
There are so many reasons why this homemade soft pretzel recipe has become a staple in my kitchen, and I just know you’re going to fall in love with it too. First off, the flavor is just out of this world. That slightly sweet, yeasty dough combined with a sprinkle of coarse salt… it’s addictive. Seriously, I’ve made these countless times, and my kids still devour them in minutes. What I love most about this recipe is its simplicity. You don’t need any fancy equipment, just basic pantry staples and a little patience for the dough to rise. And speaking of patience, the rising time is actually pretty short, making these surprisingly doable even on a weeknight when that pretzel craving hits hard. Plus, they are so budget-friendly! Flour, yeast, water, a bit of sugar, and salt – you probably have most of it already. They’re also incredibly versatile. Serve them with mustard, cheese sauce, or just enjoy them plain. If you love my easy cinnamon rolls, you’ll appreciate the simple dough-making process here, but pretzels offer a wonderfully savory alternative that’s just as comforting.
How do I make homemade soft pretzels?
Quick Overview
This recipe is all about creating a simple, pliable yeast dough, shaping it into those classic pretzel knots, giving it a quick alkaline bath for that signature chew and color, and then baking them until they’re perfectly golden. It’s a straightforward process that involves mixing, kneading (or letting your stand mixer do the work!), resting, shaping, dipping, and baking. The magic really happens in that baking soda bath – don’t skip it! It’s the key to achieving that fantastic texture and color that makes homemade soft pretzels so special.
Ingredients
For the Main Dough:
Warm water (about 105-115°F): You want it warm enough to activate the yeast but not so hot that it kills it. Think of a comfy bath temperature. About 1 ½ cups is usually perfect for this batch.
Active dry yeast: 2 ¼ teaspoons (that’s one standard packet). Make sure your yeast is fresh! If it’s old, it might not rise properly, and that’s a sad day.
Granulated sugar: 2 tablespoons. This feeds the yeast and adds a touch of sweetness to the dough.
Salt: 1 ½ teaspoons. Crucial for flavor and helps control the yeast activity. Use regular table salt here.
All-purpose flour: About 4 to 4 ½ cups, plus more for dusting. Start with 4 cups and add more as needed until the dough is just right. I always find I need a little more than the recipe calls for, depending on humidity!
For the Baking Soda Bath:
Water: 10 cups. A good amount to ensure the pretzels get fully submerged.
Baking soda: ¾ cup. This is the game-changer for that golden crust and chewy texture.
For the Topping:
Coarse salt (like pretzel salt or kosher salt): Generous sprinkle! This is what gives pretzels their classic finish and salty bite. You can also use flaky sea salt if that’s what you have.
“Made the homemade soft pretzels tonight and wow — perfect weeknight dinner. Will definitely make again!”
Step-by-Step Instructions
Step 1: Preheat & Prep Pan
First things first, preheat your oven to a nice hot 450°F (230°C). While that’s heating up, grab a couple of large baking sheets. Line them with parchment paper or a silicone baking mat. This prevents sticking and makes cleanup a breeze. You can also lightly grease them if you prefer, but parchment paper is my go-to for pretzels. Make sure you have all your ingredients prepped and ready to go before you start mixing the dough.
Step 2: Mix Dry Ingredients
In a large mixing bowl (or the bowl of your stand mixer fitted with the dough hook), whisk together 4 cups of the all-purpose flour, the sugar, and the salt. Give it a good stir to make sure everything is evenly distributed. This is a simple step, but it ensures that your salt and sugar are mixed throughout the dough, not clumped in one spot.
Step 3: Mix Wet Ingredients
In a separate, smaller bowl or a large measuring cup, combine the warm water and the active dry yeast. Give it a gentle stir and let it sit for about 5-10 minutes. You’ll know the yeast is active and ready when it gets foamy and bubbly on top. If it doesn’t get foamy, your yeast might be old, or the water was too hot or too cold. Time for new yeast!
Step 4: Combine
Once the yeast is foamy, pour the yeast mixture into the bowl with the dry ingredients. If you’re using a stand mixer, start mixing on low speed until the ingredients just come together. If you’re doing this by hand, use a wooden spoon or your hands to mix until a shaggy dough forms. Now, increase the mixer speed to medium-low and knead for about 5-7 minutes, or knead by hand on a lightly floured surface for about 8-10 minutes. You’re looking for a dough that’s smooth, elastic, and slightly tacky, but doesn’t stick to your hands. If it’s too sticky, add flour a tablespoon at a time. If it seems too dry, add a teaspoon of water.
Step 5: Prepare Filling
While the dough is resting, get your baking soda bath ready. In a large, shallow pan or pot (wide enough to submerge a pretzel shape), stir the baking soda into the 10 cups of water. Make sure the baking soda dissolves well. You want to have this ready to go when your dough is shaped. Also, have your coarse salt ready in a small bowl.
Step 6: Layer & Swirl
Punch down the risen dough to release the air. Turn the dough out onto a lightly floured surface. Divide the dough into about 8-10 equal pieces. Roll each piece into a rope about 20-24 inches long. Now for the fun part: shaping! Take a rope, form it into a U shape, cross the ends over each other twice, then bring the ends down to the bottom of the U to create that classic pretzel shape. Don’t worry if they aren’t perfect; mine rarely are! You can also just twist them however you like; they’ll taste great no matter what. Place the shaped pretzels onto your prepared baking sheets, leaving a little space between them.
Step 7: Bake
Now for the magical dip! Carefully slide each pretzel, one at a time, into the baking soda bath. Let it soak for about 20-30 seconds per side. Use a slotted spoon or a spider strainer to lift them out, letting any excess liquid drip off. Place them back onto the parchment-lined baking sheets. Immediately sprinkle them generously with coarse salt. Bake in the preheated oven for 12-15 minutes, or until they are a beautiful, deep golden brown and feel firm to the touch. Keep an eye on them as ovens can vary!
Step 8: Cool & Glaze
Once they’re baked to perfection, carefully remove the pretzels from the baking sheets and let them cool on a wire rack for at least 5-10 minutes before digging in. This helps them firm up a bit. If you’re feeling fancy and want a glaze, you can whisk together some powdered sugar with a little milk or water until you reach your desired consistency and drizzle it over the warm pretzels. Or, for a savory twist, melt some butter and brush it over the warm pretzels, then sprinkle with more salt or even some garlic powder.
“New family favorite! This homemade soft pretzels was so flavorful and ridiculously easy. Crowd-pleaser for sure.”
Step 9: Slice & Serve
These homemade soft pretzels are best served warm, straight from the oven. You can slice them in half horizontally to stuff with cheese or butter, or just enjoy them whole. They’re perfect for dipping into your favorite mustard or a creamy cheese sauce. They make a fantastic appetizer for parties, a fun weekend treat, or even a comforting snack any time of day. The aroma alone will make everyone gather in the kitchen!
What to Serve It With
These glorious homemade soft pretzels are so satisfying on their own, but they also pair beautifully with a variety of accompaniments that can elevate them for any occasion. For a simple breakfast, I love to serve them warm with a smear of butter and a cup of strong coffee. It’s a comforting start to the day that feels like a treat. For a more substantial brunch, they’re a fantastic addition to a spread. Imagine them alongside some scrambled eggs, crispy bacon, and maybe even a side of fruit salad. They add a wonderful savory element that balances out the sweeter components. As a dessert, while they might sound unusual, they can be surprisingly delightful. A drizzle of chocolate ganache or a caramel sauce over a warm pretzel is heavenly, especially if you’ve made a slightly sweeter dough version. And for those cozy snack times, which are my absolute favorite, they are perfect with a hearty cheese dip or a tangy whole-grain mustard. My kids are obsessed with them served with a side of melted cheddar cheese for dipping – it’s their go-to after-school snack. Honestly, the possibilities are endless, and I always find myself experimenting with different dips and pairings!
Top Tips for Perfecting Your Homemade Soft Pretzels
I’ve made these homemade soft pretzels more times than I can count, and through trial and error (and a few slightly burnt batches!), I’ve picked up a few tricks that I think will really help you achieve pretzel perfection. Firstly, regarding the dough: don’t be afraid of a slightly sticky dough. It’s better to be a little sticky than too dry, as a dry dough won’t be as tender. Add flour gradually, just enough to make it manageable. Kneading is important – you want that gluten to develop properly for a chewy texture. If you have a stand mixer, let it do the work for about 7 minutes. If you’re kneading by hand, really get into it for about 10 minutes. When it comes to shaping, don’t stress about perfection. Twisted and rustic looks just as good and tastes the same! The key is to roll the ropes to a consistent thickness so they bake evenly. For the baking soda bath, make sure your pot is wide enough. Don’t overcrowd the pot; dip pretzels one at a time. And for that golden color and chewy crust, the baking soda is non-negotiable. Resist the urge to shorten the time in the bath; it’s crucial. When it comes to baking, watch them closely after the 10-minute mark. Ovens vary wildly! You’re looking for that deep golden-brown color, not pale or burnt. For topping variations, while coarse salt is classic, don’t hesitate to experiment! Garlic salt, everything bagel seasoning, or even a sprinkle of cinnamon sugar on some batches can be amazing. If you want to make them ahead, I’ve found they are best enjoyed the day they are made, but I’ll share my storage tips below!
Storing and Reheating Tips
Homemade soft pretzels are definitely at their absolute best when they’re fresh and warm from the oven, but thankfully, they store pretty well too! If you find yourself with leftovers (which is rare in my house!), your best bet is to store them at room temperature. Let them cool completely, then place them in an airtight container or a resealable plastic bag. They’ll stay good for about a day, though they’ll start to lose some of their chewiness after the first 24 hours. If you need to store them for longer, the refrigerator is an option, but I find it can make them a bit tougher. If you do refrigerate them, make sure they’re in an airtight container and try to consume them within 2-3 days. They can get a little dense in the fridge. For longer storage, freezing is your friend! Once the pretzels have cooled completely, wrap them individually in plastic wrap, then place them in a freezer-safe bag or container. They can stay frozen for up to 2-3 months. To reheat, my favorite method is to pop them in a preheated oven (around 350°F or 175°C) for about 5-8 minutes, or until warmed through. This brings back some of that lovely chewiness and crisp exterior. You can also microwave them for a quick warm-up, but be mindful that they can become a little soft and chewy in the microwave. For frozen pretzels, thaw them overnight in the refrigerator before reheating in the oven. If you’re planning to glaze them, it’s always best to do that right before serving, especially if you’re glazing after storage, as the moisture can make them soggy over time.
Frequently Asked Questions
Final Thoughts
Honestly, making your own homemade soft pretzels from scratch is such a rewarding experience. The process is so simple, yet the result feels like you’ve achieved something truly special. That moment when you pull them out of the oven, golden brown and smelling incredible, is just pure kitchen joy. They’re more than just a baked good; they’re a little slice of comfort that brings people together. If you’re someone who loves that satisfying chew and salty crunch, this recipe is an absolute must-try. It’s the kind of recipe that becomes a family favorite, the one people ask for again and again. I really hope you give these a go. They’re a fantastic way to impress your friends and family, or just to treat yourself to something truly delicious. Don’t be intimidated by the shaping; it’s part of the fun! I can’t wait to hear how yours turn out. If you try this recipe, please leave a comment below and let me know what you think, or share your own favorite pretzel toppings! Happy baking!
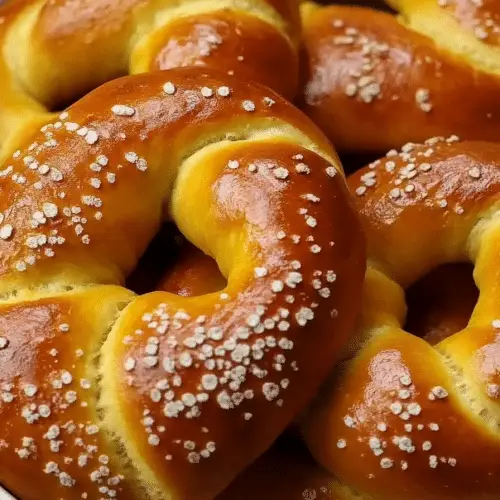
Homemade Soft Pretzels
Ingredients
Dough
- 1.5 cup Warm water about 105-115°F
- 2.25 teaspoon Active dry yeast
- 1 tablespoon Granulated sugar
- 4.5 cup All-purpose flour plus more for dusting
- 1 teaspoon Salt
- 2 tablespoon Butter melted
Boiling Solution
- 6 cup Water
- 0.5 cup Baking soda
Toppings
- 1 large Egg yolk beaten with 1 tablespoon water
- 1 tablespoon Coarse salt
Instructions
Preparation Steps
- In a large bowl, combine the warm water, yeast, and sugar. Let stand for 5-10 minutes until foamy.
- Add the flour and salt to the yeast mixture. Mix until a shaggy dough forms. Add the melted butter and knead for 5-7 minutes until smooth and elastic.
- Place the dough in a greased bowl, cover, and let it rise in a warm place for 1 hour, or until doubled in size.
- Preheat oven to 425°F (220°C). Line a baking sheet with parchment paper.
- Punch down the dough and divide it into 8 equal pieces. Roll each piece into a long rope (about 20 inches). Twist into a pretzel shape.
- In a large pot, bring 6 cups of water and 0.5 cup of baking soda to a rolling boil.
- Carefully drop each pretzel into the boiling solution for 30 seconds per side. Remove with a slotted spoon and place on the prepared baking sheet.
- Brush the pretzels with the egg wash and sprinkle with coarse salt.
- Bake for 12-15 minutes, or until golden brown.


