You know those days when you just need something SO good, so comforting, and yet surprisingly healthy? That’s exactly how I feel about this Greek hummus. It’s not just any hummus; it’s the kind that makes your eyes close with the first bite, the one that disappears from the platter way too quickly at parties. I remember my Yiayia making this when I was little, the whole house smelling like tahini and lemon. It was always served with warm, fluffy pita bread that she’d just pulled from her oven. While my version might not have the authentic Greek oven, it’s got all that love and flavor packed in. If you’ve ever been intimidated by making hummus from scratch, thinking it’s a complicated process, let me tell you, this Greek hummus recipe is going to change your mind. It’s ridiculously simple and yields a result so much better than anything store-bought. Seriously, it’s a game-changer for healthy snacking and party appetizers.
Thank you for reading this post, don't forget to subscribe!What is Greek Hummus?
So, what makes this hummus “Greek”? Well, it’s all about the nuances, the little twists that give it a distinct personality. Think of it as a super-creamy, flavorful dip that takes the classic chickpea and tahini base and elevates it with a few key ingredients that are staples in Greek cuisine. It’s essentially a more intensely flavored, often richer version of your everyday hummus. We’re talking about generous amounts of good quality olive oil, a bright squeeze of fresh lemon juice, and sometimes a hint of garlic that really sings. It’s the kind of dish that’s perfect for dipping pita bread, fresh veggies, or even spreading on toast. It’s not necessarily a strictly traditional recipe passed down through generations with a single, unchanging form, but rather a delicious interpretation that captures the vibrant spirit of Greek flavors. It’s accessible, familiar, and utterly delightful.
Why you’ll love this recipe?
Honestly, where do I even begin? There are so many reasons why this Greek hummus has become a staple in my kitchen. First off, the FLAVOR. It’s so bright and zesty, with a creaminess that’s just out of this world. The tahini is nutty and rich, the lemon adds this wonderful tang, and a touch of garlic just ties it all together. It’s the perfect balance of savory, creamy, and fresh. Then there’s the SIMPLICITY. I can whip this up in about 10 minutes flat, and that includes rinsing the chickpeas! It’s one of those lifesavers on busy weeknights when you need a healthy snack or an appetizer in a hurry. Plus, it’s incredibly COST-EFFECTIVE. Canned chickpeas are super cheap, and the other ingredients are pantry staples. You’re getting restaurant-quality flavor for a fraction of the price. And the VERSATILITY? Oh my goodness. I use this Greek hummus for everything. It’s not just for dipping! I’ve spread it on sandwiches, used it as a base for grain bowls, and even added a dollop to my morning eggs. It’s the kind of recipe that just keeps on giving. I’ve tried other hummus recipes, but this one just has that something extra. Maybe it’s the specific ratio of lemon to tahini, or the way I always use a little ice water to get it super smooth. Whatever it is, it’s become my go-to, and I think you’ll feel the same way!
How do I make Greek Hummus?
Quick Overview
Making this amazing Greek hummus is surprisingly straightforward. You’ll start by getting your chickpeas super smooth, then blend in the flavor powerhouses like tahini, lemon, and garlic. The secret to that incredible creaminess? A little ice water and a good food processor. It’s a simple blend-and-go situation that results in a dip so luxurious, you’ll swear you bought it from a fancy Mediterranean deli. Trust me, it’s easier than you think!
Ingredients
For the Main Batter:
Two (15-ounce) cans of chickpeas, rinsed and drained extremely well. The better you rinse and drain them, the smoother your hummus will be. I always give them a good shake in the colander! Make sure to remove any loose skins that come off, too – it takes an extra minute but is totally worth it for that velvety texture. You can even pop them in the freezer for about 15 minutes before processing to help them break down even more easily.
1/4 cup tahini. Use a good quality tahini! It really makes a difference. Stir it well before measuring, as the oil can separate.
2-3 tablespoons fresh lemon juice. Start with 2 and add more to your taste. I like it quite zesty, so I often go for 3.
1-2 cloves garlic, minced. Adjust to your garlic preference! If you’re not a huge garlic fan, start with just one small clove.
1/4 cup ice water. This is key for achieving that super smooth, fluffy texture. Have a few ice cubes ready to go.
1/2 teaspoon salt, or to taste. Don’t be shy with the salt, it really brings out all the flavors.
For Garnishing (Optional, but highly recommended!):
2-3 tablespoons extra virgin olive oil. A really good quality Greek olive oil will make this sing!
Pinch of smoked paprika or sumac. For a pop of color and flavor.
Fresh parsley, chopped. For freshness and a beautiful green touch.
“Packed with flavor and so simple. Exactly what I wanted from this Greek hummus!”
Step-by-Step Instructions
Step 1: Prepare the Chickpeas
Start by thoroughly rinsing and draining your canned chickpeas. This is a crucial step for smooth hummus! You can even give them a quick pat dry with a paper towel. If you’re feeling extra ambitious, you can peel the chickpeas, which guarantees the smoothest texture, but honestly, I usually skip this step and it still turns out amazing. Just make sure they are well-drained.
Step 2: Combine Flavor Base
In the bowl of your food processor, combine the minced garlic and the lemon juice. Let it sit for about 5-10 minutes. This helps to mellow out the sharpness of the raw garlic and infuse the lemon juice with its essence.
Step 3: Add Tahini and Chickpeas
Add the tahini and salt to the food processor. Then, add about half of the rinsed and drained chickpeas. Processing in batches helps ensure everything gets blended really smoothly.
Step 4: Process and Add Water
Process the mixture for about 1-2 minutes until it starts to form a thick paste. With the food processor running, slowly stream in the ice water, a tablespoon at a time. You’ll notice the mixture getting lighter and fluffier. Continue processing until it’s incredibly smooth and creamy. Scrape down the sides of the bowl as needed.
Step 5: Add Remaining Chickpeas
Add the remaining chickpeas to the food processor. Process again until the hummus is completely smooth and has a light, airy texture. This might take another 2-3 minutes. If it seems too thick, you can add another tablespoon or two of ice water, but go slow!
Step 6: Taste and Adjust
Taste your hummus and adjust seasonings as needed. Does it need more salt? More lemon juice? A touch more garlic? This is your chance to make it perfect for your palate.
Step 7: Serve
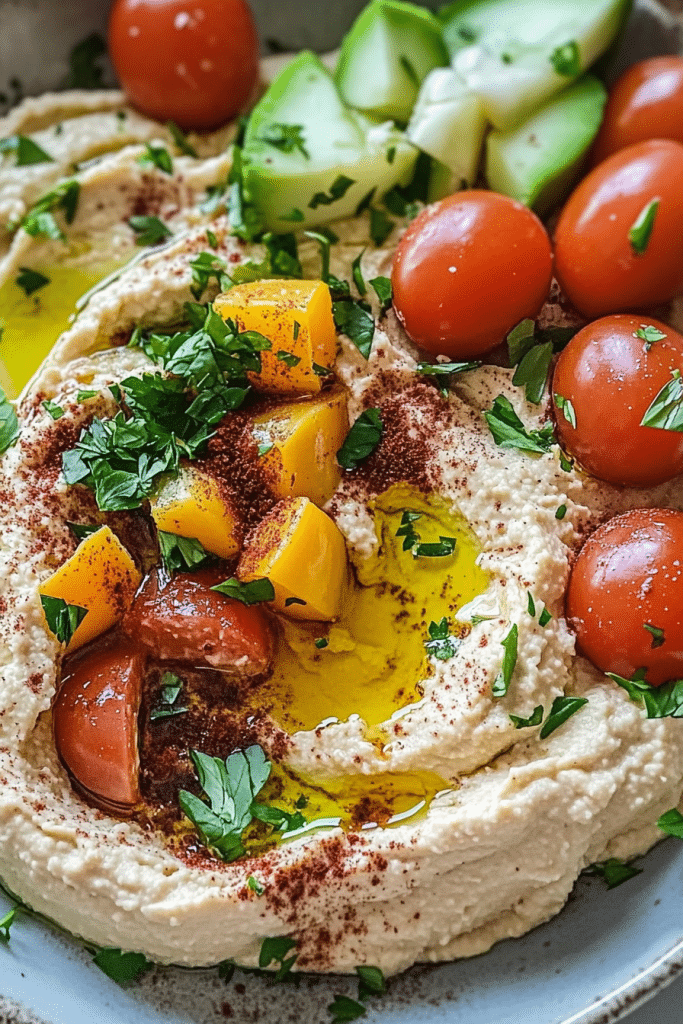
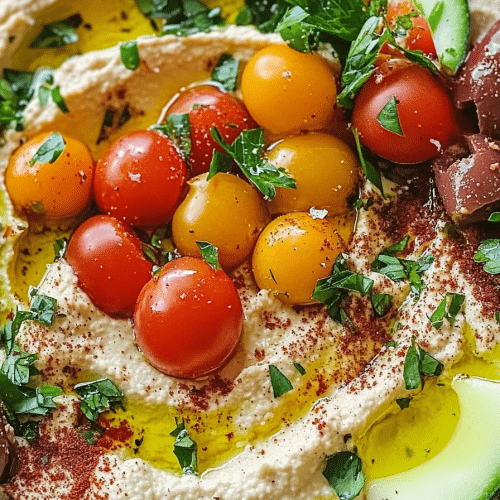
Spoon the Greek hummus into a serving bowl. Use the back of the spoon to create a little swirl on top. Drizzle generously with your best extra virgin olive oil. Sprinkle with a pinch of smoked paprika or sumac and some fresh chopped parsley, if using. This is where the hummus really gets its beautiful presentation!
Step 8: Enjoy!
Serve immediately with warm pita bread, fresh vegetables like carrots, cucumbers, and bell peppers, or even as a spread on sandwiches. It’s best enjoyed fresh, but it stores well too!
“Made the Greek hummus tonight and wow — perfect weeknight dinner. Will definitely make again!”
What to Serve It With
Oh, the possibilities are endless when it comes to serving this glorious Greek hummus! It’s honestly versatile enough for any time of day. For a simple, wholesome BREAKFAST, I love spreading a generous dollop on some toasted whole-wheat sourdough, maybe topped with a sprinkle of za’atar or a few sliced cherry tomatoes. It’s a much more satisfying start than just plain toast. For BRUNCH gatherings, this hummus is an absolute showstopper. I’ll arrange a vibrant platter with colorful crudités – think vibrant red bell peppers, crisp cucumber sticks, bright orange carrots, and snap peas. Add some Kalamata olives, some feta cheese crumbles, and of course, warm, fluffy pita bread or toasted pita chips. It’s a beautiful centerpiece that screams Mediterranean freshness. And when that late-night craving hits and I don’t want to bake a whole cake? This hummus is my go-to for a COZY SNACK. I’ll scoop it up with some whole-grain crackers or even some apple slices for a sweet and savory fix. It’s surprisingly filling and guilt-free. You can also get fancy and serve it AS DESSERT, in a way. Think of it as a savory appetizer before a lighter meal, or a sophisticated spread for a cheese board. Pair it with some figs, dates, and a drizzle of honey for a truly unique experience. My family also loves using it as a dip for these crispy oven-baked sweet potato fries – it’s our little secret indulgence!
Top Tips for Perfecting Your Greek Hummus
Over the years, I’ve learned a few tricks that take this Greek hummus from good to absolutely spectacular. The first is all about the CHICKPEAS. Make sure they are completely drained and rinsed. I sometimes even give them a quick pulse in the food processor *before* adding the other ingredients to break them down a bit more. This helps achieve that super smooth, almost whipped texture. Don’t be afraid of the ice water! It really is the secret ingredient for that airy fluffiness. I’ve tried warm water, and it just doesn’t give you the same result. Remember to add it slowly while the processor is running; you can always add more, but you can’t take it out! For the TAHINI, use the good stuff. If your tahini is a bit stiff or separated, give it a really good stir before measuring. Sometimes, I even warm my tahini jar slightly in a bowl of warm water to loosen it up. This makes it much easier to incorporate smoothly into the hummus. When it comes to the GARLIC, raw garlic can be quite potent. If you’re sensitive to its bite, you can lightly roast the garlic cloves before mincing them, or even sauté them gently in a little olive oil until they’re soft and fragrant. This mellows out the flavor beautifully. I also find that letting the lemon juice and garlic sit together for a few minutes before adding other ingredients really helps meld those flavors. Don’t rush the PROCESSING stage! Let your food processor do its work. Scrape down the sides frequently to ensure everything is getting blended evenly. The longer you process (within reason, of course!), the creamier your hummus will become. I’ve definitely learned this lesson after impatient attempts! For the GARNISH, while optional, it’s really where this Greek hummus shines. A generous swirl of high-quality extra virgin olive oil is non-negotiable for me. It adds richness and a beautiful sheen. Sumac offers a lovely tartness, and a sprinkle of smoked paprika adds a hint of warmth and color. Fresh herbs like parsley or mint add a burst of freshness that cuts through the richness. I’ve experimented with different SPICE SWAPS too – a pinch of cumin is always lovely, or for a spicy kick, a tiny bit of cayenne pepper. If you don’t have fresh lemon, bottled is okay in a pinch, but fresh is always best. My kids actually ask for this hummus all the time, and I feel good about serving it to them because it’s packed with good stuff.
Storing and Reheating Tips
This Greek hummus is fantastic for making ahead, which is a lifesaver for me! For ROOM TEMPERATURE storage, it’s best to keep it in an airtight container and serve it within a couple of hours. It’s really at its peak freshness when it’s just made. For the REFRIGERATOR, transfer the hummus to a clean airtight container. I usually press a piece of plastic wrap directly onto the surface of the hummus before putting the lid on. This helps prevent a skin from forming and keeps it from drying out. It will stay wonderfully fresh in the fridge for about 3 to 4 days. When you take it out, you might notice it has firmed up a bit. Just let it sit at room temperature for about 15-20 minutes, or give it a quick stir with a fork. It will soften up beautifully. I’ve never frozen this hummus, as I find it’s best enjoyed fresh or refrigerated. The texture can change quite a bit when frozen and thawed, and I’m all about that super creamy texture! The GLUE timing is important too. I always add the olive oil and garnishes *just before* serving. If you add the oil too early and then refrigerate, it can sometimes solidify and look a bit unappealing. So, hold off on those final touches until you’re ready to dig in!
Frequently Asked Questions
Final Thoughts
So there you have it – my absolute favorite Greek hummus recipe. It’s more than just a dip to me; it’s a taste of home, a guarantee of good times, and proof that incredible flavor can come from the simplest ingredients. I really hope you give this a try. It’s so satisfying to make something so delicious from scratch, and this recipe makes it totally achievable for anyone. Imagine your next gathering, and you bring out this vibrant, creamy bowl of goodness. It’s sure to be a hit! If you’re a fan of Mediterranean flavors, you might also love my recipe for a vibrant Tabbouleh salad or these simple Baked Feta Bites. They’re all perfect for sharing. I can’t wait to hear what you think of this Greek hummus! Let me know in the comments below how it turns out for you, and if you have any favorite ways to serve it. Happy dipping!
Greek hummus
Ingredients
Main Ingredients
- 0.5 cup cooked chickpeas, drained and rinsed reserve some for garnish
- 0.25 cup tahini
- 0.125 cup fresh lemon juice
- 2 cloves garlic, minced
- 0.0625 cup olive oil plus more for drizzling
- 0.125 teaspoon cumin
- 0.5 teaspoon salt or to taste
- 0.125 cup water or more, as needed
Garnish
- 2 tablespoon fresh parsley, chopped
- 0.0625 cup Kalamata olives, pitted and halved
- 0.03125 cup feta cheese, crumbled
- 0.03125 cup cherry tomatoes, halved
Instructions
Preparation Steps
- Combine the chickpeas, tahini, lemon juice, garlic, 0.0625 cup olive oil, cumin, and salt in a food processor.
- Process until smooth, scraping down the sides as needed. If the hummus is too thick, add water 1 tablespoon at a time until the desired consistency is reached.
- Taste and adjust seasoning if necessary.
- Spoon the hummus into a serving bowl. Drizzle with additional olive oil.
- Garnish with chopped parsley, Kalamata olives, crumbled feta cheese, and cherry tomatoes.
- Serve with pita bread or vegetable sticks.