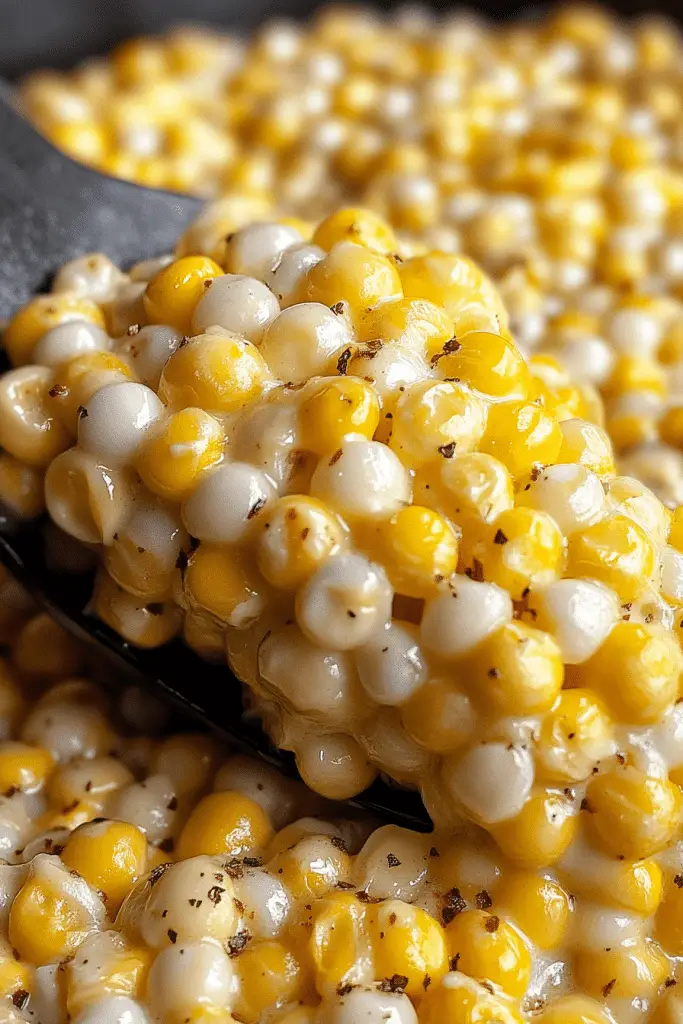
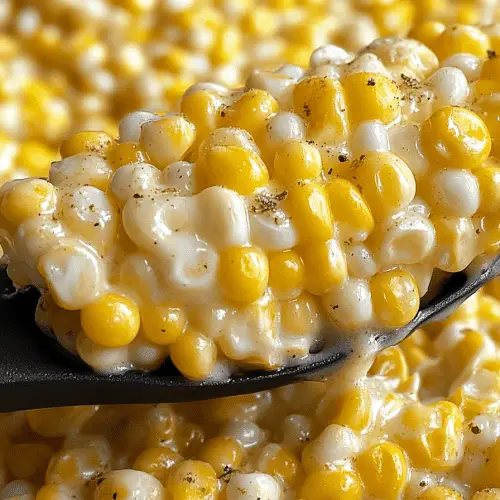
You know those recipes that just make you feel… cozy? The ones that smell amazing while they’re cooking, fill your home with warmth, and disappear in minutes the second you put them on the table? Yeah, this honey butter skillet corn is *that* recipe for me. Honestly, it’s one of those dishes I’ve made so many times I could probably whip it up in my sleep, but it never, ever gets old. It’s so simple, so satisfying, and the flavors are just out of this world. If you love classic comfort food that’s elevated just a touch, this is your new go-to. It’s a bit like the sweetest, most decadent corn you can imagine, but somehow even better because it’s all done in one pan, with that gorgeous honey butter glaze doing its magic. Forget everything you think you know about plain old corn; this is an experience!
Thank you for reading this post, don't forget to subscribe!What is honey butter skewer corn?
So, what exactly is this magical concoction? At its heart, it’s just corn, cooked to sweet perfection in a hot skillet with a generous amount of butter and a drizzle of honey. Think of it as the ultimate upgrade to your summer corn on the cob, but even easier because it’s off the cob and all mingling together. The “skillet” part is key here – it allows the corn to get those lovely little caramelized edges, adding a depth of flavor that you just can’t get any other way. The “honey butter” is where the real enchantment happens. It’s this sweet, salty, creamy elixir that coats every single kernel, making it irresistible. It’s not a complicated dish by any stretch; it’s more about letting a few really good ingredients shine. It’s the kind of dish that feels a little bit fancy but is so down-to-earth and comforting. It’s basically sunshine in a pan, with a touch of sweet indulgence.
Why you’ll love this recipe?
There are so many reasons why I’ve fallen head over heels for this honey butter skillet corn, and I just know you will too! First off, the flavor is absolutely unreal. You get that natural sweetness of the corn, then the rich, creamy butter, and that beautiful, warm hug of honey. It’s a symphony of sweet and savory that hits all the right notes. It’s genuinely addictive! What I also love is how incredibly simple it is. Seriously, we’re talking minutes of prep and then just a little bit of watching it bubble away in the skillet. It’s a lifesaver on busy weeknights when you want something delicious without a ton of fuss. Plus, it’s surprisingly budget-friendly. Corn is usually pretty affordable, and butter and honey are staples in most kitchens. You can whip this up without breaking the bank! And its versatility? Oh my gosh. I’ll get to that more in a bit, but this corn is happy as a side dish, a snack, or even part of a main meal. It’s a crowd-pleaser, for sure. My kids ask for this all the time, which is honestly the highest compliment a mom can get! It’s just one of those recipes that consistently delivers deliciousness without demanding too much from you. It’s a culinary win-win!
How do I make a honey butter skewer corn?
Quick Overview
Making this amazing honey butter skillet corn is a breeze! You’ll essentially be sautéing fresh or frozen corn kernels in a hot skillet with butter until they’re tender and slightly browned. Then, you’ll stir in honey and a pinch of salt to create that luscious glaze. The whole process takes under 15 minutes from start to finish, and the result is a side dish that’s bursting with flavor and has that irresistible sweet and buttery coating. It’s so easy, you’ll be wondering why you ever just ate plain corn before!
Ingredients
For the Main Corn Base:
2 tablespoons unsalted butter (this is for getting the pan nice and hot and starting the sauté)
4 cups fresh or frozen corn kernels (about 4-6 ears of corn if you’re shucking your own. For frozen, no need to thaw!)
1/4 teaspoon salt, plus more to taste
1/8 teaspoon black pepper, freshly ground
For the Honey Butter Glaze:
2 tablespoons unsalted butter, softened (this is for that glorious final glaze)
2 tablespoons honey (use a good quality one if you can; it makes a difference!)
Step-by-Step Instructions
Step 1: Preheat & Prep Pan
Grab your favorite skillet – a cast iron skillet is fantastic here because it holds heat so well and gives the corn a lovely char, but any good quality non-stick or stainless steel pan will work. Place it over medium-high heat. Add the first 2 tablespoons of unsalted butter. Let it melt and get nice and foamy. You want the pan hot enough that the butter sizzles immediately, but not so hot that it burns. This initial butter helps get everything started with flavor and prevents sticking.
“The Honey butter skillet corn turned out amazing. My kids asked for seconds. Saving this one!”
Step 2: Mix Dry Ingredients
While the pan is heating up, if you’re using fresh corn, make sure your kernels are cut cleanly from the cob. If you’re using frozen, just have them ready to go. You’ll want to have your salt and pepper handy too. We’re not really mixing dry ingredients separately here, but it’s good to have everything prepped and within reach before you start cooking. The corn itself is our main ingredient, and we’ll season it as we go.
Step 3: Mix Wet Ingredients
In a small bowl, combine the 2 tablespoons of softened butter with the 2 tablespoons of honey. Stir them together with a fork until they are well combined and form a loose paste. This is your glorious glaze! You can set this aside for now. Having it ready means you can just drop it into the pan at the perfect moment without having to scramble.
Step 4: Combine
Once the butter in the skillet is melted and shimmering, add your corn kernels. Be careful, as they might pop a little! Stir them around to coat them in the butter. Let the corn cook for about 5-7 minutes, stirring occasionally, until it starts to soften and you see some nice golden-brown spots forming on the kernels. This caramelization is where a lot of the flavor comes from! Season the corn with the 1/4 teaspoon of salt and the 1/8 teaspoon of pepper. Stir well to distribute the seasoning.
Step 5: Prepare Filling
This step is already done because we prepared our honey butter glaze in Step 3! We’ve got that lovely mixture of softened butter and honey ready to go. It’s important that the butter is softened and not melted, as it will emulsify better with the honey and create a smoother glaze rather than a greasy sauce.
Step 6: Layer & Swirl
Now for the magic! Reduce the heat slightly to medium. Add the prepared honey butter mixture (from Step 3) directly into the skillet with the corn. Stir it in immediately, allowing the butter to melt and the honey to coat every single kernel. Keep stirring gently for another 1-2 minutes, just until the glaze has thickened slightly and coats the corn beautifully. You’ll see it become glossy and luscious. This is when the aroma really kicks into high gear – get ready!
Step 7: Bake
We’re not technically “baking” in an oven here, but we are letting it simmer and meld in the skillet. The “cooking” happens right on the stovetop. So, after you’ve added the glaze, continue to cook over medium to medium-low heat for another 2-3 minutes, stirring frequently. This allows the flavors to meld and the glaze to become perfectly sticky and delicious. You don’t want to overcook it at this stage, just enough to bring everything together beautifully.
Step 8: Cool & Glaze
Once the corn is perfectly coated and heated through, remove the skillet from the heat. The glaze will continue to thicken slightly as it cools. If you find it’s too thin for your liking after a minute, you can stir in another tiny bit of softened butter to help it emulsify and thicken further. But usually, it’s perfect as is. The trick here is serving it warm, so the glaze is still wonderfully melty.
Step 9: Slice & Serve
This is the best part! Spoon the glorious honey butter skillet corn directly from the pan onto serving dishes. You can garnish with a tiny pinch more of fresh parsley if you’re feeling fancy, but it’s honestly perfect just as it is. Serve immediately while it’s warm and the glaze is at its most luscious. It’s so good, you might find yourself eating it straight out of the pan – no judgment here!
“I don’t know if I’ve ever eaten a better Honey butter skillet corn. The rub alone is wonderful, but the sauce??? Over the top!”
What to Serve It With
This honey butter skillet corn is incredibly versatile, and I love finding new ways to enjoy it! For a perfect breakfast, imagine this alongside some crispy bacon or fluffy scrambled eggs. The sweetness of the corn is a wonderful contrast to savory breakfast meats. If you’re planning a lovely brunch, this corn is a showstopper. Serve it in a pretty bowl with some poached eggs, smoked salmon, or even alongside a baked ham. It adds a touch of sunshine to any brunch spread. As a dessert, believe it or not, it can work! It’s not overly sweet, but the honey makes it feel decadent. Try it with a scoop of vanilla bean ice cream on the side, or drizzled with a little extra honey for an unexpected sweet treat. And for those cozy snack times? This is pure comfort. It’s wonderful on its own, or served with some grilled cheese sandwiches for an elevated twist on a classic pairing. My family loves it with barbecue chicken or pulled pork – the sweetness of the corn balances the smoky flavors perfectly. It’s also a fantastic side for roasted chicken or pork chops. Honestly, if you can grill it, roast it, or fry it, this corn is probably a delicious companion!
Top Tips for Perfecting Your Honey Butter Skillet Corn
I’ve made this honey butter skillet corn more times than I can count, and over the years, I’ve picked up a few tricks that I think really make a difference. When you’re working with fresh corn, make sure to cut the kernels off the cob cleanly. Run your knife down one side, then rotate the cob and go down the other side. This prevents mushy kernels. If you’re using frozen, just toss them straight in the pan; they’ll thaw and cook beautifully. For the butter and honey glaze, I’ve found that using softened butter, not melted, is crucial. It helps create a more emulsified, creamy glaze rather than a greasy one. And the type of honey matters! A good quality, flavorful honey will really shine through. I’ve experimented with buckwheat honey for a deeper flavor and a light clover honey for a more delicate sweetness, and both are wonderful, but they yield different results. Don’t be afraid to adjust the salt and pepper to your taste. I usually start with the amounts listed, but sometimes the corn needs a little more, or you might prefer a touch more pepper. When you’re cooking the corn initially, you really want to let it get those little bits of golden-brown caramelization. Don’t rush this step! Those browned bits are packed with flavor. Resist the urge to stir constantly; let the corn sit for a minute or two on each side to develop color. If your glaze seems a little too thin after you add it, don’t panic! You can simply continue to cook it for another minute or two, stirring, and it will thicken up. Or, a tiny extra pat of softened butter can help it emulsify and thicken. I learned this one after a few too many batches that were a tad too saucy! Trust me, getting the consistency just right makes all the difference. And finally, serve it hot! This is a dish that truly shines when it’s warm, allowing the glaze to be perfectly melty and gooey.
Storing and Reheating Tips
If, by some miracle, you have any honey butter skillet corn leftover (which, let’s be honest, rarely happens in my house!), storing it is super simple. For short-term storage, you can keep it in an airtight container in the refrigerator for up to 3 days. The flavors actually meld even more overnight, which can be quite nice! Just make sure it’s cooled completely before sealing the container to prevent condensation. If you plan to freeze it, I’d recommend doing so before you add the final honey butter glaze, if possible, as the texture of the glaze can change a bit upon thawing. However, if you need to freeze the whole thing, wrap it tightly in plastic wrap, then in aluminum foil, or place it in a freezer-safe container. It should be good in the freezer for about 1 to 2 months. When it comes to reheating, I have a few favorite methods. For refrigerated leftovers, the best way is to gently reheat it in a skillet over medium-low heat, stirring occasionally, until it’s warmed through. This helps to revive that lovely glazed texture. You can also microwave it, but be sure to stir it halfway through to ensure even heating. If you froze it, thaw it overnight in the refrigerator first. Then, you can reheat it using the skillet method. If you’re reheating corn that was frozen *with* the glaze, be extra gentle, as the glaze might be a bit more liquidy. You might need to add a tiny bit of fresh butter or honey when reheating to get it back to its perfect consistency.
Frequently Asked Questions
Final Thoughts
So there you have it – my absolute favorite honey butter skillet corn! I really hope you give this recipe a try. It’s one of those dishes that’s so simple but delivers so much flavor and comfort. It’s perfect for weeknight dinners, weekend BBQs, or even just when you’re craving something a little sweet and savory. I genuinely believe that once you make this, it will become a regular in your recipe rotation. If you love this recipe, you might also enjoy my creamy baked mac and cheese or my garlic herb roasted chicken, which are both equally comforting and delicious! Don’t be shy about leaving a comment below to let me know how yours turned out, or if you tried any fun variations. I love hearing from you all, and seeing your culinary adventures! Happy cooking, and enjoy every single sweet, buttery bite!
Honey butter skillet corn
Ingredients
Main Ingredients
- 4 cups Corn Fresh or frozen
- 4 tablespoons Butter
- 2 tablespoons Honey
- 0.25 teaspoons Salt
- 0.125 teaspoons Black pepper
- 2 tablespoons Fresh parsley Chopped, for garnish
Instructions
Preparation Steps
- Melt the butter in a large skillet over medium heat.
- Add the corn to the skillet and cook, stirring occasionally, until tender and slightly browned, about 5-7 minutes.
- Stir in the honey, salt, and pepper. Cook for another 1-2 minutes, until the honey is well combined and coats the corn.
- Garnish with fresh parsley before serving.