Oh, where do I even begin with this cheesy baked asparagus? It feels like just yesterday I was a kid, picking at my veggies, convinced that anything green was automatically “icky.” My mom would try all sorts of tricks, but nothing really stuck. Then, one fateful Sunday dinner, she pulled this out of the oven, and my world shifted. The aroma alone was enough to make me curious – a savory, cheesy goodness that just filled the kitchen. And the taste? Pure magic. It’s the kind of dish that makes even the most reluctant eater reach for seconds, and honestly, it’s become my go-to whenever I need a side dish that’s both incredibly delicious and surprisingly simple. Forget boring steamed asparagus; this cheesy baked asparagus is a revelation, a total game-changer that makes vegetables exciting again. It’s like a warm, cheesy hug on a plate, and I’ve been making it ever since.
Thank you for reading this post, don't forget to subscribe!
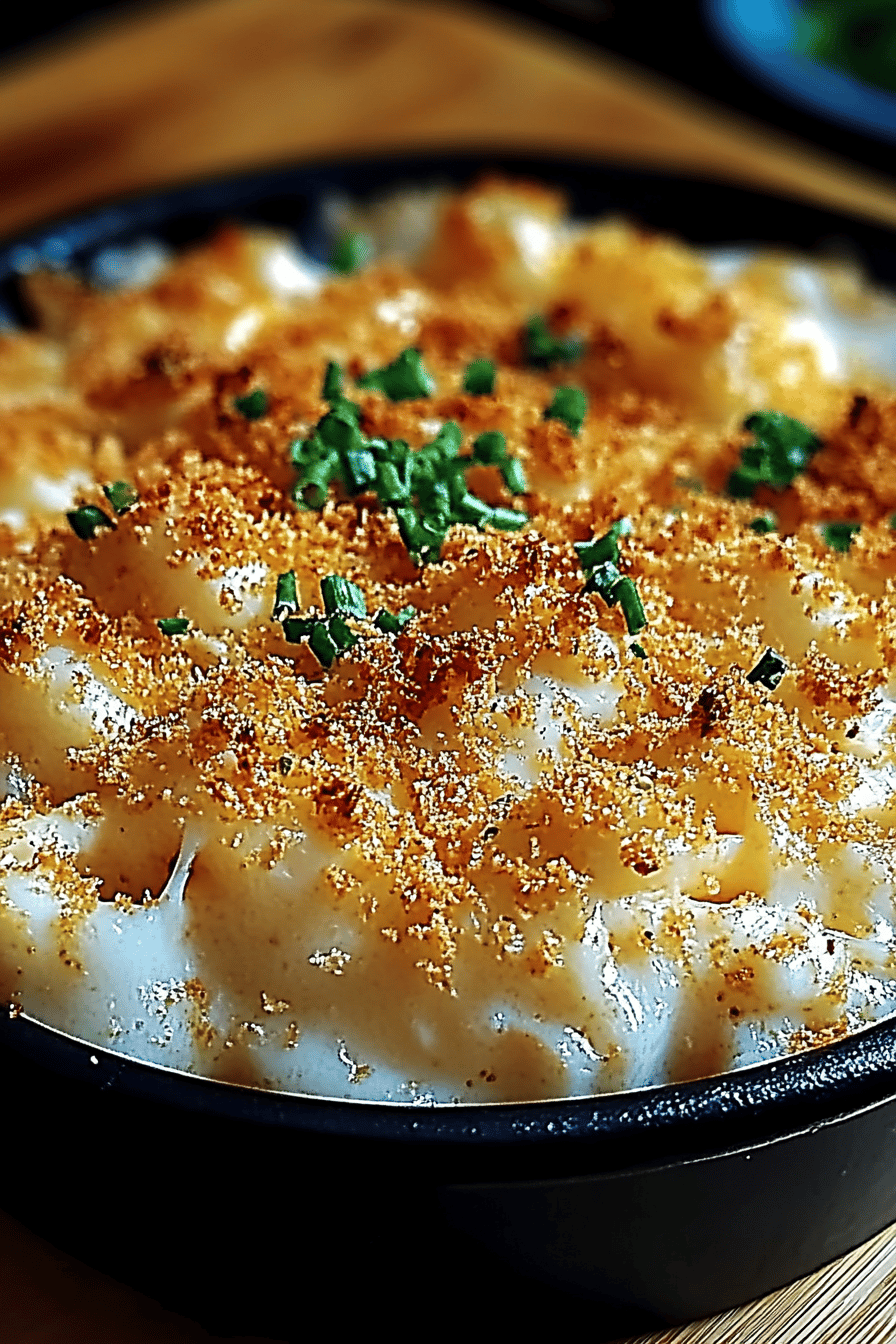
What is a Cheesy Baked Asparagus?
So, what exactly is this magical dish I keep raving about? Think of it as your favorite green vegetable, but elevated to a whole new level of deliciousness. It’s essentially tender, crisp-tender asparagus spears baked until they’re just right, then generously coated in a luscious, gooey cheese sauce. It’s not just about dumping cheese on top, though; there’s a little technique involved to make sure every bite is infused with that savory, cheesy goodness without becoming greasy or heavy. It’s the perfect balance of fresh, vibrant asparagus and rich, comforting cheese. We’re talking about a dish that’s humble enough for a weeknight meal but fancy enough to impress at a dinner party. It’s the ultimate comfort food, but with a healthy twist, and that’s why I’ve fallen head over heels for it.
Why you’ll love this recipe?
There are so many reasons why this cheesy baked asparagus recipe has earned a permanent spot in my heart (and my weekly meal rotation!). First off, the flavor is just out of this world. The asparagus itself retains a lovely bite, a freshness that cuts through the richness of the cheese. And the cheese? It forms this irresistible, slightly crispy, slightly gooey blanket that hugs every single spear. It’s savory, it’s creamy, and it’s downright addictive. What I love most about this is how ridiculously simple it is to make. Seriously, on busy nights when I’m feeling uninspired, this is my absolute lifesaver. You can have it prepped and in the oven in less than 15 minutes, and the ingredients are usually things I already have on hand. Plus, it’s incredibly cost-effective! Asparagus is often on sale, and the cheese and simple pantry staples won’t break the bank. It’s a win-win-win for your taste buds, your wallet, and your schedule. It’s also super versatile – I’ll talk more about that later – but the fact that it pairs so well with pretty much anything makes it a true kitchen hero. It’s so much more satisfying than a plain side salad, and my kids, who used to be the pickiest eaters, now ask for this cheesy baked asparagus all the time! It really is a testament to how a few simple additions can transform a humble vegetable into something spectacular.
How do I make cheesy baked asparagus?
Quick Overview
This cheesy baked asparagus recipe is all about taking fresh asparagus, tossing it with a simple, flavorful cheesy sauce, and letting the oven do the rest. You’ll briefly blanch the asparagus (or just roast it directly if you’re in a super-duper hurry), mix up a quick cheese sauce, combine everything, and bake until it’s bubbly and golden. It’s straightforward, foolproof, and delivers maximum flavor with minimal effort. Trust me, even if you think you’re not a “cooking person,” you can totally nail this!
Ingredients
For the Asparagus: What is the meaning of the word “asparagus”?
1.5 pounds fresh asparagus, trimmed (look for spears that are firm and bright green, not woody or wilted!)
1 tablespoon olive oil
Salt and freshly ground black pepper, to taste
For the Cheesy Sauce:
2 tablespoons unsalted butter
2 tablespoons all-purpose flour
1.5 cups milk (whole milk makes it super creamy, but 2% works too!)
1 cup shredded sharp cheddar cheese (or a mix of cheddar and Gruyère for extra fanciness)
1/2 teaspoon garlic powder
A pinch of nutmeg (optional, but it adds a lovely warmth!)
Salt and freshly ground black pepper, to taste
For the Topping (Optional but Recommended!):
1/4 cup panko breadcrumbs (for that perfect crunch!)
2 tablespoons grated Parmesan cheese

Step-by-Step Instructions
Step 1: Preheat & Prep Pan
First things first, get your oven preheated to 375°F (190°C). While that’s heating up, grab a baking dish – a 9×13 inch one is usually perfect for this amount. If you want to make cleanup a breeze, you can line it with parchment paper, but it’s not strictly necessary. Now, toss your trimmed asparagus spears right into the baking dish. Drizzle them with the olive oil, and give them a good sprinkle of salt and pepper. Just toss them around with your hands to make sure they’re evenly coated. We want every single spear to have a little bit of flavor starting from the get-go.
Step 2: Mix Dry Ingredients (for the Sauce Base)
In a medium saucepan, melt the butter over medium heat. Once the butter is melted and just starting to get a little foamy, whisk in the flour. You want to cook this mixture, which we call a “roux,” for about 1-2 minutes, stirring constantly. This cooks out that raw flour taste and helps thicken our sauce beautifully. It should look like a thick paste. Don’t let it brown too much; we’re just looking for a light golden hue.
Step 3: Mix Wet Ingredients (for the Sauce)
Slowly, and I mean *slowly*, start whisking in the milk, a little at a time. Keep whisking constantly as you add it. This is crucial to prevent lumps! Once all the milk is in, continue whisking over medium heat. Keep stirring and let it simmer gently until the sauce starts to thicken enough to coat the back of a spoon. It won’t be super thick yet, but you’ll see a noticeable change in consistency. This usually takes about 5-7 minutes. Now, stir in the garlic powder and that pinch of nutmeg, if you’re using it. Season with a little salt and pepper – remember the cheese will add more saltiness, so don’t go overboard here.
Step 4: Combine (Sauce and Cheese)
Turn the heat down to low. Add your shredded cheddar cheese (and Parmesan if you’re using it in the sauce) to the saucepan with the thickened milk mixture. Stir gently until the cheese is completely melted and the sauce is smooth and wonderfully creamy. If it seems a little too thick, you can add another splash of milk. If it seems too thin, let it simmer for another minute or two on low, stirring. Taste it and adjust the seasoning one last time. This is the heart of our cheesy goodness!
Step 5: Prepare Filling (Optional Topping)
This step is technically for the topping, but it’s so easy you can do it while your sauce is simmering! In a small bowl, combine the panko breadcrumbs and the grated Parmesan cheese. If you like, you can toss in a tiny drizzle of olive oil or a small pat of melted butter to help them get extra golden and crispy in the oven. This is totally optional, but oh-so-worth-it for that delightful crunch.
Step 6: Layer & Swirl (Combine Asparagus and Sauce)
Pour that glorious cheese sauce evenly over the asparagus in the baking dish. Use a spatula or a spoon to gently move the asparagus around so that each spear is coated in cheesy goodness. Make sure to get sauce all the way into the nooks and crannies. We want maximum cheesy coverage!
Step 7: Bake
Now, pop that baking dish into your preheated oven. Bake for about 20-25 minutes. You’ll know it’s ready when the asparagus is tender-crisp (you can easily pierce it with a fork but it still has a slight bite) and the cheese sauce is bubbly around the edges. If you’re adding the panko topping, sprinkle it evenly over the top during the last 5-7 minutes of baking so it gets beautifully golden and toasted. Keep an eye on it to make sure it doesn’t burn!
Step 8: Cool & Glaze (Resting and Final Touches)
Once it’s out of the oven, let it rest for about 5 minutes. This allows the sauce to set up just a little bit more, making it easier to serve. If you didn’t add the breadcrumb topping earlier, this is also a good time to sprinkle on a little extra Parmesan or some fresh parsley for a pop of color. Resist the urge to dig in immediately – that resting time is key!
Step 9: Slice & Serve
Serve this cheesy baked asparagus hot! You can serve it directly from the baking dish, or carefully transfer portions onto individual plates. It’s beautiful as is, or with a sprinkle of fresh herbs.
What to Serve It With
This cheesy baked asparagus is incredibly versatile and pairs beautifully with a wide range of dishes, making it a true kitchen workhorse. For a delightful **Breakfast**, imagine this alongside some fluffy scrambled eggs and crispy bacon. It adds a touch of elegance and a burst of flavor that’s far more exciting than plain toast. At **Brunch**, it’s a showstopper! Serve it with a perfectly roasted chicken or a quiche for a sophisticated spread. The creamy, cheesy asparagus complements the richer flavors wonderfully. For a more indulgent **Dessert** experience, believe it or not, it can even be served as a surprising savory side to something a little sweet, like a light lemon cake – the contrast is unexpected and delicious! And for those **Cozy Snacks** or casual weeknights, it’s perfect alongside grilled fish, pan-seared steak, or even just a hearty loaf of crusty bread for dipping into that leftover cheese sauce (don’t pretend you won’t!). My family absolutely loves it with simple baked salmon or pork chops; it’s the dish that always gets eaten up first, and I’ve even caught my husband sneaking leftovers straight from the fridge late at night!
Top Tips for Perfecting Your Cheesy Baked Asparagus
Over the years, I’ve picked up a few little tricks that really elevate this dish from good to absolutely stellar. For **Asparagus Prep**, make sure you trim those woody ends! You can either snap them off (they’ll naturally break at the right spot) or give them a quick chop. Also, if your asparagus spears are really thick, you might want to cook them for a couple of minutes longer before adding the sauce. For **Mixing Advice**, the key to a smooth sauce is adding the milk gradually and whisking constantly. If you do end up with a few small lumps, don’t panic! Just whisk a little more vigorously or give it a quick blitz with an immersion blender. When it comes to **Swirl Customization**, that’s really more about the asparagus and sauce combination – we want everything well-coated, not necessarily swirled like a fancy cake. But if you want to add extra flair, a sprinkle of paprika or a few red pepper flakes on top before baking can add a lovely color and a hint of heat! For **Ingredient Swaps**, feel free to experiment with different cheeses. A sharp white cheddar, Gruyère, Fontina, or even a bit of Monterey Jack can all be delicious. Just make sure to grate your cheese yourself; pre-shredded cheeses often have anti-caking agents that can make your sauce a bit grainy. When it comes to **Baking Tips**, keeping your oven temperature consistent is important. If your oven tends to run hot, you might want to reduce the temperature slightly or keep a closer eye on it, especially towards the end of baking. Always use the middle rack for even cooking. And for **Glaze Variations**, well, the cheese sauce *is* our glaze here! But if you wanted to add another layer, a drizzle of balsamic glaze right before serving can add a lovely sweet and tangy contrast.
Storing and Reheating Tips
This cheesy baked asparagus is so good, you might actually have leftovers, which is a culinary miracle in my house! If you have any that magically survived, **Room Temperature** storage is only for a very short time, maybe an hour or so, especially if your kitchen is warm. It’s best to get leftovers into the fridge promptly. For **Refrigerator Storage**, let the dish cool completely before covering it tightly with plastic wrap or transferring it to an airtight container. It should keep well in the fridge for about 2-3 days. The cheese sauce might thicken up a bit as it cools, which is totally normal. **Freezer Instructions** are a bit trickier with cheesy dishes like this, as dairy can sometimes change texture when frozen and thawed. However, if you must freeze it, wrap the cooled dish very tightly in a couple of layers of plastic wrap, then a layer of aluminum foil. It should last for about 1-2 months. For thawing, the best method is to move it from the freezer to the refrigerator overnight. **Glaze Timing Advice** here is simple: the sauce is already baked in! If you’re reheating, you might want to add a tiny splash of milk or cream to the dish when you warm it up in the oven or microwave to loosen the sauce back up. Reheating in the oven at around 350°F (175°C) covered with foil for about 15-20 minutes is usually the best way to bring it back to its cheesy glory.
Frequently Asked Questions
Final Thoughts
I really hope you give this cheesy baked asparagus a try. It’s more than just a side dish; it’s a little bit of magic that can transform a simple meal into something truly special. It’s the kind of recipe that makes you feel good about cooking and even better about eating. It’s proof that vegetables can be exciting, comforting, and utterly delicious all at once. It’s a recipe that brings smiles to the table, and honestly, that’s the best part for me. If you love this, you might also enjoy my {link to another popular veggie recipe} or my {link to another cheesy comfort food recipe} – they have a similar vibe! I can’t wait to hear what you think, so please leave a comment below and tell me how yours turned out, or if you tried any fun variations! Happy cooking!

Cheesy Baked Asparagus
Ingredients
Main Ingredients
- 1.5 pounds asparagus trimmed
- 0.5 cup shredded cheddar cheese
- 0.25 cup grated Parmesan cheese
- 2 tablespoons olive oil
- 2 cloves garlic minced
- 0.5 teaspoon salt
- 0.25 teaspoon black pepper
Instructions
Preparation Steps
- Preheat your oven to 400°F (200°C).
- In a large bowl, toss the trimmed asparagus with olive oil, minced garlic, salt, and pepper until evenly coated.
- Spread the asparagus in a single layer on a baking sheet.
- Bake for 10-12 minutes, or until the asparagus is tender-crisp.
- Remove the baking sheet from the oven. Sprinkle the shredded cheddar cheese and grated Parmesan cheese evenly over the asparagus.
- Return the baking sheet to the oven and bake for another 2-3 minutes, or until the cheese is melted and bubbly.
- Serve immediately.