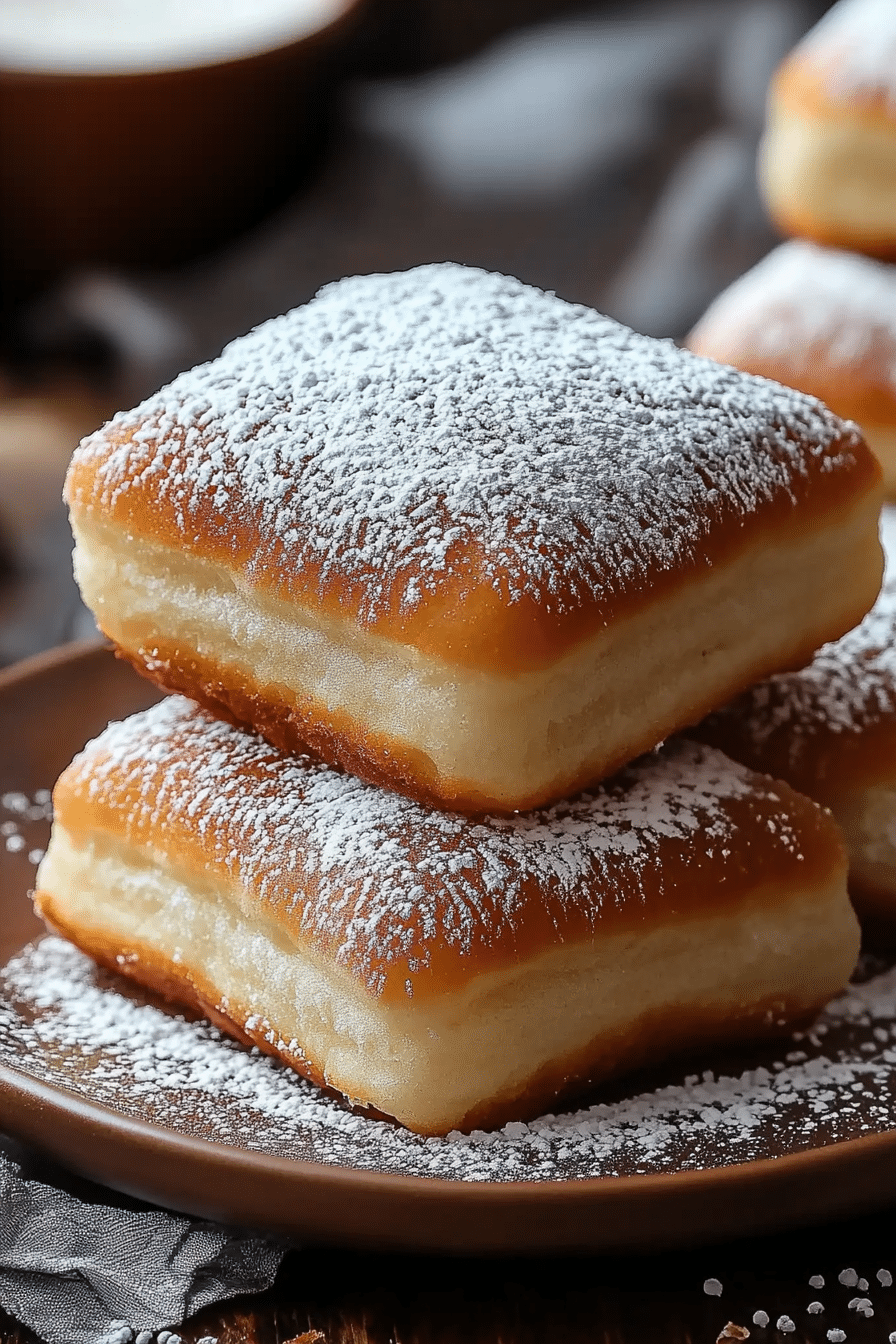
You know those moments when you’re craving something truly special, something that feels like a warm hug and a sprinkle of pure joy? That’s exactly what comes to mind when I think about making a batch of really good vanilla French beignets. Forget those dry, flavorless versions you might have encountered; we’re talking about clouds of pillowy soft dough, fried to a perfect golden hue, and dusted with a generous amount of powdered sugar. It’s a little bit of magic, and honestly, it’s not nearly as complicated as you might think. This recipe is my go-to when I want to impress without stressing, or when I just need a little sweet escape. It’s like the sophisticated cousin of a donut, but with a delicate vanilla essence that just sings. If you love a good cruller or a perfectly tender cake donut, you are going to fall head over heels for these vanilla French beignets.
Thank you for reading this post, don't forget to subscribe!What is vanilla French beignet?
So, what exactly are these delightful little treats? Think of them as impossibly light, yeasted doughnuts, but with a French flair that elevates them beyond the ordinary. The “French” in French beignets really refers to their airy, delicate texture, often achieved through a slightly different dough preparation than what you might find in a typical American doughnut shop. They’re not usually filled, though sometimes you’ll find a simple vanilla cream. The magic happens in the frying – they puff up beautifully, creating a wonderfully crisp exterior that gives way to an incredibly soft, almost custardy interior. The star of the show, beyond the perfect texture, is that subtle but irresistible hint of vanilla that permeates every single bite. It’s simple, elegant, and utterly delicious. It’s less about being fussy and more about achieving that perfect balance of delicate sweetness and airy lightness.
Why you’ll love this recipe?
Honestly, there are so many reasons why this vanilla French beignet recipe has become a staple in my kitchen. First off, the flavor is just out of this world. That pure vanilla extract, combined with the rich but not overpowering sweetness of the dough, is pure bliss. When they’re fresh out of the fryer and still warm, dusted with powdered sugar that melts into your mouth? Unbeatable. Then there’s the simplicity factor, which is a huge win for me. I know “yeasted dough” can sound intimidating, but I promise, this method is incredibly straightforward. The steps are easy to follow, and the results are so rewarding. You get that gourmet, bakery-quality treat right in your own home without needing any fancy equipment. And let’s talk about cost-efficiency! Most of the ingredients are pantry staples, making this a budget-friendly way to indulge in something truly decadent. It feels so much more special than just grabbing a box from the store, and you know exactly what’s going into them. What I love most is their versatility. While they are phenomenal on their own, they are also perfect for any occasion. Think about them for a special weekend breakfast, a delightful addition to a brunch spread, or even as an elegant dessert. My kids ask for these vanilla French beignets constantly, especially during holidays or when we have friends over. They disappear in minutes, and I always feel like a baking superhero when I pull them out of the kitchen!
How do I make vanilla French Beignets?
Quick Overview
The process for making these gorgeous vanilla French beignets involves a simple yeasted dough that gets a chance to rise, is then shaped, fried to golden perfection, and finished with a sweet dusting of powdered sugar. It’s about allowing the dough to do its thing, creating that signature airy texture, and then a quick, hot fry that seals in all the goodness. It’s really quite meditative once you get into the rhythm of it, and the anticipation of that first warm bite is totally worth it.
Ingredients
For the Main Batter:
You’ll need warm milk – not hot, just comfortably warm, around 105-115°F. This is crucial for waking up the yeast! I always use whole milk for the richest flavor and best texture, but you can get away with 2% if that’s what you have on hand. Then, granulated sugar, just enough to feed the yeast and add a touch of sweetness. Active dry yeast is what I prefer; make sure it’s fresh! You can test it by dissolving it in the warm milk and a pinch of sugar – if it gets foamy after about 5-10 minutes, it’s good to go. All-purpose flour is your best bet for that classic beignet texture. I usually measure it by spooning it into the cup and leveling it off, rather than scooping directly from the bag, which can pack it too tightly. Eggs are important for richness and structure – at room temperature, they incorporate more easily. And of course, pure vanilla extract. Don’t skimp here! The better the vanilla, the better your vanilla French beignets will taste. A little salt is essential to balance the sweetness and enhance all the other flavors.
For the Filling:
While traditional French beignets are often unfilled, I love adding a simple vanilla pastry cream for an extra layer of decadence. You’ll need more milk, sugar, egg yolks (for that luxurious creaminess), cornstarch to thicken, and more of that glorious vanilla extract. Some people also add a touch of heavy cream to the pastry cream for ultimate richness, but I find the milk version is perfectly luscious and keeps the beignet itself from being too heavy. You can also omit the filling entirely and just enjoy the pure beignet experience!
For the Glaze:
This is the simplest part, and honestly, often all you need is a generous dusting of powdered sugar. But if you want a slightly more ‘glued-on’ effect that won’t fly off with the first breeze, a simple glaze is lovely. You’ll just need powdered sugar and a liquid. Milk is fine, but a little bit of heavy cream or even a splash of vanilla bean paste mixed in makes it extra special. The key is getting the consistency right – thick enough to coat but not so thick it becomes hard like candy.
Step-by-Step Instructions
Step 1: Preheat & Prep Pan
The first thing you want to do is get your dough started. In a large bowl, combine your warm milk (around 105-115°F – think bathwater temperature) with a teaspoon of sugar and your active dry yeast. Give it a gentle stir and let it sit for about 5-10 minutes. You’re looking for it to get foamy and bubbly; if it doesn’t, your yeast might be dead, and you’ll need to start over with fresh yeast. While that’s proofing, lightly grease a large bowl for your dough to rise in. This just helps prevent it from sticking.
Step 2: Mix Dry Ingredients
In a separate, larger mixing bowl (or the bowl of your stand mixer fitted with the dough hook), whisk together your all-purpose flour, granulated sugar, and salt. Make sure these are well combined before you add the wet ingredients. This ensures that the leavening agents and salt are evenly distributed throughout the dough, which is super important for a good rise and balanced flavor.
Step 3: Mix Wet Ingredients
Once your yeast is foamy, add the eggs and pure vanilla extract to the yeast mixture. Whisk it all together until it’s well combined. This is where the magic really starts to happen, infusing that lovely vanilla aroma into the dough from the very beginning.
Step 4: Combine
Now, pour the wet ingredients into the bowl with your dry ingredients. If you’re using a stand mixer, mix on low speed until a shaggy dough forms. Then, increase the speed to medium and knead for about 5-7 minutes, or until the dough is smooth, elastic, and pulls away from the sides of the bowl. If you’re mixing by hand, stir with a wooden spoon until the dough comes together, then turn it out onto a lightly floured surface and knead for about 8-10 minutes. The dough will be a bit sticky, but resist the urge to add too much extra flour; that can make your beignets tough. Once it’s kneaded, place the dough in your greased bowl, cover it with plastic wrap or a damp kitchen towel, and let it rise in a warm place for about 1 to 1.5 hours, or until it has doubled in size.
“The Vanilla French Beignets turned out amazing. My kids asked for seconds. Saving this one!”
Step 5: Prepare Filling
While the dough is rising, you can make your vanilla pastry cream, if you’re using it. In a medium saucepan, whisk together sugar, cornstarch, and a pinch of salt. In a separate bowl, whisk the egg yolks until they’re pale. Gradually whisk in the milk into the sugar mixture, then temper the egg yolks by slowly whisking about half a cup of the warm milk mixture into the yolks, then pour the tempered yolks back into the saucepan. Cook over medium heat, whisking constantly, until the mixture thickens to a pudding-like consistency. This usually takes about 5-8 minutes. Remove from heat, stir in the vanilla extract, and pour into a clean bowl. Press plastic wrap directly onto the surface of the pastry cream to prevent a skin from forming, and let it cool completely. I usually pop it in the fridge to speed things up.
Step 6: Layer & Swirl
Once your dough has doubled, gently punch it down to release the air. Turn it out onto a lightly floured surface. For that classic beignet look, you’re going to want to roll it out. I usually aim for about 1/2-inch thickness. You can cut these into squares or rectangles – whatever you prefer. If you’re filling them, this is where you’d add a dollop of your cooled pastry cream to one half of the dough pieces, then carefully place another piece of dough on top and gently press around the edges to seal. Don’t overfill, or it will ooze out during frying! If you’re not filling them, just cut them into your desired shapes. Let the cut beignets rest for about 15-20 minutes while you heat your oil. This allows them to puff up a little more before frying.
Step 7: Bake
Okay, here’s where the fun really begins! You’ll need a neutral oil with a high smoke point, like vegetable, canola, or peanut oil, in a heavy-bottomed pot or Dutch oven. Heat the oil to about 350-360°F. It’s crucial to maintain this temperature; if it’s too low, the beignets will be greasy, and if it’s too high, they’ll burn before they cook through. Carefully slide 2-3 beignets at a time into the hot oil (don’t overcrowd the pot, as this will lower the oil temperature). Fry for about 1-2 minutes per side, until they are beautifully puffed and golden brown. Use a slotted spoon or spider strainer to flip them and then remove them from the oil.
Step 8: Cool & Glaze
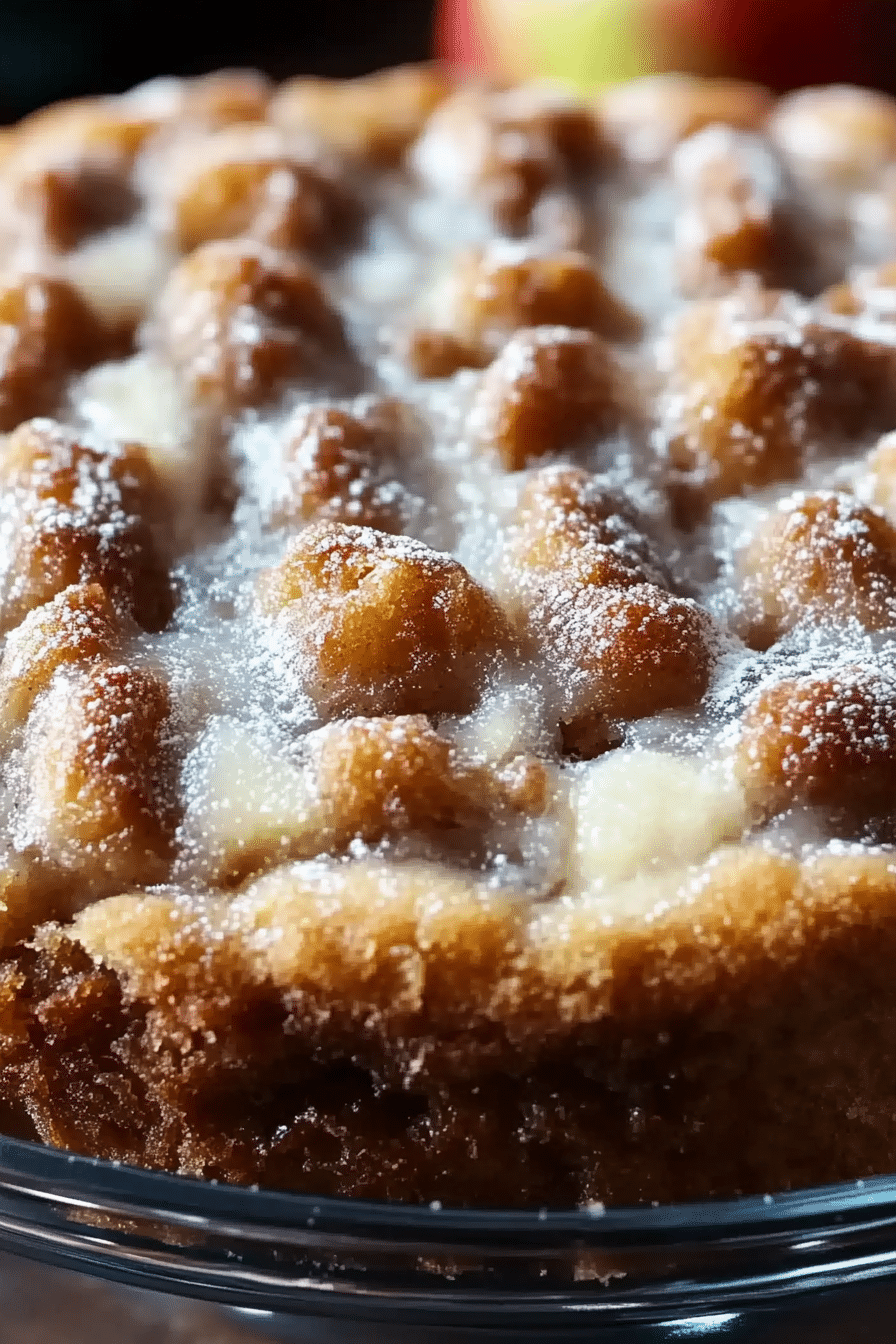
As each batch of beignets is fried, transfer them to a wire rack set over a baking sheet lined with paper towels. This allows any excess oil to drain off. Let them cool for just a few minutes – they are best served warm! If you’re dusting them with powdered sugar, do it generously while they’re still warm. If you’re using a glaze, whisk together your powdered sugar and liquid until you have a smooth, pourable consistency, then gently drizzle or dip the warm beignets. I find a simple dusting is often the most classic and satisfying for these vanilla French beignets.
Step 9: Slice & Serve
If you’ve filled your beignets, you can slice them gently in half horizontally before filling, or simply make a small slit after frying to pipe in your cream. Otherwise, they are perfect as is! Serve them immediately for the best texture – that slight crisp exterior and airy interior is truly divine when fresh. They are absolutely stunning piled high on a platter, dusted with powdered sugar, ready to be devoured.
What to Serve It With
These vanilla French beignets are so wonderfully versatile. For a delightful breakfast, a strong cup of coffee is absolutely non-negotiable. The slight bitterness of the coffee cuts through the sweetness of the beignet perfectly. You could also serve them with a side of fresh berries – a few raspberries or blueberries add a lovely pop of color and a tart contrast. For a more elegant brunch, imagine these beignets as part of a larger spread: alongside some fresh fruit salad, a savory quiche, or even some crispy bacon. A mimosa or a glass of sparkling cider would be a fantastic accompaniment. As a dessert, they can be dressed up even further. A drizzle of chocolate sauce, a dollop of whipped cream, or even a small scoop of vanilla bean ice cream on the side makes them feel extra special. My family loves them as a cozy snack on a rainy afternoon, often with a glass of warm milk or a steaming mug of hot chocolate. The aroma alone brings everyone to the kitchen, and they’re always gone in a flash. I’ve even served them dusted with a little cinnamon sugar mixture for a different twist, and they were a huge hit!
Top Tips for Perfecting Your Vanilla French Beignets
Dough Hydration: The stickiness of the dough is your friend here. It might seem counterintuitive, but a slightly wetter dough will yield a lighter, airier beignet. Resist the urge to add too much extra flour while kneading, and trust the process. If it’s excessively sticky, just use a little extra flour on your hands and the work surface, but don’t go overboard.
Yeast Activation: Always make sure your yeast is alive and well! That foamy bloom is your assurance that it’s ready to work its magic. If it doesn’t bubble up, your dough won’t rise properly, and you’ll end up with dense beignets. It’s a simple step that makes a huge difference.
Oil Temperature is Key: I can’t stress this enough. A candy thermometer is your best friend for frying. If the oil is too cool, your beignets will absorb too much grease and become heavy. Too hot, and the outside will burn before the inside is cooked. Aim for that sweet spot of 350-360°F and keep an eye on it, adjusting the heat as needed.
Don’t Overcrowd the Pot: It’s tempting to fry as many as you can at once, but trust me, it’s not worth it. Adding too many beignets at once will drop the oil temperature significantly, leading to greasy, unevenly cooked treats. Fry in small batches; you’ll get much better results, and they cook so quickly anyway!
Gentle Handling: When you’re shaping and cutting your beignets, be gentle. Overworking the dough at this stage can develop the gluten too much, making them tough. The goal is a tender, airy crumb. Similarly, when you flip them in the fryer, use a light touch so you don’t deflate them.
Serving Temperature: These are truly at their peak when they are warm. The contrast between the slightly crisp exterior and the impossibly soft interior is best enjoyed fresh. If you’re planning a party, fry them as close to serving time as possible. If you must fry ahead, they are still decent at room temperature, but the magic really happens when they’re still warm.
Vanilla Quality Matters: Since vanilla is a star flavor here, using good quality pure vanilla extract or even vanilla bean paste will make a noticeable difference. It’s worth the little splurge for that authentic, rich vanilla flavor.
“Made the Vanilla French Beignets tonight and wow — perfect weeknight dinner. Will definitely make again!”
Storing and Reheating Tips
These vanilla French beignets are, without a doubt, best enjoyed fresh out of the fryer. The delicate crispness of the exterior combined with the pillowy soft interior is something that really can’t be replicated once they’ve cooled down completely. However, if you do find yourself with leftovers (which is rare in my house!), here’s what you can do.
Room Temperature: If you’ve only got a few leftover and plan to eat them within a few hours, you can store them in an airtight container or a resealable plastic bag at room temperature. They will lose some of their crispness, but they’ll still be soft and enjoyable. I wouldn’t keep them at room temperature for more than a day, as they can become a bit chewy.
Refrigerator Storage: For longer storage, up to 2-3 days, your refrigerator is your best bet. Place them in an airtight container. Be aware that refrigeration can make them a bit denser and chewier. To revive them slightly, you can gently reheat them.
Freezer Instructions: If you want to make a big batch and save some for later, freezing is a great option. You can freeze the unfried dough pieces (shaped and proofed) or the fried beignets. For fried beignets, let them cool completely, then wrap them individually in plastic wrap, followed by a layer of aluminum foil or place them in a freezer-safe bag. They should keep well in the freezer for up to 2-3 months. To thaw, let them come to room temperature for a few hours. To reheat, a quick warm-up in a toaster oven or a conventional oven at a low temperature (around 300°F) for a few minutes can help crisp them up again, though they won’t be quite as perfect as fresh.
Glaze Timing Advice: If you’re storing beignets with a glaze, it’s generally best to apply the glaze just before serving them, especially if you plan to reheat them. A glaze applied too early can become sticky or gummy during storage or reheating.
Frequently Asked Questions
Final Thoughts
There you have it – my absolute favorite way to make vanilla French beignets. I hope this recipe brings as much joy to your kitchen as it does to mine. There’s something so deeply satisfying about creating these delicate, airy pastries from scratch, and the aroma that fills your home while they’re frying is pure bliss. They’re proof that sometimes, the simplest ingredients, treated with a little care and patience, can yield the most extraordinary results. If you’re a fan of sweet, cloud-like pastries, I truly believe these will become a cherished recipe for you too. Give them a try, savor that beautiful vanilla flavor, and don’t be afraid to get a little powdered sugar on your nose!
If you loved these vanilla French beignets, you might also enjoy my Brioche Doughnuts or my Classic Cinnamon Rolls. They share that same dedication to a tender, flavorful dough and that irresistible homemade touch. I can’t wait to hear what you think! Please leave a comment below and let me know how your beignets turned out, or share any special variations you’ve tried. Happy baking!

Vanilla French Beignets
Ingredients
For the Dough
- 1 cup warm water about 105-115°F (40-46°C)
- 2.25 teaspoon active dry yeast
- 0.5 cup granulated sugar
- 2 large eggs at room temperature
- 0.5 cup unsalted butter melted
- 1 teaspoon vanilla extract
- 4 cups all-purpose flour plus more for dusting
- 1 teaspoon salt
For Frying and Dusting
- 6 cups vegetable oil or other neutral oil for frying
- 2 cups powdered sugar for dusting
Instructions
Preparation Steps
- In a large bowl, combine the warm water, active dry yeast, and 1 tablespoon of granulated sugar. Let it sit for 5-10 minutes, or until foamy.
- Add the remaining granulated sugar, eggs, melted butter, and vanilla extract to the yeast mixture. Whisk until well combined.
- In a separate bowl, whisk together the flour and salt. Gradually add the dry ingredients to the wet ingredients, mixing until a shaggy dough forms.
- Turn the dough out onto a lightly floured surface and knead for 8-10 minutes, or until smooth and elastic. The dough will be slightly sticky.
- Grease a clean bowl with a little oil. Place the dough in the bowl, turning to coat. Cover with plastic wrap and let it rise in a warm place for 1-1.5 hours, or until doubled in size.
- Punch down the risen dough and turn it out onto a lightly floured surface. Roll the dough to about 0.5 inch thickness.
- Cut the dough into squares or desired shapes. You can also use a round cutter.
- In a large, heavy-bottomed pot or Dutch oven, heat the vegetable oil over medium-high heat to 350°F (175°C). Use a thermometer to ensure the correct temperature.
- Carefully fry the beignets in batches, about 2-3 minutes per side, or until golden brown and puffed up. Do not overcrowd the pot.
- Remove the beignets from the hot oil with a slotted spoon and place them on a wire rack lined with paper towels to drain any excess oil.
- While still warm, generously dust the beignets with powdered sugar.
- Serve immediately and enjoy!