The kitchen smells like sunshine and garlic, and I’m standing at the stove with a cast-iron skillet that’s been through countless weeknights with me. I remember the first time I made something like this for a busy family night—pepper stovetop magic that didn’t require stuffing, and somehow tasted even better than the original stuffed version. This Unstuffed Pepper Skillet is that same comforting hug in a pan: vibrant peppers, savory meat, a Tomato-Sage glaze that makes the whole thing shimmer, and a dash of sweetness to keep it sunny. It’s the kind of dish that disappears in minutes at my house, and my kids actually ask for seconds. Think of it as the lovechild of quick chili and classic peppers—simpler than a casserole, quicker than a soup, and every bite smells like home. If you’ve ever compared a stack of stuffed peppers to a cozy skillet of goodness, you’ll know exactly why this wins on weeknights: incredible flavor with almost no fuss, and leftovers that taste even better the next day.
Thank you for reading this post, don't forget to subscribe!
What is an unstuffed pepper skeillet?
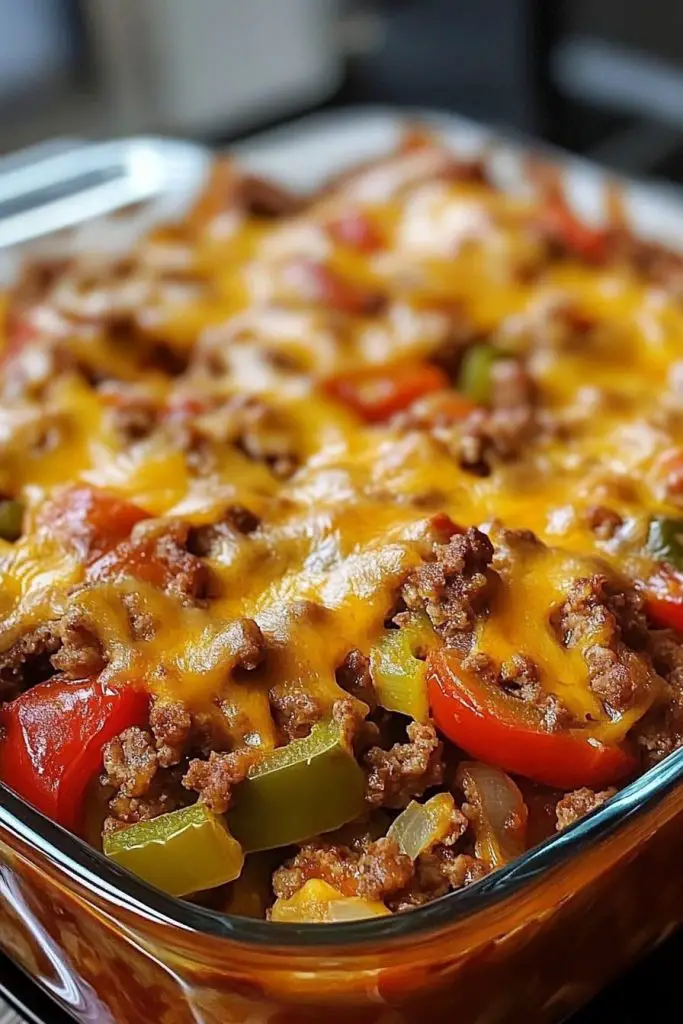
Unstuffed Pepper Skillet is essentially the deconstructed version of stuffed peppers. Think: the pepper-rific flavors you love, but all in One Pan without the extra stuffing step. It’s essentially a one-pan supper where ground meat (beef or turkey) is seasoned and browned, then mingled with colorful peppers, onions, garlic, tomatoes, and a few pantry staples. The result is bright, comforting, and surprisingly versatile. The name isn’t a fancy culinary term—it’s a friendly wink to how easy it is to get the same pepper-forward taste without any hollowed peppers. This dish is all about texture and balance: a little bite from the peppers, a little savory from the meat, and a glossy glaze that brings everything together. I like to think of it as a weeknight hero—fast, satisfying, and with enough personality to make guests think I spent hours coaxing flavor from the pot.
Why you’ll love this recipe?
What I love most about this Unstuffed Pepper Skillet is how it checks every box you need on a busy weeknight. The flavor is bright and comforting at the same time—there’s a sunshine of bell pepper sweetness offset by a savory, slightly smoky meat base. It’s incredibly simple to pull together, and you can customize it with whatever you have on hand. If you’re feeding kids, you’ll notice that the peppers soften just enough to be easy to chew, and the natural sweetness from the tomatoes keeps things kid-friendly without masking the savory notes. Budget-wise, it’s a winner: affordable ground meat, a couple of peppers, onions, and a can of tomatoes go a long way. And this dish is forgiving, which is a lifesaver on those nights when you forgot to defrost something and need a plan B. What I love most about this is its versatility—serve it over rice, with crusty bread, or spooned onto a warm tortilla for a quick handheld meal. It’s a dish I’ve made countless times, and it never fails to spark that cozy, “I’m home” feeling.
How do I make unstuffed peppers?
Quick Overview
In a hot skillet, you’ll brown your meat with onions and garlic, then introduce peppers, tomatoes, and a few spices. Everything simmers together until the peppers are tender and the flavors have married. A quick glaze is brushed on at the end to give a glossy, slightly sweet finish, and a sprinkle of cheese crowns the dish if you’re craving a little extra indulgence. The beauty here is its straightforward path: browning, seasoning, simmering, and a final glaze that ties it all together. The result is a one-pan supper that doesn’t shy away from big flavor but keeps the process simple enough that you’ll actually want to make it again tomorrow.
Ingredients
[Organize ingredients by purpose with detailed explanations:]
For the Main Base (the “batter” analog):
– 1 lb Ground Beef or ground turkey, pasture-raised if you can swing it for richer flavor
– 1 medium onion, finely chopped
– 2 cloves garlic, minced
– 2 bell peppers (mixed colors), diced
– 1 tablespoon olive oil
– 1 teaspoon smoked paprika
– 1/2 teaspoon ground cumin
– 1/2 teaspoon chili powder (optional for a little warming heat)
– Salt and black pepper to taste
For the Filling (vegetables & tomatoes):
– 1 (14.5-ounce) can crushed tomatoes or diced tomatoes with their juice
– 1 cup Tomato Sauce or passata (if you like it saucier, add a bit more)
– 1 cup corn kernels (optional, fresh or frozen works great)
– 1/2 teaspoon dried oregano or Italian seasoning
– A pinch of sugar (to balance acidity, if your tomatoes taste sharp)
– Fresh chopped parsley or cilantro for garnish
For the Glaze (the finishing shine):
– 1/2 cup tomato sauce lightly reduced on the stove, or 1/4 cup ketchup whisked with 1 teaspoon balsamic vinegar and 1/4 teaspoon smoked paprika for depth
– 2 tablespoons honey or maple syrup (optional, for a touch of sweetness that plays with the peppers)
– 1 tablespoon water or broth to loosen as needed
Step-by-Step Instructions
Step 1: Preheat & Prep Pan
Warm your largest skillet over medium-high heat. A good, sturdy pan makes all the difference here because you want a good sear on the meat and a nice char on the peppers. While it heats, measure out your spices, mince the garlic, and dice the onions and peppers. I always line up my ingredients like an orchestra, so nothing gets forgotten—it saves minutes and stop-you-in-your-tracks “where did that go?” panic mid-cooking. If you’re using a nonstick skillet, a light coating of Olive oil will help everything brown evenly without sticking.
Step 2: Mix Dry Ingredients
In a small bowl, combine smoked paprika, cumin, chili powder, salt, and pepper. This is the flavor base that will wake up the whole skillet. Don’t skip this; spices bloom when they hit heat, and a quick dry mix helps distribute them evenly through the meat. It’s one of those tiny tricks I learned after a few pan-scorching disappointments—the spice blend matters more than you’d think.
Step 3: Mix Wet Ingredients
No literal wet batter here, but you’ll want the aromatics primed. In the hot pan, add Olive oil and sauté the onion until it’s translucent and starting to caramelize at the edges. Add garlic and cook for another 30 seconds until fragrant—you’ll know it by the way your kitchen fills with that warm, inviting scent. This is where the magic begins to happen: the onions release their sweetness and the garlic adds a bit of peppery edge that makes the meat sing.
Step 4: Combine
Turn the heat to medium and add the ground meat. Break it up with a wooden spoon and cook until it’s nicely browned with little golden bits sticking to the bottom of the pan. Deglaze if you like with a splash of broth or water to loosen those tasty browned bits. Sprinkle the dry Spice Mix over the meat and stir, letting the spices toast for a minute or two in the fat. This moment—when you feel the scent shift from raw meat to deeply savory—is when you know you’re on the right track.
Step 5: Prepare Filling
Add the diced peppers and onions to the pan. They’ll soften and release their own sugars as they cook. Stir in the crushed tomatoes, tomato sauce, and corn if you’re using it. The mixture should look vibrant and a bit saucy, not dry. If your tomatoes are particularly acidic, a pinch of sugar goes a long way to balance things out. Taste as you go; it’s easier to adjust now than at the finish line.
“I don’t know if I’ve ever eaten a better Unstuffed Pepper Skillet. The rub alone is wonderful, but the sauce??? Over the top!”
Step 6: Layer & Swirl
Let everything simmer together for about 8–10 minutes, until the peppers are tender-crisp and the flavors have melded. Here’s where you can get playful: if you like a little swirl of color, drop in a quick swirl of the glaze in the last minute and gently fold to distribute it. You’re aiming for a glossy, cohesive mixture with a hint of depth from the spices and a bright tang from the tomatoes. The texture should feel substantial but not heavy, with each bite delivering a balanced mix of meat, peppers, and tomato.
Step 7: Bake
If you’re finishing with a touch of toasty goodness and melted cheese, you can slide the skillet under a broiler for 2–3 minutes after turning off the heat. Or, if you have an oven-safe skillet, you can transfer everything to a preheated 375°F oven and bake for 10–12 minutes to let the flavors settle and the surface glossy. I like the oven finish because it makes the edges of the peppers slightly caramelized and the glaze cling beautifully. If you don’t want to bake, simply cover the skillet and let it rest off the heat for 5 minutes to let the flavors mingle and the dish thicken a touch.
Step 8: Cool & Glaze
Before tasting, give the skillet a gentle rest. This helps the juices settle and makes it easier to serve. Then drizzle some of the glaze over the top and give it a quick toss to distribute. If you’re using cheese, scatter shredded cheese over the hot surface so it melts into the dish, creating a velvety layer that clings to every spoonful. The glaze should look like a lacquered shield that enhances the peppers’ natural sweetness rather than overpowering it. It’s a small flourish, but it makes a big difference in how the dish presents on the plate.
Step 9: Slice & Serve
Portion the Unstuffed Pepper Skillet into bowls or onto warm plates. A light dusting of chopped parsley or cilantro not only adds color but a fresh, herbal lift that balances the richness. This is the moment to think about what you’re pairing with it: a crusty piece of bread for sopping, a fluffy bed of rice, or even a tortilla for a quick wrap. My family loves a squeeze of lime over the top too—a tiny zing that makes everything feel brighter. If you saved some leftovers, this dish reheats beautifully—the peppers stay crisp-tender and the sauce thickens just slightly, which is a treat after a busy day.
What to Serve It With
This Unstuffed Pepper Skillet is a flexible friend for any occasion. Here are a few ideas to keep things exciting without complicating your week.
For Dinner: Serve over fluffy white rice or quinoa; a simple side salad of cucumber and tomato works wonders to cut the richness; a dollop of Sour Cream or Greek yogurt adds a cool tang that contrasts the glaze nicely.
For Lunch Prep: Spoon leftovers into containers and top with shredded cheese. Reheat gently on the stove or in the microwave, letting the cheese melt into the sauce for a cohesive bite.
For Barbecues or Potlucks: Let guests spoon the skillet onto warm tortillas or over toasted baguette slices, then offer a few toppings like sliced jalapeños, avocado, or fresh herbs. It’s a crowd-pleaser that travels well and stays flavorful even when the day’s heat has faded.
For Breakfast or Brunch: This might sound adventurous, but a spoonful over a fried egg makes a savory, satisfying start to the day. If you’re feeling fancy, transform it into a sunny-side-up pepper skillet breakfast bowl with a sprinkle of cilantro and a fried egg on top.
In my kitchen, this Unstuffed Pepper Skillet has become a go-to for casual family meals and last-minute gatherings. It pairs well with a simple green salad, a loaf of crusty bread, or a pot of soup on the side—whatever you crave in the moment. The beauty of it is that you can tune the flavors to your mood, your pantry, and your people. My kids’ favorite is when I add a little extra corn for sweetness and call it “pepper candy bites”—not a fancy name, just a reminder that simple ingredients can feel magical together.
Top Tips for Perfecting Your Unstuffed Pepper Skillet
[Expert advice organized by technique:]
Pepper Prep: If you’re using zucchini or other watery vegetables, salt them lightly and let them sit for 10 minutes, then pat dry. This keeps the dish from releasing too much moisture and keeps the peppers tasting bright. Zucchini adds moisture but can soften too quickly, so the note is to squeeze lightly and use it in moderation.
Mixing Advice: Don’t rush the browning stage. The fond that forms on the bottom of the pan—that caramelized layer—adds depth to your sauce. If you rush, you’ll miss that flavor baseline. Let the meat get a good sear before you splash in the liquids, and then scrape up those tasty browned bits as you go.
Swirl Customization: The glaze is optional but delightful. If you want more shine, whisk a teaspoon of soy sauce or Worcestershire into the glaze for a deeper, savory gloss. For a sweeter finish, a touch more honey works wonders, especially if you’re using a particularly acid tomato base.
Ingredient Swaps: Ground pork or Italian Sausage adds a different dimension if you want a richer, spicier profile. Use shredded cheese blends for a more complex finish (think cheddar-monterey-jack). If you’re vegetarian, swap the meat for lentils or finely chopped mushrooms and a pinch of smoked paprika for depth—you’ll still get that same pepper-forward vibe.
Baking Tips: If your skillet isn’t oven-safe or you simply prefer stovetop cooking, skip Step 7. Cover the pan and simmer gently for an extra 5–7 minutes to meld flavors. If you do bake, place it on the middle rack and avoid direct heat to prevent scorching the glaze. Keep an eye on the melting cheese so it doesn’t brown too aggressively.
“The Unstuffed Pepper Skillet turned out amazing. My kids asked for seconds. Saving this one!”
Glaze Variations: Try a quick glaze with balsamic and honey for a richer finish, or a light lemon-zest spin with olive oil for a bright, tangy coat. You can also finish with a dollop of sour cream or Greek yogurt to add creamy contrast to the glaze’s sweetness.
I’ve learned these little tweaks over years of making this dish for friends and family. The goal is to keep the pepper’s freshness while letting the meat’s savoriness shine through. It’s a gentle balance, and when it lands just right, you’ll hear the same quiet sigh of satisfaction around the table that I hear every time we gather for this meal.
Storing and Reheating Tips
Short-term storage is a breeze, and the flavors actually deepen after resting. Here’s how I handle it to keep the Unstuffed Pepper Skillet tasting vibrant next day.
Room Temperature: It’s best not to leave leftovers out for more than two hours. If you’re hosting a busy evening, cool the dish briefly in the pan before transferring to a container for the fridge.
Refrigerator Storage: Store in an airtight container for up to 3–4 days. Reheat gently in a skillet over low to medium heat, adding a splash of broth if it’s too thick. This helps maintain the texture of the peppers and prevents the glaze from becoming grainy.
Freezer Instructions: This dish freezes well if you portion it into airtight containers. Freeze for up to 2–3 months. Thaw in the fridge overnight and reheat slowly on the stove. If you’re planning to freeze, consider adding the glaze just before serving to keep the texture crisp and the flavors fresh.
Glaze Timing Advice: If you’re freezing, skip the glaze until you reheat. You can reheat first, then apply a fresh glaze for serving. This keeps the glaze glossy and prevents it from becoming gummy after freezing and thawing.
My best tip is to reheat slowly and taste for adjustments. A quick pinch of salt or a whisper of chili powder can wake things up after they’ve sat in the fridge, and a fresh squeeze of lemon or lime right before serving can bring it back to life.
Frequently Asked Questions
Final Thoughts
There’s something quietly hopeful about a skillet dinner that comes together with ease and delivers big flavors. The Unstuffed Pepper Skillet captures that feeling perfectly: a weeknight-friendly path to a rustic, comforting dish with pepper brightness, heartiness from the meat, and a glaze that glints at the edges. It’s the kind of recipe I reach for when I want a delicious meal without the fuss or the clean-up struggle that other “fast” dinners bring. There’s room for customization, too—swap in sausage if you want a spicier kick, try a plant-based mix, or keep it strictly pantry-friendly with whatever you have on hand. If you try this and the flavors bring a sense of home to your table, I’d love to hear how you’ve made it your own. Happy cooking, friends, and may your skillet always sing with color and comfort!


