Oh, hello there! Come on in, grab a mug. I’ve been SO excited to share this with you. You know those days when you’re just craving something utterly comforting, something that feels like a warm hug on a chilly evening or a nostalgic trip back to childhood? This tuna melt recipe is exactly that for me. It’s not just *any* tuna melt; it’s the one that has been perfected over countless lazy weekend lunches and frantic weeknight dinners. It’s the kind of simple, soul-satisfying food that makes everyone in the house sigh with pure contentment. Forget those sad, soggy versions you might have encountered; this is the real deal, bursting with flavor and that perfect crispy-cheesy exterior. If you thought you knew tuna melts, get ready to have your mind, and your taste buds, completely changed. This is the classic comfort food reimagined, and trust me, it’s even better than you remember your grandma making (no offense, Grandma!).
Thank you for reading this post, don't forget to subscribe!What is the best recipe for tuna melt?
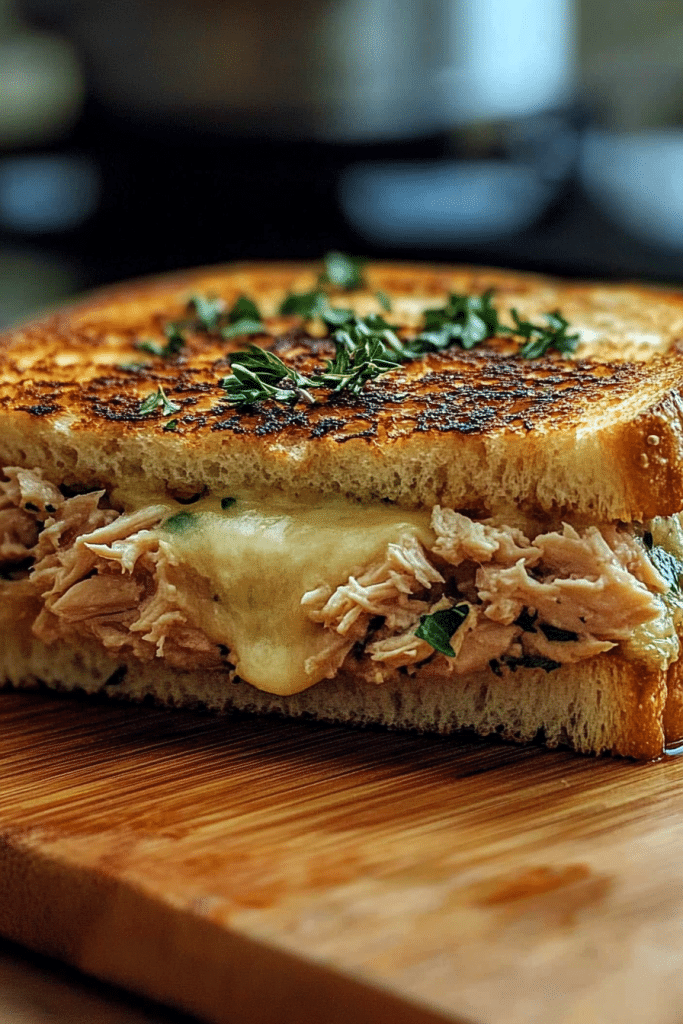
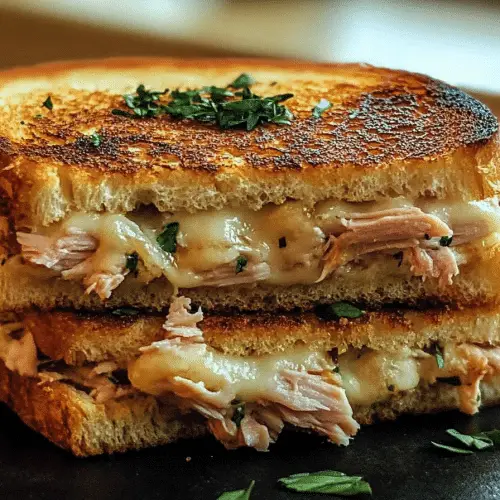
So, what exactly makes this my “ultimate” tuna melt recipe? Well, at its heart, it’s a grilled cheese sandwich that’s been elevated with a rich, creamy, and incredibly flavorful tuna filling. Think of it as the superstar of simple lunches. It’s essentially a symphony of textures and tastes: the warm, slightly tangy tuna salad nestled between two slices of perfectly toasted bread, all held together by gooey, melted cheese. The magic happens when it’s all grilled to golden-brown perfection, creating that irresistible crunch on the outside and a warm, comforting embrace on the inside. It’s the kind of dish that doesn’t need fancy ingredients or complicated techniques, but it delivers on flavor like few others can. It’s a humble sandwich, yes, but one that’s been crafted with love and a little bit of know-how to be truly extraordinary.
Why you’ll love this recipe?
There are so many reasons why I keep coming back to this tuna melt recipe, and I just know you’re going to fall in love with it too! First off, the flavor profile is just incredible. It’s not just tuna; it’s a creamy, savory blend that hits all the right notes. The secret, as I’ll share later, is in the little additions that make the tuna salad sing. Then there’s the sheer simplicity of it all. Even on a day when the thought of cooking feels overwhelming, I can whip this up in a flash. Seriously, it’s a lifesaver on busy nights when the kids are asking what’s for dinner and I haven’t even thought about it yet. And let’s talk about cost-efficiency! Tuna, bread, cheese – these are pantry staples that won’t break the bank, making this a fantastic budget-friendly option that still feels like a treat. What I love most about this tuna melt is its versatility. You can dress it up or down, serve it with a side salad for a lighter meal, or just devour it on its own when you need some serious comfort food. It’s that reliable friend in the kitchen, always there to deliver deliciousness. While there are other great sandwich recipes out there, like my classic grilled cheese or my zesty chicken salad sandwich, this tuna melt holds a special place because it’s universally loved and incredibly satisfying. It’s the perfect balance of familiar comfort and delightful taste.
How do you make tuna melt?
Quick Overview
This tuna melt is all about simple assembly and perfect grilling. You’ll mix up a quick, flavorful tuna salad, layer it with your favorite cheese on bread, and then grill it until golden brown and gooey. The key is in the ingredients and the cooking method – we’re aiming for that perfect crispy exterior and molten interior. It’s so straightforward, you’ll be making it on repeat!
Ingredients
What is the best tuna salad?
2 cans (5-6 oz each) of good quality tuna, drained well. I always opt for albacore packed in water for the best texture, but oil-packed works too if you like a richer flavor. Just make sure to drain it thoroughly; a watery tuna salad is a sad tuna salad!
1/4 cup mayonnaise. Use your favorite kind – full-fat is usually best for creaminess, but light works in a pinch.
1 tablespoon finely chopped red onion. Red onion adds a lovely crispness and a touch of bite that raw white or yellow onion can sometimes overpower.
1 tablespoon finely chopped celery. This is non-negotiable for me! It adds that essential crunch and freshness.
1 tablespoon sweet pickle relish. This is my little secret! It adds a touch of sweetness and tang that balances the savory tuna beautifully. You can also use finely chopped dill pickles if you prefer a more savory note.
1 teaspoon Dijon mustard. For a little zing and depth of flavor.
Salt and freshly ground black pepper to taste. Always taste and adjust!
For the Sandwich:
8 slices of your favorite bread. Sourdough, whole wheat, or even a good white bread all work wonderfully. I love a sturdy bread that can hold up to grilling.
4 slices of cheese. Cheddar, Swiss, Provolone, or a combination! I often use a mix of sharp cheddar for flavor and provolone for ultimate meltiness.
2 tablespoons unsalted butter, softened. For spreading on the bread for that perfect golden crust.
“New family favorite! This tuna melt recipe was so flavorful and ridiculously easy. Crowd-pleaser for sure.”
Step-by-Step Instructions
Step 1: Prepare the Tuna Salad
In a medium bowl, flake the drained tuna with a fork. Add the mayonnaise, finely chopped red onion, finely chopped celery, sweet pickle relish, and Dijon mustard. Stir everything together until well combined. Season generously with salt and freshly ground black pepper. Taste and adjust seasonings as needed. If it seems a little too thick, you can add another tiny bit of mayonnaise, but be careful not to make it too wet.
Step 2: Assemble the Sandwiches
Lay out 4 slices of bread. Divide the tuna salad mixture evenly among these 4 slices, spreading it out to the edges. Top each with 2 slices of cheese. Then, place the remaining 4 slices of bread on top to form sandwiches.
Step 3: Butter the Bread
Generously spread softened butter on the top side of each sandwich. This is crucial for achieving that gorgeous, crispy, golden-brown exterior.
Step 4: Grill the First Side
Heat a large non-stick skillet or griddle over medium heat. Carefully place the sandwiches, butter-side down, into the skillet. Don’t overcrowd the pan; cook in batches if necessary.
Step 5: Flip and Grill the Second Side
Cook for 3-5 minutes, or until the bottom slice of bread is golden brown and the cheese is starting to melt. Carefully flip the sandwiches using a spatula. Spread butter on the newly exposed top side of the bread. Continue to cook for another 3-5 minutes, or until the second side is golden brown and the cheese is completely melted and gooey.
Step 6: Check for Doneness
You want that perfect balance of crispy, buttery bread and melted cheese. If the bread is browning too quickly before the cheese melts, you can reduce the heat slightly and cover the pan for a minute or two to help the cheese melt. If the cheese isn’t melting well, you can always pop the sandwich open for a moment to help it along.
Step 7: Rest and Serve
Once perfectly grilled, remove the sandwiches from the skillet. Let them rest for just a minute – this helps the cheese settle and makes them easier to slice. Slice each sandwich in half diagonally.
Step 8: Serve Immediately
Serve your ultimate tuna melts piping hot! The melty cheese and warm filling are best enjoyed right away.
“I don’t know if I’ve ever eaten a better tuna melt recipe. The rub alone is wonderful, but the sauce??? Over the top!”
What to Serve It With
This tuna melt is a star all on its own, but it plays wonderfully with a few friends. For a classic breakfast or brunch, I love pairing it with a crisp, refreshing side salad tossed with a light vinaigrette. It cuts through the richness of the sandwich beautifully. If you’re feeling a bit more substantial for brunch, a cup of creamy tomato soup is an absolute dream. The warmth and tang of the soup with the cheesy, savory melt is pure comfort. For a light lunch, I often serve it alongside some crunchy pickles or a small portion of coleslaw. It adds a nice textural contrast and a bit of tang. On those cozy snack occasions, sometimes just a simple side of kettle-cooked potato chips is all you need for that ultimate nostalgic experience. Honestly, though, my kids will happily eat this tuna melt with absolutely nothing else, and I can’t say I blame them!
Top Tips for Perfecting Your Tuna Melt
I’ve made enough tuna melts to write a book, and along the way, I’ve picked up a few tricks that make all the difference. First, let’s talk about the tuna itself. Draining it really, really well is key. I’ve learned the hard way that even a little excess water can make the filling soggy, and we absolutely do not want that. I usually press the tuna in the can with a fork for a good minute or two. For the tuna salad, don’t be afraid to add a little something extra. The relish and Dijon mustard are non-negotiable for me; they add layers of flavor that elevate it beyond basic. If you don’t have relish, a tiny bit of finely chopped sweet pickle or even a teaspoon of ketchup can add that subtle sweetness. My kids actually prefer it with ketchup, so don’t hesitate to experiment with what your family loves! When it comes to the bread, I’ve found that a slightly thicker slice holds up best to grilling and prevents the filling from oozing out too much. Sourdough is my personal favorite for its slight tang, but a good quality whole wheat or country white bread is also fantastic. Now, for the buttering – this is where the magic happens! Don’t skimp. Spread that softened butter all the way to the edges of the bread. It creates that irresistible golden crust. I’ve learned that using softened butter is much easier to spread evenly than cold butter. And remember, medium heat is your friend. Too high, and the bread burns before the cheese melts. Too low, and it takes forever and can become greasy. Patience is key here for that perfect crispy exterior. If your cheese isn’t melting as quickly as you’d like, don’t panic! You can always cover the pan for a minute or two with a lid to help trap the heat and encourage that glorious melty goodness. I’ve also found that using a combination of cheeses adds fantastic depth. A sharp cheddar for flavor and a good melting cheese like provolone or Monterey Jack for stretchiness is a winning combo in my book.
Storing and Reheating Tips
If, by some miracle, you have leftover tuna melt (which rarely happens in my house!), here’s how to store and reheat it to get it tasting almost as good as fresh. For short-term storage, wrap the cooled sandwich tightly in plastic wrap or place it in an airtight container. It should keep well in the refrigerator for up to 2 days. When you’re ready to reheat, I’ve found the best method is to use a skillet. Place the sandwich in a dry skillet over medium-low heat, and cook for a few minutes per side until heated through and the bread is crispy again. You can also use a toaster oven or a regular oven preheated to around 350°F (175°C), wrapped loosely in foil, for about 8-10 minutes. Be cautious with the microwave, as it can make the bread a bit soft and chewy, but it’s still an option for a quick reheat if that’s your only choice. For the tuna salad itself, if you’ve made extra, it stores beautifully in an airtight container in the refrigerator for up to 3-4 days. This makes assembling a quick tuna melt even faster on another day! I wouldn’t recommend freezing the assembled sandwich, as the bread texture can really suffer. However, you can freeze the tuna salad mixture separately, well-wrapped, for up to a month. Thaw it in the refrigerator overnight and drain off any excess moisture before using it in a sandwich. The key is to always ensure your tuna melt is fully cooled before storing, and if reheating, aim for that crispy exterior and warm, melty center.
Frequently Asked Questions
Final Thoughts
So there you have it – my absolute favorite way to make a tuna melt! It’s simple, it’s comforting, and it’s consistently delicious. I truly believe this recipe has the power to make any day a little brighter, whether it’s a quick lunch or a cozy dinner. It’s a reminder that sometimes, the most satisfying meals are the ones that are made with simple ingredients and a whole lot of love. I really hope you give this tuna melt recipe a try. I’m so excited to hear what you think! If you make it, please let me know in the comments below – I’d love to hear about your experience and any little twists you add. And if you’re a fan of comforting, easy recipes like this, you might also enjoy my recipe for the ultimate grilled cheese or my quick and easy chicken noodle soup. Happy cooking, and I can’t wait to see how your tuna melts turn out!
Classic Tuna Melt Recipe
Ingredients
Tuna Salad
- 1 can tuna drained and flaked
- 0.5 cup mayonnaise
- 0.25 cup celery finely chopped
- 2 tablespoon red onion finely chopped
- 1 teaspoon lemon juice
- to taste salt
- to taste black pepper
Sandwich Assembly
- 4 slices bread your favorite kind
- 2 slices cheddar cheese
- 2 tablespoon butter softened
Instructions
Preparation Steps
- In a medium bowl, combine the drained tuna, mayonnaise, chopped celery, chopped red onion, and lemon juice. Mix well.
- Season the tuna salad with salt and black pepper to taste. Stir to combine.
- Butter one side of each slice of bread.
- Place two slices of bread, butter-side down, in a non-stick skillet or on a griddle over medium heat. Top each with a slice of cheddar cheese.
- Spoon half of the tuna salad mixture onto the cheese on each sandwich.
- Top with the remaining two slices of bread, butter-side up.
- Grill for 4-5 minutes per side, or until the bread is golden brown and the cheese is melted.
- Remove from skillet, slice in half, and serve immediately.