Oh, where do I even begin with these cannoli? If there’s one dessert that instantly transports me back to my grandmother’s bustling kitchen, it’s this one. The scent of sweet ricotta, a hint of citrus, and that impossibly crisp shell… pure magic. I know, I know, cannoli can seem a little intimidating, right? Like something you only order from a fancy Italian bakery. But I’m here to tell you, with absolute certainty, that you can make these at home, and they will be SO good, you’ll wonder why you ever hesitated. This isn’t just a recipe; it’s a little piece of sunshine I love to share. Forget those sad, soggy store-bought versions; this cannoli recipe is the real deal, and it’s surprisingly approachable. Trust me, the effort is so worth the reward!
Thank you for reading this post, don't forget to subscribe!What are cannoli?
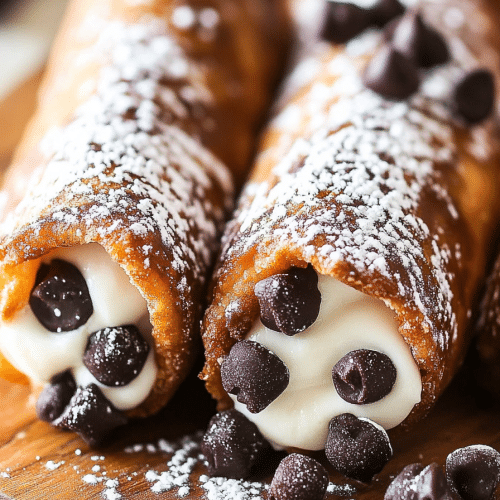
So, what exactly *is* a cannoli? At its heart, it’s a classic Italian pastry originating from Sicily. The name itself, “cannoli,” is plural, meaning “little tubes.” And that’s precisely what they are: tubes of fried dough, typically about 4-6 inches long, that are then filled with a sweet, creamy ricotta cheese mixture. Think of it as a delightful contrast: the satisfying crunch of the fried shell giving way to a luscious, almost cloud-like filling. It’s not overly sweet, which I absolutely adore, and it has this wonderful, delicate balance of flavors. Some people add chocolate chips, some add candied fruit, but the pure, unadulterated ricotta filling is what I grew up with and what I’ll always champion. It’s simple, elegant, and downright delicious.
Why you’ll love this recipe?
Honestly, there are so many reasons this cannoli recipe has earned a permanent spot in my recipe binder. First and foremost, the flavor is just out of this world. The shells get perfectly golden and crispy, and the filling is a dreamy blend of sweet, tangy ricotta with just a whisper of orange zest and vanilla. It’s a taste that’s both comforting and sophisticated. And when I say this is simple, I really mean it. Yes, there are a couple of steps, but none of them are complicated. I promise! You don’t need any fancy equipment, just a little patience and a lot of love. Plus, compared to buying them, making cannoli at home is incredibly cost-effective. You can whip up a dozen or more for a fraction of the price you’d pay at a bakery. What I love most about this recipe, though, is its versatility. While the classic is divine, you can totally customize the filling. Add mini chocolate chips, chopped pistachios, or even a swirl of fruit jam. It’s also perfect for special occasions, but honestly, I’ve made these on a random Tuesday just because I was craving something special. It’s that kind of recipe. It feels indulgent without being over the top, and that’s a sweet spot I’m always aiming for in my cooking.
How do you make cannoli?
Quick Overview
This cannoli recipe involves making a simple fried dough shell, then whipping up a luscious ricotta filling. We’ll combine these two elements to create the most incredible cannoli you’ve ever tasted. The key is to get those shells super crispy and the filling perfectly smooth and flavorful. It’s a two-part process but each part is straightforward, and the result is pure bliss. Don’t be scared of frying; it’s easier than you think, and the payoff is HUGE!
Ingredients
For the Shells: What is the best way to describe the Shells?
2 cups all-purpose flour, plus more for dusting
1 tablespoon granulated sugar
1/2 teaspoon salt
1 tablespoon unsalted butter, softened
1 large egg, lightly beaten
1/4 cup dry White Wine or Marsala wine (this is key for crispness!)
1 tablespoon white vinegar
Vegetable oil, for frying (enough to fill your pot about 3 inches deep)
For the Filling:
2 cups whole milk ricotta cheese, well-drained (this is SUPER important!)
1/2 cup powdered sugar, sifted
1 teaspoon vanilla extract
1/2 teaspoon finely grated orange zest (optional, but highly recommended!)
1/4 cup Mini Chocolate chips or chopped pistachios (optional)
For the Glaze:
1/2 cup powdered sugar, sifted
1-2 tablespoons milk or cream
“New family favorite! This Sweet Creamy Cannoli Treats was so flavorful and ridiculously easy. Crowd-pleaser for sure.”
Step-by-Step Instructions
Step 1: Preheat & Prep Pan
First things first, let’s get everything ready for the shells. You’ll need a heavy-bottomed pot or Dutch oven for frying. Pour in your vegetable oil, filling it about 3 inches deep. We want to heat this up to around 350°F (175°C). While the oil is heating, it’s a good time to get your cannoli forms ready. If you have them, great! If not, you can improvise with tightly rolled aluminum foil. Make sure you have plenty of paper towels on hand to drain the fried shells.
Step 2: Mix Dry Ingredients
In a large bowl, whisk together the flour, granulated sugar, and salt. Make a little well in the center. This is where the magic starts to happen. Getting these dry ingredients perfectly combined ensures an even texture in your final shells. I usually give it a good whisk, just to make sure everything is distributed evenly. It’s simple, but it sets the stage for everything that follows.
Step 3: Mix Wet Ingredients
In a separate, smaller bowl, whisk together the softened butter, egg, White Wine (or Marsala – it really adds a lovely depth!), and white vinegar. The alcohol in the wine actually helps the shells crisp up beautifully and evaporate as they fry, leaving behind nothing but glorious crunch. The vinegar also plays a role in that crispiness! Don’t worry, you won’t taste the wine or vinegar at all in the finished product.
Step 4: Combine
Now, pour the wet ingredients into the well of the dry ingredients. Using a fork or your hands, gradually mix everything together until a shaggy dough forms. Turn the dough out onto a lightly floured surface and knead for about 5-7 minutes, or until it’s smooth and elastic. It should feel firm but pliable, not sticky. If it’s too sticky, add a tiny bit more flour; if it’s too dry, a whisper of water. Then, wrap the dough tightly in plastic wrap and let it rest in the refrigerator for at least 30 minutes. This resting period is crucial; it allows the gluten to relax, making the dough much easier to roll out later.
Step 5: Prepare Filling
While the dough is chilling, let’s make the filling. This is where the creaminess comes in. You absolutely MUST drain your ricotta cheese thoroughly. I usually put it in a fine-mesh sieve lined with cheesecloth (or a clean kitchen towel) over a bowl in the fridge for at least a few hours, or even overnight. The less moisture in the ricotta, the thicker and creamier your filling will be, and it won’t make the shells soggy. Once drained, combine the ricotta with the sifted powdered sugar, vanilla extract, and orange zest (if using) in a bowl. Mix until it’s smooth and well combined. If you’re adding chocolate chips or pistachios, gently fold them in now. Taste it – adjust sweetness if needed. It should be sweet but not cloying. I like to pop this into the fridge to chill while I’m rolling and frying the shells.
Step 6: Layer & Swirl
Okay, time to roll out the dough! Take the chilled dough and divide it into 2 or 3 portions. Working with one portion at a time (keep the others wrapped), roll it out very thinly on a lightly floured surface. You want it almost translucent, like you can almost see through it. Use a round cutter (about 3-4 inches in diameter) or a glass to cut out circles. Wrap each circle around a cannoli form, overlapping the edges slightly. Moisten the edge with a little water to seal it shut. Pinch the seam firmly. Now, carefully place the cannoli forms with the dough into the hot oil. Fry them for 2-3 minutes per side, or until golden brown and beautifully puffed. Use tongs to carefully remove them from the oil and place them on the prepared paper towels to drain and cool. Once cool enough to handle, gently slide them off the forms. Repeat with the remaining dough.
Step 7: Bake
Oops! I meant to say fry here. My apologies, my brain jumped ahead! Let’s correct that. Carefully place the cannoli forms with the dough into the hot oil. Fry them for 2-3 minutes per side, or until golden brown and beautifully puffed. Use tongs to carefully remove them from the oil and place them on the prepared paper towels to drain and cool. Once cool enough to handle, gently slide them off the forms. Repeat with the remaining dough. This frying step is where the magic happens for those crispy shells!
Step 8: Cool & Glaze
Once your cannoli shells are completely cool, it’s time for the glaze. In a small bowl, whisk together the sifted powdered sugar with just enough milk or cream to make a drizzly consistency. It shouldn’t be too thin or too thick. You can dip the ends of the cannoli shells into the glaze, or simply drizzle it artfully over the top. Some people prefer to dust them with a little extra powdered sugar, which is lovely too. Let the glaze set for a few minutes before filling.
“Made the Sweet Creamy Cannoli Treats tonight and wow — perfect weeknight dinner. Will definitely make again!”
Step 9: Slice & Serve
This is the moment of truth! Using a piping bag with a large round tip (or a sturdy zip-top bag with the corner snipped off), carefully fill each cannoli shell with the ricotta mixture. Start filling from one end and work your way to the other, trying to get an even amount in both sides. Don’t overfill, or the filling will just ooze out. You can then garnish the ends with a few mini chocolate chips or some chopped pistachios if you like. Serve them immediately for the best texture – that contrast between the crisp shell and the creamy filling is pure heaven. This is the best way to enjoy them!
What to Serve It With
These cannoli are pretty sensational on their own, but if you’re looking to elevate the experience, here are a few ideas. For breakfast (yes, I’ve done this!), a perfectly brewed espresso or a strong cappuccino is an absolute must. The rich coffee flavor cuts through the sweetness beautifully. For a more leisurely brunch spread, imagine these little beauties nestled on a platter alongside fresh berries and a dollop of whipped cream. They add such an elegant touch! As a dessert, they’re a showstopper, of course. Serve them after a hearty Italian meal with a glass of dessert wine like Vin Santo, or a light Moscato. And for those cozy, spontaneous snack attacks? Honestly, just a glass of cold milk makes them feel like a special treat. My family loves them after a Sunday Dinner, and they’re always the first thing to disappear!
Top Tips for Perfecting Your Cannoli
Over the years, I’ve picked up a few tricks that make this cannoli recipe foolproof. First, with the zucchini prep, it’s all about that moisture. If your ricotta is too wet, your shells will get soggy in no time. Draining it thoroughly is non-negotiable! For mixing, remember that the dough for the shells shouldn’t be overworked. Knead just until it’s smooth and elastic; overworking can make them tough. When it comes to the swirl, if you’re making a layered cake, you want to make sure your batters are consistent. For cannoli, the swirl is more about how you fold in extras like chocolate chips or nuts. Don’t go overboard; just a gentle fold is enough. Ingredient swaps can be tricky. For the shells, you can try substituting some of the white wine with Marsala for a deeper flavor, but I don’t recommend skipping the alcohol and vinegar entirely, as they are key to crispness. If you absolutely can’t find cannoli forms, tightly rolled aluminum foil tubes work in a pinch, but they can be a bit fiddly. Baking, or rather frying, is all about temperature control. Make sure your oil is at the right temperature before you start; too cool and they’ll be greasy, too hot and they’ll burn before they cook through. I always have a thermometer handy. For glaze variations, a simple dusting of powdered sugar is lovely if you want something lighter, or you can get creative with colored icings for holidays!
Storing and Reheating Tips
This is a big one, and it’s the key to enjoying your cannoli for as long as possible. For room temperature storage, it’s best to fill them *just before* serving. If you must store them filled, they’re usually best eaten within a few hours. The shells will start to soften after that. If you need to store them longer, keep the fried shells and the filling separate. The fried shells can be stored in an airtight container at room temperature for up to 2 days, though they’ll be freshest on day one. The ricotta filling should be stored in an airtight container in the refrigerator for up to 3 days. When you’re ready to serve, just fill the shells. Reheating isn’t really recommended for the shells, as it can make them soggy. For freezer instructions, again, keep the shells and filling separate. Wrap the cooled shells tightly in plastic wrap, then in foil, and freeze for up to a month. Thaw them at room temperature. The filling can also be frozen in an airtight container, though the texture might change slightly upon thawing. I usually don’t freeze the filling unless I have a LOT left over. For glaze timing, if you’re storing filled cannoli, it’s best to add the glaze right before serving, or at least just before you refrigerate them, otherwise, it can get sticky.
Frequently Asked Questions
Final Thoughts
There you have it – my absolute favorite cannoli recipe! I truly hope you feel inspired to give these a try. They are a labor of love, yes, but the joy on people’s faces when they bite into a perfectly crisp, creamy cannoli is just priceless. It’s a little taste of Sicily, right in your own kitchen. If you loved making these, you might also enjoy my Tiramisu Recipe or my Classic Panna Cotta. They offer similar delightful Italian dessert vibes. Don’t be afraid to experiment with the filling additions; make them your own! I can’t wait to hear how your cannoli turn out. Please leave a comment below with your thoughts or any fun variations you tried. Happy baking, and more importantly, happy eating!
cannoli recipe
Ingredients
For the Cannoli Shells
- 1.75 cup all-purpose flour
- 2 tablespoon granulated sugar
- 0.5 teaspoon ground cinnamon
- 0.25 teaspoon salt
- 2 tablespoon unsalted butter cold, cubed
- 1 large egg
- 0.25 cup sweet Marsala wine
- 1 tablespoon water
- 0.5 tablespoon distilled white vinegar
- 8 cups vegetable oil for frying
- 1 large egg white beaten, for sealing
For the Cannoli Filling
- 2 cups ricotta cheese strained
- 2 cups mascarpone cheese cool
- 2 cups powdered sugar
Optional Decorations
- 4 ounces semi-sweet chocolate chopped, for dipping
- 0.75 cup mini chocolate chips for decorating
Instructions
Prepare the Cannoli Dough
- In a medium bowl, combine the flour, granulated sugar, cinnamon, and salt. Add the cold, cubed butter and use a pastry cutter or your fingers to cut it into the flour mixture until it resembles coarse crumbs with some pea-sized pieces remaining. Continue working it with your fingers until the butter is evenly distributed. Form a well in the center.
- In a small separate bowl, beat the large egg. Pour the beaten egg, Marsala wine, water, and distilled white vinegar into the well of the flour mixture. Stir with a fork until the mixture starts to come together and looks shaggy. Switch to using your hands to knead the dough in the bowl until it forms a cohesive ball.
- Transfer the dough to a lightly floured countertop or work surface. Knead the dough, using the heel of your hand to push it away from you, then folding it back onto itself. Repeat this process, adding more flour as needed to prevent sticking, until the dough is cohesive, elastic, and soft. It may still look a bit rough; it will smooth out as it rests. Wrap the dough tightly in plastic wrap and refrigerate for at least 2 hours, or up to 24 hours.
Prepare the Cannoli Filling
- While the dough chills, prepare the filling. Add the strained ricotta cheese, cool mascarpone cheese, and powdered sugar to a medium-sized bowl. Gently fold the ingredients together until they are just combined and smooth. Be careful not to overmix, as mascarpone can break down and become watery if over-whipped.
- Cover the bowl with plastic wrap and chill the filling in the refrigerator for 2-3 hours while you complete the cannoli shells. This allows the flavors to meld and the filling to firm up.
Form and Fry the Shells
- Lightly grease your cannoli molds with vegetable oil or non-stick baking spray and set them aside.
- Remove the chilled dough from the refrigerator and cut it in half. Wrap one half back in plastic wrap and set it aside to keep it from drying out.
- Place the other half of the dough on a lightly floured surface and lightly dust with flour. Roll it out, dusting with more flour as needed, until it is about 0.125-inch thick. Use a 4 or 4.5-inch round cutter to cut out as many circles as possible. Place the cut circles under a layer of plastic wrap to prevent them from drying. Gather the dough scraps, wrap them, and set aside.
- Repeat the rolling and cutting process with the second half of the dough, keeping all circles covered. The circles may spring back and shrink slightly after cutting; this is normal.
- Combine the scraps from both batches of dough and re-roll, cutting out more circles until you have used all the dough, aiming for about 25-28 shells in total.
- Let the covered dough circles sit for about 10 minutes to allow the dough to relax. By the time you're done cutting all circles, the first ones cut should be adequately rested.
- Working with one circle at a time, re-roll each circle on a lightly floured surface until it reaches its original size (approximately 0.125-inch thick and 4 to 4.5 inches in diameter). The dough should now be more pliable and not spring back as much. If it loses its round shape, you can re-cut it.
- Place a greased cannoli mold down the middle of a re-rolled dough round. Bring one side of the dough up and over the mold. Brush the edge of the dough that is on the mold with the beaten egg white. Fold the opposite side of the dough up and over the mold, pressing it firmly onto the egg-washed surface to create a secure overlap. Set aside on a tray as you work on the rest.
- While forming the shells, begin heating the oil. Pour about 2-3 inches of vegetable oil into a large Dutch oven or deep skillet. Attach a candy thermometer to the side of the pot and heat the oil over medium-high heat until it reaches 375°F. Reduce heat to medium to maintain the temperature. Line a baking sheet with several layers of paper towels for draining.
- Carefully add 2-3 prepared cannoli shells on their molds to the hot oil, ensuring they are fully submerged. Fry the shells for 1-2 minutes, or until the dough blisters and turns golden brown. Use tongs to grab the mold and remove the hot shell from the oil. Place it on the paper towel-lined pan to cool. Monitor the oil temperature constantly and adjust the heat as needed to maintain 375°F.
- Allow the fried shells to cool for about a minute on the paper towels, then very carefully remove the molds from inside the shells. Let the shells cool completely on a wire rack.
- If desired, melt the chopped semi-sweet chocolate. Once the shells are completely cool, dip the ends of the cannoli shells into the melted chocolate, gently shaking off any excess. Place them on parchment paper to allow the chocolate to set completely.
Fill and Serve
- When ready to serve, retrieve the chilled filling from the fridge. Transfer the filling to a piping bag fitted with a wide round tip, or simply use a large Ziplock bag with one corner snipped off (about 1 inch wide opening).
- Pipe the filling into the cooled cannoli shells, starting from one end and filling towards the middle, then repeat from the other end to ensure an even fill. If decorating with mini chocolate chips, gently press them onto the ends of the filled cannoli. Dust with a light sprinkle of powdered sugar just before serving.
- Cannoli are best served immediately after filling, as the shells will soften over time (typically staying crispy for about an hour). Store any leftover filled cannoli in an airtight container in the refrigerator. Unfilled shells can be stored in an airtight container at room temperature for a few days or frozen for up to a month. Thaw frozen shells in the fridge before filling.


