There are some flavors that just instantly transport you back to childhood, aren’t there? For me, that’s anything with graham crackers, chocolate, and toasted marshmallows. It’s pure magic! And that’s exactly what this smores pie is all about. I remember the first time I tried making a dessert that captured that classic campfire taste without actually having to build a fire. I was trying to impress some friends and wanted something that felt special but wouldn’t tie me to the kitchen for hours. This pie was an absolute revelation! It’s like a hug in dessert form, and honestly, it’s so much easier than trying to juggle melting chocolate and perfectly toasted marshmallows over a campfire (which, let’s be real, often ends in burnt fingers and sad, gooey messes). This smores pie is my go-to when that sweet craving hits hard, or when we have last-minute guests and I need a showstopper that’s ridiculously easy to pull off. It’s a crowd-pleaser, for sure, and I’ve lost count of how many times my family has begged for it. Forget complicated layer cakes or finicky cheesecakes; this pie is the real deal for instant gratification and pure, unadulterated joy.
Thank you for reading this post, don't forget to subscribe!What is a S’mores Pie?
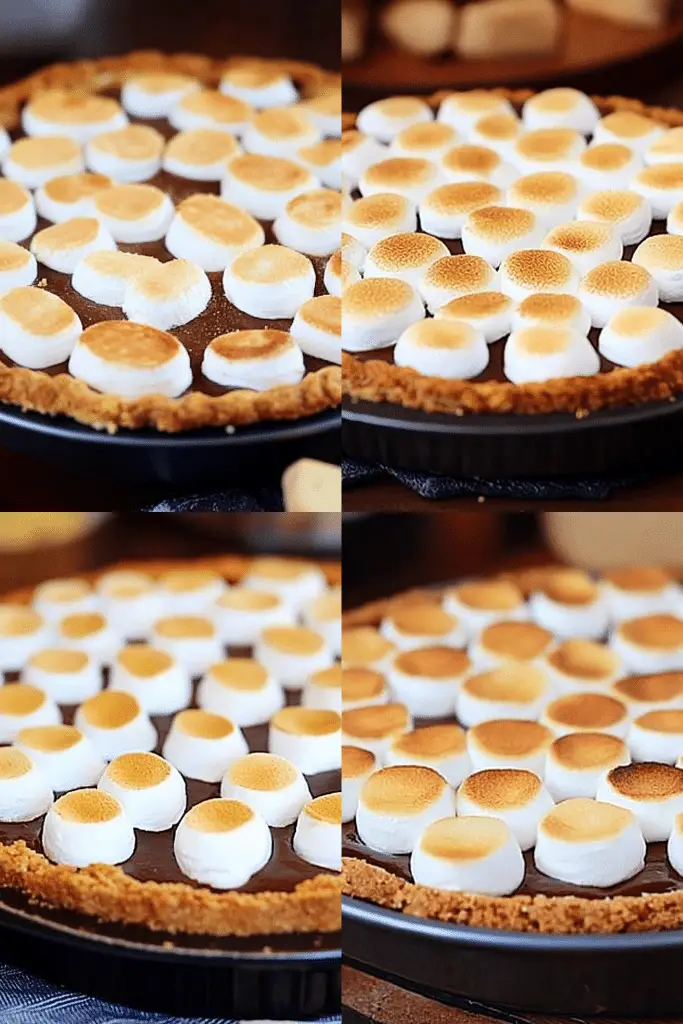
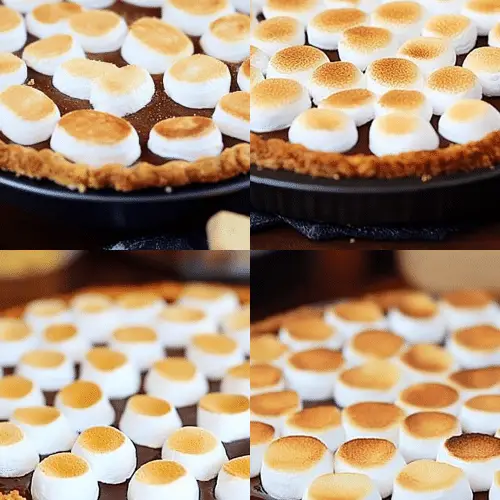
So, what exactly is this delightful creation we’re talking about? Think of it as the best parts of camping, baked into a rich, decadent pie. It’s essentially a chocolatey, gooey, marshmallow-topped dream that sits on a crumbly Graham Cracker crust. We’re talking layers of intense chocolate flavor, a luscious, molten marshmallow topping that gets beautifully browned, all nestled in that familiar, buttery graham cracker base. It’s not just a dessert; it’s an experience! The name “smores pie” is pretty straightforward, right? It’s inspired by the beloved campfire treat where you smoosh together toasted marshmallows, chocolate, and graham crackers. I love that this pie captures all those iconic flavors and textures, but in a way that feels a little more elegant and a lot more convenient for everyday indulgence. It’s the comfort of a nostalgic treat elevated to dessert perfection, and honestly, it’s just plain delicious.
Why you’ll love this recipe?
Oh, where do I even begin with why you’ll adore this smores pie? Firstly, the FLAVOR is out of this world. Imagine that deep, rich chocolate mingling with sweet, fluffy marshmallows, all anchored by that perfectly crumbly graham cracker crust. It’s a symphony of textures and tastes that will make your taste buds sing. Seriously, the smell alone as it bakes is enough to make everyone in the house gather around the oven. Then there’s the SIMPLICITY. I’m all about recipes that deliver big on taste without demanding a ton of complicated steps. This pie is surprisingly easy to whip up, even on a weeknight when you’re feeling tired. Most of the magic happens in the oven! Plus, it’s incredibly COST-EFFICIENT. The ingredients are pretty basic pantry staples, so you don’t need to break the bank to create something truly spectacular. And talk about VERSATILITY! While it’s divine on its own, I’ve found it’s fantastic served warm with a scoop of vanilla Ice Cream, or even alongside a drizzle of caramel sauce. What I love most about this smores pie, though, is that it brings a little bit of childhood joy to any occasion. It’s less fussy than a traditional pie but delivers that same satisfying wow factor. It’s the kind of dessert that sparks happy memories and creates new ones around the table. If you’re a fan of my no-bake chocolate lasagna, you’ll absolutely love the deep chocolate flavor here, but with that irresistible toasted marshmallow twist!
How do I make a S’mores Pie?
Quick Overview
This smores pie is all about effortless indulgence. We’ll start by pressing a simple graham cracker crust into the pie plate, then pour in a rich, fudgy chocolate filling. The magic really happens when we top it with a generous layer of marshmallows and let the oven work its wonders, turning them golden and gooey. It’s a straightforward process that guarantees a show-stopping dessert with minimal fuss. What makes this method special is how it concentrates those beloved smores flavors into one perfect slice. It’s truly a lifesaver when you need something impressive without the stress.
Ingredients
For the Graham Cracker Crust:
2 cups graham cracker crumbs (about 14-16 full sheets)
1/4 cup granulated sugar
1/2 cup unsalted butter, melted
*Tip: For the best crumbs, pulse graham crackers in a food processor until fine. Make sure your butter is fully melted and not browned!
For the Rich Chocolate Filling:
1 cup (6 ounces) semi-sweet chocolate chips
1/2 cup (3 ounces) milk chocolate chips (for extra creaminess)
1/2 cup heavy cream
1/4 cup unsalted butter, cut into cubes
1 teaspoon vanilla extract
Pinch of salt
*Note: Using a mix of semi-sweet and milk chocolate gives the perfect balance of richness and sweetness. You can adjust this based on your preference!
For the Toasted Marshmallow Topping:
3 cups mini marshmallows (or about 20 large marshmallows, roughly chopped)
*Optional: A few drizzles of chocolate syrup for extra flair before toasting.
“New family favorite! This smores pie was so flavorful and ridiculously easy. Crowd-pleaser for sure.”
Step-by-Step Instructions
Step 1: Preheat & Prep Pan
First things first, let’s get our oven preheating to 350°F (175°C). While it’s heating up, grab a standard 9-inch pie plate. You don’t need to grease it because the crust will provide its own buttery goodness, but it’s always good to have it ready to go.
Step 2: Mix Dry Ingredients
In a medium bowl, combine your graham cracker crumbs and granulated sugar. Give them a good whisk to make sure the sugar is evenly distributed throughout the crumbs. This little bit of sugar helps the crust bind together and adds a touch more sweetness.
Step 3: Mix Wet Ingredients
Pour the melted butter into the graham cracker and sugar mixture. Stir everything together until the crumbs are evenly moistened, resembling wet sand. This is key for a crust that holds its shape and has that lovely buttery flavor.
Step 4: Combine
Pour the crumb mixture into your pie plate. Use the bottom of a glass or a measuring cup to firmly press the crumbs evenly across the bottom and up the sides of the pie plate. You want a nice, compact layer so it doesn’t crumble apart when you slice it. You can bake this crust for about 8-10 minutes until it’s lightly golden and fragrant, then let it cool slightly while you prepare the filling. Baking it first makes it extra sturdy!
Step 5: Prepare Filling
In a heatproof bowl set over a saucepan of simmering water (a double boiler setup), combine the semi-sweet and milk chocolate chips, heavy cream, and cubed butter. Stir gently and continuously until everything is melted and smooth. This low, slow heat prevents the chocolate from scorching. Once melted and glossy, remove the bowl from the heat, stir in the vanilla extract, salt, and any other flavorings you like (a tiny pinch of espresso powder can really enhance the chocolate!). Let it cool for about 5-10 minutes until it’s just slightly thickened but still pourable.
Step 6: Layer & Swirl
Pour the warm chocolate filling evenly over the pre-baked and slightly cooled graham cracker crust. Gently spread it to the edges with a spatula. If you want to add a little something extra, you can drizzle a bit of extra chocolate syrup on top and swirl it with a toothpick for a marbled effect. This step is optional but adds a nice visual touch!
Step 7: Bake
Now for the best part! Sprinkle the mini marshmallows evenly over the chocolate filling, covering it completely. Place the pie back into the preheated 350°F (175°C) oven. Bake for about 10-15 minutes, or until the marshmallows are puffed up and beautifully golden brown. Keep a close eye on it, as marshmallows can go from golden to burnt very quickly! You can also finish it under the broiler for a minute or two, watching *very* carefully, if you want extra toasty peaks.
Step 8: Cool & Glaze
Once the marshmallows are perfectly toasted, carefully remove the pie from the oven. Let it cool on a wire rack for at least 30 minutes. This allows the chocolate filling to set up properly. If you decide you want a more defined glaze or extra chocolatey goodness, you can drizzle a little more melted chocolate or chocolate syrup over the warm marshmallows just as it starts to cool. The residual heat will help it set into a lovely sheen.
“Packed with flavor and so simple. Exactly what I wanted from this smores pie!”
Step 9: Slice & Serve
Once the pie has cooled and set, it’s ready to be sliced! A sharp knife dipped in hot water (and wiped dry between slices) will give you the cleanest cuts. Serve it warm or at room temperature. The gooey chocolate and melted marshmallows are at their Absolute Best when they’re slightly warm, but it’s also delicious once it has fully cooled. Enjoy every single bite!
What to Serve It With
This smores pie is so versatile, it can be the star of any meal or snack occasion! For breakfast (yes, I said breakfast!), a small slice with a strong cup of black coffee is pure indulgence. The rich chocolate and slightly sweet crust feel like a decadent start to the day. If you’re planning a brunch, serve it slightly warmed with some fresh berries on the side to cut through the richness. It’s a delightful addition to any spread. As a dessert, it’s a no-brainer. It’s perfect after a hearty meal, especially one featuring grilled meats or hearty stews. A scoop of good quality vanilla bean Ice Cream alongside it is absolutely divine. For those cozy snack moments, when you just need something comforting, a slice of this pie with a glass of cold milk is pure bliss. My kids absolutely love it after school, and it disappears in minutes. Sometimes, we’ll even have it as a special weekend treat after a family movie night. It’s just that good, and it always brings smiles all around!
Top Tips for Perfecting Your S’mores Pie
I’ve made this smores pie more times than I can count, and over the years, I’ve picked up a few tricks that I think really elevate it. For the crust, I always press it firmly into the pan. This is crucial for a slice that holds its shape. If you don’t press it well enough, you’ll end up with a crumbly mess, and nobody wants that! Make sure your butter is fully melted and combined with the crumbs so they stick together like magic. When it comes to the chocolate filling, don’t rush the melting process. Using a double boiler is your best friend here. It ensures the chocolate melts slowly and evenly, resulting in a super smooth, luscious filling without any chance of burning. I’ve learned this the hard way after scorching chocolate in the microwave! For the marshmallow topping, I find that using mini marshmallows gives you a more even layer of toasting. If you use large marshmallows, chop them up a bit so they spread out more uniformly. And watch them like a hawk in the oven! Marshmallows can go from perfectly golden to charcoal black in seconds. If your oven tends to bake unevenly, consider rotating the pie halfway through the marshmallow toasting stage. For ingredient swaps, if you’re not a fan of milk chocolate, you can use all semi-sweet, or even try dark chocolate for a more intense flavor. Some people also love adding a teaspoon of instant espresso powder to the chocolate filling – it doesn’t make it taste like coffee, but it really deepens and enhances the chocolate flavor. Trust me on this one! For the swirl effect, don’t overdo it. A few gentle swirls with a toothpick are all you need to create a pretty pattern without mixing the chocolate and marshmallow too much. The goal is distinct layers.
Storing and Reheating Tips
So, you’ve made this incredible smores pie, and maybe, just maybe, there are a few slices left (though I wouldn’t bet on it!). Storing it properly will ensure you can enjoy it for days to come. If you have leftovers and it’s just been a few hours, you can certainly leave it at room temperature, loosely covered, for a few hours. However, for anything longer than that, or if your kitchen is warm, it’s best to refrigerate it. Wrap the pie tightly with plastic wrap, or better yet, place it in an airtight container. In the refrigerator, it should stay delicious for about 3 to 4 days. The marshmallows might lose a bit of their puffiness over time, but the flavor will still be amazing. If you find yourself with a surplus and want to keep it even longer, freezing is a great option! Let the pie cool completely first. Then, wrap it very well in plastic wrap, followed by a layer of aluminum foil or a freezer-safe container. It can stay frozen for up to 2-3 months. When you’re ready to enjoy a frozen slice, the best way to reheat is to let it thaw in the refrigerator overnight and then warm it gently in the oven at around 300°F (150°C) for about 10-15 minutes, or until warmed through and the marshmallows are soft again. You can also reheat individual slices in the microwave, but be mindful of the marshmallows, as they can get very hot very quickly!
Frequently Asked Questions
Final Thoughts
This smores pie is more than just a dessert; it’s a warm, fuzzy memory in edible form. It’s that perfect balance of rich chocolate, gooey marshmallows, and buttery graham cracker that just makes everything feel right in the world. It’s incredibly satisfying to make something so delicious with such relative ease, and the reactions you get when people try it are priceless. If you’re looking for a dessert that’s guaranteed to impress, that brings a little bit of campfire magic into your kitchen, and that your family will be begging for again and again, then this smores pie is it. It’s my absolute go-to for a reason, and I truly hope it becomes one of your favorites too! Don’t forget to let me know how yours turns out in the comments below, and if you try any fun variations, I’d love to hear about them! Happy baking, and enjoy every single decadent bite!
smores pie
Ingredients
Crust
- 2 cups graham cracker crumbs
- 0.375 cup melted butter
- 2 tablespoon granulated sugar
Filling
- 10 ounces semi-sweet chocolate chips
- 0.5 cup heavy cream
- 1 teaspoon vanilla extract
Topping
- 2 cups marshmallows large, halved
Instructions
Preparation Steps
- Preheat oven to 350°F (175°C).
- In a medium bowl, combine graham cracker crumbs, melted butter, and sugar. Mix until well combined.
- Press the crumb mixture evenly into the bottom and up the sides of a 9-inch pie plate.
- Bake the crust for 8-10 minutes, until lightly golden. Remove from oven and let cool slightly.
- While the crust cools, make the filling. Place chocolate chips in a heatproof bowl.
- In a small saucepan, heat heavy cream over medium heat until simmering (do not boil).
- Pour the hot cream over the chocolate chips. Let sit for 5 minutes, then whisk until smooth.
- Stir in the vanilla extract.
- Pour the chocolate filling into the prepared pie crust.
- Arrange the marshmallow halves on top of the chocolate filling.
- Bake for another 15-20 minutes, or until the marshmallows are golden brown and puffy. You can also use a kitchen torch to toast the marshmallows.
- Let the pie cool completely before slicing and serving.