
There are some recipes that just feel like coming home. For me, that’s a perfectly roasted chicken. It’s more than just dinner; it’s that comforting aroma filling your kitchen, the promise of juicy meat and crispy skin, and the knowledge that you’ve created something truly special with minimal fuss. I remember my grandmother making a whole roasted chicken every Sunday, and the smell was just incredible. It wasn’t fancy, but it was always perfect. This recipe is my homage to that feeling, a way to capture that magic for my own family. When life gets hectic, and I need a meal that feels both impressive and incredibly easy, this whole roasted chicken is my absolute go-to. It’s a lifesaver on busy weeknights and always a crowd-pleaser at gatherings. Forget those complicated gourmet meals for a moment; sometimes, the simplest things are the most profound. This is comfort food at its finest, and I’m so excited to share it with you.
Thank you for reading this post, don't forget to subscribe!What is Whole Roasted Chicken?
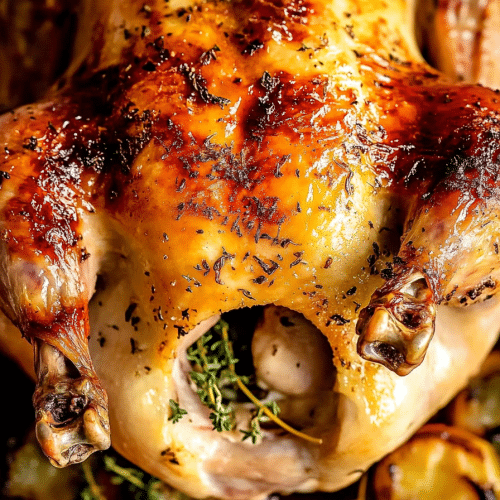
So, what exactly are we talking about when I say “whole roasted chicken”? It’s exactly what it sounds like: a complete, un-cut chicken that gets roasted in the oven until it’s beautifully golden brown and cooked all the way through. Think of it as the quintessential comfort meal. It’s not a deconstructed Chicken Dish or a particularly complex culinary feat. It’s the classic, beloved centerpiece that graces tables for Sunday dinners, holidays, or just any night you want something truly satisfying. The magic lies in its simplicity and the incredible flavor that develops as the chicken roasts. It’s the kind of dish that makes your house smell amazing and guarantees happy faces around the table. It’s essentially the foundation for so many delicious meals, but honestly, it’s often so good on its own, you won’t want to do much else with it!
Why you’ll love this recipe?
Oh, where do I even begin with why you’ll adore this whole roasted chicken? It hits all the right notes, every single time. First off, the flavor is absolutely out of this world. We’re talking incredibly juicy, tender meat that practically melts in your mouth, all thanks to a simple yet genius technique that locks in moisture. And the skin? Crispy, golden perfection that crackles with every bite. It’s honestly addicting. What I love most, though, is how surprisingly simple it is. You don’t need a culinary degree or a pantry full of obscure ingredients. Most of what you need is probably already in your kitchen. This recipe is also incredibly budget-friendly. A whole chicken is often one of the most economical ways to feed a family, and with this recipe, you get restaurant-quality results without the hefty price tag. Plus, it’s so versatile! Leftovers are fantastic in sandwiches, salads, or even repurposed into another meal. It truly stands out because it delivers maximum flavor and satisfaction with minimum effort, which is my kind of cooking. It’s the kind of recipe that makes you feel like a culinary rockstar without actually breaking a sweat. It’s better than any store-bought rotisserie chicken you’ve ever had, and I promise, you’ll feel a real sense of accomplishment bringing this to your table.
How do I make whole roasted chicken?
Quick Overview
Making this whole roasted chicken is a straightforward process that guarantees incredible results. You’ll start by prepping your chicken with a simple herb butter, which is key to both flavor and crispy skin. Then, it’s into a hot oven for a specific period, depending on the size of your bird, allowing it to cook evenly and develop that beautiful golden-brown hue. We’ll use a trick to ensure the breast doesn’t dry out, and a resting period at the end is crucial for maximum juiciness. It’s designed to be foolproof, even if you’ve never roasted a whole chicken before. The result is a succulent, flavorful bird that’s perfect for any occasion.
Ingredients
For the Whole Chicken: For the Whole Chicken: For the Whole Chicken: For the Whole Chicken: For the Whole Chicken: For the Whole Chicken
1 whole chicken (about 3.5 to 4 pounds is a great size to start with)
2 tablespoons unsalted butter, softened (good quality butter makes a difference here!)
1 tablespoon chopped fresh rosemary (or 1 teaspoon dried)
1 tablespoon chopped fresh thyme (or 1 teaspoon dried)
1 teaspoon smoked paprika (adds a lovely color and subtle smoky flavor)
1 teaspoon garlic powder
1/2 teaspoon onion powder
1 teaspoon salt
1/2 teaspoon freshly ground Black Pepper
1 lemon, halved
1 small onion, quartered
A few sprigs of fresh rosemary and thyme for the cavity (optional, but lovely)
For Crispy Skin (Optional but highly recommended):
1 tablespoon Olive oil or melted butter
Step-by-Step Instructions
Step 1: Preheat & Prep Pan
First things first, let’s get that oven nice and hot. Preheat your oven to 425°F (220°C). This high initial heat is crucial for getting that skin beautifully browned and crispy right from the start. While the oven heats up, grab a sturdy roasting pan. If you don’t have one, a large oven-safe skillet or even a baking sheet with sides will work. You want something that can catch any delicious drippings. I like to place a rack in my roasting pan if I have one; it helps the air circulate around the chicken for more even cooking, but it’s not an absolute must. Just make sure your pan is large enough to comfortably hold the chicken with a little room around it.
“Made the Simple Whole Roasted Chicken for a Delicious Dinner tonight and wow — perfect weeknight dinner. Will definitely make again!”
Step 2: Mix Dry Ingredients for Herb Butter
In a small bowl, we’re going to mix up our flavor magic for the herb butter. Combine the softened butter, chopped fresh rosemary, chopped fresh thyme, smoked paprika, garlic powder, onion powder, salt, and Black Pepper. If you’re using dried herbs, make sure they are good quality; they can sometimes be a little less potent than fresh. Mix it all together with a fork until it’s well combined and forms a fragrant paste. This is what’s going to give our chicken its incredible aroma and that delicious savory flavor right under the skin. It smells amazing even before it goes in the oven!
Step 3: Prepare the Chicken
Now, let’s get the star of the show ready. Take your whole chicken out of its packaging. You’ll want to remove any giblets or the neck from the cavity (save those for making stock later if you like!). Pat the chicken completely dry, inside and out, with paper towels. This step is SUPER important for achieving that crispy skin we all love. Moisture is the enemy of crispiness! Once it’s thoroughly dry, carefully loosen the skin over the breast and thighs. You can do this gently with your fingers or the handle of a wooden spoon. We want to create a little pocket for our herb butter to go into. Don’t worry if you tear the skin a little; it’s not the end of the world.
Step 4: Apply Herb Butter and Aromatics
This is where the real flavor infusion happens! Take your herb butter mixture and spread it evenly under the loosened skin over the breast and thighs. Get as much of it under there as you can. Then, rub the remaining herb butter all over the outside of the chicken. Don’t forget to get the legs and wings too! Next, place the halved lemon and the quartered onion inside the chicken cavity. If you have those extra sprigs of rosemary and thyme, tuck them in there as well. These aromatics will steam and flavor the chicken from the inside as it cooks. For an extra crispy skin, you can lightly brush the outside of the chicken with a little olive oil or melted butter.
Step 5: Trussing (Optional but Recommended)
Trussing the chicken – which just means tying the legs together – isn’t strictly necessary, but I find it helps the chicken cook more evenly and gives it a neater, more presentable shape. You can use kitchen twine for this. Simply tie the legs together, and you can also tuck the wing tips under the body. If you don’t have twine, don’t stress! The chicken will still be delicious. I’ve skipped this step before when I was in a pinch, and honestly, it turned out just fine. The most important thing is getting that delicious flavor onto and into the bird.
Step 6: Roast the Chicken
Now for the main event! Place your prepped chicken, breast-side up, into your prepared roasting pan. Pop it into the preheated 425°F (220°C) oven. Roast for about 15-20 minutes at this high temperature. This initial blast of heat helps to crisp up the skin nicely. After that initial period, reduce the oven temperature to 375°F (190°C). Continue roasting for another 45-60 minutes, or until the chicken is cooked through. The cooking time will vary depending on the size of your chicken, so here’s a crucial tip: use a meat thermometer! The thickest part of the thigh (without touching the bone) should register 165°F (74°C). The juices should also run clear when you pierce the thigh with a fork or knife.
Step 7: Baste and Monitor
While the chicken is roasting at the lower temperature, you can baste it every 15-20 minutes with the pan juices. This helps to keep the skin moist and adds extra flavor. If you notice any parts of the chicken browning too quickly, you can loosely tent those areas with aluminum foil. I’ve learned this trick after a few too many burnt wing tips! Keep an eye on it, especially towards the end of the cooking time. The goal is that gorgeous, even golden-brown color all over.
Step 8: Rest and Carve
This is perhaps the MOST important step for a juicy chicken, and it’s so tempting to skip! Once your chicken reaches the correct internal temperature, carefully remove it from the oven. Tent it loosely with foil and let it rest for at least 15-20 minutes before carving. This resting period allows the juices to redistribute throughout the meat, ensuring every slice is moist and tender. If you cut it too soon, all those delicious juices will run out onto the cutting board, leaving you with a dry bird. Trust me on this one; the wait is absolutely worth it!
Step 9: Slice and Serve
After resting, it’s time to carve your masterpiece! You can carve it directly in the pan to catch any extra juices, or transfer it to a carving board. Start by removing the legs and thighs, then slice the breast meat. Spoon any of those delicious pan juices over the carved chicken before serving. The aroma alone will have everyone gathering around the table, eager to dig in. It looks and smells absolutely divine!
“New family favorite! This Simple Whole Roasted Chicken for a Delicious Dinner was so flavorful and ridiculously easy. Crowd-pleaser for sure.”
What to Serve It With
This glorious whole roasted chicken is such a chameleon! It’s fantastic on its own, of course, but it also plays beautifully with a variety of sides. For a classic Sunday brunch spread, I love serving it alongside fluffy scrambled eggs, crisp bacon, and some fresh fruit salad. The savory chicken is a wonderful contrast to sweeter elements. If you’re aiming for a more elegant dinner, think roasted root vegetables like carrots, parsnips, and potatoes, all tossed with herbs and olive oil. A simple green salad with a tangy vinaigrette is also a perfect counterpoint to the richness of the chicken. For a truly cozy meal, mashed potatoes (extra butter, please!) and some steamed Green Beans or broccoli are absolute winners. My kids also love having it with some simple pasta tossed with a little of the pan juices. Honestly, the possibilities are endless, and any of your favorite side dishes will likely pair wonderfully. It’s the kind of meal that feels special enough for guests but comforting enough for a weeknight family dinner. I always make sure to have extra gravy made from the pan drippings – it’s non-negotiable in my house!
Top Tips for Perfecting Your Whole Roasted Chicken
Over the years, I’ve learned a few tricks that really elevate this whole roasted chicken from good to absolutely unforgettable. First off, about the chicken itself: always buy the freshest bird you can find. If you have the option, a free-range or organic chicken often has a richer flavor. Patting it completely dry is non-negotiable for that shatteringly crisp skin; don’t rush this step! When it comes to the herb butter, don’t be afraid to really get it under the skin. That’s where so much of the flavor is infused. If you don’t have fresh rosemary or thyme, good quality dried herbs will work, but be sure to use slightly less as they can be more potent. I’ve experimented with different herb combinations, and while rosemary and thyme are classic, a little sage or marjoram can also be delicious. For the onions and lemon in the cavity, make sure they’re well-washed, as you’re cooking them with the chicken. I’ve tried stuffing the cavity with other things like garlic cloves or even apple quarters, and they all add subtle notes. One mistake I used to make was not letting the chicken rest long enough. Seriously, give it at least 15-20 minutes. It makes all the difference in the world for juiciness. If you’re worried about overcooking the breast while the thighs finish, you can always pull the chicken out a little early and let the residual heat finish the cooking. Another tip: if you want to add vegetables to the roasting pan to cook in the chicken drippings, add them about halfway through the cooking time so they don’t burn. I’ve had great success roasting potatoes and carrots this way, and they soak up all that amazing chicken flavor.
Storing and Reheating Tips
Leftover whole roasted chicken is one of life’s great pleasures, and knowing how to store and reheat it properly ensures you can enjoy it to its fullest. Once the chicken has cooled down, I like to carve off any remaining meat from the bones. Store the carved chicken in an airtight container in the refrigerator for up to 3 to 4 days. Don’t leave cooked chicken sitting out at room temperature for more than two hours. If you want to store it for longer, you can freeze it. Wrap the carved chicken tightly in plastic wrap, then in aluminum foil, or place it in a freezer-safe bag. It will keep well in the freezer for up to 3 months. To reheat carved chicken, the best way to keep it moist is to gently warm it in a covered dish in the oven at around 300°F (150°C) with a splash of broth or water, or in a skillet over low heat. Microwaving can sometimes dry it out, but if you’re in a hurry, use a lower power setting and keep an eye on it. For the best results, try to reheat only the portion you plan to eat. If you’ve got the carcass, don’t throw it away! It’s perfect for making a rich, flavorful chicken stock, which can then be used as a base for soups and sauces.
Frequently Asked Questions
Final Thoughts
This whole roasted chicken recipe is, in my opinion, a culinary cornerstone. It’s the kind of dish that proves you don’t need to be a gourmet chef to create something truly spectacular and deeply satisfying. It’s about bringing people together, creating warm memories, and enjoying the simple, delicious pleasure of a perfectly cooked meal. The aroma that fills your home as it roasts is just the beginning of the magic. I truly believe that once you try this method, you’ll find yourself returning to it again and again, just like I do. It’s reliable, incredibly flavorful, and always brings smiles. If you love this recipe, you might also enjoy my guide to making the perfect roast potatoes or my tips for flavorful homemade chicken soup using the carcass. They’re all part of that wonderful cycle of using every bit of this amazing ingredient. Give this whole roasted chicken a try; I can’t wait to hear how yours turns out! Don’t be shy about sharing your own variations or favorite serving suggestions in the comments below. Happy roasting!
whole roasted chicken
Ingredients
Main Ingredients
- 1 whole broiler-fryer chicken 3 to 3.5 pounds
- 6 tablespoons unsalted butter softened
- 0.25 cup maple syrup
- 3 cloves garlic minced
- 0.5 tablespoon fresh oregano leaves chopped
- 0.5 tablespoon fresh thyme leaves chopped
- 1 teaspoon salt
- 1 teaspoon fresh ground black pepper
- 1 small lemon cut into 4 wedges
- 4 sprigs fresh thyme
- 4 sprigs fresh oregano
Vegetables
- 2 cups cherry tomatoes
- 1 pound baby potatoes quartered
- 1 large yellow onion cut into 8 wedges
- 0.5 pound broccoli florets
- 0.5 pound cauliflower florets
- 2 tablespoons olive oil
- salt and fresh ground pepper to taste
Instructions
Preparation Steps
- Preheat oven to 450˚F.
- Remove giblets from inside the cavity of the chicken. Thoroughly pat dry chicken with paper towels.
- Place the chicken breast-side UP on a rack set over a jelly roll pan or inside a roasting pan. Set aside.
- In a mixing bowl combine softened butter, maple syrup, garlic, oregano, thyme, salt, and pepper.
- Using your fingers, or the handle of a wooden spoon, carefully loosen the skin on the chicken breasts and thighs.
- Rub HALF of the butter mixture under the skin, spreading it all around and to the thighs.
- Rub the rest of the butter mixture on top of the skin.
- Add a bit of salt and cracked black pepper inside the cavity; fill the cavity with lemon wedges, 4 thyme sprigs, and 4 oregano sprigs.
- Using kitchen twine, tie the legs together.
- Tuck the wings under the body of the chicken.
- Roast the chicken, uncovered, for 10 minutes.
- In the meantime, combine all the veggies in a mixing bowl and add olive oil, salt, and pepper; toss to coat.
- Remove chicken from oven and add the vegetables to the pan.
- Lower oven temperature to 350˚F.
- Continue to roast the chicken for 1 hour and 10 minutes, or until internal temperature of the chicken reaches 165˚F. Use an Instant Read Thermometer to check for doneness. Start checking at the 55-minute mark. Stir veggies halfway through cooking.
- Remove chicken from oven and let rest 10 to 12 minutes before cutting.
- Cut and serve.


