Oh my goodness, friends, do I have a treat for you today! If you’ve ever, in your wildest dreams, wished you could bottle up the pure, unadulterated joy of biting into a Samoa cookie (you know the one – with the caramel, coconut, and chocolate stripes!), then prepare yourselves. This Samoa Fudge Recipe is, quite simply, a revelation. It’s one of those recipes that, once you make it, you’ll wonder how you ever lived without it. My kitchen usually smells like a bakery when I whip this up, and the kids literally start hovering around the cooling rack the moment it’s out of the oven. It’s a lifesaver for unexpected guests, a perfect pick-me-up on a dreary afternoon, and honestly, sometimes I just make it for myself because, well, I deserve it! Forget spending hours on complicated desserts; this Samoa Fudge brings all those iconic flavors into one ridiculously easy, incredibly delicious bite. It’s like a little piece of pure happiness that melts in your mouth.
Thank you for reading this post, don't forget to subscribe!What is Samoa fudge?
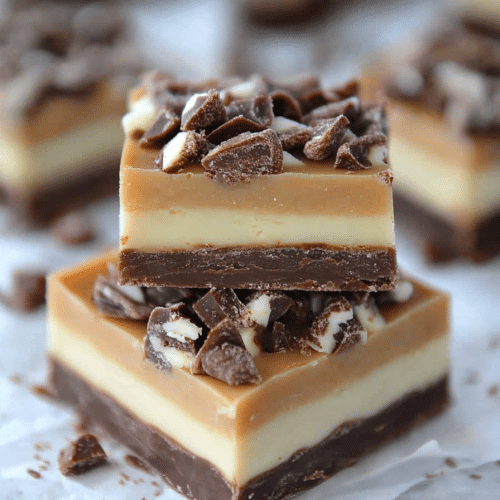
So, what exactly *is* Samoa Fudge? Think of it as the Absolute Best parts of those beloved coconut-caramel-chocolate cookies, but transformed into a luxuriously smooth, intensely flavorful fudge. It’s not your average, super-sweet, grainy fudge. This version is rich, with a wonderful chewiness from the coconut and a distinct, toasted caramel flavor that just sings. The chocolate drizzle on top is the perfect finishing touch, mimicking those signature stripes. The “Samoa” part comes from the inspiration – that iconic flavor combination that millions of people (myself included!) adore. It’s essentially a no-bake wonder that captures the essence of a cookie in a decadent, melt-in-your-mouth fudge form. It’s incredibly straightforward, which is a huge win in my book.
Why you
What are some of the best reasons to make Samoa Fudge?flavor is just out of this world. It hits all the right notes: that rich, buttery caramel, the slightly sweet and fragrant toasted coconut, and the smooth, comforting chocolate. It’s a perfect symphony of textures and tastes. Then there’s the simplicity. I’m talking minimal ingredients, no complicated techniques, and absolutely no oven required! This is a true dump-and-stir kind of magic. It’s perfect for when you’re craving something sweet but don’t have a lot of time or energy. And speaking of energy, it’s surprisingly cost-efficientMost of the ingredients are pantry staples, so you likely won’t need a special grocery run. This recipe is also incrediblyversatile. While it’s fantastic on its own, I’ve found it’s perfect for dividing up into small treat bags for gifts, or even crumbling it slightly to sprinkle over Ice Cream. It’s a crowd-pleaser, a kid-pleaser, and a definite adult-pleaser. What I love most about this is that it tastes so much more gourmet than it actually is to make. It’s the kind of dessert that gets you rave reviews without all the fuss.
How to Make Samoa Fudge
Quick Overview
The beauty of this Samoa Fudge lies in its effortless execution. You’ll melt down some key ingredients to create a luscious base, stir in the star players like coconut and caramel bits, pour it into a prepared pan, and let it set. The final touch is a Simple Chocolate drizzle. It’s a “mix, pour, chill, and enjoy” kind of process that guarantees delicious results every single time. No candy thermometer needed, no tricky tempering – just pure, simple fudge bliss. This method ensures a smooth, creamy texture that’s just divine.
Ingredients
For the Main Fudge Base:
* 2 cups granulated sugar: This is the foundation of our sweet, caramelized goodness. Make sure it’s regular white sugar for the best texture.
* 1 can (12 oz) evaporated milk: This gives our fudge that incredibly creamy, rich texture without being too heavy. I always use full-fat evaporated milk for the best results.
* 1 stick (8 tablespoons) unsalted butter: Adds richness and helps with that smooth mouthfeel. Make sure it’s softened a bit so it melts easily.
* 1 jar (7 oz) marshmallow creme: This is the secret to our incredibly smooth, light texture. Don’t skip this! It’s what makes it melt-in-your-mouth amazing.
* 1 teaspoon vanilla extract: For that classic warmth and depth of flavor. A good quality vanilla extract really makes a difference here.
* 1 ½ cups shredded sweetened coconut: This is where the “Samoa” flavor really comes to life! I prefer sweetened for that classic cookie vibe, but you can use unsweetened if you prefer to control the sugar a bit more. Toasted coconut adds an extra layer of depth, but is totally optional.
* 1 cup chopped pecans or walnuts (optional, but highly recommended!): These add a lovely crunch and nutty contrast, reminiscent of the cookie’s texture.
For the Caramel Swirl:
* ½ cup caramel sauce (store-bought or homemade): This is crucial for that signature gooey caramel layer. I usually grab a good quality jar from the Ice Cream topping aisle. If you’re feeling ambitious, homemade is wonderful too! You want a sauce that’s thick enough to swirl but not so stiff that it won’t spread.
* ¼ cup toasted coconut (for swirling): A little extra toasted coconut mixed into the caramel sauce creates beautiful pockets of flavor and texture.
For the Chocolate Drizzle:
* ½ cup semi-sweet chocolate chips: These melt beautifully and create those iconic stripes.
* 1 tablespoon coconut oil or vegetable oil: This helps the chocolate chips melt smoothly and creates a thinner drizzle that sets up nicely.
“The Samoa Fudge Easy Chocolate Caramel Coconut Treat turned out amazing. My kids asked for seconds. Saving this one!”
Step-by-Step Instructions
Step 1: Preheat & Prep Pan
First things first, grab an 8×8 inch baking pan. Line it with parchment paper, making sure to leave some overhang on the sides. This makes lifting the fudge out later SO much easier. You want those overhangs like little handles! I usually grease the pan lightly before lining it too, just to be sure nothing sticks. Set that aside.
Step 2: Mix Dry Ingredients
In a medium bowl, combine the shredded coconut and the chopped nuts, if you’re using them. If you want to toast your coconut for an even deeper flavor, you can do that in a dry skillet over medium-low heat until golden brown, stirring constantly. Let it cool completely before adding it to the fudge mixture. This step is simple but it’s where we start layering those key Samoa flavors!
Step 3: Mix Wet Ingredients
In a large, heavy-bottomed saucepan, combine the granulated sugar, evaporated milk, and butter. Place this over medium heat. Stir constantly until the butter is melted and the sugar has dissolved. You want to make sure all the sugar crystals are gone so you don’t get a grainy fudge. Bring the mixture to a boil, stirring occasionally. Let it boil gently for 5 minutes, still stirring. Be careful, it can boil over!
Step 4: Combine
Remove the saucepan from the heat. Immediately stir in the marshmallow creme until it’s completely melted and smooth. This can take a minute or two, just keep stirring! Then, stir in the vanilla extract. Now, fold in the coconut and nut mixture (the dry ingredients you prepared earlier). Stir until everything is just combined and evenly distributed. Don’t overmix at this stage; you want to keep it light and fluffy.
Step 5: Prepare Filling
While your fudge mixture is still warm, gently warm your caramel sauce in a small bowl, either in the microwave for a few seconds or over very low heat. You just want it to be pourable. If you’re adding the extra toasted coconut to the caramel, stir it in now. This makes the caramel layer even more special.
Step 6: Layer & Swirl
Pour about half of the fudge mixture into your prepared pan and spread it out evenly. Dollop spoonfuls of the warmed caramel sauce over the fudge. Then, pour the remaining fudge mixture over the caramel. Now for the fun part! Take a knife or a skewer and gently swirl the caramel into the fudge. You don’t want to over-swirl and mix it completely; just a few gentle passes to create ribbons of caramel throughout. Think of it like painting a masterpiece!
Step 7: Bake
This recipe actually doesn’t require baking! It’s a no-bake fudge. So, we skip the oven step entirely. We just need to let it chill and set up properly.
Step 8: Cool & Glaze
Once the fudge is swirled, cover the pan loosely with plastic wrap or foil. Place it in the refrigerator for at least 2-3 hours, or until it’s firm to the touch. Once it’s set, prepare the chocolate drizzle. In a microwave-safe bowl, combine the semi-sweet chocolate chips and the coconut oil. Microwave in 30-second intervals, stirring in between, until completely melted and smooth. You want it thin enough to drizzle easily. Drizzle the melted chocolate over the top of the chilled fudge in stripes, just like the cookies!
“New family favorite! This Samoa Fudge Easy Chocolate Caramel Coconut Treat was so flavorful and ridiculously easy. Crowd-pleaser for sure.”
Step 9: Slice & Serve
After drizzling the chocolate, pop the fudge back into the refrigerator for another 30 minutes or so to let the chocolate set. Once firm, use the parchment paper overhangs to lift the whole block of fudge out of the pan. Place it on a cutting board and cut it into small squares using a sharp knife. I usually wipe the knife between cuts if it starts to get sticky. Enjoy this delightful Samoa Fudge at room temperature for the best melt-in-your-mouth experience!
What to Serve It With
This Samoa Fudge is so versatile, it fits into almost any occasion! For Breakfast, while it sounds decadent, a small square alongside a hot cup of coffee is pure heaven. It’s like a little sweet treat to start the day without feeling like you’ve overdone it. I sometimes cut it into tiny, bite-sized pieces to sprinkle over yogurt or oatmeal for a special morning boost. For Brunch, it’s a fantastic addition to a dessert platter. I like to arrange small squares artfully on a nice serving dish, maybe with a few fresh berries on the side for a pop of color and freshness. It pairs beautifully with sparkling cider or a light, fruity mimosa. As Dessert, this fudge truly shines. It’s the perfect ending to a hearty meal. I’ll often serve it after a family dinner, perhaps with a scoop of vanilla bean Ice Cream or a dollop of whipped cream. It’s also a wonderful component of a larger dessert spread, alongside fruit tarts or cakes. For Cozy Snacks, this is where it really becomes a family favorite. After school, a small piece is just the thing to curb those sweet cravings. It’s perfect with a tall glass of cold milk, or even a warm mug of hot chocolate on a chilly evening. My family has a tradition of making this around the holidays, and we always have a little “fudge tasting party” where everyone tries to guess the flavors. It’s just pure comfort food, elevated.
Top Tips for Perfecting Your Samoa Fudge
I’ve made this Samoa Fudge more times than I can count, and over the years, I’ve picked up a few tricks that really help ensure perfection every single time. First, when it comes to the coconut prep, toasting it really does make a noticeable difference in flavor. Just be patient and keep it moving in the pan – burnt coconut is bitter coconut! Make sure it’s completely cooled before adding it to the fudge mixture. For mixing advice, the most crucial part is not to overcook the sugar mixture once it starts boiling. Boiling it for exactly 5 minutes is key for the right texture; any less and it might be too soft, any more and it could get too firm or grainy. Also, when you add the marshmallow creme, stir until it’s completely dissolved – no one wants little pockets of un-melted goo. For the swirl customization, remember that less is more! You want distinct ribbons of caramel, not a muddy mess. Gentle, artistic swirls are the goal. Don’t be afraid to experiment with different patterns. If you’re looking for ingredient swaps, I’ve tried using different nuts like almonds and they work well, but pecans have that classic cookie flavor. For the chocolate drizzle, if you don’t have coconut oil, vegetable oil or even a tiny bit of butter can work in a pinch, but the coconut oil really gives it that extra sheen and helps it set up perfectly. And finally, for baking tips (or rather, chilling tips!), patience is key. It really needs those 2-3 hours in the fridge to set properly. If you try to cut it too soon, it will be too soft and messy. For glaze variations, if you’re not a fan of semi-sweet chocolate, you can use milk chocolate or even White Chocolate for a different look and taste. Sometimes, I’ll even add a few sprinkles over the chocolate drizzle while it’s still wet for a festive touch!
Storing and Reheating Tips
Proper storage is essential to keep this Samoa Fudge tasting its Absolute Best. For room temperature storage, I usually keep it in an airtight container at a cool room temperature for up to 3 days. The chocolate might soften slightly in warmer weather, so if it’s very hot, the fridge is a better option. Covering it well is key to preventing it from drying out or picking up any unwanted odors. For refrigerator storage, this fudge will last beautifully for up to a week. I like to wrap individual pieces or the whole block tightly in plastic wrap, then place it in an airtight container. This helps maintain its freshness and prevents it from becoming too hard. When you’re ready to enjoy it from the fridge, I highly recommend letting it sit out for about 10-15 minutes to come back to room temperature; that’s when it’s perfectly chewy and melt-in-your-mouth. For freezer instructions, this fudge freezes remarkably well! I wrap it very securely in plastic wrap, then in aluminum foil, and place it in a freezer-safe bag or container. It can stay frozen for up to 2-3 months. To thaw, simply transfer it from the freezer to the refrigerator overnight. It will be perfectly firm and delicious the next day. I usually wait to add the chocolate drizzle until *after* it’s been thawed if I’m freezing it for a long time, just to ensure the drizzle stays pristine. For glaze timing advice, I always add the chocolate drizzle just before I plan to serve it or before refrigerating it for the final set. If you’re storing it in the fridge long-term, adding the drizzle after thawing works best.
Frequently Asked Questions
Final Thoughts
So there you have it, my friends – the ultimate Samoa Fudge! It’s a recipe that brings me so much joy, and I truly hope it brings you heaps of happiness too. It’s a testament to how simple ingredients and a little bit of love can create something truly magical. The way it captures those beloved cookie flavors in a rich, chewy fudge is just spectacular. It’s proof that you don’t need fancy techniques or hours in the kitchen to create a show-stopping treat. If you love this recipe, I think you might also enjoy my “No-Bake Chocolate Peanut Butter Bars” or my “Salted Caramel Brownies” – they’re in a similar vein of easy, decadent deliciousness! I can’t wait for you to try this Samoa Fudge and hear all about your own adventures with it. Please, if you make it, let me know in the comments below how it turned out! I’d love to see your creations and hear your thoughts. Happy baking (and no-baking!)!
Samoa Fudge
Ingredients
Main Ingredients
- 0.75 cup unsalted butter
- 0.75 cup heavy cream
- 1.5 cup granulated sugar
- 0.25 tsp kosher salt just a pinch
- 11 oz white chocolate morsels
- 3 oz coconut cream JELL-O pudding mix dry powder, not prepared
- 7 oz marshmallow fluff
- 2 cup Kraft caramel bits
- 1 tsp heavy cream for melting caramel
- 0.75 cup semi sweet chocolate morsels
- 1 cup sweetened coconut flakes toasted
Optional Garnish
- 0.5 cup chopped roasted pecans for extra crunch (optional)
Instructions
Preparation Steps
- Toast the coconut flakes in a dry skillet over medium heat, stirring frequently, until golden brown. Remove and let cool completely. Set aside.
- Melt the caramel bits with 1 teaspoon heavy cream in a microwave-safe bowl, stirring every 30 seconds, until smooth and spreadable. Set aside to cool slightly.
- In a large saucepan, combine unsalted butter, 3/4 cup heavy cream, granulated sugar, and salt. Heat over medium-high, stirring constantly, until mixture reaches a rolling boil. Boil for exactly 5 minutes, stirring continuously.
- Remove from heat and pour into a large mixing bowl. Using a stand or hand mixer, blend in the coconut pudding mix, white chocolate morsels, and marshmallow fluff on medium speed until completely smooth and well combined.
- Immediately pour the mixture into a 13x9-inch baking dish lined with parchment paper, spreading evenly with a spatula.
- Pour the slightly cooled caramel over the fudge base. Use a butter knife to gently swirl and spread the caramel, creating a marbled effect. Do not overmix—some texture is expected.
- Refrigerate for at least 2–3 hours, or until completely set and firm to the touch.
- Melt the semi-sweet chocolate morsels and spread evenly over the chilled fudge. Immediately sprinkle the toasted coconut on top, pressing lightly to adhere. Optionally, add chopped pecans for extra crunch.
- Cut into 64 small squares (approx. 1-inch pieces). Store in an airtight container in the refrigerator for up to 2 weeks. Serve chilled.


