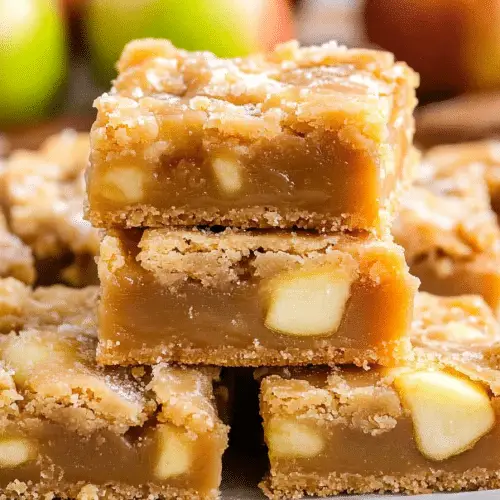
Oh, where do I even begin with these Salted Caramel apple butter bars? Honestly, every time I pull a tray of these out of the oven, it feels like a little bit of autumn magic fills my entire house. They’re just… comforting. You know that feeling? Like a warm hug on a crisp fall day. They remind me of my grandma’s kitchen, the way the air would always smell like baking spices and something sweet. I’ve tried a million different apple bar recipes over the years, but this one? This one’s different. It’s got that perfect chewy, cakey base, a swirl of rich apple butter, and then that irresistible salted caramel drizzle that just ties it all together. They’re like a cross between a gooey blondie and a spiced apple cake, but in bar form, which, let’s be honest, is always easier to share (or not share, no judgment here!). If you love apple pie but wish it was a little more portable and a lot more decadent, then you are going to be obsessed with these salted caramel apple butter bars. They’re genuinely one of my absolute favorites, and I’m so excited to share them with you.
Thank you for reading this post, don't forget to subscribe!What is Salted Caramel Apple Butter Bars?
So, what exactly are these delightful little squares? Think of them as the ultimate autumn dessert bar. At its heart, it’s a wonderfully moist, tender bar that has a flavor profile reminiscent of a classic Spice Cake, but with a slightly denser, chewier texture that just melts in your mouth. The real stars of the show, though, are the generous swirls of rich, homemade (or good-quality store-bought!) apple butter that run through the batter, infusing every bite with that deep, spiced apple flavor we all crave. And then, to elevate it from delicious to absolutely unforgettable, there’s that luscious, slightly salty caramel drizzle that creates this beautiful contrast with the sweet apple and the warm spices. It’s not overly complicated; it’s essentially a really, really good cake-like bar with incredible flavor layers. It’s the kind of treat that makes people ask, “What IS this amazing thing?” the moment they take a bite.
Why you’ll love this recipe?
Honestly, there are so many reasons why this recipe has become a staple in my kitchen. First off, the flavor is just out of this world. The combination of the warm spices in the bar, the concentrated apple goodness from the apple butter, and that perfect hit of salty caramel is pure bliss. It’s that sweet-salty balance that I’m always chasing, and these bars nail it. Then there’s the texture: a delightful chewiness that’s not quite a brownie, not quite a cake, but perfectly in between. It’s incredibly satisfying. And can we talk about how surprisingly simple this is to make? Even if you’re not a seasoned baker, you’ll find this recipe totally manageable. The ingredients are pretty standard, and the steps are straightforward. Plus, it’s incredibly cost-efficient! You likely have most of the pantry staples already, and apples are usually pretty affordable, especially this time of year. I also love its versatility. These bars are fantastic on their own, of course, but they’re also amazing served warm with a scoop of vanilla Ice Cream or a dollop of whipped cream. They make a fantastic addition to any potluck or holiday gathering, and they disappear faster than you can say “second helping!” What I love most, though, is the nostalgic feeling they evoke. They just taste like home and happy memories. They’re a guaranteed crowd-pleaser, and they make your kitchen smell absolutely divine while they’re baking.
How do I make Salted Caramel Apple Butter Bars?
Quick Overview
This recipe is all about layering flavors and textures. You’ll start by mixing up a simple, tender bar batter, then you’ll swirl in some luscious apple butter, and finally, top it all off with a dreamy Salted Caramel drizzle. The whole process is pretty hands-off once it’s in the oven, making it a lifesaver on busy weeknights or when you’re entertaining. It’s the perfect balance of effort and reward, delivering an impressive dessert with minimal fuss.
Ingredients
For the Main Batter:
You’ll want to start with good quality unsalted butter, softened. I always opt for unsalted so I can control the salt level myself, especially with that caramel glaze. For the sugar, a mix of granulated and Brown Sugar is key here – the granulated sugar gives it structure, while the brown sugar adds moisture and that lovely caramel-like depth. Make sure your eggs are at room temperature; this helps them incorporate smoothly into the batter for a consistent texture. And don’t skimp on the vanilla extract! Good quality vanilla makes a world of difference. For the flour, all-purpose is perfect, and make sure it’s spooned and leveled, not scooped directly from the bag, to avoid dry, dense bars. A little baking powder for lift, and of course, our star spice blend – cinnamon, nutmeg, and a pinch of cloves for that authentic autumn warmth. A little salt balances out all the sweetness.
For the Filling:
The star here is good quality apple butter. You can absolutely make your own, which is wonderful if you have the time and a surplus of apples, but there are some fantastic store-bought brands out there too. Look for one that’s rich, spiced, and not too watery. If yours seems a little thick, you can thin it out with a tablespoon or two of APPLE CIDER or even a little water to make it easier to swirl.
For the Glaze:
This is where the magic happens! You’ll need granulated sugar and a touch of corn syrup to help prevent crystallization and ensure a smooth glaze. We’ll add some heavy cream for richness and that lovely, pourable consistency, and of course, a good pinch of Sea Salt – I love using flaky sea salt for that extra pop of flavor and texture. A little more butter adds silkiness. If you don’t have heavy cream, you can try using half-and-half, but it might be a bit thinner.
“I don’t know if I’ve ever eaten a better salted caramel apple butter bars. The rub alone is wonderful, but the sauce??? Over the top!”
Step-by-Step Instructions
Step 1: Preheat & Prep Pan
First things first, get your oven preheated to 350°F (175°C). This is super important for even baking. Next, grab an 8×8 inch baking pan. I like to line mine with parchment paper, leaving an overhang on two sides. This makes lifting the bars out a breeze later on, which is a lifesaver when you’re trying to cut them neatly. Lightly grease the parchment paper and the exposed sides of the pan, just to be sure nothing sticks. Trust me, you don’t want to be picking burnt bits out of your beautiful bars.
Step 2: Mix Dry Ingredients
In a medium bowl, whisk together your all-purpose flour, baking powder, cinnamon, nutmeg, cloves (if using), and salt. Give it a good whisk to make sure everything is evenly distributed. This step might seem small, but it ensures that your leavening and spices are spread throughout the batter, so you don’t end up with pockets of flavor or dense spots. You want that beautiful, consistent spice note in every single bite.
Step 3: Mix Wet Ingredients
In a large bowl, cream together the softened butter, granulated sugar, and Brown Sugar until light and fluffy. This is where you want to get some good air into the mixture – it helps with the texture of the final bar. Beat in your room temperature eggs, one at a time, mixing well after each addition. Then, stir in the vanilla extract until everything is beautifully combined and smells absolutely amazing.
Step 4: Combine
Now, it’s time to bring the wet and dry ingredients together. Add the dry ingredients to the wet ingredients in three additions, mixing on low speed (or with a spatula) until just combined after each addition. Be careful not to overmix! Overmixing can develop the gluten in the flour too much, leading to tough bars. You’re looking for a thick, cohesive batter that’s just come together. A few small streaks of flour are okay; they’ll disappear during baking.
Step 5: Prepare Filling
If your apple butter is very thick, you might want to give it a quick stir in a small bowl to loosen it up slightly. This will make it easier to swirl into the batter. If it’s already nice and spreadable, you’re good to go! You want a consistency that you can dollop and swirl without it being too runny or too stiff.
Step 6: Layer & Swirl
Spread about two-thirds of the bar batter evenly into your prepared baking pan. Now, dollop spoonfuls of the apple butter over the top of this batter layer. Don’t worry about being too neat here; randomness is good! Then, gently spread the remaining batter over the apple butter. Use a knife or a skewer to gently swirl the apple butter into the batter. You can make figure-eights or just drag the knife through in a few places. The goal is to create beautiful ribbons of apple butter throughout the bars, not to completely mix it in. This visual appeal is part of what makes them so special!
Step 7: Bake
Pop the pan into your preheated oven and bake for 30-35 minutes. The edges should be golden brown, and a toothpick inserted into the center should come out with moist crumbs attached, but no wet batter. Be careful not to overbake, or they’ll be dry. If the tops start to brown too quickly, you can loosely tent them with foil.
Step 8: Cool & Glaze
Let the bars cool in the pan on a wire rack for at least 30 minutes before attempting to glaze them. This allows them to set up. While they’re cooling, make the caramel glaze. In a small saucepan over medium heat, combine the sugar and corn syrup. Stir until the sugar dissolves, then let it bubble, without stirring, until it turns an amber color. This usually takes about 5-7 minutes. Carefully whisk in the heavy cream (it will bubble up!), then stir in the butter and sea salt until smooth. Let the glaze cool slightly until it’s thick enough to drizzle but still pourable. Drizzle it generously over the cooled bars. Let the glaze set for another 15-20 minutes before cutting.
“Made the salted caramel apple butter bars tonight and wow — perfect weeknight dinner. Will definitely make again!”
Step 9: Slice & Serve
Once the glaze has set, use the parchment paper overhangs to lift the entire slab out of the pan onto a cutting board. Use a sharp knife to cut into squares. For the cleanest cuts, you can run your knife under hot water and dry it between slices. Serve them at room temperature, or gently warm them for an extra decadent treat. They’re absolutely divine on their own, but feel free to serve with a little scoop of vanilla Ice Cream or a dollop of whipped cream!
What to Serve It With
These salted caramel apple butter bars are so versatile, they’re perfect for pretty much any occasion. For a cozy breakfast, I love serving a warm bar with my morning coffee. It’s like a spiced apple muffin, but so much more satisfying! They’re also wonderful as part of a more elaborate brunch spread. Imagine them nestled alongside some fruit salad, quiches, and maybe some crispy bacon – they add that perfect sweet, comforting element. As a dessert, they are simply divine. They’re fantastic served slightly warm with a scoop of good quality vanilla bean ice cream, or a dollop of freshly whipped cream. A sprinkle of extra sea salt on top just elevates them even further. And for those cozy snacks moments, when you just need something sweet to curl up with, these bars are pure comfort. They pair beautifully with a mug of hot apple cider or a warm chai latte. My family loves them as an after-school treat, and honestly, I’ve been known to sneak one (or two!) with my tea in the evening. They’re just that good!
Top Tips for Perfecting Your Salted Caramel Apple Butter Bars
Okay, let’s get into some of the little secrets and tips I’ve picked up over the years of making these. For the batter itself, the key is not to overmix. Once you add the dry ingredients to the wet, just mix until they’re *barely* combined. A few small streaks of flour are totally fine; they’ll disappear in the oven. Overmixing develops the gluten, which can lead to tougher, drier bars, and we definitely don’t want that. We’re aiming for tender and chewy! When you’re swirling the apple butter, don’t be afraid to get a little artistic. You don’t need to perfectly cover the entire surface; random dollops and swirls create beautiful ribbons of flavor and texture. You can use a knife, a skewer, or even the back of a spoon to create those gorgeous patterns. For visual appeal, aim for contrast – you want to see those pockets of dark apple butter against the lighter batter. If you’re looking to switch things up, I’ve had success using a gluten-free all-purpose flour blend in place of the regular flour, though you might need slightly less liquid. For the apple butter, if you can’t find a good quality one, or if yours is too thin, you can simmer it down on low heat until it thickens to your desired consistency. As for baking, ovens can be tricky! Keep an eye on your bars, especially towards the end of the baking time. If the edges are looking beautifully golden but the center seems a bit underdone, you can loosely tent the pan with foil to prevent the top from burning while the inside finishes cooking. And for the caramel glaze, the consistency is everything. If it seems too thick after cooling a bit, whisk in a tablespoon of warm cream. If it’s too thin, let it sit a little longer until it naturally thickens. You can also add a pinch of espresso powder to the caramel for a subtle mocha twist!
Storing and Reheating Tips
These salted caramel apple butter bars are pretty forgiving when it comes to storage, which is another reason I love them. If you’re planning to enjoy them within a day or two, you can simply keep them in an airtight container at room temperature. They’ll stay nice and fresh. If you want them to last a bit longer, or if your kitchen tends to be warm, the refrigerator is your best bet. Store them in an airtight container or wrap them well, and they should keep nicely for up to 4-5 days. The glaze might firm up a little in the fridge, but don’t worry, they’re still delicious. For longer storage, these bars freeze beautifully. Let them cool completely and make sure the glaze is set. Then, wrap them tightly in plastic wrap, followed by a layer of aluminum foil or a freezer-safe bag. They’ll keep well in the freezer for up to 2-3 months. To thaw, simply bring them to room temperature, or pop them in the fridge overnight. If you want to reheat them, I find that popping a bar into a warm oven (around 300°F or 150°C) for about 5-10 minutes is the best way to bring back that wonderful soft texture and warmth, especially if they’ve been chilled or frozen. For the glaze, it’s best to add it once the bars have cooled significantly, whether you’re storing them at room temperature, in the fridge, or planning to freeze them. This helps it set properly and prevents the bars from becoming soggy during storage.
Frequently Asked Questions
Final Thoughts
So there you have it – my recipe for Salted Caramel Apple Butter Bars! I truly hope you give these a try. They are such a perfect balance of sweet, spice, and that irresistible salty caramel kick. They’re proof that you don’t need to be a professional baker to create something truly special and delicious. They’re wonderful for a cozy afternoon treat, a festive addition to your holiday baking, or just because you deserve something delightful. I always feel a little pang of joy when I see them sitting on my counter, knowing how much happiness they’ll bring. If you do make them, I’d absolutely love to hear how yours turn out! Please leave a comment below and share your thoughts, any variations you tried, or how your family enjoyed them. And if you’re looking for more fall-inspired baking, you might also enjoy my Spiced Pear Crumble Bars or my Pumpkin Spice Coffee Cake. Happy baking, everyone!
salted caramel apple butter bars
Ingredients
For the Crust
- 2.5 cup all-purpose flour
- 1 teaspoon baking soda
- 0.5 teaspoon salt
- 1 cup unsalted butter, softened
- 1.5 cup granulated sugar
- 2 large eggs
- 1 teaspoon vanilla extract
For the Apple Butter Filling
- 2 cup apple butter
- 1 large egg
- 0.5 cup packed brown sugar
- 1 tablespoon lemon juice
- 1 teaspoon ground cinnamon
- 0.25 teaspoon ground nutmeg
For the Salted Caramel Drizzle
- 1 cup granulated sugar
- 0.25 cup water
- 0.5 cup heavy cream, warm
- 6 tablespoons unsalted butter, cut into pieces
- 1 teaspoon flaky sea salt
Instructions
Preparation Steps
- Preheat oven to 350°F (175°C). Grease and flour a 9x13 inch baking pan.
- In a large bowl, whisk together flour, baking soda, and salt for the crust.
- In a separate large bowl, cream together softened butter and granulated sugar until light and fluffy.
- Beat in eggs one at a time, then stir in vanilla extract.
- Gradually add the dry ingredients to the wet ingredients, mixing until just combined. Press half of the dough into the bottom of the prepared baking pan to form the crust.
- In a medium bowl, whisk together apple butter, egg, brown sugar, lemon juice, cinnamon, and nutmeg for the filling.
- Spread the apple butter filling evenly over the crust.
- Crumble the remaining dough over the apple butter filling.
- Bake for 40-45 minutes, or until the topping is golden brown and the filling is set.
- While the bars are baking, prepare the salted caramel drizzle. In a medium saucepan, combine granulated sugar and water. Cook over medium heat, stirring until the sugar dissolves.
- Bring to a boil and cook without stirring until the mixture turns an amber color. Remove from heat.
- Carefully whisk in the warm heavy cream (it will bubble up) until smooth. Stir in the butter pieces until melted and incorporated.
- Stir in the flaky sea salt.
- Let the bars cool completely in the pan before drizzling with salted caramel. Slice and serve.


