Oh, where do I even begin with these Raspberry Chocolate Bars? They’re the kind of treat that instantly transports me back to my grandma’s kitchen, the air thick with the sweet aroma of baking. I remember watching her, her hands dusted with flour, carefully layering the batter and that glorious Raspberry Swirl. It wasn’t just baking; it was magic. And let me tell you, these bars are pure magic. If you’re anything like me, you love a good dessert that doesn’t require a full day of effort but still delivers that “wow” factor. These raspberry chocolate bars are my secret weapon for those moments when a serious sweet craving hits but I’m short on time. Forget complicated cakes or fussy cookies; this recipe is surprisingly simple and utterly delicious. It’s like a hug in bar form, with the tartness of raspberries cutting through the rich, decadent chocolate. Seriously, these are so good, they rival even the fanciest bakery treats, and the fact that you can whip them up at home is just the icing on the (chocolate-covered) cake!
Thank you for reading this post, don't forget to subscribe!What is raspberry chocolate?
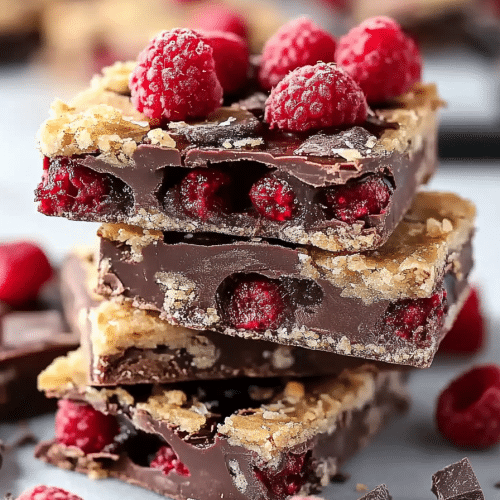
So, what exactly *are* these delightful raspberry chocolate bars that have captured my heart (and my family’s taste buds)? Think of them as a dreamy, Fudgy Brownie-like base swirled with a vibrant, slightly tart raspberry filling, all topped off with a glossy chocolate glaze. It’s a perfect trifecta of textures and flavors that just works so, so well together. The “bars” part just means they’re easy to cut and serve, making them incredibly portable and perfect for sharing – though I won’t judge if you decide to keep them all to yourself! The name itself hints at the glorious combination: the deep, satisfying richness of chocolate paired with the bright, zesty pop of fresh raspberries. It’s less about a specific origin story and more about the pure, unadulterated joy of bringing two incredible flavors together in a convenient, sliceable format. It’s essentially a decadent dessert bar that’s both comforting and a little bit sophisticated.
Why you’ll love this
There are so many reasons why I’m completely obsessed with these raspberry chocolate bars, and I just know you will be too! First off, the FLAVOR! Oh my goodness, the flavor. You get this wonderfully tender, chocolatey base that’s not too sweet, which is crucial. Then, that ribbon of Raspberry swirl cuts through it all with this amazing bright tanginess. It’s the perfect balance; it’s rich without being heavy, and sweet without being cloying. And the chocolate glaze on top? It adds that extra layer of fudgy, decadent goodness that just seals the deal. But it’s not just about the taste, is it? This recipe is SO SIMPLE. I mean, truly, ridiculously simple. You probably have most of the ingredients in your pantry right now. There’s no fancy equipment needed, no complicated techniques. It’s one of those recipes that feels fancy but is actually a lifesaver on busy weeknights or when unexpected guests pop over. Plus, it’s surprisingly cost-effective. Using common ingredients means you don’t have to break the bank to make something truly special. And the VERSATILITY! You can tweak the raspberry swirl, add a touch of almond extract to the base, or even sprinkle some chopped nuts on top if you’re feeling adventurous. These are perfect for a quick breakfast (don’t knock it till you try it!), a delightful afternoon pick-me-up, or an impressive dessert that will have everyone asking for the recipe. Honestly, what I love most about these raspberry chocolate bars is that they’re universally loved. My picky eaters devour them, my grown-up friends rave about them, and they’re always the first thing to go at any potluck. They just have this magical ability to make people happy.
How do I make Raspberry Chocolate Bars
Quick Overview
This recipe is all about simple layers coming together beautifully. We’ll start by mixing up a rich, fudgy chocolate base, then prepare a bright, fresh raspberry swirl, and finally bring it all together in the pan for a stunning marbled effect before baking. It’s a straightforward process that yields incredibly rewarding results. The beauty of this method is how it combines humble ingredients into something truly extraordinary with minimal fuss. You’ll be amazed at how simple it is to achieve that perfect balance of chocolate and raspberry.
Ingredients
For the Main Batter:
This forms the delicious, chocolatey foundation for our bars. I always use unsalted butter here because it gives me more control over the saltiness, and good quality unsweetened cocoa powder makes a huge difference. Make sure your eggs are at room temperature; they’ll incorporate much better into the batter, leading to a smoother texture. If you can find good quality dark chocolate for melting, it really elevates the flavor profile. I usually go for a 60-70% cacao content. And for the flour, all-purpose is perfectly fine! Don’t overthink it; the goal is a tender crumb.
- 1 cup (2 sticks) unsalted butter, melted
- 2 cups granulated sugar
- 4 large eggs, room temperature
- 1 teaspoon vanilla extract
- 1 cup unsweetened cocoa powder
- 1 cup all-purpose flour
- ½ teaspoon baking powder
- ¼ teaspoon salt
- ½ cup semi-sweet chocolate chips (optional, for extra chocolatey pockets)
For the Filling:
This is where that burst of fruity goodness comes in! Fresh raspberries are always my first choice because their flavor is so vibrant and pure. If fresh aren’t available, frozen work just as well, though you might need to cook them down a little longer to get the right consistency. A squeeze of lemon juice is my secret weapon here; it brightens the raspberry flavor and adds a lovely tang that perfectly contrasts the chocolate. We’re aiming for a slightly jammy consistency – not too runny, not too stiff.
- 2 cups fresh or frozen raspberries
- ¼ cup granulated sugar (adjust to your sweetness preference)
- 1 tablespoon lemon juice
- 1 tablespoon cornstarch (or arrowroot starch for a clearer finish)
For the Glaze:
This is the finishing touch that brings it all together. A simple chocolate glaze adds that extra bit of shine and fudgy texture. You can use milk chocolate, semi-sweet, or dark chocolate – whatever your heart desires! Make sure to melt it gently so it doesn’t scorch. A little bit of butter or a splash of milk can help achieve that perfect pourable consistency. It should be smooth and luscious, ready to coat those beautiful bars.
“Packed with flavor and so simple. Exactly what I wanted from this Raspberry Chocolate Bars!”
- 1 cup semi-sweet chocolate chips
- 2 tablespoons unsalted butter
- 1 tablespoon milk or cream (optional, for a thinner glaze)
Step-by-Step Instructions
Step 1: Preheat & Prep Pan
First things first, get your oven humming! Preheat it to 350°F (175°C). You’ll want to bake these in a 9×13 inch baking pan. Grease it really well with butter or cooking spray, and then line it with parchment paper, leaving some overhang on the sides. This makes it SO much easier to lift the baked bars out later. Trust me, you’ll thank yourself for this step!
Step 2: Mix Dry Ingredients
In a medium bowl, whisk together the cocoa powder, flour, baking powder, and salt. Whisking them together ensures everything is evenly distributed, which means no pockets of unincorporated flour or baking powder in your finished bars. You want it to be a uniform, lovely brown color.
Step 3: Mix Wet Ingredients
In a large bowl, combine the melted butter and sugar. Whisk them together until they’re well combined. Then, beat in the eggs one at a time, mixing thoroughly after each addition. Stir in the vanilla extract. This creates the rich, decadent base for our chocolate bars.
Step 4: Combine
Now, gradually add the dry ingredients to the wet ingredients. Mix on low speed (or gently by hand with a spatula) until just combined. Be careful not to overmix here! Overmixing develops the gluten in the flour, which can lead to tougher bars. You want to mix until you no longer see streaks of flour. If you’re using the optional chocolate chips, gently fold them in now.
Step 5: Prepare Filling
While the batter is resting for a moment, let’s whip up that glorious raspberry filling. In a small saucepan over medium heat, combine the raspberries, sugar, and lemon juice. Cook, stirring occasionally, until the raspberries break down and the mixture starts to thicken, about 5-7 minutes. In a tiny bowl, whisk the cornstarch with a tablespoon of water to make a slurry. Pour this slurry into the simmering raspberry mixture, stirring constantly. Cook for another minute or two until it thickens to a jam-like consistency. Remove from heat and let it cool slightly.
Step 6: Layer & Swirl
Pour about two-thirds of the chocolate batter into your prepared pan and spread it out evenly. Dollop spoonfuls of the raspberry filling over the batter. Then, pour the remaining one-third of the batter over the raspberry filling. Now for the fun part: take a knife or a skewer and gently swirl the raspberry filling through the chocolate batter. Don’t overdo it; you want distinct swirls, not a uniform pink mess! A few gentle passes are all you need.
Step 7: Bake
Pop that pan into your preheated oven and bake for 30-35 minutes. You’ll know they’re done when a toothpick inserted into the chocolatey parts comes out with moist crumbs attached (not wet batter). The raspberry swirls might still be a bit gooey, and that’s perfectly okay!
Step 8: Cool & Glaze
Let the bars cool in the pan for at least 20-30 minutes before you even think about glazing. They need to set up a bit. While they’re cooling, gently melt the chocolate chips and butter for the glaze in a heatproof bowl set over a pan of simmering water (or in the microwave in short bursts). Stir until smooth. If it seems too thick, add a tablespoon of milk or cream. Once the bars are slightly cooled, pour the glaze over the top and spread it evenly.
“New family favorite! This Raspberry Chocolate Bars was so flavorful and ridiculously easy. Crowd-pleaser for sure.”
Step 9: Slice & Serve
This is arguably the hardest part: waiting for them to cool completely! Once the glaze has set, use the parchment paper overhang to lift the entire slab out of the pan onto a cutting board. Slice into bars using a sharp knife. I like to warm up my knife in hot water and dry it between cuts for extra clean slices. Serve them at room temperature for the best texture and flavor.
What to Serve It With
These raspberry chocolate bars are wonderfully versatile, perfect for so many different moments! For breakfast, I love having one with a strong cup of coffee. The richness of the chocolate and the tartness of the raspberry feel like such a decadent start to the day, and honestly, they’re so easy to grab and go. For a more leisurely brunch, I like to cut them into smaller, bite-sized pieces and arrange them on a pretty platter. They look so elegant next to a fruit salad or a mimosa. As a dessert, they’re phenomenal on their own, but if you want to go all out, a scoop of vanilla bean Ice Cream or a dollop of freshly whipped cream is divine. The contrast of the warm (if you reheat them gently!) bars with the cold creaminess is just heavenly. And for those cozy snack moments, when you just need something comforting, these are your answer. I often pair them with a glass of cold milk or a soothing cup of herbal tea. My kids particularly love them dunked in milk! We also have a tradition of having these after Sunday dinner, usually served with a side of berries if we have them. It’s a simple, sweet ending to a family meal that always brings smiles.
Top Tips for Perfecting Your Raspberry Chocolate Bars
Over the years, I’ve learned a few tricks that I think make these raspberry chocolate bars truly shine. For the raspberries, if you’re using frozen, don’t thaw them completely before cooking. Add them straight from the freezer to the pan; they’ll break down beautifully. When you’re making the filling, don’t be afraid to cook it down a bit more than you think you need to. A slightly thicker filling will prevent your bars from becoming soggy. And that lemon juice? Don’t skip it! It’s the key to making the raspberry flavor pop and preventing it from tasting too sweet or flat. For the main batter, I cannot stress enough the importance of not overmixing. Once the flour is incorporated, stop mixing. A few tiny lumps are okay; they’ll bake out. Overmixing will result in a tough, dense bar, and we want tender and fudgy! When you’re swirling the raspberry filling, use a light hand. You want distinct, beautiful ribbons of red peeking through the chocolate, not a muddy mess. A skewer or the tip of a knife works wonders. Just a couple of gentle turns should do it. For baking, ovens can be a bit finicky, so always do the toothpick test. If it comes out with wet batter, give them a few more minutes. If it comes out completely clean, they might be slightly overbaked, but still delicious! I’ve found that lining the pan with parchment paper that hangs over the sides is a total game-changer for easy removal. It saves so much heartache when trying to get the bars out of the pan cleanly. And for the glaze, if it seems too thick, a tiny bit of milk or cream is your best friend. If it’s too thin, just let it sit for a few minutes, and it will thicken up as it cools slightly.
Storing and Reheating Tips
These raspberry chocolate bars are pretty sturdy when it comes to storage, which is another reason I love them! At room temperature, they’ll stay delicious for about 2-3 days, especially if you keep them in an airtight container. I usually just leave them in the pan, covered tightly with plastic wrap, if I plan to eat them within that timeframe. For longer storage, your refrigerator is your friend. In an airtight container, they’ll keep well for up to a week. I find that they taste even better after a day or two, as the flavors meld together even more. If you plan to freeze them, I highly recommend doing so before you add the glaze. Cut them into bars, wrap each bar individually and tightly in plastic wrap, then place them in a freezer-safe bag or container. They can stay frozen for up to 3 months. When you’re ready to enjoy them, you can either thaw them at room temperature for a few hours or gently warm them in the microwave. If you do glaze them before freezing, be aware that the glaze might become a little softer upon thawing, but they’ll still be incredibly tasty. For reheating, I sometimes love to give them a quick zap in the microwave for about 10-15 seconds, especially if I’m serving them with Ice Cream. It makes them wonderfully warm and gooey!
Frequently Asked Questions
Final Thoughts
So there you have it – my absolute favorite Raspberry Chocolate Bars! I truly hope you give this recipe a try. It’s one of those comforting, crowd-pleasing desserts that just brings a smile to everyone’s face. The blend of rich chocolate with that bright, zesty raspberry swirl is simply irresistible, and the best part is how incredibly easy it is to make. It’s the perfect recipe for when you want something truly special without spending hours in the kitchen. If you love this recipe, you might also enjoy my Fudgy Brownie Recipe or my Lemon Raspberry Scones for more delightful berry and chocolate combinations! Baking should be fun, and this recipe is designed to be just that. I can’t wait to hear what you think, so please leave a comment below and let me know how yours turned out, or if you tried any fun variations! Happy baking, my friends!
Raspberry Chocolate Bars
Ingredients
Shortbread Crust
- 2 cups all-purpose flour
- 0.5 cup granulated sugar
- 1 cup unsalted butter, softened
Raspberry Filling
- 2 cups fresh raspberries
- 0.25 cup granulated sugar
- 1 tablespoon cornstarch
Chocolate Ganache
- 6 ounces semi-sweet chocolate chips
- 0.5 cup heavy cream
Instructions
Preparation Steps
- Preheat oven to 350°F (175°C). Line an 8x8 inch baking pan with parchment paper, leaving an overhang.
- For the crust: In a medium bowl, whisk together flour and sugar. Cut in the softened butter with a pastry blender or your fingertips until the mixture resembles coarse crumbs.
- Press the crust mixture evenly into the bottom of the prepared baking pan.
- Bake the crust for 15-18 minutes, or until lightly golden brown.
- While the crust bakes, prepare the raspberry filling: In a small saucepan, combine raspberries, sugar, and cornstarch. Cook over medium heat, stirring constantly, until the mixture thickens and raspberries break down, about 5-7 minutes. Remove from heat.
- Spread the raspberry filling evenly over the baked crust.
- Return the pan to the oven and bake for another 10-12 minutes, until the filling is bubbly.
- Let the bars cool completely in the pan on a wire rack.
- For the ganache: In a heatproof bowl, combine chocolate chips and heavy cream. Microwave in 30-second intervals, stirring in between, until smooth and melted.
- Pour the ganache over the cooled raspberry filling and spread evenly.
- Chill the bars in the refrigerator for at least 1 hour to allow the ganache to set.
- Once set, lift the bars out of the pan using the parchment paper overhang and cut into squares.


