You know those days? The ones where you *need* something sweet, something rich, something that feels like a warm hug in dessert form, but you also don’t want to spend hours in the kitchen wrestling with complicated steps? Yeah, me too. That’s precisely when I reach for this Raspberry Brownies Recipe. It’s become my go-to for absolutely everything – impromptu guest arrivals, potlucks, a little mid-week treat just because, or even when I just want to bake something that smells absolutely divine filling the house. Honestly, I think these might be even better than a classic brownie. They’ve got that deep, fudgy chocolate goodness, but then BAM! You hit a pocket of bright, tart raspberry that just cuts through the richness perfectly. It’s a flavor combination that’s surprisingly sophisticated, yet so incredibly comforting. My family devours them, my friends always ask for the recipe, and for a while there, my nickname was “The Brownie Lady” thanks to these bad boys. They’re not just good; they’re genuinely addictive, in the best possible way!
Thank you for reading this post, don't forget to subscribe!What is a raspberry brownie?
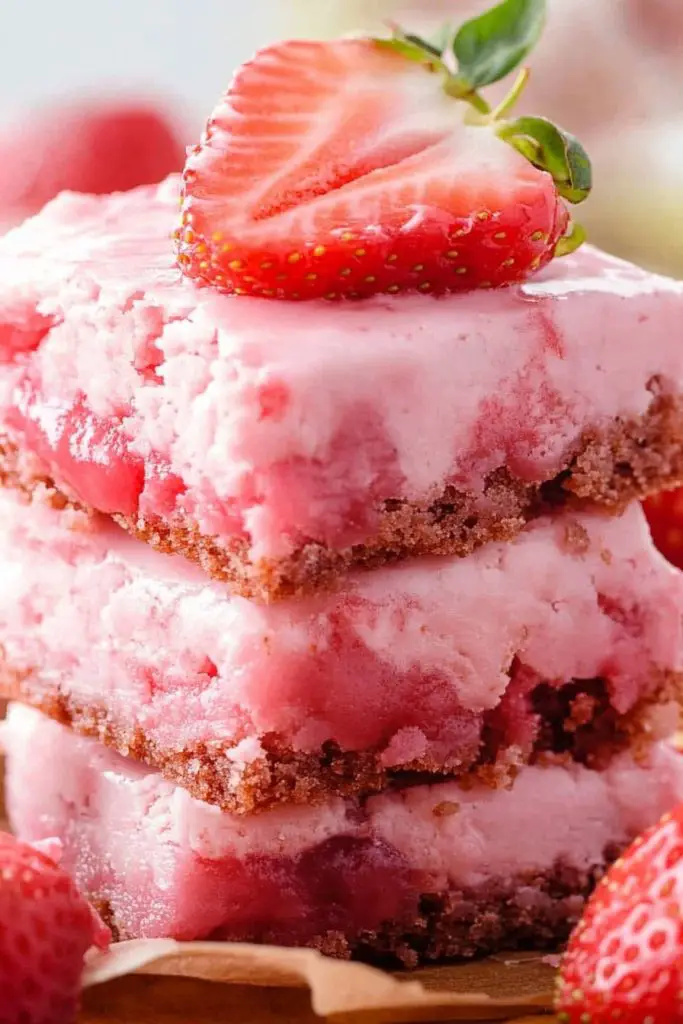
So, what exactly are these magical Raspberry Brownies? Think of them as your favorite Fudgy Brownie, but with a seriously delightful twist. Instead of just being plain old chocolate, we’re swirling in pockets of bright, tart raspberries. It’s not like a cakey brownie; these are dense, rich, and have that perfect crackly top that we all love. The raspberries aren’t cooked down into a jam; they’re added in a way that they soften and burst as they bake, creating these gorgeous streaks of ruby red and adding a burst of fruity tang that balances the deep chocolate flavor. It’s essentially the best of both worlds: the comforting, indulgent chocolate you crave, with a vibrant, fruity surprise that makes each bite exciting. They’re like a little party in every square!
Why you’ll love this recipe?
Why do I love raspberry brownies?flavor is just out of this world. The dark chocolate is intensely rich and fudgy, and when you bite into those soft, slightly tart raspberry bursts, it’s pure bliss. It’s not too sweet, which I really appreciate, because sometimes those super sweet desserts can be a bit much. What I also adore is the simplicity. Honestly, I can whip these up in about 15 minutes of active time. The ingredients are all pretty standard pantry staples, and the steps are straightforward. You don’t need any fancy equipment, just a bowl, a whisk, and a spatula. And let’s talk about Cost-efficiency: What is the best way to measure cost-efficiency?! Brownies are usually pretty budget-friendly to begin with, and adding in fresh or frozen raspberries doesn’t really break the bank, especially when you consider how many servings you get. They’re so much more economical than buying fancy bakery treats. The versatility is another huge plus. I’ve made these for birthday parties, bake sales, and even just for an after-school snack. They’re great served warm with a scoop of vanilla Ice Cream, or perfectly fine at room temperature with a cup of coffee. I’ve even drizzled a little extra melted chocolate over them when I’m feeling extra decadent. They’re just so adaptable! Compared to a plain brownie, these offer so much more complexity and visual appeal. The swirls of raspberry make them look so professional, but they’re surprisingly easy to achieve.
How to Make Raspberry Brownies
Quick Overview
Making these Raspberry Brownies is honestly a breeze. You basically melt some chocolate and butter, whisk in sugar and eggs, fold in the dry ingredients, and then swirl in those gorgeous raspberries. The key is not to overmix and to get those beautiful ribbons of fruit running through the chocolatey goodness. It’s a one-bowl wonder for the batter part, which is always a win in my book. The whole process from start to finish, including baking, is less than an hour, which is pretty amazing for something this delicious. Trust me, the hardest part will be waiting for them to cool!
Ingredients
For the Main Batter:
You’ll need about 1 cup (2 sticks or 226g) of unsalted butter. I always use unsalted so I can control the salt content, but salted works in a pinch, just maybe reduce the added salt a tiny bit. Then, we’ll need 6 ounces (170g) of good quality bittersweet or semi-sweet chocolate. I prefer using a good baking chocolate bar, chopped, rather than chips, as it melts more smoothly. You’ll also need 1 ½ cups (300g) granulated sugar and 2 teaspoons of pure vanilla extract. Two large eggs are essential for that fudgy texture, and make sure they’re at room temperature so they incorporate better. And for the dry stuff: ¾ cup (95g) all-purpose flour and ½ teaspoon salt. You can use a good quality cocoa powder if you want an even deeper chocolate flavor, about ¼ cup, but I usually stick to just melted chocolate for these.
For the Filling:
This is where the magic happens! You’ll need about 1 ½ cups of fresh or frozen raspberries. If you’re using frozen, don’t thaw them completely; just give them a quick rinse and pat them dry. Keeping them slightly frozen helps them hold their shape a bit better and create those defined swirls. If you want a slightly sweeter filling, you can toss them with a tablespoon of sugar, but I usually skip this because the Brownie Batter is sweet enough. Some people like to add a squeeze of lemon juice to the raspberries to brighten them up even more, which is a great idea if you have it!
For the Glaze (Optional, but highly recommended!):
This is super simple and adds another layer of deliciousness. You’ll need about ½ cup (95g) powdered sugar, 1-2 tablespoons of milk (or even raspberry juice for extra flavor!), and ½ teaspoon of vanilla extract. You can also add a tiny pinch of salt to balance the sweetness. For a chocolate glaze, just melt a couple ounces of chocolate with a tablespoon of butter.
“I don’t know if I’ve ever eaten a better Raspberry Brownies. The rub alone is wonderful, but the sauce??? Over the top!”
Step-by-Step Instructions
Step 1: Preheat & Prep Pan
First things first, get that oven preheating to 350°F (175°C). This is crucial for even baking. Then, grab an 8×8 inch baking pan. I like to line mine with parchment paper, leaving some overhang on the sides. This makes it a breeze to lift the brownies out once they’re cooled. You can grease the pan with butter or cooking spray before lining, just to make sure nothing sticks, but the parchment usually does the trick. Make sure the parchment paper is smoothed out so you don’t get any weird creases in your brownies.
Step 2: Mix Dry Ingredients
In a medium bowl, whisk together your ¾ cup of all-purpose flour and ½ teaspoon of salt. If you’re adding cocoa powder for extra chocolatey-ness, whisk that in now too. Just a quick whisk to combine them evenly. This step ensures that your flour and salt are distributed throughout the batter, preventing any dense pockets or salty surprises. It’s a simple step, but it really helps with the final texture.
Step 3: Mix Wet Ingredients
Now for the luscious chocolatey base! In a heatproof bowl set over a saucepan of simmering water (a double boiler situation), melt your 6 ounces of chopped chocolate and 1 cup of butter. Stir gently until it’s smooth and glossy. Take the bowl off the heat and let it cool slightly for a few minutes – you don’t want to cook your eggs! While it’s cooling, in a separate larger bowl, whisk together your 1 ½ cups of granulated sugar and 2 teaspoons of vanilla extract. Then, beat in your two large eggs, one at a time, until the mixture is pale and slightly thickened. This process helps to aerate the batter a little, which contributes to that delightful crackly top.
Step 4: Combine
Now, pour that slightly cooled melted chocolate and butter mixture into the egg and sugar mixture. Gently whisk everything together until it’s just combined and you have a beautiful, glossy chocolate batter. Be careful not to overmix here; we’re aiming for a fudgy brownie, not a tough one. Then, gently fold in your dry ingredients (the flour and salt mixture) until *just* combined. You might still see a few streaks of flour, and that’s perfectly okay! Overmixing at this stage is the quickest way to end up with tough brownies, so err on the side of under-mixing. Remember, the residual heat will continue to cook the flour a bit as it cools.
Step 5: Prepare Filling
If you’re using fresh raspberries, gently rinse them and pat them dry. If using frozen, just give them a quick rinse and pat them dry with a paper towel. Don’t worry if they’re still a little frosty. If you want a little extra zing, you can lightly toss them with a teaspoon of lemon juice. I sometimes like to mash about a quarter cup of them slightly with a fork to create a bit of a sauce-like consistency that will swirl beautifully into the batter. This isn’t strictly necessary, but it does create gorgeous streaks.
Step 6: Layer & Swirl
Pour about two-thirds of your brownie batter into the prepared pan and spread it out evenly. Now, dollop about half of your raspberries over the batter. Spoon the remaining brownie batter over the raspberries, and then scatter the rest of the raspberries on top. Grab a butter knife or a skewer and gently swirl the raspberries into the batter. You don’t want to mix them in completely; just create those pretty marbled patterns. Be gentle, you’re looking for ribbons, not a uniform pink batter!
Step 7: Bake
Pop the pan into your preheated oven. Bake for about 25-30 minutes. The edges should look set, and the center should be *just* starting to look firm. A toothpick inserted into the center should come out with moist crumbs attached, not wet batter. If it comes out completely clean, they might be a little overbaked. I always tend to pull mine out a minute or two early, as they continue to bake as they cool in the pan. Ovens can vary, so keep an eye on them, especially the first time you make them!
Step 8: Cool & Glaze
This is the hardest part: letting them cool! Let the brownies cool completely in the pan on a wire rack. I know, I know, it’s torture! But if you try to cut them too soon, they’ll be gooey and messy. Once they’re completely cool, lift them out of the pan using the parchment paper overhang. If you’re adding the glaze, whisk together your powdered sugar, milk/juice, vanilla, and salt in a small bowl until smooth and drizzly. You want it thick enough to coat but thin enough to pour. Drizzle it over the cooled brownies and let it set for about 15-20 minutes before slicing. If you prefer a more intense chocolate hit, you can melt 2 ounces of chocolate with 1 tablespoon of butter and drizzle that instead!
“Packed with flavor and so simple. Exactly what I wanted from this Raspberry Brownies!”
Step 9: Slice & Serve
Once the glaze is set (or if you skipped it), use a sharp knife to cut them into squares. Wipe the knife clean between cuts for nice, clean edges. These are fantastic served at room temperature, but honestly, they’re even better when they’re slightly warm with a scoop of vanilla bean Ice Cream. The contrast of the warm, fudgy brownie and the cold, creamy ice cream is just divine. They also pair wonderfully with a strong cup of coffee or a glass of cold milk. Enjoy every single bite!
What to Serve It With
These Raspberry Brownies are so versatile, they fit right in at any gathering or quiet moment. For Breakfast (yes, I said breakfast!), I love serving a smaller, thinner slice with a really good, dark roast coffee. The richness of the brownie cuts through the bitterness of the coffee beautifully. It feels like a decadent treat to start the day, especially on a weekend. For Brunch, I like to present them a little more elegantly. I’ll cut them into neat squares and arrange them on a pretty platter, maybe with a few fresh raspberries scattered around for garnish. A mimosa or a sparkling rosé pairs wonderfully with the bright fruitiness. As Dessert, these truly shine. They’re perfect after a hearty meal. I love serving them warm, with a scoop of good quality vanilla or even raspberry sorbet. A drizzle of chocolate sauce or a dusting of powdered sugar takes them to the next level. And For Cozy Snacks? This is where they live most of the time in my house! I’ll cut them into smaller, more manageable squares, and they’re perfect for an afternoon pick-me-up with a glass of cold milk or a soothing cup of tea. My kids absolutely adore them as a post-homework snack. A family tradition is to have these on movie nights, all snuggled up on the couch. They’re just the perfect comfort food!
Top Tips for Perfecting Your Raspberry Brownies
Over the years, I’ve definitely learned a few tricks that make these Raspberry Brownies even better. For the Raspberry Prep, if you’re using frozen berries, make sure they aren’t completely thawed. A little bit of frostiness helps them keep their shape and prevents them from bleeding too much color into the batter, giving you those lovely distinct swirls. If you have very juicy fresh raspberries, you might want to gently pat them dry with a paper towel. Don’t be afraid to slightly mash a few of them before adding; this creates little pockets of intense raspberry goodness. When it comes to Mixing Advice, the biggest thing is not to overmix the batter once you add the flour. Seriously, just fold it in until you don’t see dry streaks. Overmixing develops the gluten in the flour, leading to tough, cakey brownies instead of dense, fudgy ones. It’s a common mistake, and I’ve definitely made it myself in the past! For Swirl Customization, I like to use a butter knife or a toothpick and make just a few gentle passes through the batter and raspberries. Think artistic swirls, not a uniform mix. You want to see distinct ribbons of chocolate and raspberry. Don’t overdo it, or you’ll lose that marbling effect. For Ingredient Swaps, if you don’t have all-purpose flour, you can try a good quality gluten-free all-purpose blend, but you might need to adjust the liquid slightly depending on the blend. I’ve also experimented with using melted coconut oil instead of butter, and it gave them a slightly different, but still delicious, texture – a bit more tender, perhaps. For Baking Tips, always preheat your oven properly. I also recommend placing your baking pan in the center of the oven to ensure even heat circulation. Don’t rely solely on the baking time; check for doneness with a toothpick. A few moist crumbs are perfect; wet batter means they need more time, and a completely clean toothpick means they’re likely overbaked and will be drier. For Glaze Variations, if you want a thinner glaze, just add a touch more milk or liquid. If it’s too thin, add more powdered sugar a tablespoon at a time. You can also add a drop of raspberry extract for a more intense fruit flavor, or even a bit of zest from a lemon or orange. Another fun glaze is to simply melt some white chocolate and drizzle that over the top!
Storing and Reheating Tips
How you store these Raspberry Brownies really depends on how long you need them to last and how you like to eat them. For Room Temperature storage, as long as they have set completely and aren’t too gooey, they can stay at room temperature for about 2-3 days. The best way to store them is in an airtight container, perhaps with some parchment paper between layers if you’re stacking them. This helps prevent them from drying out and keeps them fresh. If you live in a warm climate or it’s humid, it’s usually safer to store them in the refrigerator. For Refrigerator Storage, they’ll keep well for up to a week. Place them in an airtight container, and they should retain their fudgy texture. The flavors often meld even more overnight, making them even tastier! When you want to serve them from the fridge, I highly recommend letting them sit out at room temperature for about 20-30 minutes first. This way, they’re not hard and cold, and you can really appreciate the fudgy texture. For Freezer Instructions, these freeze beautifully! Wrap individual brownies or the entire pan tightly in plastic wrap, then in aluminum foil. They can stay frozen for up to 2-3 months. To thaw, simply unwrap them and let them come to room temperature on a wire rack. For Glaze Timing Advice, it’s best to add the glaze *after* the brownies have cooled completely if you plan to store them at room temperature or in the freezer. If you glaze them and then store them in the fridge, the glaze can sometimes become a bit sticky or hard. If you’re serving them within a day or two and they’re already in the fridge, you can glaze them and let them set before covering.
Frequently Asked Questions
Final Thoughts
So there you have it – my absolute favorite Raspberry Brownies! I truly hope you give these a try. They’re the kind of recipe that makes you feel like a baking rockstar without actually having to be one. The combination of rich chocolate and bright, tangy raspberries is just so incredibly satisfying. They’re perfect for sharing, but I won’t tell if you decide to keep them all to yourself – I definitely do sometimes! If you love these, you might also enjoy my Fudgy Chocolate Chip Cookies or my Lemon Raspberry Scones. They use some similar flavor profiles and are just as comforting and delicious. I can’t wait to hear how your Raspberry Brownies turn out! Please leave a comment below and let me know your thoughts, or share your own tips and variations. Happy baking, and enjoy every single fudgy, fruity bite!
Raspberry Brownies
Ingredients
Brownie Batter
- 0.5 cup unsalted butter melted
- 1 cup granulated sugar
- 0.5 cup unsweetened cocoa powder
- 2 large eggs
- 1 teaspoon vanilla extract
- 0.5 cup all-purpose flour
- 0.25 teaspoon salt
- 0.5 cup chocolate chips semi-sweet
Raspberry Swirl
- 1 cup fresh raspberries
- 1 tablespoon granulated sugar
Instructions
Preparation Steps
- Preheat oven to 350°F (175°C). Grease and flour an 8x8 inch baking pan.
-
In a medium bowl, whisk together melted butter and sugar until well combined.0.5 cup unsalted butter
-
Stir in cocoa powder until smooth.0.5 cup unsalted butter
-
Beat in the eggs one at a time, then stir in vanilla extract.0.5 cup unsalted butter
-
In a separate small bowl, combine flour and salt.0.5 cup unsalted butter
- Gradually add the dry ingredients to the wet ingredients, mixing until just combined. Do not overmix.
-
Fold in the chocolate chips.0.5 cup unsalted butter
-
To make the raspberry swirl: In a small saucepan, combine raspberries and sugar. Cook over medium heat until raspberries break down and mixture thickens slightly. Mash with a fork.0.5 cup unsalted butter
- Pour half of the brownie batter into the prepared pan. Dollop half of the raspberry mixture over the batter. Swirl gently with a knife. Repeat with the remaining brownie batter and raspberry mixture.
- Bake for 25-30 minutes, or until a toothpick inserted into the center comes out with moist crumbs attached.
- Let cool completely before cutting into squares.


