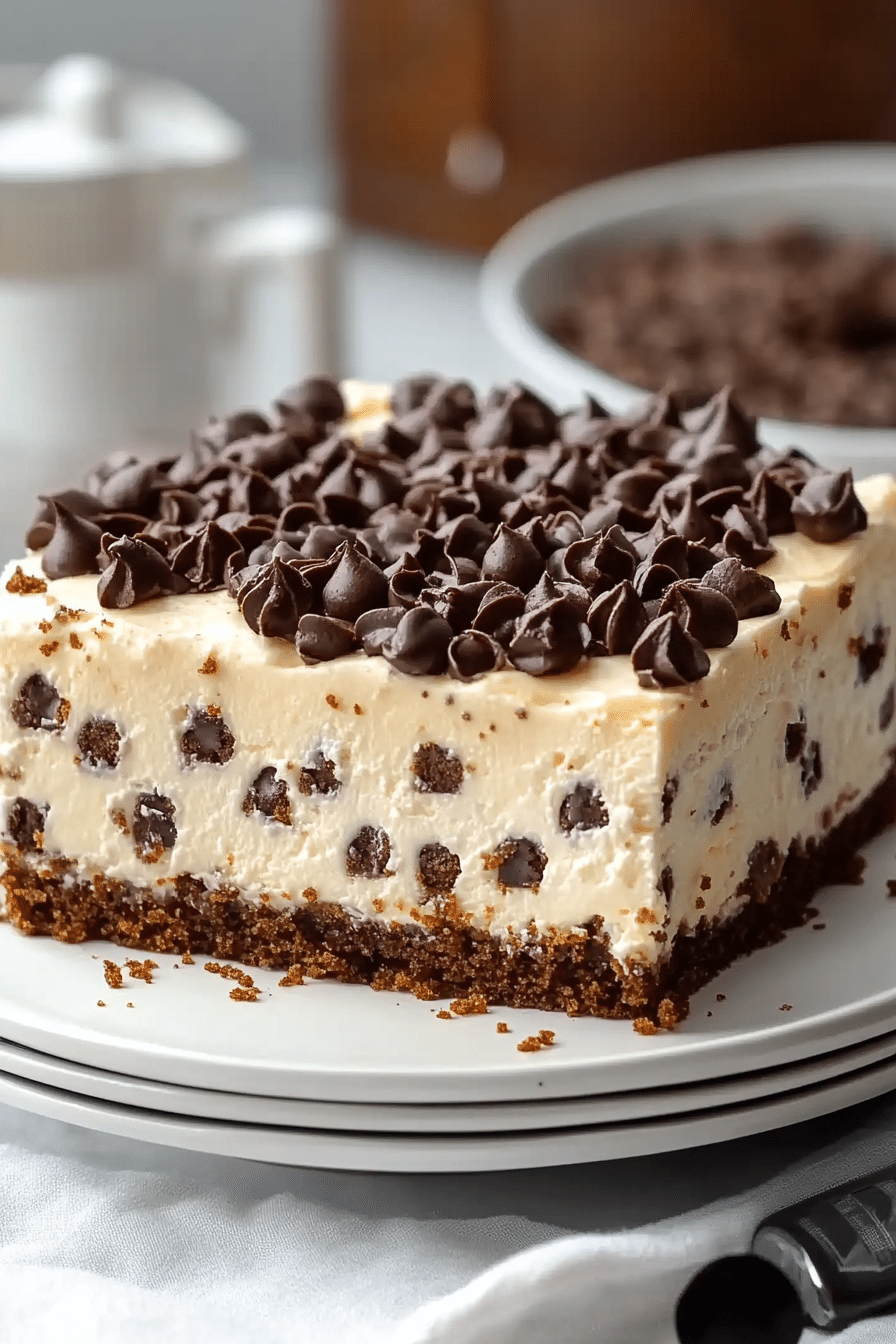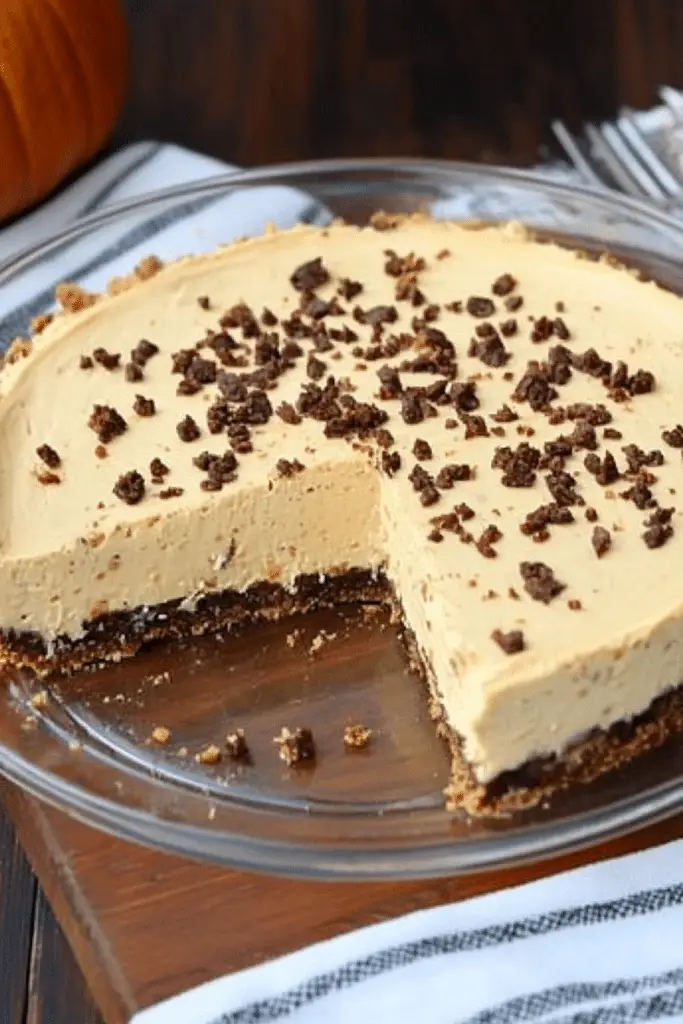
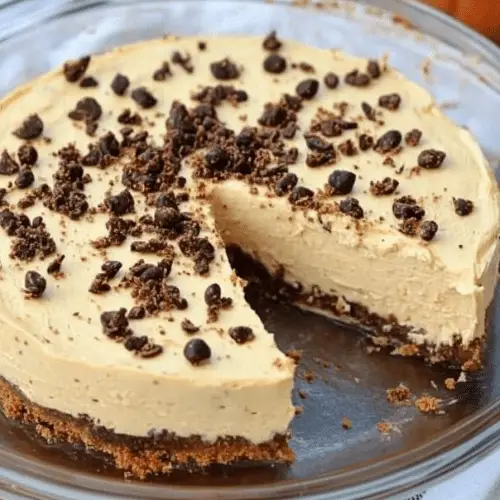
Okay, friend, gather ’round because I’m about to share something truly special with you. It’s not just a recipe; it’s a hug in dessert form, a golden slice of autumn that brings everyone to the table with a happy sigh. I’m talking about my absolute favorite Pumpkin Cheesecake. Honestly, if there was one dessert that screams “cozy,” this would be it. The moment you taste that creamy, spiced filling against the crumbly graham cracker crust, you just know it’s going to be a good day, or a perfect evening. It’s the kind of thing my family starts asking about as soon as the leaves even *think* about changing color. Forget those store-bought versions that are either too bland or too… well, artificial. This is the real deal, homemade with love, and it’s surprisingly simple to make. It’s got that comforting texture and flavor that makes you feel instantly warm and content. I’ve tried countless pumpkin recipes over the years, but this pumpkin cheesecake is the one that’s earned a permanent spot in my recipe box. It’s a showstopper that’s surprisingly forgiving for beginners, and a guaranteed crowd-pleaser for even the pickiest eaters.
Thank you for reading this post, don't forget to subscribe!What is pumpkin cheesecake?
So, what exactly *is* this magical creation? At its heart, it’s a classic New York-style cheesecake but with a delightful autumnal twist. Instead of just plain cream cheese, we’re infusing it with rich, smooth pumpkin puree and a warm blend of cinnamon, nutmeg, cloves, and ginger. Think of it as a creamy, dreamy hug for your taste buds, reminiscent of your favorite pumpkin pie but with the luxurious, dense texture that only a truly great cheesecake can deliver. The name itself, “Pumpkin Cheesecake,” is pretty straightforward, but what it represents is so much more. It’s that feeling of crisp air, fallen leaves, and the comfort of a crackling fireplace all rolled into one perfect dessert. It’s sophisticated enough for a holiday gathering but wonderfully comforting for a quiet night in. It’s essentially the best of both worlds: the elegance of cheesecake meeting the cozy embrace of pumpkin spice.
Why you’ll love this recipe?
Honestly, where do I even begin? There are so many reasons why I keep coming back to this particular pumpkin cheesecake recipe, and I just know you’re going to fall head over heels for it too. First off, the flavor is just out of this world. It’s not overly sweet, which I really appreciate. The pumpkin puree brings a subtle earthiness that pairs beautifully with the tangy cream cheese, and the spices are perfectly balanced – warming, fragrant, but not overpowering. It smells absolutely divine while it’s baking, filling your whole house with that unmistakable scent of fall. Then there’s the simplicity. I know, I know, cheesecake can sometimes sound intimidating, right? But this recipe is a lifesaver. I’ve broken it down so it’s easy to follow, and even if you’re new to cheesecake making, you’ll feel like a pro. The steps are logical, and the results are consistently fantastic. You don’t need any fancy gadgets or techniques. And speaking of results, let’s talk about the texture. It’s unbelievably smooth, creamy, and dense, exactly how a good cheesecake should be. Another huge win for this recipe is its Cost-efficiency: What is the best way to measure cost-efficiency?. Most of the ingredients are pantry staples, and even the pumpkin is usually quite affordable, especially when it’s in season. Compared to buying a gourmet dessert, this is a fraction of the cost and a million times more satisfying. Finally, its versatility is incredible! While it’s perfect on its own, you can easily dress it up or down. I love it with a dollop of whipped cream and a sprinkle of cinnamon, but it’s also fantastic with a caramel drizzle or even some candied pecans. If you’re a fan of my classic New York Cheesecake or my Spiced Apple Crumble, you’re going to adore this. It takes those beloved flavors and textures and elevates them with the comforting essence of pumpkin. What I love most about this pumpkin cheesecake, though, is the pure joy it brings. It’s the centerpiece of so many happy memories and gatherings in my home, and I can’t wait for it to become a favorite in yours too.
How do you make a pumpkin cheesecake?
Quick Overview
Making this decadent pumpkin cheesecake is a straightforward process that yields impressive results. We’ll start by creating a buttery graham cracker crust, then whip up a velvety smooth pumpkin-spiced cream cheese filling, pour it into the crust, and bake it gently to perfection. The key to its success lies in using room-temperature ingredients for the filling to ensure ultimate creaminess and a water bath for even baking, which prevents cracking. It’s designed to be approachable, ensuring you can create a restaurant-worthy dessert right in your own kitchen with minimal fuss. You’ll be amazed at how easy it is to achieve such a rich, satisfying, and beautifully spiced treat.
Ingredients
For the Crust:
2 cups graham cracker crumbs (about 14 full graham crackers, finely crushed)
1/4 cup granulated sugar
1/2 cup unsalted butter, melted
For the Filling:
3 (8-ounce) packages cream cheese, softened to room temperature
1 1/2 cups granulated sugar
1/4 cup all-purpose flour
1 teaspoon pumpkin pie spice (or 1 teaspoon cinnamon, 1/4 teaspoon nutmeg, pinch of cloves and ginger)
1/2 teaspoon salt
1 cup pumpkin puree (not pumpkin pie filling)
4 large eggs, at room temperature
1/4 cup heavy cream, at room temperature
For the Glaze (Optional):
1/2 cup powdered sugar, sifted
1-2 tablespoons milk or heavy cream
1/4 teaspoon vanilla extract
Step-by-Step Instructions
Step 1: Preheat & Prep Pan
First things first, let’s get our oven and pan ready. Preheat your oven to 325°F (160°C). You’ll need a 9-inch springform pan for this. To make sure our cheesecake doesn’t stick and to help it bake evenly, we’re going to wrap the outside of the springform pan *really* well with a couple of layers of heavy-duty aluminum foil. Make sure it goes all the way up the sides. This is super important, especially if you plan on using a water bath (which I highly recommend for the smoothest, crack-free cheesecake!).
Step 2: Mix Dry Ingredients
In a medium bowl, combine the graham cracker crumbs and granulated sugar. Give them a good whisk to make sure they’re evenly distributed. This sugar will help the crust get a little crisp and golden brown. I like to crush my graham crackers in a food processor for a really fine, even crumb, but you can also put them in a zip-top bag and use a rolling pin – it’s a great stress reliever!
Step 3: Mix Wet Ingredients
Now, let’s work on that creamy filling. In a large bowl (or the bowl of your stand mixer fitted with the paddle attachment), beat the softened cream cheese on medium speed until it’s completely smooth and free of lumps. This is crucial for a silky texture! Add the granulated sugar and flour and beat again until well combined and smooth. The flour acts as a stabilizer, helping the cheesecake set up properly. Scrape down the sides of the bowl often to make sure everything is incorporated evenly. Then, beat in the pumpkin pie spice and salt until fragrant.
Step 4: Combine
Now, gradually add the pumpkin puree to the cream cheese mixture, beating on low speed until just combined. Next, add the eggs one at a time, beating on low speed just until each egg is incorporated before adding the next. You really don’t want to overmix here; overbeating can incorporate too much air, which leads to cracking. Finally, stir in the heavy cream on low speed until the batter is smooth and luscious. It should be thick and creamy, with a beautiful orange hue.
Step 5: Prepare Filling
The filling is already prepared in the previous step! It should be smooth, creamy, and have that lovely pumpkin color. I always give it a final stir by hand with a spatula to make sure there are no hidden pockets of unmixed ingredients at the bottom or sides of the bowl. The texture should be like thick, pourable batter. This ensures every bite of your pumpkin cheesecake will be perfectly spiced and creamy.
“Made the Pumpkin Cheesecake tonight and wow — perfect weeknight dinner. Will definitely make again!”
Step 6: Layer & Swirl
Pour the prepared pumpkin cheesecake filling evenly over the graham cracker crust in the prepared springform pan. If you want a little swirl action (which looks beautiful!), you can reserve about 1/4 cup of the filling, tint it slightly with a drop of orange food coloring if you like (or leave it plain!), and then dollop it on top of the cheesecake batter. Use a toothpick or a skewer to gently swirl the reserved batter into the main batter, creating pretty patterns. Don’t over-swirl, or the colors will just blend together.
Step 7: Bake
This is where the magic happens! If you’re using a water bath (highly recommended!), place the foil-wrapped springform pan into a larger roasting pan. Carefully pour enough hot water into the roasting pan to come about halfway up the sides of the springform pan. Bake in the preheated oven for 60-75 minutes. The edges of the cheesecake should be set, but the center should still have a slight jiggle when you gently nudge the pan. If you’re not using a water bath, the baking time might be a bit shorter, but you’ll need to watch it closely for signs of cracking. For the best texture, I like to turn off the oven during the last 10-15 minutes of baking, prop the oven door open slightly, and let the cheesecake sit in the cooling oven. This slow cool-down is another trick for preventing cracks!
Step 8: Cool & Glaze
Once baked, carefully remove the cheesecake from the oven (and the water bath, if used). Let it cool completely on a wire rack. Once it’s mostly cooled, you can remove the foil from the outside of the springform pan. Then, cover the cheesecake loosely with plastic wrap and refrigerate for at least 6 hours, or preferably overnight. This is non-negotiable! The cheesecake needs this time to set up properly and for the flavors to meld. Once chilled and set, you can prepare the optional glaze. Whisk together the sifted powdered sugar, milk, and vanilla extract until smooth and drizzly. Pour it over the chilled cheesecake and let it drip down the sides. It adds a lovely touch of sweetness and a beautiful finish.
Step 9: Slice & Serve
To get those perfect, clean slices, use a sharp knife that has been dipped in hot water and wiped dry before each cut. Gently run the knife around the edge of the cheesecake before releasing the sides of the springform pan. Serve chilled, either plain or with your favorite toppings like whipped cream, a drizzle of caramel, or some toasted pecans. This pumpkin cheesecake is truly a dessert that looks and tastes incredible, no matter how you serve it.
What to Serve It With
This pumpkin cheesecake is so versatile, it really fits into almost any occasion! I love experimenting with different pairings depending on the mood and the meal.
For Breakfast: While it feels like a dessert, a small, thin slice of this pumpkin cheesecake can be absolutely divine alongside a strong cup of coffee on a leisurely weekend morning. It’s a delightful treat that feels special. I sometimes even add a tiny dollop of plain Greek yogurt on the side to balance out the richness. It’s a little indulgence that makes waking up feel like a celebration.
For Brunch: This is where it truly shines! Arrange slices on a beautiful platter, perhaps with a few fresh berries or a scattering of pomegranate seeds for a pop of color. It pairs wonderfully with a mimosa or a festive sparkling cider. It’s elegant enough to impress guests but still has that comforting, approachable vibe that makes brunch so enjoyable. It’s become a staple at our family Easter and Thanksgiving brunches because it’s a change from the usual pies.
As Dessert: Of course, this is its primary role! Serve it after a hearty meal, like roast chicken or a festive holiday dinner. A drizzle of warm caramel sauce or a dusting of cinnamon is all you need. For a slightly lighter feel, a small dollop of homemade whipped cream is perfect. It’s a sophisticated ending to any meal that leaves everyone feeling satisfied but not overly stuffed. It’s a welcome change from chocolate cake and always a delightful surprise.
For Cozy Snacks: This is my favorite informal pairing. On a chilly evening, I’ll cut a modest slice, curl up on the couch with a mug of chai tea or hot apple cider, and just savor it. It’s pure comfort food. Sometimes, if I’m feeling extra indulgent, I’ll toast some walnuts or pecans and sprinkle them on top. It’s the perfect way to end the day, a little moment of peace and deliciousness.
My family also has a tradition of making this on the first truly cold day of autumn. We’ll have a simple dinner, and then I’ll bring out the cheesecake. The smiles it brings are priceless, and it really sets the mood for the cozy season ahead. I’ve also found that it pairs surprisingly well with a slightly tart Riesling or a sweet port wine if you’re serving it as part of a more formal dessert spread.
Top Tips for Perfecting Your Pumpkin Cheesecake
I’ve made this pumpkin cheesecake more times than I can count, and over the years, I’ve picked up a few tricks that make all the difference. I want you to have the absolute best experience making and eating it!
Zucchini Prep: (Wait, did I say zucchini? Oh my goodness, I am so sorry, friend! I must have been thinking about another recipe. We’re talking about pumpkin here! Let me correct that.) Pumpkin Puree Prep: Make sure you’re using 100% pure pumpkin puree, not pumpkin pie filling. The filling already has spices and sugar added, which would totally throw off the flavor balance of the cheesecake. Also, drain any excess liquid from the puree if it seems watery. Sometimes, I even press it gently through a fine-mesh sieve if I’m aiming for an ultra-silky smooth texture, though it’s usually not necessary if you buy a good quality brand. Just check the can – it should only list pumpkin. Freshness matters too; a can that’s been lurking in the pantry for years might have a slightly metallic taste.
Mixing Advice: This is probably the most critical part of cheesecake making. Always, always, always use room-temperature cream cheese and eggs. Cold ingredients won’t emulsify properly, leading to a lumpy, uneven batter. Beat the cream cheese until it’s *completely* smooth before adding anything else. And when you add the eggs, beat on low speed *just* until they’re incorporated. Overmixing incorporates air, and that air expands during baking, causing cracks. It’s tempting to whip it up vigorously, thinking it will make it lighter, but trust me, gentle is best for cheesecake!
Swirl Customization: The swirl isn’t just for looks; it adds a little visual interest and can break up the uniform color if you like. If you decide to do a swirl, don’t overdo it. A few gentle passes with a toothpick are all you need to create pretty patterns. You can also play with adding a tiny bit of caramel extract or even a pinch of espresso powder to the reserved batter for a different flavor dimension within the swirl. It’s a subtle touch that can elevate the whole experience.
Ingredient Swaps: If you can’t find graham crackers, digestive biscuits or even shortbread cookies can work for the crust, though the flavor will be slightly different. You might need to adjust the amount of butter slightly depending on how fine your crumbs are. For the pumpkin pie spice, if you don’t have it, making your own blend is easy: combine 1 teaspoon cinnamon, 1/4 teaspoon nutmeg, a pinch of ground cloves, and a pinch of ground ginger. It’s a pretty forgiving recipe, so don’t stress too much about exact spice measurements; adjust to your preference!
“I don’t know if I’ve ever eaten a better Pumpkin Cheesecake. The rub alone is wonderful, but the sauce??? Over the top!”
Baking Tips: The water bath is your best friend for preventing cracks and ensuring a creamy texture. It creates a humid environment that allows the cheesecake to bake gently and evenly. If you’re nervous about water leaking into your foil, double or even triple wrap your springform pan. Another great tip is the slow cool-down. After baking, turn off the oven, crack the door, and let the cheesecake sit inside for about an hour. This gradual cooling prevents the drastic temperature change that often causes cracks. Also, don’t pull it out as soon as the timer goes off; cheesecake is often best when it’s had time to set up slowly.
Glaze Variations: If the simple powdered sugar glaze isn’t your jam, try a caramel sauce, a dollop of sweetened whipped cream, or even a sprinkle of toasted nuts. You could also make a spiced glaze by adding a tiny bit of cinnamon or pumpkin pie spice to the powdered sugar mixture. For a richer finish, a thin layer of melted chocolate drizzled over the top can be decadent. Just remember to let the cheesecake chill completely before adding any toppings so they don’t melt into it.
Storing and Reheating Tips
Proper storage is key to keeping your delicious pumpkin cheesecake tasting fresh and wonderful. I’ve learned a few things about this over the years, especially when I’ve made it ahead for parties!
Room Temperature: Once it’s fully chilled and set, you can leave the cheesecake uncovered on the counter for about 1-2 hours if you’re serving it. The glaze will start to soften if left out too long, and the cheesecake is best enjoyed slightly chilled anyway. For longer periods, it’s really best to keep it refrigerated.
Refrigerator Storage: This is the best method for keeping your cheesecake fresh. Once it’s completely cooled and set, cover the springform pan tightly with plastic wrap or transfer it to an airtight container. It will stay wonderfully fresh in the refrigerator for up to 4-5 days. The flavors actually tend to deepen and meld more after the first day, making it even more delicious! Just make sure it’s well-covered to prevent it from absorbing any fridge odors.
Freezer Instructions: Yes, you can freeze pumpkin cheesecake! It’s a fantastic way to have a treat on hand for a future craving or event. If you’re freezing the whole cheesecake, make sure it’s completely chilled first. Then, wrap it tightly, first in a layer of plastic wrap, and then in a layer of aluminum foil, or place the plastic-wrapped cheesecake in a freezer-safe container. It will keep well in the freezer for up to 2-3 months. To thaw, remove it from the freezer and let it thaw overnight in the refrigerator. For slices, you can wrap individual slices tightly and freeze them. They thaw much faster that way. Don’t refreeze after thawing.
Glaze Timing Advice: If you plan to store your cheesecake for more than a day, I highly recommend applying the glaze *just before* serving. If you glaze it and then refrigerate it for a long time, the glaze can become sticky or even weep. If you *do* need to store it with the glaze on, ensure it’s tightly covered. For freezing, it’s best to freeze the plain cheesecake and add the glaze (or any other topping) after it has thawed and is ready to be served.
Frequently Asked Questions
Final Thoughts
There you have it, my friend – the recipe for my absolute favorite Pumpkin Cheesecake! I truly hope you give this one a try. It’s more than just a dessert; it’s a little slice of comfort, a way to bring warmth and joy into your kitchen. The creamy, spiced filling, the buttery crust, the sheer perfection of that first bite… it’s just pure bliss. What I love most about it is that it feels incredibly special, yet it’s so approachable to make. It’s the kind of recipe that makes people feel loved and appreciated. If you enjoy this recipe, you might also want to check out my Classic Apple Pie for another taste of fall goodness, or my No-Bake Chocolate Peanut Butter Pie for a different kind of creamy indulgence. I can’t wait to hear what you think! Please, if you make this, leave a comment below and let me know how it turned out, or share your own special tips or variations. Your feedback means the world to me!
Pumpkin Cheesecake
Ingredients
Crust
- 2.5 cups graham cracker crumbs
- 0.25 cup granulated sugar
- 0.75 cup unsalted butter, melted
Cheesecake Filling
- 3 packages cream cheese, softened
- 1.5 cup granulated sugar
- 0.75 cup pumpkin puree
- 4 large eggs
- 0.33 cup sour cream
- 1 teaspoon vanilla extract
- 1 teaspoon pumpkin pie spice
- 0.5 teaspoon cinnamon
- 0.25 teaspoon salt
Instructions
Crust Preparation
- Preheat oven to 350°F (175°C).
- In a medium bowl, combine graham cracker crumbs and granulated sugar. Pour in melted butter and stir until well combined.
- Press the mixture firmly into the bottom of a 9-inch springform pan.
- Bake for 8-10 minutes. Remove from oven and let cool.
Cheesecake Filling Preparation
- In a large bowl, beat cream cheese and granulated sugar until smooth.
- Beat in pumpkin puree, eggs one at a time, sour cream, and vanilla extract until just combined. Do not overmix.
- Stir in pumpkin pie spice, cinnamon, and salt.
- Pour the filling over the prepared crust.
- Bake for 60-75 minutes, or until the center is almost set.
- Turn off the oven and let the cheesecake cool in the oven with the door slightly ajar for 1 hour.
- Remove from oven and let cool completely on a wire rack. Chill in the refrigerator for at least 4 hours before serving.