There are some flavors that just instantly transport me back to my grandmother’s kitchen, and the vibrant, earthy sweetness of her pickled beetroot is absolutely one of them. I can still picture those deep ruby jars lined up on her pantry shelves, shimmering under the dim light. She always said it was “nature’s candy,” and honestly, she wasn’t wrong. Whenever we had a big Sunday roast, a side of her pickled beetroot was non-negotiable. It cut through the richness of the meat so perfectly, adding this delightful tang and a pop of color that made the whole plate sing. It’s funny, because I used to think making pickled beetroot was some sort of ancient art, something only grandmas could master. But I learned her secrets, and let me tell you, it’s surprisingly simple! In fact, this recipe is so straightforward, it’s become my go-to when I want something a little special without a lot of fuss. It’s like a shortcut to that comforting, homemade goodness, and the best part? You probably have most of the ingredients in your pantry already. Forget those bland, vinegary store-bought versions; we’re going to make something truly spectacular.
Thank you for reading this post, don't forget to subscribe!What is pickled beetroot?
So, what exactly are we talking about when I say pickled beetroot? At its heart, it’s simply fresh beetroot that’s been cooked and then preserved in a brine, usually a mix of vinegar, water, sugar, and spices. Think of it as giving those beautiful, humble beets a tangy, slightly sweet makeover that completely transforms their flavor profile. They go from being just a root vegetable to this incredible sweet-tart sensation. My grandma used to call them “pickled jewels” because of their stunning color. It’s essentially a way to capture the best of beetroot season and have that deliciousness on hand all year round. Unlike some other pickled vegetables that can be overwhelmingly sour, a good pickled beetroot has a beautiful balance – the natural earthiness of the beet still shines through, but it’s elevated by that wonderful acidic kick and a hint of sweetness. It’s not just a condiment; it’s a star on its own!
Why you’ll love this recipe?
Honestly, there are so many reasons I keep coming back to this pickled beetroot recipe, and I have a feeling you will too! First off, the flavor. Oh, the flavor! It’s this perfect symphony of sweet and tangy with just a whisper of spice from the peppercorns and bay leaf. The beetroot itself becomes tender but still has a pleasant bite, and that vibrant ruby color just makes everything look so much more appealing. It’s truly a feast for the eyes and the palate. Then there’s the simplicity. I know “pickling” can sound intimidating, but this is genuinely so easy. It’s more about patient simmering than active work. You literally prep the beets, boil them, make a brine, and then let them hang out together. That’s it! And because we’re using basic pantry staples, it’s incredibly cost-effective. A few pounds of beets, some vinegar, sugar, and spices – you can make a big batch for a fraction of what you’d pay at the store. What I love most, though, is its sheer versatility. This isn’t just for your Sunday roast (though it’s divine there!). It’s fantastic in salads, piled high on sandwiches, chopped into dips, or even just eaten straight from the jar with a fork when no one’s looking (guilty!). Compared to other pickled items, like onions or cucumbers, pickled beetroot has a unique depth of flavor that complements so many dishes. It’s also naturally vegan and gluten-free, making it a crowd-pleaser for almost everyone. It’s the kind of thing that makes your everyday meals feel a little more special.
How do I make pickled beetroot?
Quick Overview
This recipe is all about coaxing the best flavor out of simple ingredients. We’ll start by boiling the beets until they’re tender enough to pierce easily with a fork but not mushy. While they’re cooking, we’ll whip up a quick brine of vinegar, sugar, and spices. Once the beets are cooked and cooled enough to handle, we’ll peel and slice them, then immerse them in the warm brine. The magic happens as they sit, allowing the flavors to meld and the beets to absorb that delicious tangy goodness. It’s a hands-off process for the most part, which is always a win in my book!
Ingredients
For the Beets:
2 pounds fresh beets (about 4-5 medium beets)
*Tip: Look for firm, unblemished beets. You can often find them with the greens still attached – those greens are delicious sautéed as a side dish, so don’t toss them! Wash them thoroughly before cooking.*
For the Brine:
2 cups APPLE CIDER vinegar (or white vinegar if that’s what you have)
1 cup water
1 cup granulated sugar
1 tablespoon salt
1 teaspoon black peppercorns
2 bay leaves
Optional: A few strips of fresh ginger or a star anise for an extra layer of flavor.
Step-by-Step Instructions
Step 1: Cook the Beets
Wash your beets really well, scrubbing away any dirt. You don’t need to peel them before cooking – it actually helps them retain their gorgeous color. Place the whole, unpeeled beets in a large pot and cover them with cold water by about an inch. Bring to a boil, then reduce the heat, cover, and simmer for 45-60 minutes, or until they are tender when pierced with a fork. The cooking time will vary depending on the size of your beets.
Step 2: Prepare the Brine
While the beets are cooking, it’s time to make our flavorful brine. In a medium saucepan, combine the Apple Cider vinegar, water, sugar, salt, peppercorns, and bay leaves. If you’re using any optional aromatics like ginger or star anise, add them now. Bring the mixture to a gentle simmer over medium heat, stirring until the sugar and salt are completely dissolved. Let it simmer for about 5 minutes to allow the flavors to meld. Once done, remove it from the heat and let it cool slightly.
Step 3: Peel and Slice the Beets
Once the beets are tender, drain them and rinse them briefly under cool water to make them easier to handle. The skins should slip off with minimal effort. You can use a small paring knife or even just your fingers for this. Be warned, they will stain your hands, so consider wearing gloves if that bothers you! Slice the peeled beets into your desired thickness. I usually go for about 1/4-inch thick rounds, but spears or cubes work wonderfully too. This is where you get to decide how you like them!
Step 4: Combine Beets and Brine
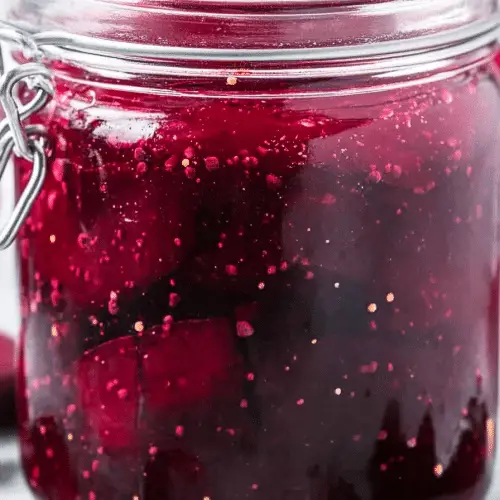
Now for the fun part! Pack your sliced beets snugly into clean, sterilized jars. Leave about a 1/2-inch headspace at the top. Pour the slightly cooled brine over the beets, making sure they are completely submerged. You can remove the bay leaves and peppercorns from the brine if you prefer, but I usually leave them in for extra flavor. Gently tap the jars on the counter to release any air bubbles, and add more brine if needed to ensure the beets are covered.
Step 5: Chill and Marinate
Once the jars are filled and sealed, let them cool to room temperature. Then, transfer them to the refrigerator. The real magic happens as they chill and marinate. For the best flavor, I recommend waiting at least 24 hours before digging in. The longer they sit, the more the flavors develop, becoming richer and more complex. They’re typically best after a few days, and the flavor will continue to deepen over a couple of weeks.
Step 6: Serve and Enjoy!
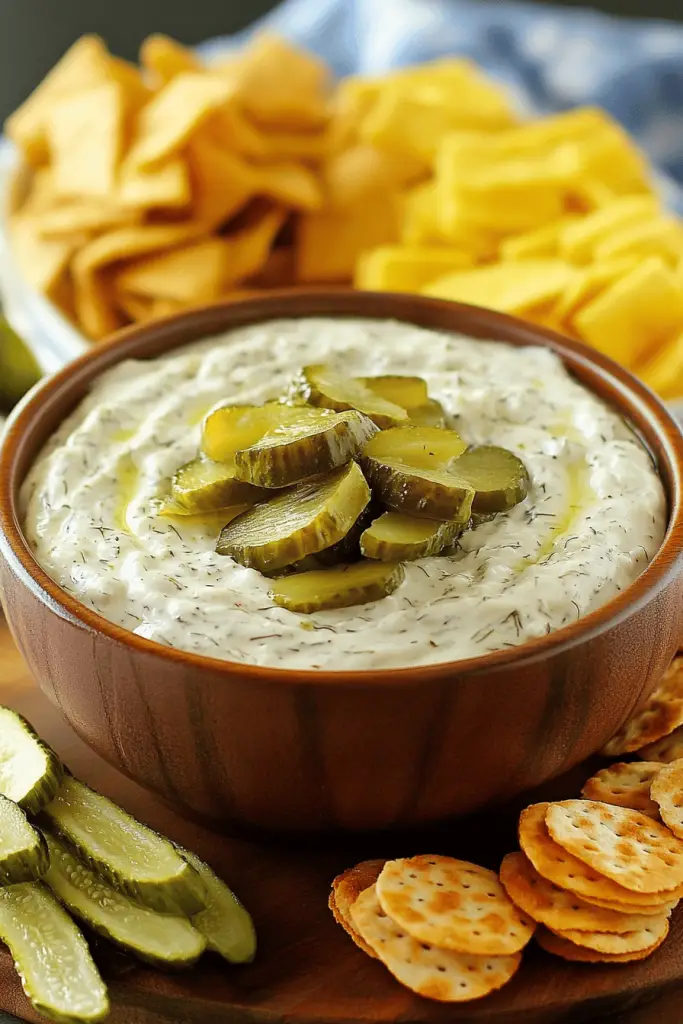
When you’re ready to serve, simply spoon out your delicious pickled beetroot. The brine itself is also incredibly flavorful and can be used as a dressing for salads or as a marinade. Enjoy this vibrant, tangy treat with your favorite meals!
“I don’t know if I’ve ever eaten a better pickled beetroot. The rub alone is wonderful, but the sauce??? Over the top!”
What to Serve It With
Oh, the possibilities are truly endless when it comes to this pickled beetroot! It’s not just a side dish; it’s a flavor enhancer, a vibrant addition that elevates almost anything it touches.
For Breakfast: Sounds a little unusual, right? But trust me! A few slices on top of some scrambled eggs or alongside a simple Breakfast Hash can add a surprising zing that wakes up your taste buds. It’s a fantastic way to sneak in some extra veggies first thing in the morning.
For Brunch: This is where it truly shines. Imagine a beautiful Charcuterie Board with an assortment of cheeses, cured meats, crusty bread, and a jewel-toned bowl of pickled beetroot. It provides that perfect counterpoint to richer, fattier elements. It’s also amazing piled onto avocado toast or alongside a quiche.
As Dessert: Okay, maybe not a traditional dessert, but for those who love a bit of savory with their sweet, it’s incredible. Think of it as an accompaniment to certain types of cheese, especially sharp cheddar or a creamy goat cheese. The tanginess cuts through the richness beautifully. Some people even chop it finely and mix it into a savory cheesecake filling!
For Cozy Snacks: My absolute favorite casual way to enjoy it is straight from the jar with a fork while I’m prepping dinner, or alongside a simple ham and cheese sandwich. It’s also fantastic mixed into a potato salad or layered into a vibrant beet salad with walnuts and feta. My kids, surprisingly, love it mixed into their Tuna Salad for a little color and tang!
It’s the kind of thing that makes people say, “Wow, what’s in this?” It’s a simple addition that makes a big impact.
Top Tips for Perfecting Your Pickled Beetroot
I’ve made this pickled beetroot countless times, and along the way, I’ve picked up a few tricks that I think really make a difference in achieving that perfect balance of flavor and texture. You know how sometimes you make something, and it’s just… okay? These tips are my secret weapon to making it consistently *amazing*.
Beetroot Prep: The most crucial part here is ensuring your beets are cooked *just right*. Overcooked beets turn mushy, and nobody wants that. I always recommend the fork test: if it slides in easily but the beet still holds its shape, it’s perfect. Don’t over-boil! Also, while you don’t have to peel them before cooking, make sure you give them a good scrub. Any lingering dirt can affect the final flavor and appearance. For slicing, I find a mandoline incredibly helpful for getting uniform slices quickly, which ensures they all pickle evenly. If you don’t have one, a sharp knife and steady hand will do just fine!
Brine Balancing: The ratio of vinegar to water to sugar is key. My recipe uses a 2:1:1 ratio of vinegar, water, and sugar. This gives a lovely tang without being overwhelmingly sour, and the sugar balances it out beautifully. If you prefer a tarter pickle, you can increase the vinegar slightly. If you like it sweeter, add a tablespoon or two more sugar. Taste your brine (before adding the beets, of course!) and adjust it to your liking. It’s much easier to fix it now than later. And for the spices – don’t be shy! The peppercorns and bay leaves add a wonderful subtle depth, but feel free to experiment with whole cloves, mustard seeds, or even a pinch of red pepper flakes for a bit of warmth.
Jarring and Sealing: Sterilizing your jars is super important for preservation, even if you plan to eat them relatively quickly. I usually just pop mine through a hot dishwasher cycle or boil them for a few minutes. Make sure your lids are clean and the rims are dry before sealing them tightly. When you pour the brine over the beets, ensure there are no large air pockets. You can run a clean skewer or chopstick around the inside edges of the jar to release trapped air. This ensures the beets are fully submerged and prevents spoilage.
Flavor Infusion Time: Patience is a virtue with pickling! While they are technically safe to eat after 24 hours, the flavors really start to meld and deepen after about 3-4 days. I find the taste is at its peak for me after a week. The beets become beautifully infused with the brine’s flavors, and their natural sweetness harmonizes perfectly with the tang. Try to resist eating them all at once!
Ingredient Swaps: If you don’t have apple cider vinegar, white vinegar works perfectly well. The flavor will be slightly sharper, but still delicious. For the sugar, you could experiment with brown sugar for a deeper, molasses-like note, though it will change the color slightly. Honey or maple syrup can also be used, but again, they will alter the flavor profile. For the beets themselves, make sure they are fresh and firm; avoid any that look soft or have started to sprout.
Baking Tips (for the “why not?” moments): Sometimes I like to roast the beets instead of boiling them. It concentrates their flavor even more and can give a slightly sweeter result. To do this, wrap them individually in foil and roast at 400°F (200°C) for about an hour, or until tender. Then proceed with peeling and slicing. It’s a little more hands-on but totally worth it for a richer flavor.
Glaze Variations: This recipe is for pickled beetroot, but if you’re thinking of other preparations, a simple glaze can be made by reducing some of the pickling liquid with a touch more sugar and maybe a knob of butter for a richer finish. It’s lovely drizzled over roasted beets.
“Packed with flavor and so simple. Exactly what I wanted from this pickled beetroot!”
Storing and Reheating Tips
One of the best things about making pickled beetroot is its shelf life. It’s such a fantastic way to preserve those delicious beets, and I always like to have a jar or two ready to go. Here’s how I usually store mine to keep them tasting their best.
Room Temperature Storage: Once the jars have cooled completely after pickling, and before you open them, they can technically be stored at room temperature. However, I find the quality and flavor are significantly better when they are refrigerated. So, as soon as they’ve cooled down, I move them straight to the fridge. If you are very confident in your sterilizing technique and plan to eat them within a couple of weeks, room temperature *might* be okay, but for safety and best flavor, the fridge is definitely the way to go.
Refrigerator Storage: Once opened, or if you’ve put them in the fridge straight away (which I highly recommend), your pickled beetroot will keep well in the refrigerator for at least 3-4 weeks, and often longer. I’ve had jars that have tasted perfectly delicious even after a couple of months! Always make sure the beets are submerged in the brine. If some have floated to the top, you can add a little extra brine (made with the same vinegar, water, sugar, and salt ratio) or even just a splash of plain vinegar to keep them covered. Use a clean spoon or fork to serve, and reseal the jar tightly after each use. This helps maintain freshness and prevents contamination.
Freezer Instructions: Pickled beetroot isn’t ideal for freezing, especially if you want to maintain its texture. The pickling brine can become a bit watery and the beets can become somewhat mushy after thawing. If you absolutely must freeze it, I would recommend draining off as much brine as possible and storing the beets in an airtight container. However, I honestly advise against it for the best results. Freshly pickled from the fridge is always superior!
Glaze Timing Advice: If you’re making a glaze for serving (like reducing some brine or making a separate syrup), it’s best to do this just before you serve. Glazes can sometimes alter the texture of the pickled beets if left on for too long, especially if they are quite thick or sweet. For most of my serving suggestions, I just use the beets as they are, straight from the jar.
Following these storage tips will ensure you have perfectly tangy, delicious pickled beetroot ready whenever the craving strikes!
Frequently Asked Questions
Final Thoughts
So there you have it – my tried-and-true method for making pickled beetroot that’s bursting with flavor and so simple to achieve. It’s honestly one of those recipes that feels like a little bit of kitchen magic. That vibrant color, the perfect balance of sweet and tangy, and the fact that it lasts for weeks in the fridge makes it a true pantry hero. It’s the kind of thing that can take a simple meal from ordinary to extraordinary with just a spoonful or two. I really hope you give this a try, because for me, it’s more than just a recipe; it’s a taste of home, a connection to family traditions, and a reminder that delicious things don’t always need to be complicated.
If you’re a fan of vibrant, flavorful preserves, you might also enjoy my recipe for quick pickled red onions or my easy refrigerator dill pickles. They’re all about bringing those fresh, bright flavors to your table with minimal fuss. I can’t wait to hear what you think of this pickled beetroot! If you make it, please leave a comment below and let me know how it turned out. And if you have any of your own family tips or variations, I’d love to read them! Happy pickling!
Pickled Beetroot
Ingredients
Main Ingredients
- 0.5 kg Fresh Beetroots
- 0.5 cup White Vinegar
- 0.5 cup Water
- 0.25 cup Granulated Sugar
- 1 tsp Salt
- 0.5 tsp Black Peppercorns
- 1 Bay Leaf
Instructions
Preparation Steps
- Preheat oven to 200°C (400°F). Wash the beetroots thoroughly. Trim off the leaves, but leave about an inch of stem attached to prevent bleeding.
- Wrap each beetroot individually in aluminum foil and place on a baking sheet. Roast for 45-60 minutes, or until tender when pierced with a fork.
- Once cooled slightly, peel the beetroots (the skin should slip off easily). Cut them into bite-sized cubes or slices.
- In a saucepan, combine white vinegar, water, sugar, and salt. Bring to a simmer over medium heat, stirring until sugar and salt are dissolved.
- Add the peppercorns and bay leaf to the pickling liquid. Remove from heat.
- Pack the prepared beetroot into clean, sterilized jars. Pour the hot pickling liquid over the beetroot, ensuring they are fully submerged. Leave about half an inch of headspace.
- Seal the jars tightly and let them cool completely. Refrigerate for at least 24 hours before serving to allow the flavors to meld.


