You know those moments when a craving hits, a serious, can’t-ignore-it craving, and you just need something sweet, something comforting, something that tastes like pure joy? That’s exactly when I reach for this peppermint cookie bar recipe. It’s become my go-to, my secret weapon for holiday parties, bake sales, or even just a Tuesday afternoon pick-me-up. Honestly, if you love a good Chocolate Chip Cookie but want to elevate it with a festive, bright twist, these peppermint cookie bars are about to become your new best friend. They’re like the love child of a classic chewy cookie and a decadent brownie, all wrapped up in one easy-to-make package. My kiddos gobble these up faster than I can bake them, and I’ve lost count of how many times friends have begged me for the recipe after just one bite. It’s just that good. Forget fussy layered cakes or complicated confections; this is the sweet treat that delivers maximum flavor with minimum fuss. And let’s be honest, who doesn’t love a good bar cookie? They’re just so darn forgiving and perfect for sharing (or not!).
Thank you for reading this post, don't forget to subscribe!What are Peppermint Cookie Bars?
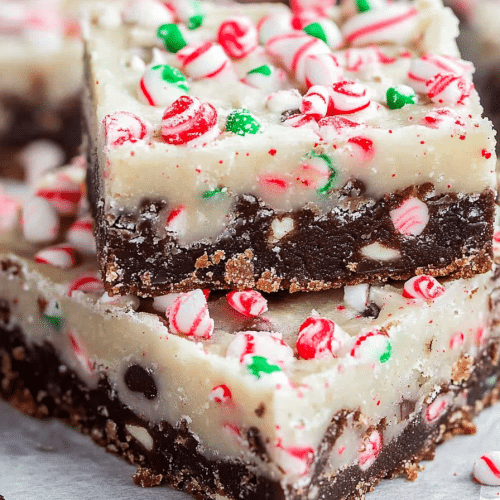
So, what exactly *are* peppermint Cookie Bars? Think of them as your favorite soft, chewy sugar cookie base, but with a delightful pepperminty kick, all baked in a single pan and then topped with a luscious chocolate glaze. It’s essentially a supersized, slab version of a peppermint cookie, making them incredibly easy to slice and serve. The “cookie bar” part means you get that wonderful cookie texture throughout, but without the hassle of scooping individual cookies. The peppermint is subtle enough not to be overpowering, offering a refreshing coolness that perfectly complements the rich chocolate. It’s a flavor combination that just screams winter holidays to me, but honestly, I’ve been known to whip these up any time of year when that minty chocolate craving strikes. It’s a simple concept, really, but the execution is pure magic. It’s that familiar, comforting cookie flavor, but with a delightful little surprise that makes it feel extra special.
Why you’ll love this recipe?
Oh, where do I even begin with why you’re going to adore these peppermint Cookie Bars? First and foremost, the flavor is just out of this world. You get that sweet, buttery cookie base with a subtle hint of refreshing peppermint, all married together with a rich, glossy chocolate glaze. It’s a match made in dessert heaven. And the texture? Imagine a cookie that’s perfectly soft and chewy in the middle, with just a hint of crispness around the edges. It’s truly divine.
Then there’s the simplicity. Seriously, this recipe is a lifesaver on busy nights or when you need to whip up a crowd-pleaser in a flash. You mix everything in one bowl (mostly!), press it into a pan, bake, and glaze. No rolling out dough, no cutting out shapes, no fuss. It’s about as straightforward as baking gets, and the results are consistently fantastic. I’ve been known to make these while simultaneously helping with homework and making dinner – it’s that easy!
Cost-efficiency is another big win here. All the ingredients are pantry staples, which means you probably already have most of what you need on hand. No need for expensive specialty ingredients or last-minute grocery store runs. You get a whole pan of deliciousness for a fraction of the cost of store-bought treats.
And versatility! While they are absolutely sensational on their own, these bars are also incredibly versatile. You can chop up some extra candy canes to sprinkle on top before the glaze sets for an extra festive crunch, or add some chocolate chips to the batter for an even more decadent experience. They’re perfect for bake sales, potlucks, Holiday Cookie platters, or just as a special treat with your afternoon coffee. What I love most about this recipe is that it’s so forgiving. Even if you’re a beginner baker, you’re going to nail this one. It’s the kind of recipe that builds confidence and delivers pure joy with every bite. It’s just so much easier than baking dozens of individual cookies, and you get that wonderful, satisfying cookie experience.
How do I make Peppermint Cookie Bars?
Quick Overview
Making these peppermint Cookie Bars is a breeze! You’ll start by mixing up a simple, buttery cookie dough, then press it into a baking pan. After a quick bake, you’ll top it all off with a sweet, minty chocolate glaze. The whole process from start to finish is surprisingly fast, making it perfect for those last-minute dessert needs. It’s all about simple steps leading to a spectacular outcome, proving that delicious treats don’t need to be complicated.
Ingredients
For the Main Batter:
You’ll need softened unsalted butter – about 1 cup (that’s two sticks). Make sure it’s truly softened, not melted, for the best texture. Then, you’ll need a good cup and a half of granulated sugar. This is what gives them that classic cookie sweetness. We’ll also use one large egg and a teaspoon of pure vanilla extract for flavor depth. For the dry stuff, it’s two and a quarter cups of all-purpose flour, about a teaspoon of baking soda to give them a little lift, and a pinch of salt to balance all that sweetness. And, of course, for that hint of peppermint, we’ll add about half a teaspoon of peppermint extract directly into the batter. Don’t go overboard with the peppermint extract in the batter; we’ll add more in the glaze for a stronger punch!
For the Filling (which is actually part of the batter here!):
In this case, the “filling” is incorporated right into the main cookie batter, so there’s no separate filling to prepare. That’s part of what makes these bars so easy!
For the Glaze:
This is where we really amp up the peppermint goodness! You’ll need about two cups of powdered sugar, sifted if you can, to ensure a super smooth glaze. Then, we’ll add in some milk or cream – start with about two tablespoons and add more, a teaspoon at a time, until you get your desired drizzling consistency. The star of the show here is more peppermint extract – I usually add about 1 to 1.5 teaspoons for a lovely, pronounced minty flavor. You can adjust this based on how minty you like things! Finally, for that beautiful chocolatey finish, you’ll need about half a cup of melted semi-sweet chocolate chips or finely chopped semi-sweet chocolate. Make sure it’s smooth and melted before you stir it into the glaze.
Step-by-Step Instructions
Step 1: Preheat & Prep Pan
First things first, get your oven preheated to 350 degrees Fahrenheit (175 degrees Celsius). While that’s heating up, grab an 8×8 inch baking pan. You’ll want to grease it really well with butter or cooking spray, or even better, line it with parchment paper, leaving some overhang on the sides. This makes lifting the bars out a breeze later on. Trust me, using parchment paper is a game-changer for easy cleanup and removal!
Step 2: Mix Dry Ingredients
In a medium bowl, whisk together your all-purpose flour, baking soda, and salt. Just a quick whisk to make sure everything is evenly distributed. This prevents pockets of baking soda or salt in your cookies, which nobody wants!
“New family favorite! This Peppermint Cookie Bar Delights was so flavorful and ridiculously easy. Crowd-pleaser for sure.”
Step 3: Mix Wet Ingredients
In a large bowl, cream together the softened butter and granulated sugar until it’s light and fluffy. This usually takes a few minutes with an electric mixer, or a bit longer if you’re doing it by hand. Then, beat in the egg and vanilla extract until well combined. Stir in the peppermint extract for the batter.
Step 4: Combine
Now, gradually add the dry ingredients to the wet ingredients, mixing on low speed (or stirring with a spatula) until just combined. Be careful not to overmix here! Overmixing can lead to tough cookies. You want to stop as soon as you don’t see any more dry flour streaks. The dough will be thick and wonderfully fragrant.
Step 5: Prepare Filling
As I mentioned, there’s no separate filling for this recipe! The peppermint flavor is already in the batter, and the chocolate glaze comes at the end.
Step 6: Layer & Swirl
Spoon the Cookie Dough into your prepared baking pan. It will be thick, so use a spatula or your fingers (lightly greased if they’re sticky) to press it evenly into the bottom of the pan. Make sure it’s distributed uniformly so it bakes evenly.
Step 7: Bake
Bake for about 20-25 minutes, or until the edges are lightly golden brown and a toothpick inserted into the center comes out clean or with a few moist crumbs attached. Keep an eye on them in the last few minutes, as oven temperatures can vary! You want them baked through but still wonderfully soft and chewy.
Step 8: Cool & Glaze
Let the bars cool in the pan on a wire rack for at least 15-20 minutes. While they’re cooling, whisk together the powdered sugar, milk/cream, and peppermint extract for the glaze until smooth. Stir in the melted chocolate. If the glaze is too thick, add a tiny bit more milk; if it’s too thin, add a bit more powdered sugar. Once the bars have cooled slightly, pour the glaze over the top and spread it evenly. If you like, you can sprinkle some crushed candy canes on top before the glaze sets!
Step 9: Slice & Serve
Let the glaze set completely (this can take another 30 minutes or so). Then, use the parchment paper overhang to lift the entire slab out of the pan. Place it on a cutting board and slice into squares or bars. I usually cut mine into 16 squares. Serve and enjoy!
What to Serve It With
These peppermint Cookie Bars are pretty much a standalone star, but they do play exceptionally well with others! For a cozy breakfast treat, I love pairing them with a steaming mug of coffee or a rich hot chocolate. The warmth of the drink and the sweetness of the bar are just heavenly on a chilly morning. Sometimes, I’ll even break a small piece off and dunk it – don’t judge!
For a more elegant brunch spread, especially around the holidays, these bars are fantastic arranged on a platter alongside fresh berries and maybe some mini quiches. A glass of chilled sparkling cider or even a light mimosa would be a lovely accompaniment. They add that touch of festive sweetness without being too heavy.
As a dessert, they’re a dream. Serve them alongside a scoop of vanilla bean Ice Cream for a delightful contrast, or with a rich dark chocolate mousse for ultimate decadence. A small glass of milk is also a classic for a reason, and these bars definitely earn that treat.
And for those casual, cozy snack moments? They’re perfect! Grab one (or two!) with a glass of cold milk after school, or enjoy one with a cup of herbal tea in the evening. They’re the perfect size for satisfying a sweet tooth without feeling like you’ve overdone it. My family tradition is to have one of these with a big glass of milk after we’ve decorated the Christmas Tree. It just feels like the official start of the cozy season!
Top Tips for Perfecting Your Peppermint Cookie Bars
I’ve made these peppermint Cookie Bars countless times, and through all those batches, I’ve picked up a few tricks that I think really make a difference. For the batter, the key is the butter. Make sure it’s properly softened – about room temperature, where it yields easily to your finger but isn’t greasy. Creaming the butter and sugar until it’s truly light and fluffy is crucial for that tender cookie texture. Don’t rush this step! It incorporates air, which is essential.
When you’re combining the wet and dry ingredients, really heed the “don’t overmix” advice. As soon as the flour streaks disappear, stop. Overmixing develops the gluten in the flour too much, leading to tough, dense bars instead of the soft, chewy ones we’re after. A few lumps are totally fine and actually preferable!
For the glaze, consistency is everything. I always start with the lower amount of liquid and add more just a teaspoon at a time until I reach a drizzling consistency that’s not too runny and not too thick. If you accidentally make it too thin, don’t panic! You can always whisk in a little more powdered sugar to thicken it up. And for the peppermint extract, start with what the recipe calls for, but don’t be afraid to taste and adjust. My preference is for a noticeable but not overwhelming mint flavor, and I find 1 to 1.5 teaspoons of good quality peppermint extract does the trick for the glaze. Remember, you can always add more, but you can’t take it away!
I’ve experimented with ingredient swaps too. If you don’t have regular milk for the glaze, half-and-half or even heavy cream will work beautifully and make it extra rich. For the chocolate in the glaze, good quality semi-sweet chocolate chips melt smoothly and give a great flavor. If you prefer a darker chocolate taste, feel free to use dark chocolate chips instead.
“The Peppermint Cookie Bar Delights turned out amazing. My kids asked for seconds. Saving this one!”
When it comes to baking, the biggest variable is your oven. I always recommend using an oven thermometer to ensure your oven is actually at 350 degrees. Also, be mindful of how you position your pan. Baking on the center rack usually gives the most even results. And the toothpick test is your best friend. You want a few moist crumbs clinging to it, not wet batter, but also not completely clean and dry, which can indicate overbaking.
Finally, a little tip on slicing: if the glaze is still a little soft, you can pop the whole pan into the refrigerator for about 15-20 minutes to help it firm up before slicing. This makes for much cleaner cuts. A sharp knife is also key. Sometimes I wipe the knife clean between cuts for the neatest edges.
Storing and Reheating Tips
These peppermint cookie bars are wonderfully forgiving when it comes to storage, which is another reason I love them. At room temperature, they’ll stay fresh and delicious for about 3 to 4 days, especially if you keep them in an airtight container. I usually store them in a container with a lid, or I’ll wrap the pan tightly with plastic wrap. They tend to stay nice and soft this way. They’re perfect for leaving out for guests to nibble on throughout the day.
If you need them to last a bit longer, or if your kitchen is particularly warm, the refrigerator is your friend. Pop them into an airtight container, and they’ll keep well in the fridge for up to a week. The texture might firm up a little in the fridge, but they’re still absolutely delicious. They’re actually quite refreshing when served cold!
And for true make-ahead magic, these bars freeze like a dream! Once they’re completely cooled and the glaze is set, you can cut them into squares and freeze them individually wrapped in plastic wrap, then placed in a freezer-safe bag or container. They’ll keep beautifully for up to 2-3 months. When you’re ready to enjoy them, just transfer them to the refrigerator to thaw overnight, or let them come to room temperature on the counter for a few hours.
A quick note on the glaze: I find it holds up best when applied after the bars have cooled and are ready to be stored at room temperature or in the fridge. If you plan to freeze them, you can either glaze them before freezing or add the glaze after thawing. Glazing them before freezing usually works best, as the glaze firms up nicely in the freezer. Just ensure everything is completely cooled and set before wrapping for the freezer.
Frequently Asked Questions
Final Thoughts
I truly hope you give these peppermint cookie bars a try. They’re more than just a dessert; they’re a little piece of comfort, a burst of festive cheer, and a guaranteed crowd-pleaser. The way the buttery cookie base melts in your mouth, followed by that cool hint of peppermint and the rich chocolate, is just pure bliss. They’re proof that you don’t need complicated techniques or exotic ingredients to create something truly special and delicious. They’re my go-to when I want to impress without stressing, and I have a feeling they’ll become a favorite in your kitchen too.
If you love this recipe, you might also enjoy my other holiday treats or my collection of easy bar cookies. They’re all designed to bring maximum flavor with minimum fuss, just like these peppermint beauties.
I can’t wait to hear how yours turn out! Please leave a comment below to share your experience, any variations you tried, or just to say hello. Your feedback makes my day!
peppermint cookie bar
Ingredients
Cookie Bar Base
- 1 cup unsalted butter softened
- 1 cup granulated sugar
- 0.5 cup light brown sugar packed
- 0.5 teaspoon kosher salt
- 2 large eggs
- 1 teaspoon vanilla extract
- 2 cups all-purpose flour
- 0.5 cup unsweetened cocoa powder
- 1 teaspoon baking soda
- 15 cookies Oreos crushed
- 1.5 cups red and green M&M's or chocolate chips
Peppermint Fudge Topping
- 14 ounce sweetened condensed milk 1 can
- 2 Tablespoons unsalted butter
- 12 ounce Ghirardelli white chocolate wafers
- 12 candy canes peppermint candy canes crushed
Instructions
Preparation Steps
- Preheat oven to 375°F (190°C). Line a 15x10x1 inch baking sheet with parchment paper, leaving an overhang on the sides for easy removal.
- In a large bowl, beat the softened butter, granulated sugar, light brown sugar, and kosher salt with an electric mixer until light and creamy.
- Add the eggs one at a time, mixing well after each addition. Stir in the vanilla extract.
- In a separate bowl, whisk together the all-purpose flour, unsweetened cocoa powder, and baking soda. Gradually add the dry ingredients to the wet ingredients, mixing until just combined. The batter will be thick.
- Fold in the crushed Oreos and M&M's.
- Press the cookie dough evenly into the prepared baking sheet. Bake for 15-20 minutes, or until the edges are set and the center is soft. It will continue to set as it cools. Remove from oven and let cool slightly.
- While the bars are baking, prepare the white chocolate fudge. In a small saucepan over medium heat, combine the sweetened condensed milk and 2 tablespoons of unsalted butter. Stir constantly with a whisk until butter is melted and mixture is warm.
- Remove from heat and immediately add the white chocolate wafers. Stir until the white chocolate is completely melted and the mixture is smooth, about 2 minutes.
- Pour the warm white chocolate fudge over the still-warm cookie bars and spread evenly. Immediately sprinkle with the crushed peppermint candy canes.
- Allow the bars to cool completely and set, about 30 minutes at room temperature or faster in the refrigerator. Once set, lift the bars out of the pan using the parchment paper overhang, slice into squares, and serve.


