If I had to pick my all-time favorite cookie, it would be these peanut butter cookies—no contest. There’s something downright addictive about their soft, chewy center paired with that slightly crispy edge, all infused with the rich, nutty flavor of peanut butter. I remember the first time I made them during a rainy weekend, and the smell alone filled the house—imagine warm, toasted peanuts with a hint of vanilla drifting through the air. My kids ask for these all the time, and honestly, I do too. They’re the kind of cookie that’s perfect when you’re craving a sweet something but don’t want to fuss over complicated recipes. Plus, they’re so quick to whip up that I always do this when I need a little comfort or an instant treat. Trust me, once you get the hang of it, you’ll turn to these over and over—because good things really do come in small, peanut buttery packages.
Thank you for reading this post, don't forget to subscribe!What is peanut butter cookies?
Think of peanut butter cookies as the best friend of your cookie platter—simple, satisfying, and downright irresistible. It’s essentially a cookie that spotlights the luscious, nutty flavor of peanut butter, with a tender crumb that melts in your mouth. The name’s pretty straightforward, but what makes these cookies special is their slightly chewy texture combined with a bit of a crisp edge. They originally gained popularity in the United States in the early 20th century as a way to make a quick, protein-packed snack, and somehow that tradition stuck. It’s the kind of cookie that feels like a warm hug, especially when freshly baked and still a little steamed from the oven. Think of it as a classic, comfort food that pairs well with a glass of milk or a cup of coffee, perfect for everything from kids’ lunchboxes to evening indulgence.
Why you’ll love this recipe?
What I love most about these peanut butter cookies is how they hit all the right notes with minimum fuss. First off, the flavor—rich, slightly salty, with a deep peanutty goodness that’s honestly hard to beat. It’s like a spoonful of peanut butter in cookie form, but not overdone—just perfectly balanced. The texture is another win; they’re chewy but with a satisfying crispness on the edges, and that soft interior makes every bite melt in your mouth. Plus, this recipe is stupidly easy. No fancy equipment, no rest times, just mix, scoop, and bake. It’s a lifesaver on busy nights or when friends drop by unexpectedly. Budget-wise, it’s a win too since most ingredients are pantry staples—peanut butter, sugar, flour, eggs. And if you’re feeling creative, you can add chocolate chips, chopped nuts, or even a sprinkle of sea salt on top. Honestly, what I love most about this is that it’s kind of a canvas—simple yet endlessly customizable. Everyone at my house asks for these, and I love how forgiving they are, so even if you’re not a baking pro, you’ll end up with a batch that looks and tastes like a million bucks.
How do I make peanut butter cookies?
Quick Overview
This recipe is as straightforward as it gets—a one-bowl wonder that comes together in minutes. You start by mixing your wet ingredients, adding in the dry, forming a dough, and then shaping your cookies. I love to press a crosshatch pattern on top with a fork—it’s a classic look and helps them bake evenly. Bake until just golden around the edges, cool slightly, and then enjoy that irresistible aroma filling your kitchen. The best part? They’re ready in about 20 minutes, making them perfect for last-minute sweet cravings or when you just need a comforting treat fast.
Ingredients
For the Main Batter:
– 1 cup creamy peanut butter (natural or processed—your choice, but I prefer natural for extra flavor)
– 1 cup sugar (white or brown sugar, depending on your sweetness preference)
– 1 large egg
– 1 teaspoon vanilla extract
– 1 1/4 cups all-purpose flour
– 1/2 teaspoon baking soda (for a little lift)
– Pinch of salt (if using unsalted peanut butter)
For the Filling (Optional):
– Chocolate chips or chopped Reese’s cups (if you want to add some extra decadence)
– Chopped nuts (peanuts or almonds for crunch)
– A drizzle of melted chocolate for glazing
For the Glaze (Optional):
– 1/2 cup powdered sugar
– 1-2 teaspoons milk or cream
– A splash of vanilla or a sprinkle of sea salt
“New family favorite! This Nutty Spider Cookies How to Make Them was so flavorful and ridiculously easy. Crowd-pleaser for sure.”
Step-by-Step Instructions
Step 1: Preheat & Prep Pan
Start by preheating your oven to 350°F (175°C). Line baking sheets with parchment paper or silicone mats—trust me, this makes cleanup a breeze and prevents sticking. If your cookie sheet tends to run hot, consider moving it to the middle rack for even baking.
Step 2: Mix Dry Ingredients
In a small bowl, whisk together the flour, baking soda, and salt. Set aside. This step ensures your dry ingredients are evenly distributed—important for uniform baking and avoiding any pockets of baking soda or salt.
Step 3: Mix Wet Ingredients
In a larger bowl, combine the peanut butter, sugar, egg, and vanilla. Use a spatula or hand mixer to blend everything until smooth and slightly fluffy. The dough will look quite thick but sticky—that’s perfect.
Step 4: Combine
Add the dry ingredients to the wet mixture, stirring gently until just combined. Be careful not to overmix—overworking the dough can make the cookies tough. If it feels a little thick, that’s totally normal; it helps the cookies hold their shape.
Step 5: Prepare Filling
If you’re adding chocolate chips or nuts, fold them into the dough now. This is also where you could roll in chopped candies or other goodies—whatever makes your heart happy.
Step 6: Layer & Swirl
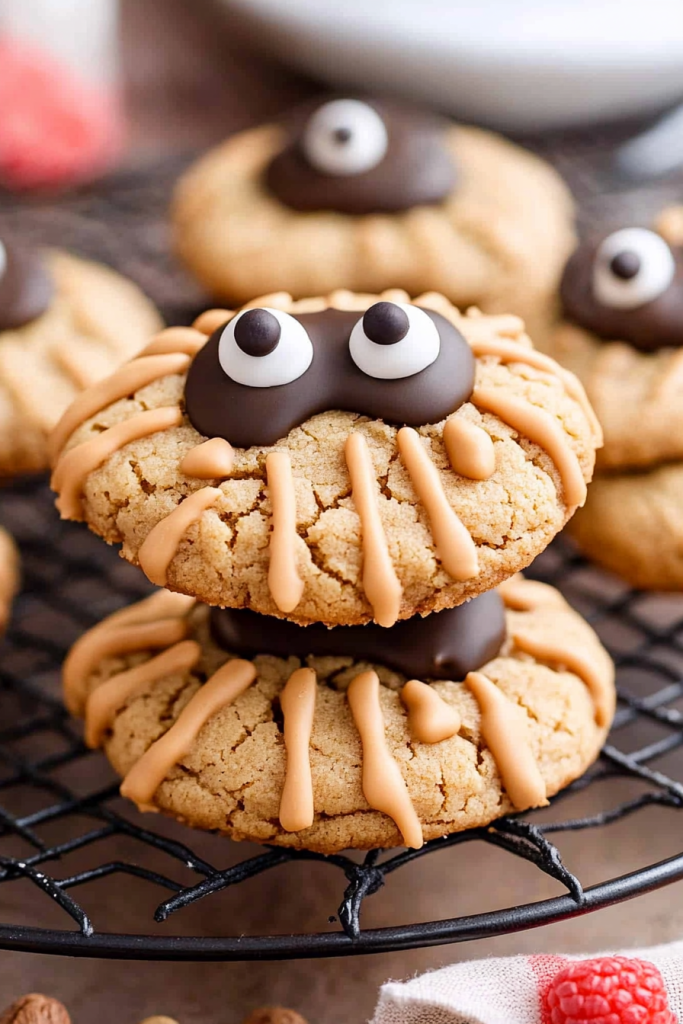
Use a cookie scoop or your hands to grab a tablespoon-sized piece of dough. Roll into a ball, place on the baking sheet, and flatten slightly with the back of a fork. For the classic crosshatch pattern, press down gently with a fork twice across each cookie: first horizontally, then vertically. I love to sprinkle a tiny pinch of sea salt on top here—it balances the sweetness beautifully.
Step 7: Bake
Pop the tray into your preheated oven and bake for 8-10 minutes, or until edges are golden brown but centers still look soft. Keep an eye—they can go from perfect to overdone quickly. Every oven is different, so your first batch might need a minute or two less or more. Let them sit for a minute on the pan—they’ll firm up just enough—and then transfer to a wire rack.
Step 8: Cool & Glaze
Allow your cookies to cool slightly before glazing or serving. If you’re glazing, mix powdered sugar with a splash of milk and vanilla—stir until smooth. Drizzle over the cooled cookies or dip the tops for a shiny, sweet finish. I like to wait until they’re just warm so the glaze melts into the surface beautifully.
“Made the Nutty Spider Cookies How to Make Them tonight and wow — perfect weeknight dinner. Will definitely make again!”
Step 9: Slice & Serve
This is the hardest part—waiting! Once cooled, these cookies are perfect for stacking in a tin or pretty plate. They’re delicious warm, but honestly, they’re even better the next day when the flavors have settled. My family loves them with a glass of cold milk or a cup of strong coffee. Sometimes, I’ll freeze a batch for when the craving hits—just let them thaw at room temperature for a few minutes before digging in.
What to Serve It With
Peanut butter cookies are pretty versatile, so I often serve them in different ways depending on the occasion. For a quick coffee break, I’ll pair them with a steaming mug of black coffee or a frothy cappuccino—the salty-sweet combo is just divine. For brunch, I love stacking a few on a pretty plate with some fresh berries and a dollop of whipped cream. When I want to elevate them as a special dessert, I’ll add a drizzle of caramel or a scoop of vanilla ice cream—they’re fabulous warm and gooey. And for cozy evenings, I toss a handful of chocolate chips into the dough and serve with hot cocoa—trust me, this disappears in minutes at my house. I’ve even made cookie sandwiches by spreading a little jam or Nutella between two cookies. Basically, these cookies are the baking version of a warm hug, and I love how adaptable they are for all sorts of treats.
Top Tips for Perfecting Your Peanut Butter Cookies
Over the years, I’ve learned a few tricks to make these cookies even better. First, if your peanut butter is very oily or chunky, give it a good stir before measuring—this helps prevent spreading too much during baking. I always do this one trick: refrigerate the dough for about 15 minutes before baking. It sounds extra, but it really helps the cookies keep their shape and prevents them from spreading too flat. If you want them extra chewy, add a teaspoon of honey or a splash of milk to the dough. Now, the swirl pattern—don’t be afraid to get creative. I try different crossing patterns, or even pressing a fork in a zig-zag fashion for a rustic look. For ingredient swaps, I’ve tested almond butter, which makes a slightly richer cookie, and coconut sugar, which adds a nice caramel note. Just be mindful that these swaps may alter the texture or sweetness slightly. Also, baking is all about texture. Every oven bakes differently, so keep an eye, especially after 8 minutes. You want the edges to be beautifully golden but the centers to remain soft. As for the glaze—sometimes I skip it altogether or add a sprinkle of flaky sea salt on top to cut through the sweetness. It’s all about personal touches and finding what makes your taste buds happy. Surprisingly, I’ve even tested adding a few oats for a heartier feel, and let me tell you—absolutely amazing! The key here is to stay flexible and have fun with it. Baking should be relaxed, imperfect, and most of all delicious.
Storing and Reheating Tips
These cookies are sturdy but best enjoyed fresh, although they store well with the right methods. If you’re not planning to gobble them all immediately, let them cool completely then store them in an airtight container at room temperature. They’ll stay soft and chewy for about 3-4 days—cover them tightly to keep that perfect texture. If you want to keep them for longer, pop the container into the fridge for up to a week, but keep in mind they might lose some of their softness; popping them in the microwave for 10-15 seconds can revive that gooey warmth. For freezing, wrap the cookies individually in plastic wrap or place them in a freezer bag, making sure to squeeze out as much air as possible. They’ll keep well for up to 3 months—perfect for stash-it-away moments. When you’re ready to enjoy, let them thaw at room temperature or warm them up for a few seconds in the microwave for that just-baked feel. If you’ve glazed them, I recommend waiting to add the glaze until they’re completely cooled—otherwise, the glaze can become too runny or melt completely off.
Frequently Asked Questions
Final Thoughts
If I’ve learned anything over years of baking, it’s that some recipes just become part of the family fabric—these peanut butter cookies are definitely one of those. They remind me of lazy Sunday afternoons, school snacks, and impromptu gatherings with friends. They’re simple, warm, and satisfying—and honestly, one of the easiest ways to bring a smile to someone’s face. Don’t be shy to make these your own—double the chocolate, add a sprinkle of sea salt, or even fold in some crushed pretzels for a salty twist. Once you’ve baked a batch or two, you’ll see—they’re so much more than just a cookie; they’re a little piece of happiness. I can’t wait to hear how yours turn out—please leave a comment below or share your variations. Happy baking, and enjoy every crumb!
peanut butter cookies
Ingredients
Main Ingredients
- 0.5 cup unsalted butter
- 0.5 cup granulated sugar
- 0.5 cup brown sugar
- 0.5 cup creamy peanut butter
- 1 large egg
- 1 teaspoon vanilla extract
- 1.75 cups all-purpose flour
- 1 teaspoon baking soda
- 0.5 teaspoon salt
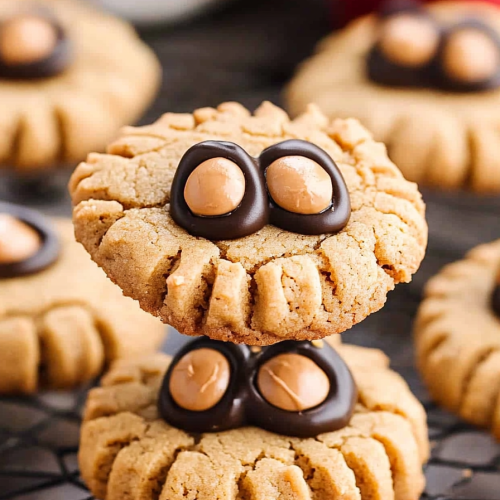
- 25 pieces mini reese’s cups
- 1 bottle Black cookie icing
- 25 pairs candy eyes
Instructions
Preparation Steps
- Add the butter and sugars to a large mixing bowl. Use an electric mixer to beat them together on medium speed for about 2-3 minutes. Once creamed, add in the peanut butter and mix again on medium speed until combined.
- Then, add the egg and vanilla extract and beat on a low speed until just combined.
- Add in the flour, baking soda, and salt. Mix again on a low speed.
- Shape the cookie dough into a disc and wrap in plastic wrap. Place in the refrigerator for one hour to chill. Place the mini reese’s cups in the refrigerator to also chill.
- After the cookie dough has been chilling for one hour, preheat the oven to 350°F and line two baking sheets with parchment paper.
- Create 1-inch balls of dough and place them on the baking sheet about two inches apart. Bake for 10-11 minutes, just until the cookies begin to crack. While baking, unwrap the reese’s cups and keep refrigerated.
- As soon as the cookies come out of the oven, gently press a reese’s cup into the center of each cookie. Move to a cooling rack.
- Once cookies are cool, pipe on the spider’s legs and attach the candy eyes to create fun Halloween decorations.


