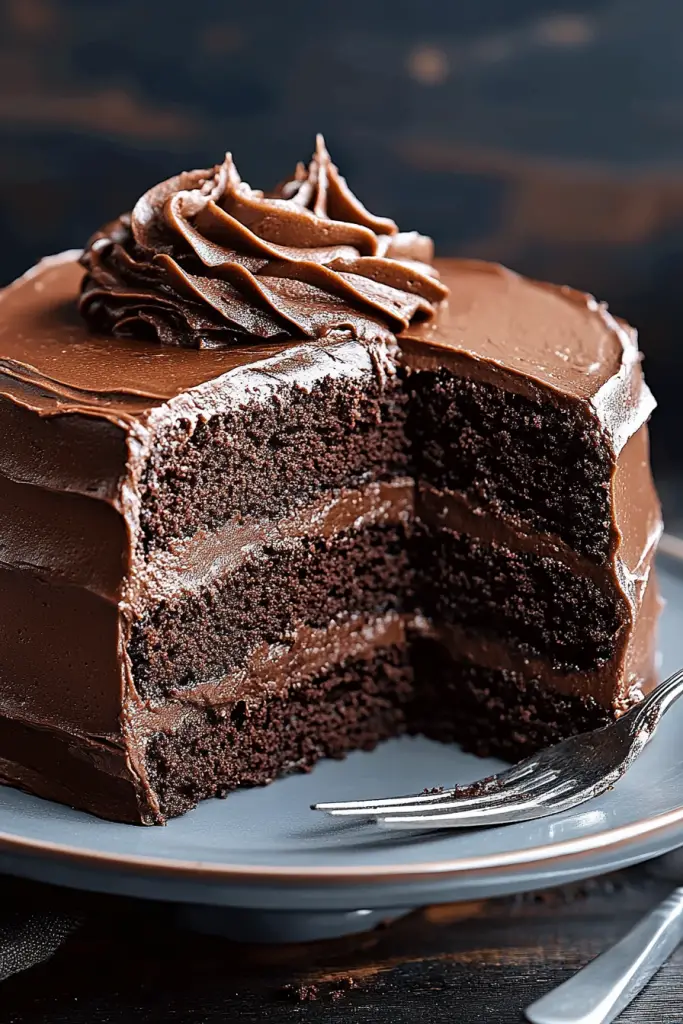
Oh, these cupcakes. Where do I even begin? If you’ve been searching for that elusive *perfect* chocolate cupcake – the kind that’s impossibly moist, ridiculously chocolatey, and melts in your mouth like a dream – then darling, you’ve found it. These aren’t just any Chocolate Cupcakes; they’re my go-to, my lifesaver, the recipe that my family begs for on repeat. They’re the reason I discovered that sometimes, the simplest ingredients create the most magical results. I’ve spent years tinkering, tasting, and occasionally lamenting over batches that just didn’t hit the mark. But this one? This one is a keeper. It’s like a warm hug in cupcake form, and honestly, it’s probably better than a whole cake because you get that perfect frosting-to-cake ratio in every single bite. Forget those dry, crumbly disappointments. Get ready for pure chocolate bliss.
Thank you for reading this post, don't forget to subscribe!What are the best chocolate cupcakes?
So, what exactly makes these “The Moistest Chocolate Cupcakes”? Well, it’s a combination of a few clever tricks and super accessible ingredients that work in perfect harmony. Think of it as your classic chocolate cupcake, but elevated. It’s essentially a single-bowl wonder (mostly!) that packs a serious chocolate punch without being overly sweet or dense. The magic really lies in how we coax out maximum moisture and flavor from simple pantry staples. It’s the kind of recipe you can whip up on a Tuesday when a chocolate craving hits hard, or effortlessly scale up for a birthday party. No complicated techniques, no obscure ingredients – just pure, unadulterated chocolate goodness that happens to be incredibly moist. It’s the friendly neighbor of chocolate cakes, always there to save the day with its comforting, rich flavor.
Why you’ll love this recipe?
Honestly, if I had to pick just one reason to make these, it would be the texture. They are unbelievably moist. Like, “how is this possible?” moist. That’s because we’re using a secret weapon: buttermilk and a touch of oil, which together create an unbelievably tender crumb that stays that way for days. But it’s not just about the moisture. The flavor is intensely chocolatey, a deep, rich cocoa taste that isn’t overpowering. It’s sophisticated enough for grown-ups but totally kid-approved (my kids devour these!).
And the simplicity! I’m all about making baking accessible, and this recipe is surprisingly forgiving. You can practically make the batter in one bowl. No separating eggs, no fancy equipment needed. Just mix, bake, and enjoy. Plus, the ingredients are super budget-friendly. You likely have most of them in your pantry right now, which is always a win in my book. What I love most about this is its versatility. While they’re divine on their own, they’re a blank canvas for your favorite frosting. They’re perfect for those moments when you want something special but don’t have hours to spend in the kitchen. They’re the kind of cupcakes that make people ask, “What’s your secret?” and you can happily say, “It’s just a really good recipe!”
How do I make the best chocolate cupcakes?
Quick Overview
This is your shortcut to chocolate heaven. We’re talking about a straightforward process that involves whisking together dry ingredients, then adding your wet components to create a smooth, luscious batter. The key is gentle mixing to keep everything tender. They bake up beautifully, filling your kitchen with an irresistible aroma. Once cooled, they’re ready for a simple, decadent glaze. It’s a foolproof method designed for maximum flavor and minimum fuss, ensuring moist, delightful cupcakes every single time.
Ingredients
For the Main Batter:
2 cups all-purpose flour: I always opt for unbleached flour for a slightly better texture, but all-purpose works beautifully here.
1 ¾ cups granulated sugar: This provides sweetness and contributes to the moist texture.
¾ cup unsweetened cocoa powder: Use a good quality one! It’s the star of the show. Dutch-processed cocoa gives a richer, darker flavor and color, but natural cocoa works too.
1 ½ teaspoons baking soda: Our leavening agent, ensuring a nice lift.
1 teaspoon baking powder: A little extra lift and tenderness.
1 teaspoon salt: Balances the sweetness and enhances the chocolate flavor.
2 large eggs: Room temperature eggs incorporate better, so take them out of the fridge about 30 minutes before you start.
1 cup buttermilk: This is crucial for that signature moistness! If you don’t have any, you can make a quick substitute by adding 1 tablespoon of white vinegar or lemon juice to 1 cup of milk and letting it sit for 5-10 minutes.
½ cup vegetable oil: Or any neutral-flavored oil like canola. This is another key player in keeping them Super Moist!
2 teaspoons vanilla extract: Never skimp on vanilla; it rounds out all the flavors.
1 cup hot water or hot brewed coffee: Coffee intensifies the chocolate flavor without making it taste like coffee, I promise! But hot water works perfectly fine too.
For the Filling (Optional but highly recommended!):
½ cup semi-sweet chocolate chips: Or dark chocolate, whatever you prefer!
2 tablespoons heavy cream: To make the chips melt into a gooey center.
“Made the moist chocolate cupcakes tonight and wow — perfect weeknight dinner. Will definitely make again!”
For the Glaze:
1 ½ cups powdered sugar: Sifted to avoid lumps.
¼ cup unsweetened cocoa powder: Again, good quality makes a difference!
3-4 tablespoons milk or heavy cream: Start with 3 and add more until you reach your desired consistency.
1 teaspoon vanilla extract: For that extra touch of flavor.
Pinch of salt: To balance the sweetness.
Step-by-Step Instructions
Step 1: Preheat & Prep Pan
First things first, let’s get your oven all warmed up to 350°F (175°C). Line a standard 12-cup muffin tin with cupcake liners. I always use paper liners because they make cleanup a breeze, but you could also grease and flour your muffin tin if you prefer. Make sure you have all your ingredients measured out and ready to go. Baking is so much more enjoyable when you’re not frantically searching for things!
Step 2: Mix Dry Ingredients
In a large bowl, whisk together the flour, granulated sugar, cocoa powder, baking soda, baking powder, and salt. Give it a good whisk for at least 30 seconds. This step is important because it ensures all your dry ingredients are evenly distributed, which helps the cupcakes rise evenly and prevents any pockets of baking soda or salt. You want everything to be well combined and looking like a lovely, uniform sandy mixture.
Step 3: Mix Wet Ingredients
In a separate medium bowl (or a large measuring cup), whisk together the eggs, buttermilk, vegetable oil, and vanilla extract. Just whisk them until they’re well combined and slightly frothy. Don’t over-beat them, just get them happily acquainted.
Step 4: Combine
Now, pour the wet ingredients into the bowl with the dry ingredients. Using a whisk or a rubber spatula, gently mix until *just* combined. There will still be some lumps, and that’s perfectly okay! The key here is *not* to overmix. Overmixing develops the gluten in the flour, which can lead to tough cupcakes, and we definitely don’t want that. Once you’ve incorporated the wet into the dry, it’s time for the hot liquid.
Slowly pour in the hot water or hot brewed coffee while whisking continuously. The batter will become quite thin, and this is exactly what you want! This thin batter is a big part of why these cupcakes are so incredibly moist. Whisk until the batter is smooth and no dry streaks remain. It should look like melted chocolate. Again, don’t go crazy with the whisking, just until it’s combined.
Step 5: Prepare Filling (If using)
If you’re adding that gooey chocolate center, now’s the time to get it ready. In a small bowl, combine the chocolate chips and heavy cream. Microwave in 30-second intervals, stirring in between, until the chocolate is melted and smooth. Alternatively, you can gently melt them over a double boiler. Let this mixture cool slightly while you fill your cupcake liners.
Step 6: Layer & Swirl
Now for the fun part! Fill each cupcake liner about two-thirds full with the chocolate batter. If you’re adding the chocolate filling, spoon about a teaspoon of the melted chocolate mixture into the center of each cupcake. Then, carefully top with a little more batter, just enough to cover the filling and keep the liners about two-thirds full. You don’t want them overflowing!
Step 7: Bake
Pop your muffin tin into the preheated oven. Bake for 18-22 minutes, or until a wooden skewer or toothpick inserted into the center of a cupcake comes out clean. Baking time can vary slightly depending on your oven, so keep an eye on them. They should spring back lightly when touched.
Step 8: Cool & Glaze
Once baked, let the cupcakes cool in the muffin tin for about 5-10 minutes. This allows them to set up properly. Then, carefully transfer them to a wire rack to cool completely. Patience is key here – you don’t want to glaze warm cupcakes, or the glaze will just melt off! While they’re cooling, whisk together the powdered sugar, cocoa powder, vanilla extract, and salt in a medium bowl. Gradually add the milk or cream, one tablespoon at a time, whisking until you achieve a smooth, pourable glaze. If it’s too thick, add a tiny bit more liquid; if it’s too thin, add a little more powdered sugar.
Step 9: Slice & Serve
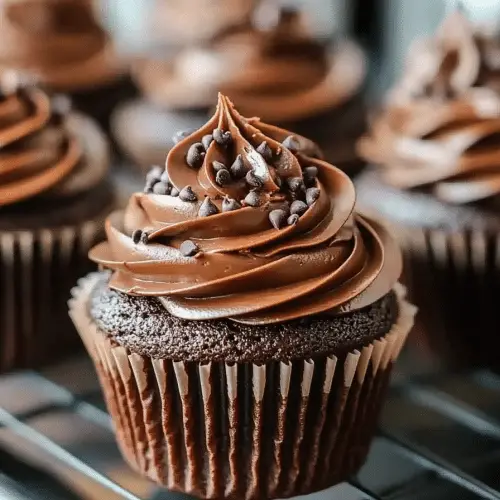
Once the cupcakes are completely cool, it’s time to glaze them! You can dip the tops into the glaze, spoon it over, or even use a piping bag for more control. Let the glaze set for a few minutes, and then… enjoy! These are best served at room temperature, but they’re also amazing straight from the fridge if you’ve been storing them. The texture is just incredible, no matter the temperature.
What to Serve It With
These chocolate cupcakes are stars on their own, but they also play wonderfully with others! Here are a few ideas for how to serve them:
For Breakfast: Okay, hear me out! A single, small chocolate cupcake with a strong cup of black coffee or a creamy latte is a surprisingly decadent way to start the day, especially on a weekend. It feels like a treat without being overly heavy. Imagine the smell of coffee and rich chocolate wafting through your kitchen. Pure bliss!
For Brunch: Elevate these by serving them on a pretty tiered stand. They’re fantastic alongside fresh berries – the tartness of raspberries or strawberries cuts through the richness of the chocolate beautifully. A dollop of lightly sweetened whipped cream or a small scoop of vanilla bean Ice Cream makes them extra special for a festive brunch. And a glass of chilled sparkling cider or a mimosa? Perfection.
As Dessert: This is their natural habitat! After dinner, these cupcakes are a crowd-pleaser. They’re excellent with a glass of Red Wine (like a Merlot or Cabernet Sauvignon, the fruit notes complement the chocolate), or a rich hot chocolate. For a truly indulgent experience, serve one with a scoop of salted caramel ice cream. It’s a flavor combination that can’t be beat.
For Cozy Snacks: My kids often grab one after school with a tall glass of cold milk. It’s the Ultimate Comfort snack. On a rainy afternoon, curled up with a good book and one of these cupcakes, is pure hygge. They’re also fantastic for potlucks and casual get-togethers because they’re easy to transport and always a hit.
My family traditions often involve these after a Sunday roast. They’re comforting, familiar, and just make everyone happy. I’ve also found they pair wonderfully with a simple dusting of powdered sugar if you’re not feeling the glaze, or even a scoop of peanut butter frosting for a Reese’s-inspired treat.
Top Tips for Perfecting Your Moistest Chocolate Cupcakes
I’ve made these countless times, and over the years, I’ve picked up a few tricks that I think make a real difference. These are the little things that elevate them from “good” to “absolutely unforgettable.”
“New family favorite! This moist chocolate cupcakes was so flavorful and ridiculously easy. Crowd-pleaser for sure.”
Zucchini Prep: Wait, zucchini? Yes! While this recipe doesn’t explicitly call for zucchini, the principles of moisture are key. For any recipe where moisture is the goal, like carrot cake or zucchini bread, I always stress the importance of managing the liquid. With these cupcakes, the oil and buttermilk are key. Ensure your buttermilk is at room temperature; it emulsifies better into the batter. And using hot liquid is non-negotiable – it blooms the cocoa powder for a richer flavor and contributes significantly to that incredibly tender crumb.
Mixing Advice: This is probably the most critical point. Overmixing is the enemy of tender baked goods. Once you add the dry ingredients to the wet, mix only until they’re *just* combined. A few small lumps are fine! Seriously, stop mixing when you can’t see any more dry flour. Then, when you add the hot liquid, mix until smooth but don’t keep going. The batter will be thin, and that’s a good thing. It signifies that you haven’t overdeveloped the gluten. Think gentle folding and incorporating, not vigorous beating.
Swirl Customization: While this recipe is for a plain chocolate cupcake with a chocolate glaze, you can absolutely play with swirls! If you were making a marbled cake, you’d divide your batter and color one portion. For cupcakes, you could do a chocolate ganache swirl right before baking, or even a cream cheese swirl. The key is to add it gently and not overmix it into the main batter.
Ingredient Swaps: I’ve experimented with almond milk instead of buttermilk when I’ve run out, and it actually made the cupcakes even creamier! The acidity of buttermilk is ideal, but plant-based milks can work. If using regular milk and you don’t have buttermilk, the vinegar/lemon juice trick is your best friend. For the oil, while vegetable oil is standard, melted coconut oil can work, but it might impart a slight coconut flavor. Stick to neutral oils for the truest chocolate flavor.
Baking Tips: Always preheat your oven thoroughly. An oven thermometer is a great investment to ensure your oven is actually at 350°F (175°C). If your oven tends to run hot, you might need to reduce the temperature slightly or shorten the baking time. Don’t overcrowd the muffin tin; allow air to circulate around each cupcake for even baking. And always use the toothpick test to check for doneness – it should come out clean, with no wet batter clinging to it. A few moist crumbs are okay, but no goo!
Glaze Variations: If you want a thicker glaze, use less liquid. For a thinner, more drizzle-like consistency, add more liquid, a teaspoon at a time. You can also add a touch of espresso powder to the glaze for an extra coffee kick, or even a bit of orange zest for a chocolate-orange twist. For a richer glaze, substitute some of the milk with heavy cream.
Storing and Reheating Tips
One of the best things about these moist chocolate cupcakes is how well they keep. That moisture isn’t just for the first day!
Room Temperature: For best quality, store unfrosted or glazed cupcakes in an airtight container at room temperature for up to 2-3 days. If you glazed them with a soft glaze, make sure it’s fully set before stacking or packing them tightly. The oil and buttermilk really help them stay perfectly soft and delicious.
Refrigerator Storage: If your kitchen is particularly warm, or you want them to last a bit longer, you can store them in the refrigerator. Again, an airtight container is your best friend. They’ll keep well for about 4-5 days this way. The texture might firm up slightly in the fridge, but they’ll still be incredibly moist.
Freezer Instructions: These cupcakes freeze beautifully! You can freeze them unfrosted or frosted (if the frosting is stable). Wrap each cupcake tightly in plastic wrap, then place them in a freezer-safe airtight container or a heavy-duty freezer bag. They’ll last for up to 2-3 months. To thaw, unwrap them and let them come to room temperature on a wire rack for a few hours. If they were frosted with a buttercream, you might want to give them a quick blast under the broiler (watch carefully!) for a minute to help revive the frosting’s texture.
Glaze Timing Advice: For room temperature or refrigerator storage, it’s generally best to glaze the cupcakes *after* they have cooled completely. If you’re freezing them, I highly recommend freezing them unfrosted. Once they’re thawed, then you can glaze them. This prevents the glaze from cracking or becoming sticky during freezing and thawing. If you do glaze before freezing, make sure the glaze is thoroughly set and you use good quality freezer wrap.
Frequently Asked Questions
Final Thoughts
So there you have it! My absolute favorite recipe for moist chocolate cupcakes. I truly believe these are the ones you’ve been dreaming of – tender, deeply chocolatey, and incredibly satisfying. They’re proof that you don’t need complicated techniques or fancy ingredients to achieve baking perfection. It’s the simple, thoughtful combination of ingredients and a bit of love that makes them so special.
If you love these, you might also enjoy my fudgy brownie recipe or my classic vanilla cake – they share a similar commitment to deliciousness and ease. Give these cupcakes a try, and I promise, you won’t be disappointed. They’re perfect for birthdays, holidays, or just because you deserve a little bit of chocolate magic in your day.
I can’t wait to hear how your cupcakes turn out! Please leave a comment below to let me know your thoughts, or share your own tips and variations. Happy baking, my friends!
Moist Chocolate Cupcakes
Ingredients
Main Ingredients
- 2.5 cups all-purpose flour
- 0.75 cup unsweetened cocoa powder
- 2 teaspoons baking soda
- 1 teaspoon salt
- 2 cups granulated sugar
- 2 large eggs
- 1 cup buttermilk
- 0.5 cup vegetable oil
- 2 teaspoons vanilla extract
- 1 cup hot water
Instructions
Preparation Steps
- Preheat your oven to 350°F (175°C). Line a 12-cup muffin tin with paper liners.
-
In a large bowl, whisk together the flour, cocoa powder, baking soda, and salt.2.5 cups all-purpose flour
-
In a separate bowl, whisk together the sugar, eggs, buttermilk, oil, and vanilla extract until well combined.2.5 cups all-purpose flour
- Gradually add the wet ingredients to the dry ingredients, mixing until just combined. Be careful not to overmix.
-
Slowly pour in the hot water and mix until the batter is smooth and thin.2.5 cups all-purpose flour
- Divide the batter evenly among the prepared muffin cups, filling each about two-thirds full.
- Bake for 20-25 minutes, or until a toothpick inserted into the center comes out clean.
- Let the cupcakes cool in the muffin tin for a few minutes before transferring them to a wire rack to cool completely.


