There’s something magical about the smell of peppermint—like a little burst of holiday cheer even if it’s mid-summer. I remember my grandma’s kitchen as a child, baking Peppermint Cookies that filled the entire house with this sweet, minty aroma that made everyone gather around the oven. Now, years later, I’ve turned that nostalgic scent into something a bit more everyday, a treat that somehow feels special but is super easy to whip up on a busy morning or a lazy weekend afternoon. These peppermint chocolate swirl muffins are my go-to when I want that minty, chocolaty fix without too much fuss—think of them as the lovechild of a candy cane and a brownie in muffin form. They’re loaded with rich chocolate, laced with fresh peppermint, and topped with a drizzle of glaze. Trust me, this combo disappears in minutes at my house—and I always do a little happy dance when I see my kids sneaking seconds!
Thank you for reading this post, don't forget to subscribe!What is Peppermint Chocolate Swirl Muffins?
Think of these muffins as a playful twist on classic chocolate muffins, but with a peppermint infusion that elevates everything to a whole new level of deliciousness. It’s essentially a muffin that’s not just sweet but has this refreshing mint kick that feels like a holiday celebration, even if it’s June. The swirl of peppermint chocolate makes each bite interesting—kind of like a surprise party for your taste buds. The muffin batter itself is simple, made with common ingredients you probably already have in your pantry, but I’ve added a little secret: a splash of peppermint extract to give it that unmistakably fresh scent. If you’ve ever loved those Peppermint Patties or candy canes, this recipe will remind you of those—without the hard candy crunch, just soft, tender muffins with pockets of silky chocolate and peppermint goodness. It’s perfect for breakfast, brunch, or even a cozy snack during movie night.
Why you’ll love this recipe?
What I love most about these Peppermint Chocolate swirl muffins is how effortlessly they turn ordinary ingredients into something wonderfully indulgent. The flavor? Oh, it’s a knockout—rich, chocolaty, with a cooling peppermint that’s just enough without overpowering. When I say this recipe is simple, I mean it. You throw together the batter in one bowl, swirl in the chocolate and peppermint, and bake. No fancy equipment, no complicated steps—just good old-fashioned baking made easy. Budget-wise, they’re pretty friendly, too. The ingredients are staples: flour, cocoa, sugar, eggs, and a few flavorings. Plus, you can easily adapt it if you’re dairy-free or want to go lighter—trust me, I’ve tested it with almond milk and it turns out just as tasty! And versatility? This recipe suits all kinds of occasions—breakfast on the go, a sweet treat for the kids, or a festive dessert when friends pop over. Honestly, what I love most is that these muffins are a crowd-pleaser, and they put me right in a holiday kind of mood, no matter the time of year.
How do I make Peppermint Chocolate Swirl Muffins?
Quick Overview
Making these muffins is a breeze—a true one-bowl wonder, honestly. You start by mixing your dry ingredients, then whisk together the wet ingredients. After that, you combine everything, swirl in melted chocolate with a hint of peppermint, and bake. The key is to not overmix after adding the wet to the dry—it keeps the muffins nice and fluffy. Once out of the oven, a quick cool and drizzle of peppermint glaze transforms these from good to heavenly. The result? Moist, tender muffins with beautiful swirls of chocolate and mint every time. It’s a recipe I’ve made countless times, and each batch seems better than the last, especially once I got the swirl right—trust me, it’s a game-changer for presentation and flavor.
Ingredients
For the Main Batter:
– 2 cups all-purpose flour (I’d recommend unbleached for a richer flavor)
– ½ cup unsweetened cocoa powder (Dutch-processed preferred)
– 1 cup granulated sugar (or coconut sugar for a healthier twist)
– 1 tablespoon baking powder
– ½ teaspoon salt
– 1 teaspoon vanilla extract
– 1 teaspoon peppermint extract (don’t skip this—it’s the star!)
– 1 cup milk (I tested with almond milk and loved it; whole milk’s always classic)
– ½ cup vegetable oil or melted butter
– 2 large eggs
For the Filling:
– ½ cup semi-sweet chocolate chips or chopped Dark Chocolate
– 2 tablespoons peppermint syrup or finely chopped peppermint candies (for extra peppermint punch)
– Optional: crushed candy canes for topping
For the Glaze:
– 1 cup powdered sugar
– 2-3 tablespoons milk or cream
– ½ teaspoon peppermint extract
– A few drops of red or green food coloring (for a festive touch)
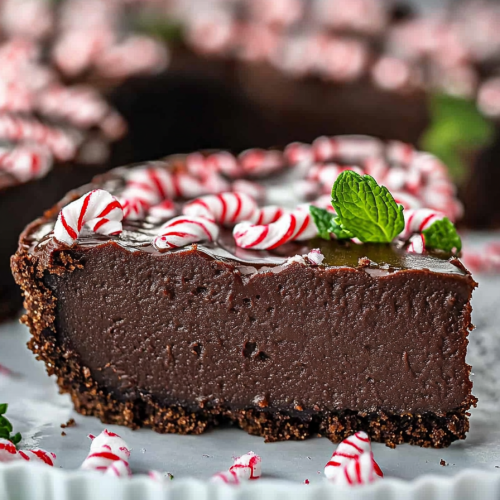
“Packed with flavor and so simple. Exactly what I wanted from this Mint Chocolate Pie A Simple Holiday Treat!”
Step-by-Step Instructions
Step 1: Preheat & Prep Pan
Set your oven to 375°F (190°C). Line a muffin tin with paper liners or grease with butter—whatever you prefer. I always do this early because I’ve learned the hard way that muffins stick if you’re not prepared. It’s super quick, and I like to have all my ingredients ready to go before mixing starts.
Step 2: Mix Dry Ingredients
In a large bowl, whisk together the flour, cocoa powder, sugar, baking powder, and salt. This is the base of your muffin batter—think of it as organizing all your flavor magnets so they mix evenly later. Make sure there are no lumps, especially in the cocoa powder.
Step 3: Mix Wet Ingredients
In a separate bowl, whisk the eggs, milk, oil, vanilla, and peppermint extract. I always do this until it’s smooth and slightly frothy—this ensures everything combines nicely. Trust me, don’t skip the peppermint extract, it’s what gives these muffins that holiday magic aroma.
Step 4: Combine
Pour your wet mixture into the dry ingredients and stir gently. Overmixing is the enemy here; you want just combined batter with a few lumps. If you overdo it, your muffins might turn out dense—nobody wants that. As soon as it looks like everything is just about mixed, stop stirring.
Step 5: Prepare Filling
In a small bowl, melt the chocolate chips for about 30 seconds in the microwave, stirring until smooth. Fold in a teaspoon of peppermint syrup or chopped peppermint candies for that burst of mint. Set aside.
Step 6: Layer & Swirl
Fill each muffin cup about ⅓ with batter. Drop a teaspoon of the melted chocolate mixture onto the batter, then cover with a second layer of batter. Use a toothpick or skewer to gently swirl the chocolate into the batter—don’t overdo it, just a few gentle swirls. This swirling creates those pretty ribbons of flavor that make every bite special.
Step 7: Bake
Bake for 18-20 minutes. Check doneness by inserting a toothpick in the center—it should come out with moist crumbs but no wet batter. The smell alone will get everyone in the house flocking to the kitchen.
Step 8: Cool & Glaze
Let the muffins cool in the pan for about 5 minutes, then transfer to a wire rack. Meanwhile, prepare your peppermint glaze by mixing powdered sugar, peppermint extract, and enough milk until it’s thick but pourable. Once muffins are cool enough to handle, drizzle the glaze over the top for that finishing touch—if you want to get fancy, add a few sprinkles of crushed peppermint candies now.
“The Mint Chocolate Pie A Simple Holiday Treat turned out amazing. My kids asked for seconds. Saving this one!”
Step 9: Slice & Serve
Serve these slightly warm or at room temperature. They look pretty on a platter with a dusting of powdered sugar or a few extra candy cane pieces. Honestly, they’re just as good on their own, but I love pairing them with Hot Cocoa or a steaming cup of coffee.
What to Serve It With
If you ask me, these muffins are pretty much their own show—they don’t need much else. But for a more festive brunch, I love serving them with a dollop of whipped cream and a side of fresh berries. Coffee or hot chocolate is a no-brainer, especially if you’re celebrating a cozy weekend or holiday morning. During Christmas, I sprinkle some extra crushed candy canes on top for that perfect holiday vibe. If you’re craving a quick breakfast, warming one in the microwave for 15 seconds turns it into a melt-in-your-mouth treat. For dessert, they’re fabulous with a scoop of vanilla ice cream or caramel sauce drizzled on top. My family actually asks for these all the time—and I don’t blame them; they’re just so fun and satisfying to eat!
Top Tips for Perfecting Your Peppermint Chocolate Swirl Muffins
Over the years, I’ve learned a few tricks that make these muffins turn out perfect every time. For starters, always sift your cocoa powder. It’s prone to clumping and makes your batter smoother. When blending wet and dry, fold gently—overmixing can lead to tough muffins, and nobody wants that. Now, swirling the chocolate is the fun part—try to create a marble effect with a gentle swirl, not a messy swirl—that way, each muffin looks just as delicious as it tastes. I once added a teaspoon of finely chopped fresh mint leaves instead of peppermint extract for a more natural mint flavor, and it worked beautifully—just something to play with. Swapping dark chocolate for milk chocolate or white chocolate can change the flavor profile, making these muffins adaptable for different tastes. A tip I’ve tested: baking at 375°F works best for a nice rise without burning the edges; but if your oven runs hot, dial it down slightly. Lastly, don’t skip the glaze—this adds freshness and a glossy finish that makes the muffins look bakery-worthy. A little patience glazing right after cooling keeps everything moist and shiny.
Storing and Reheating Tips
These muffins stay pretty fresh for about 2 days at room temperature if covered tightly with foil or stored in an airtight container. I recommend refrigerating them if you’re not eating within that window—just pop them in a container and they’ll hold well for up to a week. To keep them moist, I usually microwave a muffin for about 10 seconds before serving—trust me, it revives that soft, just-baked texture. Want to make them ahead? Freeze them in an airtight bag or container for up to 3 months. When thawing, leave them out for about 30 minutes or microwave on low for 20 seconds. If you’ve glazed the muffins, wait until they’re completely cooled before adding the glaze—otherwise, it might slide off or melt. Reheat glazed muffins slightly if desired, but I prefer them at room temp—they’re soft, fragrant, and just the right amount of sweet. Whether you’re eating them fresh or leftovers, these muffins are still delicious, and the peppermint flavor holds up well even after a day or two.
Frequently Asked Questions
Final Thoughts
If you’re on the hunt for a muffin that brings a little holiday magic no matter the season, give these peppermint chocolate swirl muffins a try. They strike the perfect balance between rich chocolate and refreshing mint, and I promise they’ll brighten up any breakfast or snack time. Over the years, I’ve tweaked this recipe countless times—testing different chocolates, adjusting the peppermint amount, and trying various toppings. Through it all, one thing remains true: these muffins are simple, satisfying, and utterly addictive. My kids ask for these almost weekly, and I love that I can whip them up in under 30 minutes. Plus, they look pretty cute with swirling chocolate ribbons—makes me feel like a pro baker even when I’m just winging it in my kitchen. So go ahead, mix up a batch, and get ready for some happy faces around your table. And I’d love to hear how yours turn out—leave a comment below or share your variations. Happy baking, friends!
peppermint
Ingredients
Main Ingredients
- 1.5 cups granulated sugar
- 0.5 cup water
- 2 teaspoons peppermint extract
- 1 cup heavy cream
- 1 cup white chocolate chips
Instructions
Preparation Steps
- Combine sugar and water in a saucepan and heat over medium heat until the sugar dissolves, forming a syrup.
- Remove from heat and stir in peppermint extract.
- In a separate saucepan, heat heavy cream until just simmering.
- Pour hot cream over white chocolate chips and stir until smooth. Add peppermint syrup and mix well.
- Pour mixture into molds or a dish and refrigerate until set, about 2 hours.


