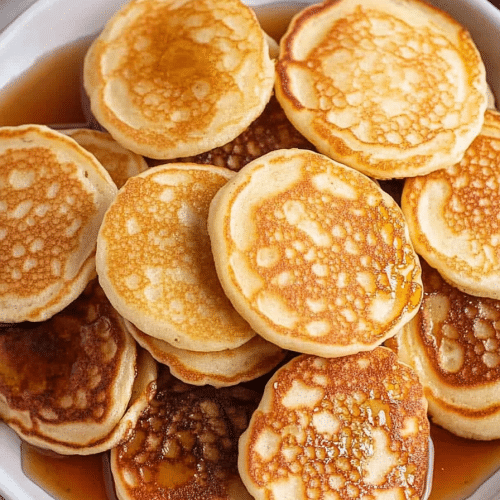
You know those days? The ones where you just need something sweet, something comforting, something that feels like a hug in food form? I have a recipe for you, and it’s honestly one of my most treasured. It’s for these absolutely adorable, incredibly delicious tiny pancakes. They’re not just pancakes; they’re little flavor bombs, perfect for weekend brunches, quick sweet fixes, or even just making a regular Tuesday feel a bit more special. My kids go absolutely wild for them, and honestly, who can blame them? They’re like the mini-me version of classic comfort, and when that first bite hits, it’s pure bliss. They remind me of the miniature food toys I had as a kid, but these are gloriously edible and incredibly satisfying. If you’ve ever loved a good fluffy pancake, then get ready, because these tiny pancakes are about to steal your heart.
Thank you for reading this post, don't forget to subscribe!What are tiny pancakes?
So, what exactly are these little wonders? Think of them as your favorite fluffy buttermilk pancakes, but shrunk down to adorable, bite-sized perfection. They’re essentially miniature versions, cooked on a griddle or a non-stick pan, often just a couple of inches in diameter. The beauty of them is that you can have several without feeling overstuffed, and they’re just so darn cute! I love that they don’t require a full-on breakfast production line. They’re quick to cook, and the portion size makes them ideal for sharing – or, let’s be honest, for when you want to try a few different toppings without committing to a whole plate. They’re the perfect vehicle for all your favorite pancake fixings, just in a more manageable, utterly charming package.
Why you’ll love this recipe?
Honestly, I could rave about these tiny pancakes for days! First off, the flavor is just out of this world. They’re light, fluffy, and have that classic, comforting pancake taste that everyone loves. But it’s the texture that really gets me. Because they’re so small, they cook up super fast, meaning you get a perfectly cooked interior and a slightly crisp edge – pure magic. And the simplicity? Oh my goodness, it’s a lifesaver. This batter comes together in minutes, making it perfect for those rushed mornings or when you get a late-night craving. You don’t need a lot of fancy ingredients either; most of what you’ll need is probably already in your pantry. Plus, they are ridiculously cost-effective. A batch of these can feed a crowd without breaking the bank, and that’s always a win in my book.
What I love most about this recipe, though, is its versatility. You can serve them for breakfast, brunch, or even as a fun dessert. They’re amazing plain, but that’s just the beginning. You can add fresh berries, a drizzle of maple syrup, a dollop of Whipped Cream, or even a sprinkle of powdered sugar. They’re like a blank canvas for your culinary creativity! If you’re a fan of my mini blueberry muffins or my easy cinnamon swirl bread, you’re going to adore these tiny pancakes. They offer that same homemade goodness and crowd-pleasing appeal but with the added charm of being miniature. They’re just so much fun to make and even more fun to eat!
How do I make tiny pancakes?
Quick Overview
Making these tiny pancakes is surprisingly straightforward. You’ll whisk together your dry and wet ingredients separately, then gently combine them to form a simple batter. The key is not to overmix! Then, it’s just a matter of spooning small dollops onto a hot, greased griddle and flipping them as soon as they get bubbly. They cook up incredibly fast, meaning you can have a whole batch ready in under 15 minutes. It’s genuinely that easy, and the results are consistently delightful.
Ingredients
For the Main Batter:
This is your classic pancake base, just perfected for miniature size. I always use all-purpose flour because it’s readily available and gives a great texture. Make sure your baking powder is fresh; it’s crucial for that fluffy lift! Using whole milk makes them incredibly rich, but I’ve tested this with almond milk and it actually made it even creamier, so feel free to experiment. The touch of sugar isn’t too much, just enough to give them a hint of sweetness that balances everything out. And don’t skip the salt; it really makes the other flavors pop.
- 1 ½ cups all-purpose flour
- 3 ½ teaspoons baking powder (make sure it’s fresh for maximum fluffiness!)
- 1 teaspoon salt
- 1 tablespoon granulated sugar
- 1 ¼ cups whole milk (or your favorite non-dairy alternative)
- 1 large egg
- 3 tablespoons unsalted butter, melted and slightly cooled
For the Filling (Optional but Highly Recommended!):
This is where the magic really happens for me. A little swirl of sweetness inside makes these truly special. My go-to is a simple mixture of Brown Sugar and cinnamon, but feel free to get creative. You could add a few mini chocolate chips, some finely chopped fruit like raspberries, or even a swirl of jam. The key is to keep it relatively small so it distributes well and doesn’t make the tiny pancakes too heavy.
- 2 tablespoons packed brown sugar
- 1 teaspoon ground cinnamon
For the Glaze:
A simple glaze adds that extra touch of decadence. I like a basic powdered sugar glaze, but you can easily jazz it up. A little vanilla extract is a must for me, and if you want a slightly thinner glaze, just add a touch more milk or water. For a LEMON GLAZE, swap out the milk for lemon juice! It’s so adaptable.
- 1 cup powdered sugar
- 2-3 tablespoons milk (or water)
- ½ teaspoon vanilla extract
Step-by-Step Instructions
Step 1: Preheat & Prep Pan
First things first, get your griddle or a large non-stick skillet heating up over medium-low heat. This is super important. If the pan is too hot, the tiny pancakes will burn on the outside before they cook through. Too low, and they might not get that lovely golden-brown color. I usually test it by flicking a tiny drop of water onto the surface – it should sizzle gently. Once it’s at the right temperature, give it a light coating of butter or cooking spray. You want just enough to prevent sticking, not so much that they fry.
Step 2: Mix Dry Ingredients
In a medium bowl, whisk together your flour, baking powder, salt, and sugar. Whisking well ensures that the baking powder and salt are evenly distributed, which means your tiny pancakes will rise beautifully and have a consistent flavor throughout. I always give it a good thirty seconds of whisking, just to make sure everything is well combined and there are no pockets of unincorporated ingredients. This step is simple but makes a big difference!
Step 3: Mix Wet Ingredients
In a separate, larger bowl, whisk together the milk and the egg until they’re just combined. Then, slowly stream in the melted butter while whisking continuously. You don’t want to scramble the egg with hot butter, so make sure it’s cooled down a bit. Once that’s all mixed, add this wet mixture to your dry ingredients. Don’t stir it too much yet!
Step 4: Combine
Now, this is the crucial part for tender pancakes: gently fold the wet ingredients into the dry ingredients. Use a spatula or a wooden spoon and mix until *just* combined. It’s perfectly okay, and actually preferred, if there are still a few lumps in the batter. Overmixing develops the gluten in the flour, which can lead to tough, rubbery pancakes. We want light and fluffy, so stop mixing as soon as you don’t see any big streaks of dry flour. Honestly, a few lumps are a good sign!
“The Mini Pancakes How to Make Tiny Delights turned out amazing. My kids asked for seconds. Saving this one!”
Step 5: Prepare Filling
If you’re making the filling, now’s the time. In a small bowl, combine the Brown Sugar and cinnamon. Give it a quick stir until it’s evenly mixed. This little mixture is going to be swirled into the batter for an extra layer of flavor and sweetness. It’s like a secret surprise inside each tiny pancake!
Step 6: Layer & Swirl
This is where the fun really starts! Working in batches so you don’t overcrowd the pan, spoon about 1 to 1 ½ tablespoons of batter onto the hot griddle for each tiny pancake. If you’re adding the filling, quickly sprinkle about ¼ teaspoon of the cinnamon-sugar mixture over the wet batter on the griddle. Then, using a toothpick or the tip of your spoon, gently swirl the filling into the batter. Don’t go crazy; just a few swirls will do the trick for a beautiful marbled effect. Make sure your pancakes are spaced out so they have room to spread a little and you can easily flip them.
Step 7: Bake
Cook the tiny pancakes for about 1-2 minutes per side. You’ll know they’re ready to flip when you see small bubbles forming on the surface and the edges look set. Use a thin spatula to carefully flip them over. The second side usually cooks even faster, just another minute or so, until golden brown. Keep an eye on them; they cook up really quickly!
Step 8: Cool & Glaze
As each batch of tiny pancakes is done, transfer them to a plate. If you’re not serving them immediately, you can keep them warm in a single layer on a baking sheet in a slightly warm oven (around 200°F / 95°C). While they’re cooling slightly, whisk together the powdered sugar, 2 tablespoons of milk, and vanilla extract in a small bowl. If the glaze is too thick, add a little more milk, a teaspoon at a time, until you reach your desired drizzling consistency. Once the pancakes are slightly cooled, you can drizzle the glaze over them. I like to do this while they’re still a little warm so the glaze melts just a touch.
Step 9: Slice & Serve
Serve your adorable tiny pancakes warm, perhaps with a dusting of powdered sugar, a drizzle of maple syrup, or your favorite toppings. They’re perfect stacked up high or arranged artfully on a platter. Enjoy the little bursts of joy in every bite!
What to Serve It With
These tiny pancakes are so versatile, they can be dressed up or down for any occasion. For a simple, yet delightful breakfast, I love pairing them with a good cup of coffee and maybe a side of fresh berries. The slightly tart berries cut through the sweetness beautifully, and the coffee is just the perfect wake-up call. They’re so quick to make, making them my go-to on busy weekday mornings when the kids are begging for something special.
When it’s time for a more leisurely brunch, these tiny pancakes really shine. Serve them alongside some crispy bacon or savory sausage for a lovely sweet and savory contrast. A small bowl of yogurt with granola also makes a fantastic addition, offering a healthier option. For a touch of elegance, I’ll arrange them on a tiered stand with some fresh Fruit Salad. They look so pretty and always impress guests!
And who says pancakes are just for breakfast? These tiny pancakes are phenomenal as a light dessert. Imagine them served with a scoop of vanilla bean ice cream and a warm berry compote. The combination of warm, fluffy pancakes, cool ice cream, and tart fruit is just divine. A dusting of cocoa powder can also turn them into a chocolatey treat. They’re perfect for when you want something sweet after dinner but don’t want to bake a whole cake.
On those cozy nights in, when all you want is comfort food, these tiny pancakes are the answer. Serve them with a warm mug of hot chocolate and a good book. They’re so easy to grab and eat, making them the ultimate comfort snack. My family loves them for movie nights too – they’re the perfect shareable treat that doesn’t leave you feeling heavy.
Top Tips for Perfecting Your Tiny Pancakes
I’ve made these tiny pancakes more times than I can count, and over the years, I’ve picked up a few tricks that I think really elevate them. For the zucchini prep (if you’re adding it, see below!), make sure you squeeze out as much moisture as possible. Grating it finely helps too; this ensures you don’t end up with watery pancakes. I always use the fine side of my box grater for the best texture. And for freshness, always use your zucchini soon after grating; it can get a little brown if left sitting out too long.
When it comes to mixing the batter, remember my mantra: don’t overmix! I’ve learned this lesson the hard way countless times. Lumps are your friends here. Just mix until the dry ingredients are hydrated. You want that tender, melt-in-your-mouth texture, and overmixing is the quickest way to ruin it. The batter should be thick but pourable; if it seems too thick, you can always add a tiny splash more milk.
For that gorgeous swirl effect with the filling, don’t overdo it. A few gentle turns with a toothpick is all you need. You want streaks of cinnamon-sugar, not a muddy mess. The goal is visual appeal and little pockets of spiced sweetness. If you’re using chocolate chips, just sprinkle them on top before flipping. For an extra pop of color, I sometimes add a few finely chopped strawberries or raspberries directly into the batter or just on top before swirling.
Ingredient swaps can be fun! For a gluten-free version, I’ve had success using a good quality 1-to-1 gluten-free baking flour. The texture might be slightly different, a bit more dense, but still delicious. For a dairy-free option, oat milk or soy milk work wonderfully. I even tested this with almond milk and it actually made it even creamier! I’ve also experimented with a touch of honey or maple syrup instead of sugar, but it can sometimes affect the browning, so keep an eye on the cooking time.
Baking tips are crucial for that perfect golden hue. Make sure your pan is evenly heated. I often rotate my pan halfway through cooking a batch to ensure even browning. Don’t be afraid to adjust the heat as you go; different burners can run hotter. To test for doneness, gently poke the center. It should spring back slightly. You can also lift an edge with your spatula to check the color. If they’re browning too quickly, turn the heat down slightly. If they’re too pale, turn it up just a touch.
“New family favorite! This Mini Pancakes How to Make Tiny Delights was so flavorful and ridiculously easy. Crowd-pleaser for sure.”
For the glaze, consistency is key. If it’s too thick, it will be hard to drizzle and might clump. If it’s too thin, it’ll run right off. I always start with the smaller amount of liquid and add more only if needed. You can also experiment with flavorings! A little lemon zest, a pinch of nutmeg, or even a tiny bit of espresso powder can add a delightful twist. For a richer glaze, try using cream instead of milk.
Storing and Reheating Tips
These tiny pancakes are best enjoyed fresh, but I know life gets busy, so here’s how I store and reheat them. If you have leftovers and plan to eat them within a day or two, storing them at room temperature in an airtight container is usually fine. Just make sure they’ve cooled down completely before sealing them up. They should retain their fluffiness for about 24 hours this way.
For longer storage, I always opt for the refrigerator. Place them in a single layer in an airtight container or wrap them tightly in plastic wrap, then in foil. They’ll stay good in the fridge for up to 3-4 days. The texture might soften slightly, but they’re still perfectly enjoyable. I usually avoid stacking them directly on top of each other in the fridge to prevent them from getting soggy.
Freezing is a great option if you want to have these on hand for future cravings. Let the pancakes cool completely. Then, arrange them in a single layer on a baking sheet lined with parchment paper and freeze until solid. Once frozen, transfer them to a freezer-safe bag or container. They should keep well for up to 2-3 months. To thaw, you can either leave them at room temperature for a bit or reheat them directly.
When it comes to reheating, I usually opt for the toaster oven or a regular oven set to a low temperature (around 300°F / 150°C) for a few minutes. This helps bring back some of that crispness. For a quick fix, you can microwave them, but they might lose some of their texture and become a bit soft. If you plan on glazing them, I usually add the glaze *after* reheating. If I’m storing them unfrosted, I’ll add the glaze to individual servings just before enjoying them.
Frequently Asked Questions
Final Thoughts
Honestly, I can’t get enough of these tiny pancakes. They’re proof that sometimes, the most delightful things come in small packages. They’re incredibly easy to whip up, surprisingly forgiving, and always a guaranteed hit with everyone who tries them. The perfect balance of fluffy texture and comforting flavor makes them a go-to in my kitchen, and I truly hope they become one in yours too. They’re just so much fun to make and even more fun to eat, whether you’re dressing them up with fancy toppings or enjoying them simply.
If you loved these tiny pancakes, I think you might also enjoy my recipe for miniature cinnamon rolls or my fluffy ricotta pancakes – they’re all about bringing a little extra joy to your baking adventures. Give these a try, and I promise you won’t be disappointed. I can’t wait to hear how yours turn out!
If you make these, please let me know in the comments below! I’d love to see your creations and hear about your favorite toppings or variations. Happy baking!
tiny pancakes
Ingredients
Main Ingredients
- 1 cup all-purpose flour spooned, leveled, and sifted
- 2 tablespoons granulated sugar
- 2.5 teaspoons baking powder
- 0.25 teaspoon table salt
- 1 cup whole milk room temperature
- 1 egg extra large egg room temperature
- 2 tablespoons salted butter melted and cooled
- 1 teaspoon pure vanilla extract
Instructions
Preparation Steps
- In a medium size mixing bowl, whisk together the sifted flour, granulated sugar, baking powder and salt until well combined.
- In a small mixing bowl, whisk together the room temperature milk, egg, melted and cooled butter and vanilla extract.
- Stir the wet ingredients into the dry ingredients just until combined. Do not over mix. (A few lumps are ok).
- Spray a nonstick 10 to 12 inch skillet with nonstick cooking spray and heat over medium-high heat until a droplet of water sizzles when dropped on the surface.
- Spoon 1 to 1.5 tablespoons of pancake batter in a circle shape, spaced about 1 inch apart. You can also add the pancake batter to a piping bag or squeeze bottle for more control of the size and shape of the pancakes.
- Cook the pancakes for about 1 to 1.5 minutes, or until tiny bubbles appear on the surface and the outer edges of the pancakes begin to appear set. Flip the pancakes and continue for about another 1 minute, or until the bottom of the pancake is golden brown. Transfer the cooked pancakes to a serving plate and repeat the process with the remaining batter.


