There are some recipes that just make your heart sing, you know? The kind that, the moment you start mixing the ingredients, a little spark ignites in the kitchen. For me, that’s these lemon raspberry scones. They’re not just a treat; they’re a memory baked into every bite. I remember the first time I made these, I was trying to impress my in-laws who were coming over for a surprise visit. I wanted something that felt a little fancy but wouldn’t take all day, something that tasted like sunshine and summer, even though it was a chilly autumn afternoon. These lemon raspberry scones were an absolute triumph! The bright burst of lemon combined with the sweet tang of raspberries is just… well, it’s magic. It’s like the perfect balance of everything good. They’re a little like a classic scone, but with a delightful fruity twist that makes them stand out. Honestly, if you’re looking for a guaranteed crowd-pleaser that’s deceptively easy, you’ve found it.
Thank you for reading this post, don't forget to subscribe!What is a lemon raspberry scones?
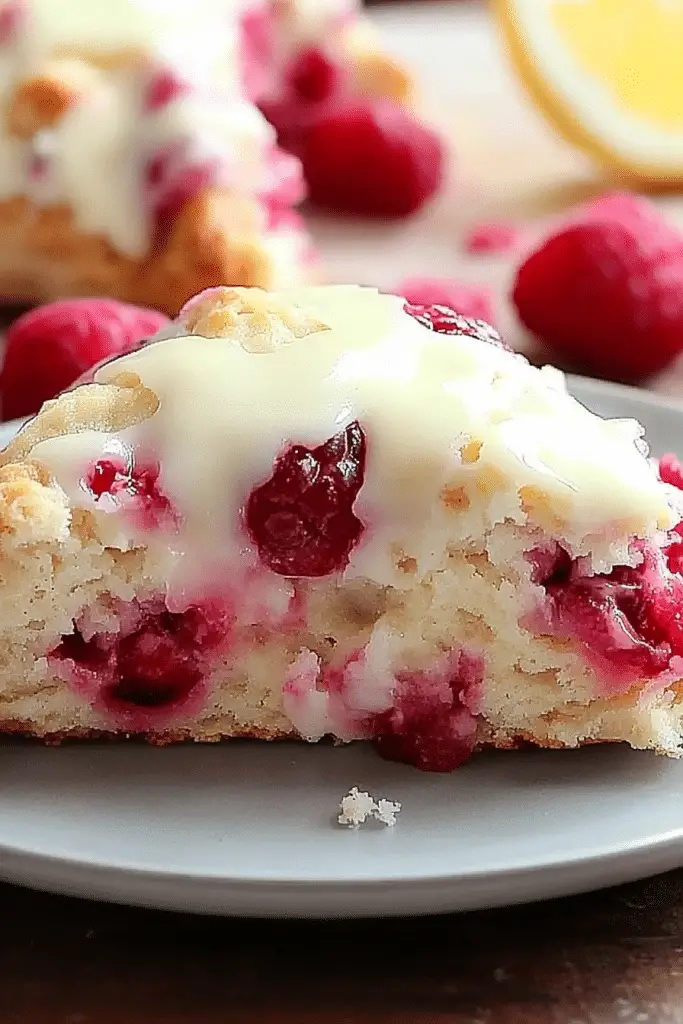
So, what exactly are these little pockets of joy? Think of a traditional scone – that lovely, slightly crumbly, buttery biscuit-like pastry that’s a staple at teatime and brunches. Now, imagine infusing that with the zesty, invigorating punch of fresh lemon and the sweet, slightly tart burst of juicy raspberries. That’s pretty much it! They’re not overly sweet, which is what I love. The lemon isn’t just for flavor; it brightens up the whole profile and cuts through the richness of the butter. The raspberries add pops of vibrant color and a delightful texture. They’re essentially a delightful hybrid, perfect for any time of day. It’s like the best parts of a muffin and a biscuit got married and had the most beautiful, delicious babies. They are simple, elegant, and utterly delicious.
Why you’ll love this recipe?
Honestly, where do I even begin? There are so many reasons why these lemon raspberry scones have earned a permanent spot in my recipe rotation. First and foremost, the flavor. Oh my goodness, the flavor! It’s this incredible dance between the bright, zesty lemon and the sweet, slightly tart raspberries. It’s refreshing, it’s comforting, and it’s just so incredibly satisfying. I’ve tested this with Meyer lemons too, and they give an even softer, more floral citrus note that’s divine. Beyond the taste, the simplicity is a huge win. In under an hour, from start to finish, you can have warm, homemade scones cooling on your rack. I’ve made these on busy Saturday mornings when the kids are clamoring for something special, and it’s a lifesaver. They’re also surprisingly cost-effective. You probably have most of the ingredients in your pantry right now! And let’s talk about versatility. These aren’t just for breakfast. They’re perfect for a mid-afternoon pick-me-up with a cup of tea, or even served slightly warm as a light dessert with a dollop of whipped cream. I’ve even seen friends crumble leftover scones over yogurt parfaits, and it’s a brilliant idea. What I love most about these lemon raspberry scones, though, is the feeling they evoke. They feel like a little slice of happiness, a reminder of simple pleasures and warm afternoons. They’re truly special, and I’m so excited for you to try them.
How do I make lemon raspberry scones?
Quick Overview
This recipe is designed for maximum flavor with minimal fuss. We’ll start by whisking together our dry ingredients, then gently incorporate cold butter until it resembles coarse crumbs. Next, we’ll mix in the wet ingredients just until combined – remember, we don’t want to overmix! Then, it’s a simple matter of folding in those beautiful raspberries and swirling in some vibrant lemon zest. Shape them, bake them until golden, and finish with a simple lemon glaze. It’s a straightforward process that yields incredibly impressive results, even if you’re a beginner baker.
Ingredients
For the Main Batter:
2 ½ cups all-purpose flour, plus more for dusting. I always use unbleached all-purpose flour for the best texture.
½ cup granulated sugar. You can adjust this slightly if you prefer them sweeter or tarter, but this is a good starting point.
2 teaspoons baking powder. This is crucial for that lovely lift and tender crumb.
½ teaspoon salt. It balances the sweetness and brings out all the flavors.
½ cup (1 stick) unsalted butter, very cold and cut into small cubes. Cold butter is key to flaky scones!
1 cup heavy cream, plus a little more for brushing. Full-fat is best here for richness.
For the Filling:
1 cup fresh or frozen raspberries. If using frozen, don’t thaw them completely; they’ll hold their shape better.
Zest of 1 large lemon. Use a microplane for the finest zest, which distributes the flavor beautifully. Avoid the white pith, as it can be bitter.
For the Glaze:
1 cup powdered sugar, sifted. Sifting prevents any little lumps.
2-3 tablespoons fresh lemon juice. Start with 2 and add more until you reach your desired drizzling consistency.
“New family favorite! This Lemon Raspberry Scones was so flavorful and ridiculously easy. Crowd-pleaser for sure.”
Step-by-Step Instructions
Step 1: Preheat & Prep Pan
First things first, let’s get your oven preheating to 400°F (200°C). While that’s happening, line a large baking sheet with parchment paper. This is a game-changer for easy cleanup! You can also lightly grease the parchment paper if you’re feeling extra cautious, but usually, it’s not necessary.
Step 2: Mix Dry Ingredients
In a large mixing bowl, whisk together the all-purpose flour, granulated sugar, baking powder, and salt. Give it a good whisk to make sure everything is evenly distributed. This ensures your scones will rise evenly and have a consistent flavor throughout. You want to see a uniform color, no streaks of salt or sugar.
Step 3: Mix Wet Ingredients
In a separate, smaller bowl, whisk together the cold heavy cream and the lemon zest. Make sure the lemon zest is well distributed throughout the cream. This allows the oils from the zest to start infusing the cream before it even hits the dry ingredients.
Step 4: Combine
Now for the butter! Add the cold, cubed butter to the dry ingredients. Using your fingertips, a pastry blender, or a food processor (pulse it very briefly!), cut the butter into the flour mixture until it resembles coarse crumbs with some pea-sized pieces of butter still visible. Don’t overwork it! Those little pockets of butter are what create flakiness. Then, pour the wet ingredients into the dry ingredients. Gently stir with a spatula or wooden spoon until *just* combined. The dough will be shaggy and a little wet. Again, resist the urge to overmix! A few dry spots are better than a tough scone.
Step 5: Prepare Filling
Gently fold in the fresh or frozen raspberries into the dough. Try not to break them up too much. If you’re using frozen raspberries, just lightly toss them in the dough. The lemon zest is already in the wet ingredients, so that part is done!
Step 6: Layer & Swirl
Turn the shaggy dough out onto a lightly floured surface. Gently pat it into a rough rectangle, about ¾ inch thick. Don’t knead it! You’re just bringing it together. You can fold it in half once or twice if you like, but keep it gentle. Then, you can either cut it into wedges (like a pizza) or use a biscuit cutter to create rounds. For wedges, cut into 8 triangles. For rounds, use a 2-inch cutter and press straight down without twisting. Place the scones onto your prepared baking sheet, spacing them about 2 inches apart.
Step 7: Bake
Brush the tops of the scones lightly with a little extra heavy cream. This helps them get a beautiful golden-brown crust. Bake for 18-22 minutes, or until they are puffed up and the tops are golden brown. You can insert a toothpick into the center; it should come out clean or with just a few moist crumbs. If they’re browning too quickly on top, you can loosely tent them with foil.
Step 8: Cool & Glaze
Let the scones cool on the baking sheet for about 5 minutes, then transfer them to a wire rack to cool completely. While they’re cooling, whisk together the sifted powdered sugar and lemon juice for the glaze. Start with 2 tablespoons of juice and add more a teaspoon at a time until you get a thick but drizzly consistency. Once the scones are completely cool (this is important, or the glaze will melt off!), drizzle the glaze generously over the tops. Let the glaze set for about 15-20 minutes before serving.
“The Lemon Raspberry Scones turned out amazing. My kids asked for seconds. Saving this one!”
Step 9: Slice & Serve
Once the glaze has set, your lemon raspberry scones are ready to be enjoyed! Slice them in half if you like for an extra layer of glaze, or serve them whole. They are absolutely divine served warm, but they’re also delicious at room temperature. The contrast of the slightly crisp exterior and the tender, fluffy interior is just heavenly. Serve them with a cup of your favorite tea, coffee, or even a glass of milk.
What to Serve It With
These lemon raspberry scones are so wonderfully versatile, making them a fantastic addition to any meal or snack occasion. For a simple yet elegant **Breakfast**, I love pairing them with a good quality black coffee or a light herbal tea. The bright flavors of the scone really wake up your taste buds in the morning. A small bowl of fresh berries alongside can also be lovely. For a more festive **Brunch**, these scones really shine. Imagine them as part of a larger spread with some scrambled eggs, crispy bacon, and maybe a fruit salad. They add that touch of homemade charm that makes any brunch feel special. A mimosa or a sparkling rosé would be a perfect beverage pairing. As a light **Dessert**, these scones are surprisingly satisfying. Serve them slightly warm with a dollop of vanilla bean whipped cream or a scoop of lemon sorbet. The combination of warm scone, cool cream, and tart sorbet is pure bliss. And for those moments when you just need a little something sweet and comforting for **Cozy Snacks**, there’s nothing better. Pair them with a warm cup of tea or even hot chocolate. My kids absolutely love them as an after-school treat, especially when they’re still a little warm from the oven. My personal family tradition is to have them on the first day of spring – it just feels like they capture that feeling of renewal and brightness perfectly.
Top Tips for Perfecting Your Lemon Raspberry Scones
Over the years, I’ve learned a few tricks that really elevate these lemon raspberry scones from good to absolutely phenomenal. Here are my top tips: Firstly, when it comes to the raspberries, whether fresh or frozen, handle them gently. If you’re using fresh ones, give them a quick rinse and pat them very dry. For frozen, I tend to just toss them in while still mostly frozen; this prevents them from bleeding too much color into the dough and keeps them from getting mushy. My biggest piece of advice for scone success is all about the butter. It *has* to be very cold. I literally cut my butter into cubes and pop it in the freezer for about 15 minutes before I start mixing. This ensures that when the scones hit the hot oven, the butter melts and creates steam pockets, resulting in that incredibly tender, flaky texture we all love. Don’t be afraid of those little lumps of butter in the dough; they are your friends! When you’re combining the wet and dry ingredients, less is absolutely more. Overmixing is the enemy of tender scones. Stir just until you no longer see large streaks of dry flour. The dough should look shaggy and a bit messy; that’s exactly what you want. For the swirl effect, I like to cut the dough into wedges and then gently twist each wedge before placing it on the baking sheet. This creates a beautiful, rustic look and ensures even baking. If you find your scones are browning too quickly before the inside is cooked, a simple trick is to loosely tent the baking sheet with aluminum foil for the last part of the baking time. This allows them to cook through without burning the tops. For ingredient swaps, I’ve had success using buttermilk instead of heavy cream in a pinch; you might need slightly less, and the scones will be a bit more tender. For the lemon flavor, if you can’t find a fresh lemon, a teaspoon or two of good quality lemon extract can work, but fresh zest is always my preference for its brightness and natural oils. And finally, for the glaze, don’t be tempted to glaze while the scones are hot! They need to be completely cool, or you’ll end up with a sticky, melted mess instead of a nice, set drizzle.
Storing and Reheating Tips
One of the best things about these lemon raspberry scones is how well they keep, making them perfect for making ahead. If you’re planning to enjoy them within a day or two, storing them at **Room Temperature** is perfectly fine. Just place them in an airtight container or wrap them well in plastic wrap. They’ll stay lovely and fresh for about 2-3 days this way. If you think you might need them for a bit longer, the **Refrigerator Storage** is your best bet. Pop them into an airtight container, and they should keep well for up to 5 days. The texture might become slightly firmer in the fridge, but they reheat beautifully. For longer storage, or if you bake a double batch (which I often do!), the **Freezer Instructions** are invaluable. Wrap each cooled scone tightly in plastic wrap, then place them in a freezer-safe bag or container. They can stay frozen for up to 3 months. To thaw, simply remove them from the freezer and let them come to room temperature on the counter, or gently reheat them. When it comes to reheating, if they’ve been in the fridge, I love to pop them in a moderate oven (around 300°F or 150°C) for about 5-10 minutes until warmed through and slightly crisp again. If they’re from frozen, you can often reheat them directly from frozen in the oven for a few minutes longer, or let them thaw first and then reheat. I generally recommend adding the **Glaze Timing Advice** only when you’re ready to serve them. If you glaze them before storing, especially in the fridge or freezer, the glaze can become sticky or even melt off. It’s best to make the glaze and drizzle it just before serving for that perfect finish.
Frequently Asked Questions
Final Thoughts
So there you have it – my absolute favorite lemon raspberry scones! I truly believe this recipe captures that perfect balance of bright, zesty, and sweet that makes baked goods so utterly delightful. They’re proof that you don’t need complicated techniques or fancy ingredients to create something truly special. Whether you’re looking for a quick breakfast treat, a show-stopping brunch addition, or just a little something to brighten your day, these scones are a winner. I love them because they feel both comforting and a little bit elegant, and the smell that fills the house when they’re baking is just heavenly. If you enjoyed this recipe, you might also love my Blueberry Lemon Loaf Cake or my Raspberry Almond Scones – they have a similar happy, fruity vibe! I truly hope you give these lemon raspberry scones a try. I can’t wait to hear what you think and see your creations! Please feel free to leave a comment below with your thoughts, any variations you try, or how they turn out. Happy baking, everyone!

Lemon Raspberry Scones
Ingredients
Main Ingredients
- 2.5 cups all-purpose flour
- 0.33 cup granulated sugar
- 2.5 teaspoons baking powder
- 0.5 teaspoon salt
- 0.5 cup cold unsalted butter cut into cubes
- 1 large egg
- 0.5 cup heavy cream
- 1 medium lemon zested
- 1 cup fresh raspberries
Instructions
Preparation Steps
- Preheat oven to 400°F (200°C). Line a baking sheet with parchment paper.
- In a large bowl, whisk together the flour, sugar, baking powder, and salt.
- Cut in the cold butter using a pastry blender or your fingertips until the mixture resembles coarse crumbs.
- In a small bowl, whisk together the egg and heavy cream.
- Add the wet ingredients to the dry ingredients along with the lemon zest. Mix until just combined. Do not overmix.
- Gently fold in the raspberries.
- Turn the dough out onto a lightly floured surface and gently pat into a disc about 0.75 inches thick.
- Cut the disc into 8 wedges using a sharp knife or bench scraper.
- Place the scones on the prepared baking sheet.
- Bake for 12-15 minutes, or until golden brown and cooked through.
- Let cool slightly on the baking sheet before transferring to a wire rack.