I’ve learned to уважание the kitchen clock over the years, and this particular dish became my quiet, cheerful anchor on hectic weeknights. The scent of butter and savory cheese drifting through the house makes dinner feel like a warm hug, even when the day was a little chaotic. This is Instant Pot Mac and Cheese at its finest: ultra-creamy, deeply comforting, and ready in a fraction of the time it used to take on the stove. It’s the dish I pull out when everyone’s grumbling about hungry tummies, but we still want something homemade and cozy. I’ll be honest—this isn’t just a shortcut; it’s a better, silkier version of the classic we grew up with. The Instant Pot does the heavy lifting, the cheese does the talking, and you get to skip the babysitting of a million little pot splashes. This one’s a lifesaver on busy nights, and my kids actually ask for seconds, which is basically a parental victory lap in my book.
Thank you for reading this post, don't forget to subscribe!What is an Instant Pot Mac and Cheese?
Instant Pot Mac and Cheese is basically macaroni swimming in a velvety cheese sauce, but pressure-cooked into instant creaminess. Think of it as macaroni and cheese that hits all the right notes with less stirring and more staying power in the pot. It’s essentially pasta cooked with a silky roux, a splash of milk, and a personal blend of cheeses, all brought together under pressure to yield a sauce that clings to every elbow noodle. The name hints at modern convenience, but the flavor feels timeless—nostalgic, a little indulgent, and absolutely crowd-pleasing. It’s easy to customize with your go-to cheese mix, and it travels well from family dinner to lunchbox leftovers. If you’ve ever wondered whether you can achieve a glossy, restaurant-worthy sauce in a home kitchen without babysitting a sauce on the stove, this recipe proves you can. It’s comfort in a single pot, and I’m thrilled to share it with you.
Why you’ll love this recipe?
What I love most about this version is the balance between ease and indulgence. It’s not merely quick; it’s quietly luxurious in texture and flavor, even when you’re juggling a dozen other things. Here are the reasons this recipe sits at the top of my weeknight rotation:
- Flavor: The sauce is creamy without being heavy, with a gentle tang from mustard and a kiss of paprika that lingers on the palate. The cheese blend—cheddar, mozzarella, and a touch of parmesan—melts into a glossy finish that coats every noodle perfectly. I’ve tested this with a dash of smoked cheddar for a subtle smoky undertone, and trust me on this: it’s magic.
- Simplicity: One pot, minimal stirring, and a pressure-cook step that seals in all the flavors. It’s the kind of recipe you can start after the kids finish their baths and still have a bubbling sauce by the time you hear “What’s for dinner?” from the kitchen doorway.
- Cost-efficiency: What is the best way to measure cost-efficiency? Pantry staples do the heavy lifting—pasta, a few cheeses, and a splash of milk. It’s comfort food that won’t break the bank, especially if you buy cheese in blocks and shred it yourself for better melty texture.
- Versatility: This base loves mix-ins. I rotate in crispy pancetta, roasted broccoli, or peppery jalapeños depending on what’s in the fridge. And if you’re cooking for little ones, you can dial back the heat and add extra cheese for that extra-silky finish. If you’ve got a craving for something extra, you can even toss in a spoonful of truffle oil at the end for a wow moment.
What I’ve learned after countless dinners is that the texture is everything. The pot’s heat and the quiet simmer during pressure release create a sauce that clings to every noodle, not a puddle at the bottom. This is the kind of dish that makes a family room feel cozy, even if the day didn’t go as planned. If you’re looking for a cheese-forward dish that still feels like home, you’ve found your new staple. For more variations, you’ll want to check out other creamy pasta posts I’ve tucked into my blog’s archives—you’ll find a few that pair especially well with this technique.
How do I make an Instant Pot Mac and Cheese?
Quick Overview
Here’s the streamlined magic: you sauté a simple roux in the Instant Pot to build a creamy base, shower in dry pasta and a cozy combo of liquids, lock the lid, and cook under high pressure until the noodles are perfectly tender and the sauce has glossy body. A quick stir in the cheese blends (and a handful reserved for folding in at the end) finishes the sauce, then you can top with a breadcrumb crumble if you like a little crunch. It’s hands-off enough to let you tend to the rest of dinner without babysitting a pot, but rich enough that everyone feels satisfied and cared for.
Ingredients
For the Main Batter:
- 12 oz (340 g) elbow macaroni or shells
- 1 3/4 cups (420 ml) chicken or vegetable broth
- 1 cup (240 ml) whole milk, warm
- 1/2 cup (120 ml) heavy cream or half-and-half (optional for extra creaminess)
- 2 tablespoons unsalted butter
- 2 tablespoons all-purpose flour
- 1/2 teaspoon kosher salt (adjust to taste)
- 1/4 teaspoon black pepper
- 1/2 teaspoon mustard powder or 1 teaspoon Dijon (optional)
- 1/4 teaspoon smoked paprika (optional for depth)
- 2 cups shredded cheddar cheese
- 1 cup shredded mozzarella or Gouda for extra melt
- 2 ounces cream cheese, softened (optional but creamy magic)
For the Filling:
- 1 cup additional shredded cheese (a mix of cheddar and parmesan works beautifully)
- 2 tablespoons cream cheese or ricotta to keep the sauce extra silky
- 1/4 teaspoon garlic powder for a gentle savory kick
- Fine salt and white pepper to taste
For the Glaze:
- 2 tablespoons unsalted butter, melted
- 1 tablespoon grated parmesan
- 1/2 teaspoon paprika or chili powder for a subtle kiss of heat
- Pinch of flaky salt
Step-by-Step Instructions
Step 1: Preheat & Prep Pan
Set your Instant Pot to the Sauté function and melt the butter until it starts to sizzle. This is the moment you know you’re about to make something creamy and cozy. Whisk in the flour and cook for 1 minute, just until the raw scent of flour fades and a pale blond paste forms. This roux step is the backbone of the sauce—don’t rush it. While the roux rests, grate your cheese, measure out the milk and broth, and set aside the pasta. I always like to have the cheese ready to go so there’s no scrambling once the pressure releases.
Step 2: Mix Dry Ingredients
Stir in the salt, pepper, mustard powder, and paprika into the roux. These dry components wake up the flavor and give the sauce a little personality. If you’ve got garlic powder or a pinch of cayenne you want to sneak in, sprinkle it in here. A little goes a long way, and you’ll thank yourself when the sauce coats every noodle perfectly.
Step 3: Mix Wet Ingredients
In a separate bowl, whisk together the warm milk, broth, and heavy cream. The goal is to have a smooth liquid that blends quickly with the roux. If you’re using Cream Cheese, whisk it into the wet mixture until it’s fully smooth. This is the secret to a dessert-level creaminess without needing to babysit the sauce on the stove for ages.
Step 4: Combine
Pour the wet mixture into the Instant Pot with the roux and give it a quick stir. Add the dry pasta, pushing it down so it’s mostly submerged in the liquid. Lock the lid, seal the vent, and set to High Pressure for 4 minutes. Quick-release once the timer beeps, and open the lid with confidence—the pasta will be just tender and the sauce glossy and ready for its cheese cameo.
“Packed with flavor and so simple. Exactly what I wanted from this Instant Pot Mac and Cheese: 7 Secrets to Creamy Perfection!”
Step 5: Prepare Filling
Stir in the 2 cups of shredded cheese for the main sauce, plus the reserved Cream Cheese if you’re using it. This is where the texture shifts from bright, runny sauce to a lush, clingy coating. If you prefer extra cheese pull, fold in the second cup of cheese a little at a time and watch it melt into a seam of cheesiness. Taste and adjust with a pinch more salt if needed. If you’ve got a dollop of sour cream or a splash of hot sauce, now’s the time to fold it in to add personality without overpowering the cheese.
Step 6: Layer & Swirl
If you like a little swirl of color and texture, you can fold in a small amount of reserved cheese to create a marbled effect, leaving some cheese to be sprinkled on top. For a crunchy topping, mix the breadcrumb topping with melted butter and a pinch of parmesan, then sprinkle it over the top after you’ve poured the cheese into serving bowls. The swirl and top layer are optional, but they give you a restaurant-worthy finish without much extra work.
Step 7: Bake
For a crisper top, you can finish this under a hot broiler or in a hot oven for 5–7 minutes after transferring to a baking dish. If you’re lucky enough to have an Air Fryer lid, a quick 2–3 minute puff on the top will do wonders. I love the warm, nutty scent that rises when the crumbs brown slightly. If you’re serving straight from the pot, skip this step—simply spoon into bowls and let the melty cheese shine on its own.
Step 8: Cool & Glaze
Let the mac and cheese rest for 3–5 minutes before glazing. A light glaze—melted butter whisked with parmesan, paprika, and a tiny pinch of salt—adds a glossy finish and a touch of buttery richness. Drizzle or toss the glaze with a gentle hand; you want the sauce to gleam, not slide off the pasta. The resting time helps the sauce thicken a bit and makes the dish easier to scoop and plate.
Step 9: Slice & Serve
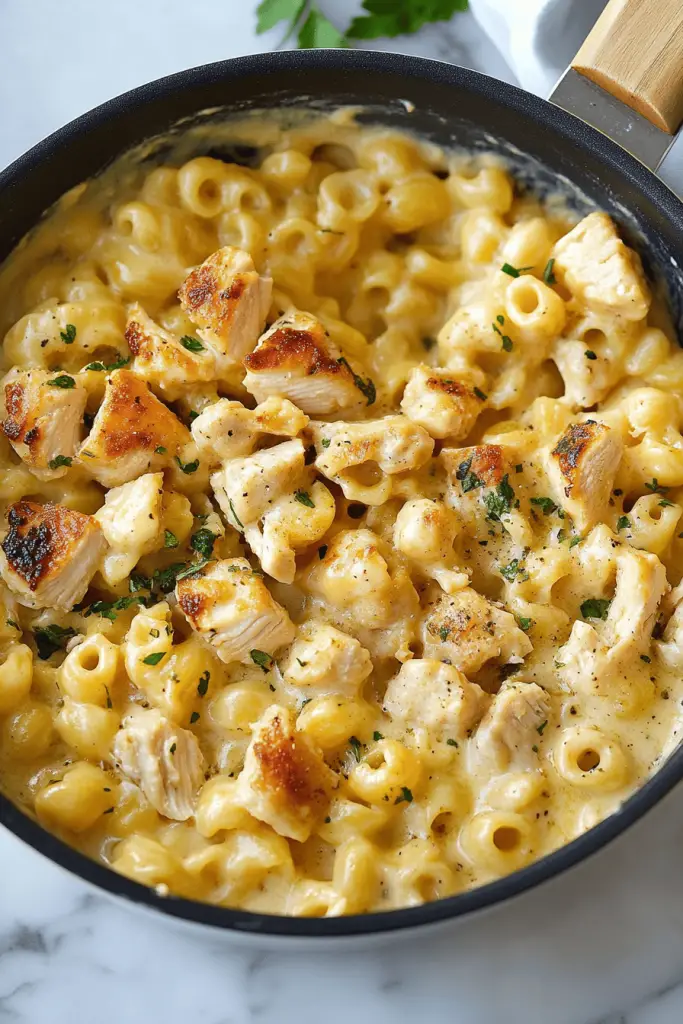
Portion into bowls and top with a final shower of cheese and the optional breadcrumb crunch. The first bite should reveal a creamy, silky sauce that clings to each noodle, with that satisfying cheddar bite and a whisper of sweetness from the milk. I love finishing with a light dusting of cracked pepper and a couple of chives or parsley for color. If you want to make it feel extra homestyle, serve it with a simple green salad and some crusty bread to mop up every last bit of sauce. This isn’t just dinner—it’s a little celebration in a bowl, especially when you’re feeding a hungry crew after a long day.
What to Serve It With
Instant Pot Mac and Cheese shines on its own, but it’s even better when it has company. Here are some pairing ideas that suit different moods and occasions:
For Breakfast: A playful, savory morning plate—serve alongside crispy bacon and a soft-scrambled egg, with a light green salad on the side for a balanced start. The creaminess pairs surprisingly well with a robust mug of coffee or a cinnamon-spiced latte. It’s a fun way to stretch leftovers into a weekend brunch vibe.
For Brunch: Think a laid-back table with a simple fruit platter, a dollop of Sour Cream on the side, and a glass of sparkling water with a squeeze of lemon. You can bump the cheese by adding a little extra cheddar on top and setting out a few hot sauces for guests who like a bit of kick.
As Dessert: Dessert might feel like a stretch, but a cheese-forward, slightly sweet-savory take can work in a pinch. Consider a tiny sprinkle of nutmeg and a maple glaze on the top for a cheeky, indulgent finish. If you still want something sweeter, you could pair with a bold fruit compote and a dollop of whipped cream on the side to balance the richness.
For Cozy Snacks: Scoop into small ramekins, top with breadcrumbs, bake briefly, and serve with a cup of tea or a hot chocolate. It’s the kind of snack that feels like a hug in between errands or after practice. My kids love dipping in with little forks and telling me which noodle they snagged first—that tiny moment of joy is what keeps me coming back to this dish.
Top Tips for Perfecting Your Instant Pot Mac and Cheese
These little refinements have saved my dinner countless times. They’re the things I wish I’d known sooner, and I’m sharing them with you so your version is even better from day one.
Pasta Prep: Use a short pasta shape like elbow, shells, or c = one that holds onto the sauce well. If you go with a longer shape, cut or bend it so it fits in the pot without bending too much. Undercook by 1 minute if you’re unsure—the residual heat will finish the job as it rests in the sauce, and you’ll avoid a mushy texture.
Mixing Advice: Don’t over-stir after the cheese goes in. A gentle fold rather than vigorous stirring keeps the sauce from breaking and maintains that glossy look. If you notice a few lumps, a quick whisk with the pot off the heat can smooth it right out.
Swirl Customization: Reserve a small portion of cheese to fold in at the end for a pretty marbled effect and extra melty pockets. You can also swirl in a spoonful of sour cream or cream cheese for a tangy, creamy finish.
Ingredient Swaps: Gluten-free pasta works nicely here; just follow package directions for timing. For non-dairy options, swap in almond milk and a dairy-free cheese blend; you’ll still get that silky texture, though the flavor will skew a touch different. If you’re using sharp cheddar, cut back a bit on salt to compensate for the saltiness of the cheese.
“I don’t know if I’ve ever eaten a better Instant Pot Mac and Cheese: 7 Secrets to Creamy Perfection. The rub alone is wonderful, but the sauce??? Over the top!”
Baking Tips: If you’re finishing under the broiler, keep a watchful eye. A minute too long and you’ll scorch the top; a few seconds can mean the difference between golden toppings and a bland finish. For a truly crisp top without the oven, an air fryer lid is a fantastic tool.
Glaze Variations: The glaze is a flexible finish. Try a garlic-parmesan glaze for a savory lift, or a chili-lime glaze for a bright kick. For a simpler option, a drizzle of browned butter with pepper and parsley gives a glossy sheen and a toasty aroma that makes the dish feel extra special.
Lessons learned: cheese quality matters more than you think. Freshly shredded cheeses melt more smoothly and give you that lush, cohesive sauce. I’ve found block cheese, grated at home, makes a world of difference compared to pre-shredded varieties. And trust me, a quick rest before serving helps the sauce settle into a perfect, spoonable texture. If you’ve got a small crowd, double the batch and freeze the leftovers; the sauce freezes well and reheats beautifully with a little extra splash of milk.
Storing and Reheating Tips
Leftovers happen, and they can be glorious if you store them right. Here’s how I keep this dish at peak creaminess for as long as possible.
Room Temperature: Don’t leave mac and cheese out for more than two hours. If you’re taking it to a potluck or a party, pack it in a thermal container and keep the lid on to retain moisture and heat.
Refrigerator Storage: Transfer to an airtight container within two hours of cooking. It will stay delicious for 3–4 days. When reheating, add a splash of milk or cream and a dab of butter to revive that creamy texture, then gently warm on the stove or in the microwave, stirring occasionally to keep it from drying out.
Freezer Instructions: You can freeze the leftovers, but the texture changes a bit. Freeze in individual portions with a light layer of sauce to protect from freezer burn. Thaw overnight in the fridge and reheat with a splash of milk. You might need to whisk in a touch more cheese to recover the silkiness.
Glaze Timing Advice: If you plan to glaze, keep the glaze separate until you’re reheating. Warm the pasta first, then drizzle with glaze right before serving to preserve shine and flavor.
Frequently Asked Questions
Final Thoughts
This Instant Pot Mac and Cheese is more than a weeknight saver; it’s a little ritual you can bring to the table any night you crave comfort with minimal effort. It’s the kind of dish that makes the entire kitchen smell like a hug, drawing everyone in with that first spoonful of creamy, cheesy goodness. If you try it, I’d love to hear how you customize your cheese blend or what add-ins became your family’s favorites. Do you fold in a little crispy pancetta for a salty pop, or add a handful of broccoli for color and texture? Comment below with your twists, rate the recipe, and share photos of your bubbling pots and glossy forks. Happy baking—and even happier eating!

Instant Pot Mac and Cheese
Ingredients
Main Ingredients
- 16 oz elbow macaroni
- 4 cups water or chicken broth
- 0.25 cup unsalted butter cut into pieces
- 12 oz evaporated milk
- 8 oz sharp cheddar cheese shredded
- 4 oz Monterey Jack cheese shredded
- 4 oz cream cheese cubed
- 1 tsp salt
- 0.5 tsp black pepper freshly ground
- 0.25 tsp dry mustard powder optional, enhances cheese flavor
Instructions
Preparation Steps
- Combine the elbow macaroni, water (or broth), and salt in the inner pot of your Instant Pot.
- Secure the lid and set the valve to sealing. Cook on High Pressure for 4 minutes.
- Once cooking is complete, perform a quick release of the pressure by carefully turning the valve to venting. Once the float valve drops, open the lid.
- Stir in the butter, evaporated milk, sharp cheddar cheese, Monterey Jack cheese, cream cheese, black pepper, and dry mustard powder (if using).
- Stir continuously until all the cheeses are completely melted and the sauce is smooth and creamy. The residual heat will melt the cheese.
- Serve immediately and enjoy your delicious Instant Pot Mac and Cheese!


