
There’s just something about sitting outside, a cool breeze on my face, and that irresistible smell of grilled shrimp wafting through the air that instantly takes me back to summer nights at my grandparents’ house. I remember peeling shrimp with my mom, getting all sticky with that sweet shrimp juice, and sneaking bites before dinner was even ready. Over the years, I’ve perfected my grilled Shrimp Recipe, and I gotta say — it’s become one of those meals everyone in my family asks for again and again. It’s simple, succulent, and tastes like a fancy restaurant but honestly requires almost no time or fuss. Trust me, once you try this, grilled shrimp will become your new favorite way to eat seafood — perfect for everything from quick weeknights to weekend barbecues. And the best part? It’s incredibly versatile, so you can dress it up or down depending on your mood. Ready to get grilling? Let’s do this!
Thank you for reading this post, don't forget to subscribe!What is grilled shrimp?
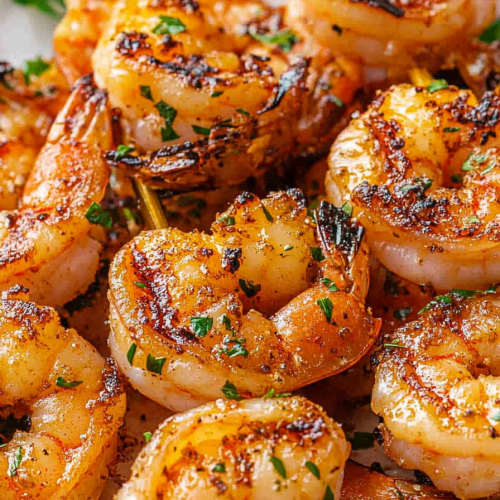
Think of grilled shrimp as the seafood version of a summer blockbuster — bright, bold, and totally satisfying. It’s basically shrimp that’s been marinated in a simple, flavorful mixture and cooked quickly on the grill, giving it those irresistible char marks and smoky undertones. The name is pretty straightforward: “grilled” because it’s cooked over high heat on a barbecue or grill pan, and “shrimp” because it’s all about those tiny, tender crustaceans. But don’t let the simplicity fool you — good grilled shrimp packs a punch of flavor and a perfect balance of juicy tenderness and smoky crunch. It’s popular in coastal regions and often associated with beach trips and lazy cookouts, but honestly, it’s a year-round favorite in my house. Once you master the grilling process, you’ll see why it’s a no-brainer for any seafood lover!
Why you’ll love this recipe?
What I love most about this grilled shrimp is how easy it is to make without sacrificing flavor. I used to shy away from seafood because I thought it was complicated or expensive, but this recipe changed everything. The marinade is just a few ingredients — lemon juice, garlic, a splash of Olive oil, and some seasonings — and it gives the shrimp a bright, zesty kick that’s downright addictive. Plus, the grilling itself is quick and foolproof, especially once I learned a few tricks to get those perfect char marks. My kids actually ask for seconds of this — they love how juicy and flavorful it is, and I love how it’s healthy and light. The cost is budget-friendly, too, because shrimp is surprisingly affordable when you buy in bulk or on sale. And if you’ve ever made stir-fry or pasta with shrimp, you’ll appreciate how versatile this dish is. Serve it over rice, toss into salads, or even put in tacos — whichever way you choose, it always disappears in minutes at my house. This recipe is a lifesaver on busy nights because I can marinate everything early in the day, throw it on the grill, and have dinner on the table in no time. It’s honestly become my go-to for easy, impressive meals.
How do I make grilled shrimp?
Quick Overview
This grilled Shrimp Recipe is all about simplicity. You start by marinating the shrimp in a flavorful mixture, then thread them onto skewers or just toss them directly onto the grill. The secret is high heat — quick searing gives that smoky flavor and keeps the shrimp tender. When they’re nicely charred, you’re almost there. A quick brush with some fresh lemon or herbs at the end elevates the flavor even more. It’s a straightforward process that gives you restaurant-quality results with minimal effort. Seriously, once you try this, you’ll wonder why you ever bothered with complicated seafood recipes. Just remember, don’t overcook — shrimp go from perfect to rubbery in seconds, so keep a close eye!
Ingredients
For the Marinade:
– 1/4 cup olive oil (good quality, cold-pressed if possible)
– 3 cloves garlic, minced (fresh is best)
– Juice of 1 large lemon (or lime if you prefer)
– 1 teaspoon smoked paprika (adds a lovely smoky flavor)
– 1/2 teaspoon red pepper flakes (adjust for heat preference)
– Salt and freshly ground Black Pepper, to taste
– Optional: chopped fresh herbs like parsley or cilantro for added freshness
For the Shrimp:
– 1 pound large shrimp (15-20 count), peeled and deveined, tails on or off depending on your preference
– Skewers or a grilling basket (if using skewers, soak wooden ones in water for 30 minutes to prevent burning)
Step-by-Step Instructions
Step 1: Preheat & Prep Pan
Get your grill heated to about 400-450°F (medium-high heat). If you’re using a charcoal grill, wait until the coals are ashed over and glowing. For a gas grill, just turn it on and give it a few minutes to reach the right temperature. Meanwhile, if you’re using wooden skewers, soak them in water to prevent burning. Lay out a baking sheet or plate for your marinated shrimp and skewers if needed.
“I don’t know if I’ve ever eaten a better How to Recreate Texas Roadhouse Shrimp. The rub alone is wonderful, but the sauce??? Over the top!”
Step 2: Mix Dry Ingredients
In a small bowl, whisk together all your dry seasonings — smoked paprika, red pepper flakes, salt, and pepper. This mixes the flavors evenly and ensures nothing gets lost during the marinade process. I always do this step first to have everything ready before garlic and lemon juice come into play.
Step 3: Mix Wet Ingredients
In a larger bowl or a resealable bag, combine olive oil, lemon juice, garlic, and the dry spice mixture. Whisk everything together until emulsified. I like doing this because it’s mess-free and easy to toss the shrimp into the marinade. Trust me, a good marinade is the secret to that vibrant, juicy flavor!
Step 4: Combine
Add the shrimp to the marinade, either in the bowl or bag, and toss gently to coat all of them evenly. If you have time, let it sit at room temperature for 15-20 minutes, or refrigerate for up to an hour for even more flavor. Don’t skip this step — it infuses the shrimp with those bright, garlicky, smoky notes.
Step 5: Prepare Filling
If you’re using skewers, thread the shrimp on evenly, about 3-4 per skewer. If not, just plan to toss the shrimp directly onto the grill. You can also sprinkle some extra herbs on top before grilling if you love that fresh pop of flavor.
Step 6: Layer & Swirl
Place the skewered shrimp on the grill, spacing them evenly. You want a nice sizzle when they hit the hot grates. You can also swirl the shrimp a bit with tongs halfway through cooking to get those gorgeous grill marks and ensure even cooking. Keep an eye on them so they don’t overcook — a few minutes per side, usually, is enough.
Step 7: Bake
Wait until the shrimp turns opaque and has those perfect caramelized grill lines. They usually take about 2-3 minutes per side. If you’re unsure, cut into one to check — it should be pink and firm, not translucent or rubbery. This is the moment you get to enjoy that irresistible smoky aroma wafting off the grill!
Step 8: Cool & Glaze
Once cooked, transfer the shrimp to a platter and squeeze fresh lemon over the top. If you want an extra layer of flavor, brush them lightly with some herb-infused butter or a little extra marinade. Wait just a minute for everything to soak in before serving — this ensures the flavors stay juicy and bold.
Step 9: Slice & Serve
Serve your grilled shrimp hot, placed on a bed of fresh greens, or tucked into a warm tortilla. I love pairing it with a side of grilled veggies or a simple rice pilaf. My family always devours this in minutes, and I usually have to make a second round!
“Made the How to Recreate Texas Roadhouse Shrimp tonight and wow — perfect weeknight dinner. Will definitely make again!”
What to Serve It With
This grilled shrimp is so versatile, it can shine at almost any meal. For breakfast, toss them into a spicy breakfast bowl with eggs and avocado — trust me, it’s a revelation. At brunch, serve alongside a fresh, citrusy salad with a light vinaigrette and a chilled glass of White Wine or sparkling water with lime. As a dinner main, pair it with grilled vegetables, a handful of fluffy rice, or even a bed of pasta tossed lightly in olive oil and garlic. My personal favorite is serving these shrimp with a zesty mango salsa and warm corn tortillas, making it into quick shrimp tacos that disappear in minutes. And honestly, I even toss leftovers into chopped salads the next day — they’re just so good cold or at room temp. No matter how you serve it, this dish always seems to brighten the table and bring a smile to everyone’s face, including mine.
Top Tips for Perfecting Your Grilled Shrimp
After making this so many times, I’ve picked up a few tricks to ensure each batch is better than the last. First, always buy fresh, high-quality shrimp — they make all the difference in flavor and texture. I like to peel and devein mine myself; it’s quicker than you think and you get that satisfying clean look, but honestly, pre-peeled works just fine if you’re pressed for time. When marinating, don’t forget to turn the shrimp so every side gets coated. I’ve tested marinating with different oils — coconut oil adds a subtle sweetness, but olive oil keeps it classic. Be careful not to over-marinate; 30 minutes is plenty, or it can start to break down the shrimp’s delicate texture. When grilling, oil your grates well to prevent sticking — I learned this the hard way — and don’t overcrowd the grill. Watch them like a hawk: they go from perfect to rubber in seconds. As for the glaze, I love finishing with a splash of fresh herbs or even a drizzle of honey for a touch of sweetness. Honestly, each tweak and tip I’ve picked up over the years makes this dish more dynamic and forgiving, so don’t hesitate to experiment!
Storing and Reheating Tips
If you happen to have leftovers (which I doubt, but just in case!), store them promptly in an airtight container in the fridge. They’ll stay fresh for about 2-3 days. To reheat, the quickest way is on a hot skillet with a little olive oil, just a couple of minutes until warmed through — no microwave! Cold shrimp are also great on salads or chopped into cold pasta. If you want to freeze leftover shrimp, lay them flat on a baking sheet first, freeze until firm, then transfer to a freezer bag. They’ll keep for up to 3 months. When you’re ready to enjoy again, thaw in the fridge overnight and reheat gently on the stove. A quick tip: If you want to keep that smoky flavor, brush a little oil on the shrimp before reheating and toss on the grill or under the broiler for a couple of minutes. Just be careful not to overcook, as seafood dries out easily.
Frequently Asked Questions
Final Thoughts
Honestly, once you nail the art of grilling shrimp, it becomes a secret weapon in your dinner arsenal. It’s quick, versatile, and absolutely bursting with flavor — no complicated techniques or fancy ingredients required. I’ve made this countless times, and I promise, it’s one of those dishes that gets everyone’s approval, from picky eaters to seasoned seafood lovers. The smell alone draws everyone to the table, and the taste always keeps people coming back for more. Plus, it’s so adaptable; you can turn it into tacos, salads, pasta, or just eat it on its own with some crusty bread. I love that it’s a healthy, protein-packed option that doesn’t leave me spending hours in the kitchen. If you try it, I bet your family or friends will ask for it again and again just like mine always do. So, go ahead — fire up that grill and enjoy some of the best shrimp you’ve ever tasted. Happy grilling! And do share your own twists or photos — I love hearing how it turns out for you!
grilled shrimp
Ingredients
Main Ingredients
- 1.5 pounds jumbo shrimp
- 0.25 cup olive oil
- 2 tablespoons lemon juice
- 2 tablespoons fresh parsley
- 3 cloves garlic
- 1 teaspoon dried oregano
- 0.5 teaspoon paprika
- 0.5 teaspoon salt
- 0.5 teaspoon black pepper
- 0.5 teaspoon crushed red pepper optional
- g lemon wedges for garnish
Instructions
Preparation Steps
- Peel the shrimp and devein them if needed, leaving the tails on.
- In a medium bowl, mix olive oil, lemon juice, parsley, garlic, oregano, paprika, salt, black pepper, and red pepper flakes until well combined.
- Add the shrimp to the marinade and toss until coated. Cover and refrigerate for at least 15 minutes.
- Preheat your grill to medium-high heat.
- Thread the shrimp onto skewers, about 4-6 per skewer.
- Grill the shrimp for 2-3 minutes per side until they are opaque and cooked through.
- Remove from grill, garnish with lemon wedges, and serve immediately.


