
Oh, hello there! Grab a mug of tea, or maybe even a little something stronger if it’s that time of day. I’ve been meaning to share this with you for ages. You know how sometimes you get that *craving*? That specific, deep-down yearning for something cool, refreshing, and just *perfectly* sweet? For me, that craving almost always leads to Homemade Peppermint Patties. Forget those store-bought ones that feel like little frozen hockey pucks of sugar. We’re talking about melt-in-your-mouth, intensely minty, chocolate-covered bliss that you can whip up right in your own kitchen. I’ve tried so many variations over the years, and honestly, this peppermint patties recipe is the one that just *works*. It’s ridiculously easy, surprisingly quick, and the result? Pure magic. It’s like a little hug for your taste buds, and if you’re anything like me, you’ll be making these way more often than you probably should!
Thank you for reading this post, don't forget to subscribe!What Are Homemade Peppermint Patties?
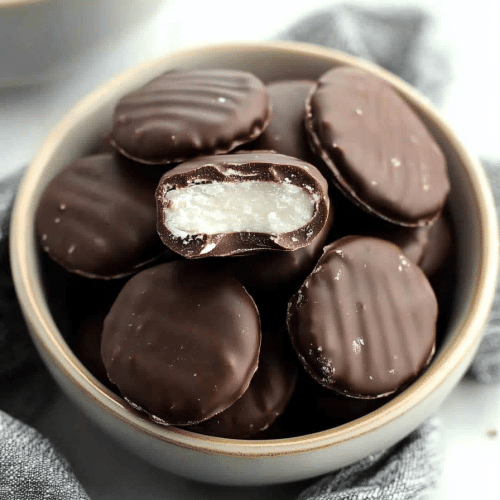
So, what exactly are we making here? Think of these Homemade Peppermint patties as your personal little treasures. They’re a soft, slightly chewy confection flavored with pure peppermint oil, all encased in a smooth, dark chocolate shell. It’s that classic combination we all know and love, but done the homemade way, which means you control the quality of ingredients and the intensity of that minty punch! The name itself, peppermint patties, pretty much says it all. They’re little discs, or “patties,” bursting with cool peppermint flavor. The beauty of making them yourself is that you can tailor them exactly to your liking. Want them intensely minty? Add an extra drop of oil. Prefer a milder hint? Ease up a bit. It’s your kitchen, your rules! They’re not hard candies, and they’re definitely not cookies. They sit in their own delicious category, perfect for a post-dinner treat or a little pick-me-up during the day.
Why you’ll love this recipe?
Honestly, there are so many reasons why I keep coming back to this specific Peppermint Patties recipe, and I just know you’re going to adore it too. Firstly, the flavor. Oh my goodness, the flavor! That bright, clean mint is just so wonderfully refreshing, and it pairs beautifully with the rich, slightly bitter dark chocolate. It’s sophisticated enough for guests but cozy enough for a quiet night in. Then there’s the simplicity. I can’t stress this enough – this recipe is a lifesaver when I’m short on time but still want to make something special. You don’t need any fancy equipment or a culinary degree. Seriously, if you can stir a few things together, you can make these! And speaking of saving money, the ingredients are incredibly budget-friendly. A little bit of butter, sugar, milk, peppermint, and some chocolate chips – you probably have most of it in your pantry right now! I also love how versatile they are. You can eat them as is, dust them with cocoa powder, or even dip them halfway. They’re perfect for holiday goodie bags, teacher gifts, or just keeping a secret stash all to yourself (I won’t tell!). What I love most about this recipe, though, is the sheer joy of making something so delicious from scratch. It feels like a real accomplishment, and sharing them with people I care about is the best part. It’s a little taste of homemade happiness, and who doesn’t need more of that?
How to Make Peppermint Patties
Alright, let’s get down to business! This is where the magic happens, and trust me, it’s easier than you think. The whole process involves mixing up a simple filling, shaping it, and then dipping it in chocolate. It sounds straightforward, and it really is! The most “difficult” part is letting them set properly so you get that clean chocolate shell. The key is patience, especially when it comes to the cooling and setting stages. But the payoff is so, so worth it.
Ingredients
For the Main Batter (the
- 3 cups powdered sugar, sifted (This is key for a smooth texture! Don’t skip sifting.)
- 1/4 cup unsalted butter, softened (Make sure it’s truly softened, not melted.)
- 2 tablespoons milk (Whole milk gives the best richness, but I’ve tested with almond milk and it actually made it even creamier! Your call.)
- 1 teaspoon pure peppermint extract (Or oil, if you’re feeling bold! Start with less and add more to taste.)
- Pinch of salt (Just a tiny bit to balance the sweetness.)
For the Glaze:
- 12 ounces good quality semi-sweet or dark chocolate chips (Using chocolate meant for melting or baking bars works best for a smooth shell.)
- 1 tablespoon coconut oil or vegetable shortening (This is what makes the chocolate nice and glossy and easier to work with.)
Step-by-Step Instructions
Step 1: Preheat & Prep Pan
You don’t actually need to preheat an oven for the filling, but you will need to prepare a baking sheet. Line a large baking sheet with parchment paper or wax paper. This is super important because your peppermint patties will stick otherwise. Make sure you have enough space in your fridge or freezer for this baking sheet, as it will need to chill.
“The Homemade Minty Delights Easy Peppermint Patties turned out amazing. My kids asked for seconds. Saving this one!”
Step 2: Mix Dry Ingredients
In a large mixing bowl, add the sifted powdered sugar and the pinch of salt. Give it a quick whisk to make sure everything is evenly distributed. This step might seem minor, but starting with evenly distributed dry ingredients helps create a uniform texture in the final patties.
Step 3: Mix Wet Ingredients
In a separate, smaller bowl, cream together the softened butter and the milk until it’s smooth and well combined. Then, stir in the peppermint extract. Be careful not to go overboard with the extract right away; you can always add more later if you want a stronger mint flavor. It’s easier to add more than to take away!
Step 4: Combine
Gradually add the wet ingredients to the dry ingredients, mixing with a spoon or a stand mixer on low speed. You want to mix until a stiff dough forms. It should be thick and slightly crumbly, but hold together when you squeeze it. If it seems too dry and won’t come together, add another teaspoon of milk, just a tiny bit at a time. If it’s too wet, add a tablespoon more of sifted powdered sugar. The goal is a pliable dough that you can easily shape.
Step 5: Prepare Filling
Once your dough is the right consistency, it’s time to shape those patties! You can do this in a few ways. The classic method is to roll small portions of the dough into little balls and then flatten them into about 1/2-inch thick discs. Or, you can roll the entire dough out between two sheets of parchment paper to about 1/2-inch thickness and then use a small cookie cutter (a mini round cutter works perfectly!) to cut out your patties. I often just use a small cookie scoop to get uniform portions and then flatten them with my hands. Place the shaped patties onto your prepared baking sheet.
Step 6: Layer & Swirl
This step is actually just about chilling the patties to firm them up before dipping. Once all your patties are shaped and on the baking sheet, place the entire sheet into the refrigerator for at least 30 minutes, or into the freezer for about 15 minutes. They need to be firm enough so they don’t fall apart when you dip them in the warm chocolate. This chilling step is crucial for a neat chocolate coating!
Step 7: Bake
No baking involved here! The “cooking” happens when you melt the chocolate and dip your chilled patties.
Step 8: Cool & Glaze
Now for the fun part – the chocolate coating! Melt your chocolate chips with the coconut oil or shortening. You can do this in a microwave-safe bowl in 30-second intervals, stirring in between, until smooth. Or, use a double boiler method for extra control. Once melted and smooth, let it cool slightly – you don’t want it piping hot when it touches the chilled peppermint filling. Take your firm patties out of the fridge/freezer. Using a fork or a dipping tool, dip each patty into the melted chocolate, ensuring it’s fully coated. Let any excess chocolate drip back into the bowl. Place the chocolate-coated patties back onto your parchment-lined baking sheet. If you want to get fancy, you can use a fork to drizzle thin lines of contrasting chocolate (like White Chocolate) over the dark chocolate shell once it starts to set a bit. This step is purely for aesthetics, but it does look lovely!
Step 9: Slice & Serve
Let the chocolate-covered patties sit at room temperature until the chocolate is completely set, which usually takes about 30-60 minutes depending on your kitchen’s temperature. You can also pop them back in the fridge for about 10-15 minutes to speed this up, but don’t leave them in too long or condensation can form. Once the chocolate is firm, they are ready to be enjoyed! Store them in an airtight container. They are best served at room temperature or slightly chilled.
“I don’t know if I’ve ever eaten a better Homemade Minty Delights Easy Peppermint Patties. The rub alone is wonderful, but the sauce??? Over the top!”
What to Serve It With
These homemade peppermint patties are pretty much a standalone star, but they can also be lovely accompaniments to other treats or drinks. For breakfast? I know, it sounds a bit decadent, but honestly, a tiny peppermint patty with my morning coffee is a little moment of luxury I sometimes indulge in. It’s like a tiny reward to start the day! Presentation-wise, just a simple small plate with one or two. For a proper brunch spread, they can be a delightful little sweet bite after the main course. I love arranging them on a pretty tiered stand alongside some fruit salad or mini muffins. They add a pop of color and a refreshing finish. If you’re serving them as dessert, they are fantastic alongside a rich Chocolate Cake or a dense brownie. They cut through the richness beautifully. Think of them as a palate cleanser with a kick! And for those cozy snack times? They’re perfect. I’ll often have one with a glass of milk while I’m curled up with a good book. My kids go wild for them after dinner. They’re the perfect way to satisfy that sweet tooth without feeling overly heavy. We also love to pair them with a warm mug of hot chocolate, especially around the holidays. The mint and chocolate combination is just unbeatable then!
Top Tips for Perfecting Your Peppermint Patties
Over the years, I’ve learned a few tricks that make this peppermint patties recipe even better, and I’m more than happy to share them with you. First off, for the peppermint flavor, using good quality peppermint extract or oil is paramount. Don’t skimp here! Start with the amount I’ve listed and taste your filling mixture before you chill it. You can always add another drop or two, but you can’t take it away. For the dough consistency, it’s like Goldilocks – you want it just right. Too dry and it’ll crumble, too wet and it’ll be sticky and hard to handle. My trick is to mix it until it *just* comes together. If it seems a little crumbly, gently press it together. I’ve found that adding milk just a teaspoon at a time is the safest bet if it’s too dry. When it comes to shaping, consistency is key. Using a small cookie scoop ensures all your patties are roughly the same size, which means they’ll all set and coat evenly. I’ve also tried rolling the dough and using cookie cutters, which gives a super neat look, but honestly, just flattening discs with my hands is faster and works just as well. For the chocolate coating, the temperature matters. If your chocolate is too hot, it can melt the chilled filling. Let it cool slightly after melting. Also, using chocolate that’s designed for coating or baking bars will give you a much smoother, glossier finish than standard chocolate chips, though chips will work in a pinch! The coconut oil or shortening is my secret weapon for that perfect sheen and easy dipping. If you’re feeling adventurous with swirl patterns on top, make sure your base chocolate has set a little bit before you drizzle the contrasting color. You can use a toothpick to gently swirl it. Another thing I learned the hard way: make sure your baking sheets are truly lined with parchment or wax paper! I once tried to skip it, and let’s just say cleaning sticky peppermint dough off a baking sheet is not my idea of fun. For ingredient swaps, if you don’t have butter, you can use a good quality vegetable shortening, but the flavor won’t be quite as rich. For a dairy-free option, use a plant-based butter alternative and a plant-based milk. The outcome is still delicious! And finally, for baking, even though we aren’t technically baking, the setting time is crucial. Don’t rush the chilling or the chocolate setting. Patience is truly a virtue with these! If your chocolate starts to get too thick while you’re dipping, just pop it back in the microwave for 10-15 seconds to loosen it up.
Storing and Reheating Tips
Storing these delightful peppermint patties is thankfully quite straightforward, and they stay fresh for a good while, which is part of why I love making a big batch. At room temperature, they’re best stored in an airtight container, and they’ll keep well for about 5-7 days. Make sure they’re completely set before you put the lid on, though, otherwise, you might get some condensation. They don’t get stale quickly, which is great! If you live in a warmer climate or if your kitchen tends to be warm, you might want to store them in the refrigerator to ensure the chocolate coating stays firm and doesn’t get too soft. In the fridge, they’ll last even longer, probably for up to 2 weeks. Just pop them into an airtight container. When you’re ready to eat them from the fridge, I usually let them sit out for about 10-15 minutes to take the chill off and soften up a bit. They’re not really “reheated” in the traditional sense, but if you find they’ve become a bit too hard from being chilled, just let them come to room temperature. For longer storage, freezing is definitely an option! You can freeze the chocolate-coated patties for up to 2-3 months. Wrap them individually in plastic wrap, then place them in a freezer-safe bag or container. To thaw, just transfer them to the refrigerator overnight, and then let them come to room temperature. The glaze timing advice is really about ensuring you have a good coating. If you’re planning to store them for a while, make sure the chocolate is fully set before sealing them in their container. For immediate enjoyment, you can serve them once the chocolate is firm.
Frequently Asked Questions
Final Thoughts
So there you have it – my absolute favorite peppermint patties recipe! I truly hope you give these a try. They’re such a delightful little treat, perfect for satisfying those sweet cravings with a burst of cool mint and rich chocolate. They’re not just a dessert; they’re a little piece of homemade joy that’s surprisingly easy to create. Remember, the beauty of this recipe lies in its simplicity and the delicious results. If you’re a fan of these, you might also enjoy my [Link to another relevant recipe, e.g., Chocolate Chip Cookies] or my [Link to another relevant recipe, e.g., No-Bake Energy Bites] for more quick and tasty treats! I can’t wait to hear how yours turn out. Please feel free to leave a comment below with your own tips, variations, or just to let me know you made them! Happy baking, or should I say, happy candy making!
peppermint patties recipe
Ingredients
Peppermint Filling
- 7 oz marshmallow cream 1 jar (e.g., Fluff)
- 10 Tbsp unsalted butter softened
- 1.5 tsp vanilla extract
- 1 tsp peppermint extract
- 5.5 cups powdered sugar
Chocolate Coating
- 16 oz dark chocolate melting wafers 1 package (e.g., Ghirardelli)
- 8 oz white chocolate melting wafers optional, for decoration (e.g., football laces)
Instructions
Preparation Steps
- In a large mixing bowl, beat the marshmallow cream, softened butter, vanilla extract, and peppermint extract until fully combined and smooth.
- Gradually add the powdered sugar to the mixture, mixing on medium speed until well blended and a thick, uniform dough forms. This may take a couple of minutes for it to come together.
- Line a large baking sheet with parchment paper. Using approximately 1 tablespoon of the peppermint filling for each, shape into a ball and then flatten into traditional patty shapes. If desired, you can shape them into small footballs by pinching the ends. Continue until all filling is used.
- Cover the shaped peppermint patties with plastic wrap and freeze for at least 2 hours, or preferably overnight, until firm.
- Melt the dark chocolate melting wafers according to package directions (e.g., in a microwave or double boiler). Using a toothpick or fork, carefully dip each frozen peppermint patty into the melted chocolate. Tap gently to allow any excess chocolate to drip off, then place back on the parchment-lined baking sheet.
- Repeat until all peppermint patties are coated. The chocolate should set quickly due to the cold patties. Allow them to fully set at room temperature or in the refrigerator for a few minutes.
- If making football shapes, melt the white chocolate melting wafers according to package directions. Pour into a small ziploc bag and snip off a tiny corner. Pipe laces onto the chocolate footballs. The white chocolate will set quickly.
- Store the finished peppermint patties in an airtight container at room temperature.


