You know those days? The ones where a serious craving hits, the kind that only a warm, sweet treat can satisfy? For me, that craving almost always leads me straight to making a batch of homemade doughnuts. There’s just something magical about pulling them fresh from the oven, still warm and smelling like pure happiness. This recipe isn’t just my go-to; it’s become a weekend ritual in our house, a little slice of joy that’s surprisingly achievable even when life gets a bit hectic. Forget those pale imitations from the grocery store; these are the real deal – tender, fluffy, and bursting with flavor. Honestly, if you’ve ever been intimidated by making doughnuts from scratch, I promise this recipe will make you a believer. It’s like the comforting hug of a classic cake doughnut, but with an extra layer of love you can only get from your own kitchen. If you love a good Cinnamon Roll but want something a little quicker, these are your ticket!
Thank you for reading this post, don't forget to subscribe!What are home made doughnuts?
So, what exactly are these glorious Homemade Doughnuts we’re talking about? Think of them as little circles of happiness, baked to golden perfection. Unlike their fried cousins, these are baked, which makes them a little lighter and a lot less fussy to make at home. They get their incredible texture from a simple cake-like batter that’s not too dense and not too airy – just right. The name “doughnuts” itself conjures up images of those classic rings, often glazed or sugared, but this recipe takes it a step further, offering a delightful twist that’s both familiar and exciting. It’s essentially a wonderfully moist, subtly sweet cake that bakes up into these perfectly shaped treats, ready to be dressed up however you like. They’re the kind of baked good that feels special enough for a celebration but is simple enough for any Tuesday afternoon. It’s comfort food at its finest, really.
Why you’ll love this recipe?
There are so many reasons why this homemade doughnut recipe has earned a permanent spot in my recipe binder, and I’m sure you’ll feel the same way. First off, the flavor is just out of this world. They have this incredible balance of sweetness and a hint of vanilla that’s so comforting. The texture? Oh, it’s divine. Imagine a super tender, moist crumb that melts in your mouth. It’s not dense like some baked goods can be, nor is it too light; it’s just this perfect, satisfying chew. And the best part? They are surprisingly simple to whip up. I’ve made these on busy Saturday mornings when we had unexpected guests, and they were a lifesaver. The ingredients are all pantry staples, so you don’t need to make a special trip to the store, which is a huge win in my book. Plus, they’re incredibly cost-effective compared to buying gourmet doughnuts. What I truly adore, though, is their versatility. You can glaze them, dust them with cinnamon sugar, or even fill them. It’s like having a blank canvas for your sweet cravings! If you enjoy my super Easy Banana Bread Recipe for its simple charm and delicious results, you’re going to absolutely adore these homemade doughnuts for similar reasons – pure, unadulterated comfort. This recipe truly shines because it delivers exceptional taste and texture without demanding hours in the kitchen. It’s my secret weapon for when I want to impress, or just treat my family to something special, without the stress.
How do I make homemade doughnuts?
Quick Overview
Making these homemade doughnuts is a straightforward process that involves mixing a simple batter, pouring it into a greased doughnut pan, and baking until golden. The whole thing comes together pretty quickly, from gathering ingredients to pulling them out of the oven. What makes this method so fantastic is that it skips the sometimes-intimidating frying step, making them accessible for everyone. You get all the fluffy, tender goodness of a classic doughnut without the mess or fuss. It’s seriously a win-win!
Ingredients
For the Main Batter:
2 cups all-purpose flour: I always use unbleached for a better texture. Make sure it’s spooned and leveled, not scooped directly from the bag, to avoid a dense result. This is the foundation for our fluffy doughnuts.
1 cup granulated sugar: For that classic sweetness. You can reduce this slightly if you prefer a less sweet doughnut, but I find this amount just perfect.
2 teaspoons baking powder: This is our leavening agent, crucial for getting that lovely lift and airy texture. Make sure it’s fresh!
1/2 teaspoon salt: Balances the sweetness and enhances the other flavors.
1/4 teaspoon ground nutmeg: My secret ingredient! It adds a warm, cozy depth that makes these doughnuts truly special. You can omit it, but I highly recommend it.
1 large egg: Acts as a binder and adds richness. Let it come to room temperature for easier incorporation.
“Made the Homemade Doughnuts Easy and Delicious tonight and wow — perfect weeknight dinner. Will definitely make again!”
1 cup milk: Whole milk gives the best richness, but I’ve tested this with 2% and even almond milk, and it turns out wonderfully creamy each time.
1/4 cup unsalted butter, melted and slightly cooled: Don’t skip the butter! It adds tenderness and a lovely richness. Make sure it’s not too hot when you add it to the wet ingredients.
1 teaspoon vanilla extract: For that classic, comforting doughnut flavor. Good quality vanilla makes a difference!
For the Glaze (Optional but highly recommended!):
1 1/2 cups powdered sugar: Sifted to ensure a smooth, lump-free glaze.
2-3 tablespoons milk (or cream for extra richness): Start with 2 tablespoons and add more until you reach your desired drizzling consistency.
1/2 teaspoon vanilla extract: Or any other flavor extract you like!
Step-by-Step Instructions
Step 1: Preheat & Prep Pan
First things first, preheat your oven to 350°F (175°C). Then, get your doughnut pans ready. The most important part here is to grease them really well! I like to use a pastry brush with melted butter or cooking spray to make sure every nook and cranny is coated. This is vital to prevent the doughnuts from sticking, which would be a tragedy after all your hard work.
Step 2: Mix Dry Ingredients
In a large mixing bowl, whisk together the flour, granulated sugar, baking powder, salt, and nutmeg. Whisking them thoroughly ensures everything is evenly distributed, which means your leavening agent will work its magic uniformly. You want to see a consistent, pale yellow mixture with no streaks of baking powder or salt. This step is simple, but it sets the stage for perfectly structured doughnuts.
Step 3: Mix Wet Ingredients
In a separate medium bowl, whisk together the egg, milk, melted butter, and vanilla extract until they are just combined. It’s important that your melted butter has cooled slightly so it doesn’t cook the egg. You’re looking for a smooth, homogenous liquid mixture.
Step 4: Combine
Now, pour the wet ingredients into the dry ingredients. Using a spatula or wooden spoon, mix until just combined. Don’t overmix! Seriously, this is key to tender doughnuts. A few small lumps in the batter are totally fine; they’ll bake out. Overmixing develops the gluten in the flour, which can lead to tough, chewy doughnuts, and nobody wants that. Stop mixing as soon as you no longer see dry streaks of flour.
Step 5: Prepare Filling (If using)
If you decide to fill your doughnuts (and oh, you totally should!), now’s the time to get that ready. While the recipe doesn’t explicitly include a filling for the batter itself, you can prepare a quick fruit compote, chocolate ganache, or even a Cream Cheese filling to pipe in *after* baking. For a simple fruit filling, I often just simmer down some berries with a touch of sugar until thick. Make sure it’s cooled before using.
Step 6: Layer & Swirl (for specific types, not this basic cake doughnut)
This step is more for decorative or layered doughnuts, which is a different process. For this classic baked doughnut, we’re just going to pour the batter directly into the prepared pan!
“New family favorite! This Homemade Doughnuts Easy and Delicious was so flavorful and ridiculously easy. Crowd-pleaser for sure.”
Step 7: Bake
Spoon or pipe the batter into the prepared doughnut pans, filling each cavity about two-thirds full. Be careful not to overfill, or they’ll lose their shape. Bake for 10-12 minutes, or until a toothpick inserted into the thickest part of a doughnut comes out clean. The tops should be lightly golden brown. Keep an eye on them, as ovens can vary!
Step 8: Cool & Glaze
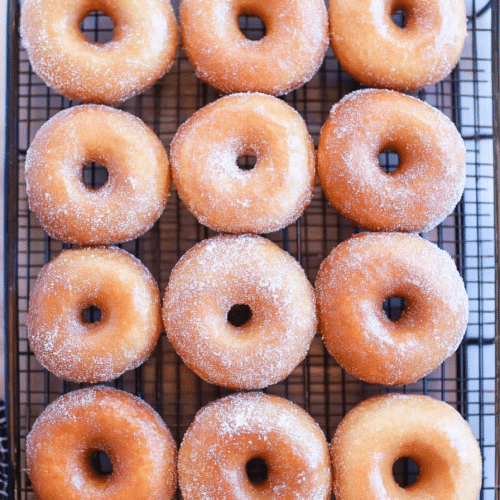
Let the doughnuts cool in the pans for about 5 minutes before carefully inverting them onto a wire rack to cool completely. While they’re cooling, whisk together the powdered sugar, 2 tablespoons of milk, and vanilla extract for the glaze. If it’s too thick, add more milk, a teaspoon at a time, until it’s pourable but not watery. Once the doughnuts are completely cool, dip the tops into the glaze or drizzle it over. Let the glaze set for about 15-20 minutes.
Step 9: Slice & Serve
These homemade doughnuts are best enjoyed fresh! If you’ve made filled doughnuts, now’s the time to carefully pipe your filling into the cooled doughnut using a piping bag with a thin tip. Serve them as is, or with a delicious cup of coffee. They are utterly divine when still slightly warm!
What to Serve It With
These homemade doughnuts are pretty self-sufficient, but pairing them with the right accompaniments can elevate the whole experience. For a casual breakfast, they are absolutely heavenly with a big, steaming mug of strong black coffee or a creamy latte. The warmth of the coffee cuts through the sweetness perfectly. If you’re planning a weekend brunch spread, I love to serve these alongside fresh fruit salad – the brightness of the berries and melon really complements the richness of the doughnuts. A small bowl of whipped cream or Greek yogurt can also be a nice touch for dipping. As a dessert, these are a showstopper. Imagine them dusted with a little powdered sugar and served with a scoop of vanilla bean Ice Cream. For those cozy afternoon snacks when you just need a little something sweet, they’re perfect with a glass of cold milk, just like when we were kids! My family loves them with a simple dusting of cinnamon sugar, and honestly, that’s often all they need.
Top Tips for Perfecting Your Homemade Doughnuts
After making these countless times, I’ve picked up a few tricks that I think make a big difference. When it comes to preparing your doughnut pan, seriously, don’t skimp on the greasing! I even use a little baking spray in my pans before I add the batter. A well-greased pan ensures that every single doughnut pops out cleanly, looking its best. Overmixing the batter is probably the most common pitfall; remember, just mix until you no longer see dry flour. A few lumps are a good thing! For the glaze, the consistency is key. If it’s too thick, your doughnuts will be overwhelmed; if it’s too thin, it’ll all run off. Aim for a consistency that drizzles nicely but still coats the doughnut. I’ve learned that a slightly cooler oven can sometimes result in a more tender doughnut, so if yours are browning too quickly, try lowering the temperature by about 10-15 degrees and baking for a few minutes longer. If you’re feeling adventurous with your glaze, a tiny bit of lemon zest or even a swirl of melted chocolate can add a whole new dimension. I once accidentally grabbed cinnamon instead of nutmeg, and it actually turned out to be a delicious variation! It’s all about experimenting and finding what you love. And for goodness sake, let them cool properly on the wire rack; trying to glaze warm doughnuts is a sticky, messy disaster waiting to happen!
Storing and Reheating Tips
These homemade doughnuts are truly at their best on the day they’re made. If you have any leftovers (which is rare in my house!), storing them properly is crucial. At room temperature, I’ll keep them in an airtight container for up to two days. They might lose a little bit of their initial fluffiness, but they’re still perfectly delicious. If you’ve glazed them, the glaze can get a bit sticky if they’re packed too tightly, so I usually place parchment paper between layers if I’m stacking them. For longer storage, refrigeration isn’t ideal for the texture of cake doughnuts as it can make them a bit dry. However, if you need to keep them for up to four days, an airtight container in the fridge will do. Just know they’ll be best reheated. For reheating, I love to pop a doughnut in a toaster oven for just a minute or two, or even in a dry skillet over low heat for a similar effect. This brings back a lovely warmth and a touch of that fresh-baked softness. You can also freeze unfrosted doughnuts for up to a month. Wrap them tightly in plastic wrap, then in foil or a freezer bag. Thaw them overnight at room temperature or gently warm them as mentioned above. If you’re freezing glazed doughnuts, I’d recommend glazing them after thawing and reheating for the best texture, as the glaze can sometimes become a little soft in the freezer.
Frequently Asked Questions
Final Thoughts
I truly hope you’ll give this homemade doughnut recipe a try. It’s one of those recipes that brings so much joy, both in the making and in the eating. There’s a special kind of satisfaction that comes from creating something so delicious with your own two hands, and these doughnuts are the perfect embodiment of that. They’re simple, incredibly flavorful, and make any occasion feel a little bit more special. If you love this recipe and are looking for other comforting bakes, you might also enjoy my fudgy brownies or my soft chocolate chip cookies – they’re all about that homemade goodness! I can’t wait to hear what you think of these doughnuts. Please leave a comment below to let me know how yours turned out, and feel free to share any fun variations or tips you discovered. Happy baking, and I hope your kitchen is filled with the wonderful aroma of these fresh doughnuts!
homemade doughnuts
Ingredients
Main Ingredients
- 1.125 cup whole milk warm to about 105°F
- 0.25 cup sugar
- 2.25 teaspoons instant yeast or active dry yeast (1 packet)
- 2 large eggs lightly beaten
- 1.25 sticks unsalted butter 10 tablespoons total (0.5 cup + 2 tbsp), melted
- 4 cups all-purpose flour
- 0.5 teaspoon salt
- 3 cups vegetable shortening or oil for frying
Glaze Ingredients
- 0.5 cup butter melted
- 2 teaspoons vanilla extract
- 4 cups powdered sugar
- 3 tablespoons whole milk or cream to thin glaze as needed
- 0.125 teaspoon salt a pinch
Instructions
Preparation Steps
- Warm the milk to about 105°F (just lukewarm). Add to a mixing bowl or stand mixer. Stir in sugar until dissolved, then add yeast and let rest for 5 minutes until foamy.
- Add the beaten eggs and melted butter to the mixer and stir to combine. Set mixer to low speed and gradually add flour and salt. Mix until dough forms, then continue mixing for 5 minutes until smooth and elastic. Let dough sit in the bowl for 10 minutes after mixing.
- Transfer the dough to a lightly oiled bowl, cover tightly with plastic wrap, and refrigerate for at least 2 hours or overnight. This step ensures the butter is solid and makes the dough easier to handle.
- On a lightly floured surface, roll the refrigerated dough to 0.5 inch thickness. Use a 3-inch donut cutter to cut circles, then cut out centers. Place shaped donuts and donut holes on a greased baking sheet. Cover and let rise for 1 hour until puffy and doubled in size.
- Heat 2–3 inches of oil or shortening in a heavy skillet or Dutch oven over medium heat to 360°F (use a candy thermometer). Carefully add 2–3 donuts at a time and fry for 90 seconds per side, or until golden brown. Fry donut holes for 30 seconds per side. Remove with a slotted spoon and drain on paper towels.
- To make the glaze: Melt butter in a medium bowl. Add vanilla, powdered sugar, and salt. Stir into a thick paste. Gradually add milk, 1 tablespoon at a time, until the glaze is smooth and of 'school glue' consistency.
- Dip warm donuts fully into the glaze, flipping to coat both sides. Return to a cooling rack to set or enjoy immediately. Store leftovers in an airtight container.


