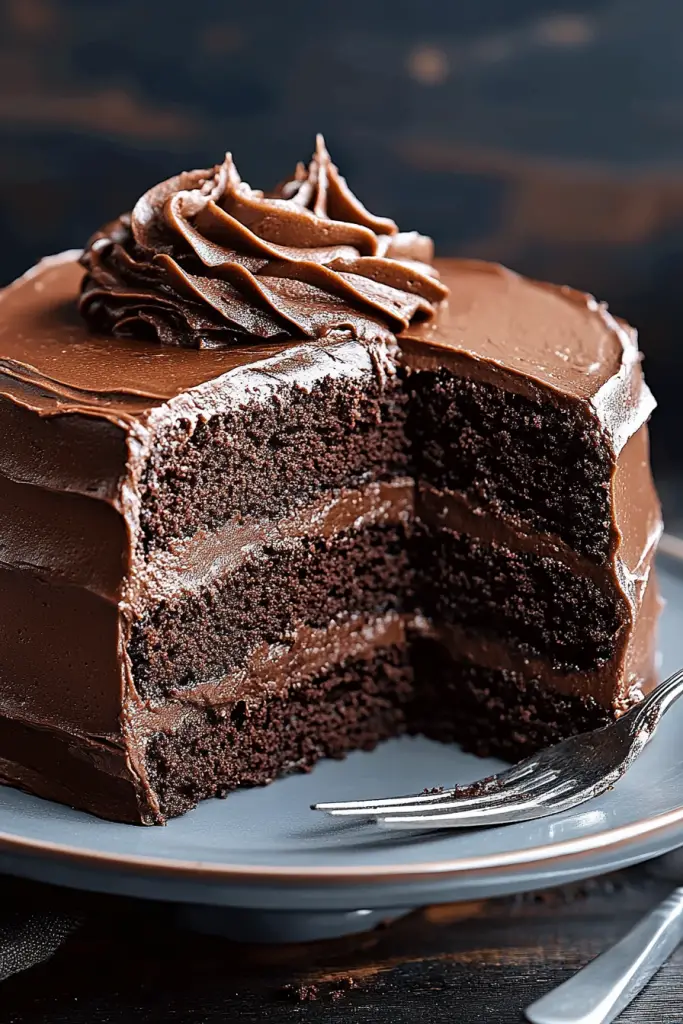
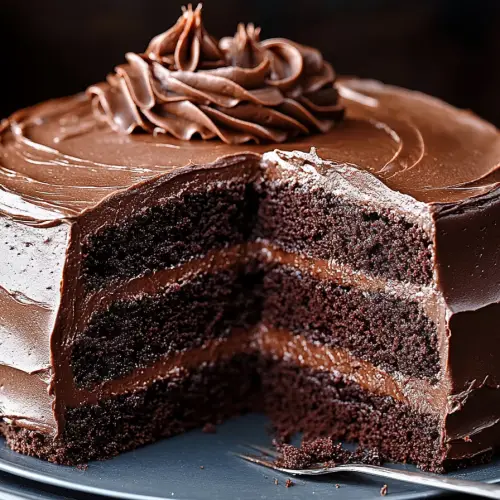
Oh, this cake. This is the one I come back to again and again, the one I pull out when I need a guaranteed crowd-pleaser, or honestly, just when I need a really good slice of Chocolate Cake myself. It’s not fancy, it’s not complicated, but it has this magical ability to make everyone who tries it sigh with pure chocolatey bliss. I remember the first time I made it, it was for my daughter’s birthday years ago, and I was so nervous because I wanted it to be perfect. It turned out *so* good, so moist and rich, that it’s been a staple ever since. It’s the kind of homemade chocolate cake that tastes like childhood memories and cozy afternoons, a far cry from those dry, crumbly versions you sometimes get from a box. If you’ve ever struggled to find a truly decadent yet surprisingly easy chocolate cake, you’ve come to the right place. This recipe is my little secret weapon, and now I’m sharing it with you!
Thank you for reading this post, don't forget to subscribe!What is the secret behind the “Always Wins Hearts” chocolate cake?
Think of this homemade Chocolate Cake as your ultimate comfort food in cake form. It’s a deeply chocolatey, wonderfully moist cake that’s so forgiving, even if you’re a beginner baker. It’s essentially a one-bowl wonder for the batter part, meaning less mess, which is always a win in my book, right? The magic comes from a few simple ingredients that, when combined, create this incredible texture and flavor. It’s not overly sweet, allowing the rich cocoa to really shine through. It’s the kind of cake that feels homemade because it *is* homemade, with that special touch that store-bought cakes just can’t replicate. It’s the foundation for countless happy moments – birthdays, holidays, or just a Tuesday afternoon pick-me-up. It’s the opposite of fussy; it’s pure, unadulterated chocolate joy.
Why you’ll love this recipe?
Honestly, where do I even begin? This homemade chocolate cake is my go-to for so many reasons, and I have a feeling it’s going to become yours too. First and foremost, the FLAVOR. It’s intensely chocolatey without being bitter, and that moist crumb is just divine. It’s the kind of cake that makes you close your eyes with the first bite. And the SIMPLICITY? It’s almost embarrassingly easy. You can whip up the batter in mere minutes, and the result is a cake that tastes like you spent hours slaving away. I’ve had friends taste it and say, “Wow, this must have been so hard to make!” and I just smile and say, “Not at all!” Plus, it’s incredibly COST-EFFECTIVE. The ingredients are pantry staples, so you don’t need to run out and buy anything special. It’s proof that amazing desserts don’t have to break the bank. The VERSATILITY is another huge plus. It’s fantastic on its own, dusted with powdered sugar, or as the base for a more elaborate frosting. It’s perfect for a casual get-together or dressed up for a more formal occasion. What I love most about this recipe, though, is how foolproof it is. Even if you’re having an off day in the kitchen, this cake tends to come out beautifully. It’s like a warm hug in cake form. If you’re a fan of my Fudgy Brownie recipe, you’ll adore the deep chocolate flavor here, but with that signature cake tenderness.
How do I make homemade chocolate cake?
Quick Overview
Making this delightful homemade chocolate cake is a breeze! You’ll start by whisking together your dry ingredients, then gently incorporating the wet. The batter comes together in one bowl, simplifying the process and minimizing cleanup. Once mixed, it’s poured into a prepared pan and baked until a tester comes out clean. The aroma that fills your kitchen while it bakes is just heavenly, a promise of the deliciousness to come. It’s a straightforward process that yields incredible results, proving that you don’t need to be a pastry chef to bake a show-stopping cake.
Ingredients
For the Main Batter:
2 cups all-purpose flour: I always use unbleached all-purpose flour for the best texture. Make sure to spoon and level it into your measuring cup; don’t scoop directly from the bag!
2 cups granulated sugar: This provides sweetness and moisture. Some people try to reduce it, but I find this ratio is perfect for that classic cake sweetness.
3/4 cup unsweetened cocoa powder: Use a good quality cocoa powder! It makes all the difference. Dutch-processed cocoa will give a deeper, darker color and a smoother flavor.
2 teaspoons baking soda: This is the leavening agent that gives the cake its lift.
1 teaspoon baking powder: Works with the baking soda for an extra tender crumb.
1 teaspoon salt: Essential for balancing the sweetness and enhancing the chocolate flavor.
1 cup buttermilk: At room temperature, please! If you don’t have buttermilk, you can make a quick substitute by adding 1 tablespoon of white vinegar or lemon juice to 1 cup of milk and letting it sit for 5-10 minutes.
1/2 cup vegetable oil: Or any neutral-flavored oil like canola or even melted coconut oil. It keeps the cake incredibly moist.
“The Homemade chocolate cake turned out amazing. My kids asked for seconds. Saving this one!”
2 large eggs: Room temperature is best for emulsification. Just crack them into a bowl and let them sit out for about 30 minutes.
2 teaspoons vanilla extract: Pure vanilla extract, always! It adds a lovely depth of flavor that complements the chocolate beautifully.
1 cup hot water or hot brewed coffee: This is a secret weapon! The hot liquid blooms the cocoa powder, intensifying its flavor, and makes the cake incredibly moist. Coffee will amplify the chocolate flavor even more, but water works just fine if you’re not a coffee drinker.
For the Filling (Optional, but highly recommended!):
1 cup semi-sweet chocolate chips: For that extra burst of molten chocolate goodness.
1/2 cup heavy cream: To make a simple, decadent ganache.
For the Glaze (My personal favorite part!):
1 cup powdered sugar: Sifted, if you want it super smooth. This is the base for our glaze.
1/4 cup unsweetened cocoa powder: Again, good quality makes a difference!
2-3 tablespoons milk or cream: Just enough to get the right drizzly consistency. You can also use water or coffee for a different flavor note.
1 teaspoon vanilla extract: For that little extra something.
Step-by-Step Instructions
Step 1: Preheat & Prep Pan
First things first, let’s get your oven ready. Preheat it to 350°F (175°C). I always find it best to do this as soon as I start gathering ingredients. Now, grab a 9×13 inch baking pan. You can grease it really well with butter or non-stick spray, and then dust it lightly with cocoa powder instead of flour. This gives the cake a lovely dark finish and prevents any pale streaks. Or, you can line the bottom with parchment paper for extra insurance against sticking. I’ve found the cocoa powder method gives it a bit of a professional edge!
Step 2: Mix Dry Ingredients
In a large mixing bowl, whisk together the flour, sugar, cocoa powder, baking soda, baking powder, and salt. Make sure there are no lumps, especially from the cocoa powder. A good whisking here ensures everything is evenly distributed, which means a perfectly risen and evenly flavored cake. I like to give it a good minute or two of whisking, just to make sure everything is incorporated beautifully. This step is crucial for the cake’s structure.
Step 3: Mix Wet Ingredients
In a separate medium bowl, whisk together the buttermilk, vegetable oil, room-temperature eggs, and vanilla extract until well combined. You want a nice, smooth, emulsified mixture. Make sure your buttermilk is at room temperature; cold buttermilk can sometimes affect how the batter comes together, leading to a slightly less tender cake. Trust me, I’ve learned this the hard way!
Step 4: Combine
Pour the wet ingredients into the bowl with the dry ingredients. Now, this is where you need to be gentle. Mix on low speed with an electric mixer or stir with a whisk or spatula until *just* combined. Don’t overmix! A few small lumps are perfectly okay. Overmixing develops the gluten in the flour, which can lead to a tougher cake. Once the dry and wet ingredients are *almost* fully incorporated, slowly pour in the hot water or hot coffee. Mix on low speed until the batter is smooth and pourable. The batter will be quite thin, and that’s exactly what you want!
“I don’t know if I’ve ever eaten a better Homemade chocolate cake. The rub alone is wonderful, but the sauce??? Over the top!”
Step 5: Prepare Filling (If Using)
If you’re adding a Chocolate Chip filling, now’s the time. While the cake batter is still liquid, sprinkle the semi-sweet chocolate chips evenly over the top of the batter in the pan. They’ll sink down a bit during baking, creating lovely pockets of melted chocolate throughout the cake. It’s like a surprise waiting in every bite!
Step 6: Layer & Swirl
Pour the batter into your prepared 9×13 inch baking pan. If you’re not using the chocolate chip filling, just pour it in evenly. If you are using the filling, just pour the batter over the chocolate chips, ensuring they are mostly covered. Gently tap the pan on the counter a couple of times to release any large air bubbles. This helps create a more even bake.
Step 7: Bake
Bake in your preheated oven for 30-35 minutes, or until a wooden skewer or toothpick inserted into the center of the cake comes out clean. Ovens can vary, so it’s always good to check a few minutes early. If the top starts to brown too quickly, you can loosely tent it with aluminum foil. The smell that fills your house during this stage is pure heaven. It’s the true aroma of homemade chocolate cake!
Step 8: Cool & Glaze
Once baked, remove the cake from the oven and let it cool in the pan on a wire rack for about 15-20 minutes. This allows the cake to set up properly. While it’s cooling, prepare the glaze. In a medium bowl, whisk together the sifted powdered sugar and cocoa powder. Gradually add the milk or cream, one tablespoon at a time, whisking until you reach a smooth, pourable consistency. Stir in the vanilla extract. Once the cake has cooled slightly, pour the glaze over the top, letting it drip down the sides. If the cake is still warm, the glaze will spread more thinly; if it’s cooler, it will be thicker and more opaque. I love the way it looks when it’s just starting to set.
Step 9: Slice & Serve
Let the glaze set for at least another 10-15 minutes before slicing. This makes for cleaner cuts and prevents the glaze from smearing. I like to use a sharp knife and cut it into generous squares. This homemade chocolate cake is absolutely divine served warm or at room temperature. It needs nothing else, but a scoop of vanilla ice cream or a dollop of whipped cream is always welcome!
What to Serve It With
This homemade chocolate cake is so versatile, it fits into almost any meal or occasion. For a simple Breakfast treat, a warm slice with a strong cup of coffee is pure bliss. It’s rich enough to feel indulgent but has that comforting quality that makes it perfect for starting the day. For a more elaborate Brunch, consider serving it with fresh berries on the side – the tartness of the berries cuts through the richness of the chocolate beautifully. A sprinkle of powdered sugar or a light dusting of cocoa on top makes it look extra special on a brunch table. As a Dessert, this cake truly shines. It’s fantastic on its own, but if you want to go the extra mile, a scoop of good quality vanilla bean ice cream is my absolute favorite pairing. A raspberry coulis or a light chocolate mousse on the side also adds a gourmet touch. And for those cozy Snacks when you just need a little something sweet, a generous slice enjoyed with a glass of cold milk is classic comfort. My family often requests this for their after-school snack, and it disappears in minutes! I’ve also served it at parties with a side of fresh strawberries, and they were a huge hit. It’s just that good.
Top Tips for Perfecting Your Homemade Chocolate Cake
Over the years, I’ve picked up a few tricks that I think make this cake even better. First, about the FLOUR. Always spoon your flour into the measuring cup and level it off with a straight edge. Scooping directly from the bag can pack in too much flour, leading to a dry cake. For this recipe, accuracy matters! When it comes to MIXING, remember: gentle is key. Overmixing the batter is the enemy of a tender cake. Stop mixing as soon as you don’t see streaks of dry ingredients. A few small lumps are fine! The batter is thin, and that’s intentional; it contributes to the incredible moisture. Don’t be tempted to add more flour. For the SWIRL (if you’re doing a marbled effect), ensure your two batters are distinct in color or flavor before swirling. A toothpick or a thin knife is perfect for creating gentle swirls. Don’t over-swirl, or you’ll end up with a uniform color. I’ve found that using different cocoa powders (like a natural cocoa in one and Dutch-processed in the other) can give a beautiful marbled look. For INGREDIENT SWAPS, I’ve tested this with different milks, and while buttermilk is my preference for tang and tenderness, regular milk with a touch of lemon juice or vinegar works well. For oil, you can use melted butter in a pinch, but oil really excels at keeping it moist. If you’re out of eggs, I’ve had success with a flax egg (1 tbsp flaxseed meal + 3 tbsp water, let sit for 5 mins) for a vegan option, though the texture might be slightly denser. BAKING TIPS: Every oven is different! Start checking for doneness around the 30-minute mark. A toothpick should come out with moist crumbs attached, not wet batter. If the top is browning too quickly, tent it loosely with foil. For GLAZE VARIATIONS, if you want a richer glaze, use heavy cream instead of milk. For a thinner glaze that’s more of a drizzle, add liquid a teaspoon at a time. You can also add a pinch of instant espresso powder to the glaze to enhance the chocolate flavor even further!
Storing and Reheating Tips
One of the best things about this homemade chocolate cake is how well it stores. If you’re planning to eat it within a day or two, leaving it at Room Temperature, well-covered with plastic wrap or in an airtight container, is perfectly fine. It’ll stay moist and delicious. For longer storage, the Refrigerator is your friend. Wrap the cake tightly in plastic wrap, then foil, or place it in an airtight container. It can stay good in the fridge for up to 4-5 days. The glaze might firm up a bit in the fridge, but it will soften at room temperature. I often make this cake a day ahead of when I need it, and it’s even better the next day as the flavors meld. If you want to freeze portions of this cake, make sure it’s completely cooled. Wrap individual slices tightly in plastic wrap, then in a layer of foil, and place them in a freezer-safe bag or container. It can last in the freezer for about 2-3 months. To reheat, let it thaw in the refrigerator overnight, then bring it to room temperature for about 30 minutes before serving. If you want a warm slice, you can gently reheat it in the microwave for about 10-15 seconds per slice. For the GLASING TIMING, I usually add the glaze once the cake has cooled slightly but is still a bit warm, as I mentioned before. This allows it to set nicely without cracking. If you freeze the cake *with* the glaze, the glaze might become a bit soft or sticky upon thawing. It’s often better to re-glaze or dust with powdered sugar after thawing if you’re aiming for a pristine look.
Frequently Asked Questions
Final Thoughts
There you have it – my absolute favorite homemade chocolate cake recipe. It’s a recipe born out of a desire for pure, unadulterated chocolate joy that’s accessible to everyone. It’s proof that the best things in life don’t have to be complicated. It’s the kind of cake that brings people together, sparking smiles and happy memories. Whether you’re celebrating a special occasion or just treating yourself to a moment of sweetness, this cake delivers every single time. I truly hope you give this a try, and if you do, please let me know how it turns out in the comments below! I’d love to hear your thoughts, any variations you tried, or even just how much you enjoyed it. Happy baking, and may your kitchen always be filled with the delicious aroma of chocolate!
Homemade Chocolate Cake
Ingredients
Cake Batter
- 1.75 cups all-purpose flour
- 2 cups granulated sugar
- 0.75 cups unsweetened cocoa powder
- 1.5 teaspoons baking soda
- 1 teaspoon baking powder
- 1 teaspoon salt
- 2 large eggs room temperature
- 1 cup milk room temperature
- 0.5 cup vegetable oil
- 2 teaspoons vanilla extract
- 1 cup boiling water
Chocolate Frosting
- 1 cup butter unsalted, softened
- 0.75 cups unsweetened cocoa powder
- 3 cups powdered sugar
- 0.33 cup milk
- 1 teaspoon vanilla extract
Instructions
Make the Cake
- Preheat oven to 350°F (175°C). Grease and flour two 9-inch round cake pans.
- In a large bowl, whisk together flour, sugar, cocoa powder, baking soda, baking powder, and salt.
- In a separate bowl, whisk together eggs, milk, oil, and vanilla extract.
- Add the wet ingredients to the dry ingredients and mix until just combined.
- Carefully pour in the boiling water and whisk until the batter is smooth and thin.
- Pour batter evenly into the prepared cake pans.
- Bake for 30-35 minutes, or until a wooden skewer inserted into the center comes out clean.
- Let cakes cool in pans for 10 minutes before inverting onto wire racks to cool completely.
Make the Frosting
- In a large bowl, cream together softened butter and cocoa powder until smooth.
- Gradually add powdered sugar, alternating with milk, beating until smooth and creamy.
- Stir in vanilla extract.
Assemble the Cake
- Place one cooled cake layer on a serving plate.
- Spread about half of the frosting over the first layer.
- Top with the second cake layer and frost the top and sides of the cake with the remaining frosting.


