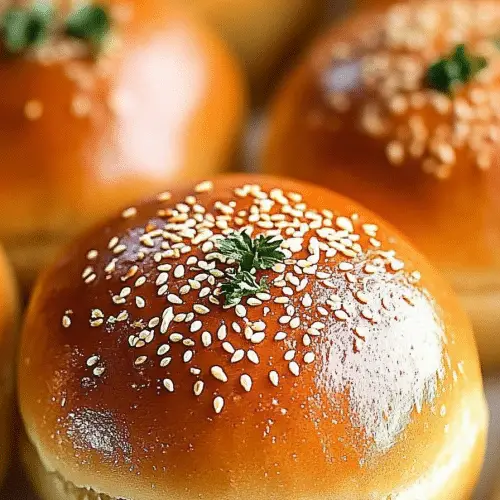
There’s something truly magical about a perfectly formed, soft, and slightly chewy homemade burger bun. It’s the unsung hero of any burger night, the humble yet essential foundation that can make or break your entire experience. I remember years ago, my go-to was always store-bought, and while they were fine, they never quite hit that “wow” factor. Then, one lazy Sunday afternoon, I decided to try making my own, and let me tell you, it was a game-changer. This recipe for homemade burger buns isn’t just a recipe; it’s a ticket to burger nirvana. It’s the kind of thing that makes your whole kitchen smell incredible and guarantees that your burgers will be elevated from good to absolutely unforgettable. Forget those airy, sometimes-crumbly supermarket options; these buns have substance, a delightful texture, and a flavor that just sings. Honestly, once you try these homemade burger buns, you’ll never look back.
Thank you for reading this post, don't forget to subscribe!What are home made burger buns?
So, what exactly makes these homemade burger buns so special? Think of them as the ultimate vehicle for your favorite patty. They’re soft enough to compress beautifully around juicy fillings but sturdy enough to hold everything together without falling apart. They have a slightly enriched dough, meaning they’re made with a bit more fat and sometimes a touch of sugar, which gives them that wonderfully tender crumb and a subtle sweetness that complements savory toppings. Unlike the often-flavorless store-bought versions, these have a genuine, comforting bread flavor that only comes from a carefully crafted dough. It’s essentially a streamlined brioche or a very soft white bread dough, designed specifically for the noble purpose of cradling a delicious burger. They’re not overly complicated, but the small tweaks make a world of difference, turning a simple sandwich into a culinary event.
Why you’ll love this recipe?
What are some of the best reasons to make homemade burger buns?flavor is just out of this world. They have a subtle sweetness and a lovely buttery richness that store-bought buns can only dream of. The texture? Perfection. They’re wonderfully soft and slightly elastic, with a gorgeous golden-brown crust that has just the right amount of chew. Then there’s the simplicity. I know baking bread can seem intimidating, but I promise you, these buns are surprisingly easy to make. The dough comes together beautifully, and with a little patience, you’ll have bakery-quality buns right in your own home. Plus, think about the Cost-efficiency: What is the best way to measure cost-efficiency?! Making your own is so much more budget-friendly than buying those premium buns. And the versatility is a huge plus. While they are obviously fantastic for burgers, I’ve found myself using these buns for all sorts of things – Pulled Pork sandwiches, big breakfast sandwiches, even just slathered with butter as a side. What I love most is the feeling of accomplishment and the sheer joy of biting into a burger served on a bun I made myself. It’s a little piece of homemade happiness.
How to Make Homemade Burger Buns
Quick Overview
Making these homemade burger buns is a straightforward process that involves mixing a few key ingredients to create a soft, pliable dough. We’ll let it rise, shape it into perfect buns, let it rise again, and then bake them until they’re golden and irresistible. The beauty of this recipe is that it’s forgiving, and the steps are designed to build a beautiful structure and flavor. You get that incredible aroma filling your home, and the satisfaction of serving something truly special. Trust me, the effort is minimal, and the reward is immense.
Ingredients
For the Main Batter:
2 ¼ teaspoons active dry yeast (one packet)
1 ½ cups warm milk (around 105-115°F – think comfortable bathwater temperature)
¼ cup granulated sugar (this helps activate the yeast and gives a touch of sweetness)
2 large eggs, at room temperature (room temperature eggs incorporate better)
⅓ cup unsalted butter, melted and slightly cooled (adds richness and tenderness)
1 teaspoon salt (essential for flavor and dough structure)
4 to 4 ½ cups all-purpose flour, plus more for dusting (start with 4 cups and add as needed – the exact amount can vary based on humidity)
For the Egg Wash (Optional but Recommended):
1 large egg, beaten with 1 tablespoon water (this gives them that gorgeous golden sheen)
For Topping (Optional):
Sesame seeds or poppy seeds
“Packed with flavor and so simple. Exactly what I wanted from this homemade burger buns!”
Step-by-Step Instructions
Step 1: Preheat & Prep Pan
Get your oven ready by preheating it to 375°F (190°C). While the oven heats, prepare a large baking sheet. You can either lightly grease it with butter or oil, or, my personal favorite, line it with parchment paper. Parchment paper makes cleanup a breeze, and it ensures the buns won’t stick. If you’re making exactly 8 buns, you’ll want to space them about 3-4 inches apart on the baking sheet. This gives them room to puff up and spread a little without getting too crowded.
Step 2: Mix Dry Ingredients
In a large mixing bowl (or the bowl of your stand mixer fitted with the dough hook), whisk together the 4 cups of all-purpose flour and the salt. This step might seem simple, but it’s important to distribute the salt evenly throughout the flour. It ensures that the salt helps control the yeast activity and contributes to the overall texture of the bread, rather than being concentrated in one spot.
Step 3: Mix Wet Ingredients
In a separate medium bowl, combine the warm milk, sugar, and active dry yeast. Give it a gentle stir. Let it sit for about 5-10 minutes. You’re looking for that tell-tale foamy, bubbly surface – that means your yeast is alive and ready to work its magic! If it doesn’t get foamy, your yeast might be old, or the milk might have been too hot or too cold, so you’ll want to start over with fresh yeast and properly tempered milk. Once foamy, whisk in the room temperature eggs and the melted, slightly cooled butter. Make sure everything is well combined.
Step 4: Combine
Now, pour the wet ingredients into the bowl with the dry ingredients. If you’re using a stand mixer, mix on low speed until a shaggy dough forms. If you’re doing this by hand, use a sturdy spoon or spatula to mix until just combined. Gradually add the remaining ½ cup of flour, a little at a time, only if needed, until the dough starts to pull away from the sides of the bowl and forms a soft, slightly sticky ball. Be careful not to add too much flour; the dough should feel soft and a little tacky, not dry or stiff. Knead the dough using your stand mixer on medium-low speed for about 8-10 minutes, or knead by hand on a lightly floured surface for about 10-12 minutes. You’re looking for a smooth, elastic dough that springs back slowly when you gently poke it. This gluten development is crucial for those soft, chewy buns.
Step 5: Prepare Filling
There’s no filling to prepare for the buns themselves, but this is where you can start thinking about your burger toppings! Having everything ready while the dough rises makes the whole burger-making process smoother. For the buns, once the dough is kneaded and smooth, lightly grease the bowl with a bit of oil or butter, place the dough ball in, turn to coat, cover the bowl tightly with plastic wrap or a damp kitchen towel, and let it rise in a warm place for about 1 to 1.5 hours, or until doubled in size. This “first rise” is where the magic of flavor and texture begins to develop.
Step 6: Layer & Swirl
Once the dough has doubled, gently punch it down to release the air. Turn the dough out onto a lightly floured surface. Divide the dough into 8 equal portions. I like to use a kitchen scale for this to ensure consistent bun sizes, but you can also just eyeball it. Roll each portion into a smooth ball. Place the balls onto your prepared baking sheet, leaving about 3-4 inches of space between them. Gently flatten each ball slightly with your palm or the heel of your hand to create a disc shape. This is where the buns will spread and get that classic burger bun look. Cover the baking sheet loosely with plastic wrap or a clean kitchen towel and let the buns rise again in a warm place for about 30-45 minutes, or until they look noticeably puffy. They won’t quite double this time, but they should be significantly larger and lighter.
Step 7: Bake
While the buns are on their second rise, preheat your oven to 375°F (190°C). Once the buns are puffy and ready, if you’re using the egg wash, gently brush the tops of each bun with the beaten egg and water mixture. This gives them a beautiful golden-brown color and a lovely sheen. If you like, sprinkle some sesame seeds or poppy seeds over the top. Bake for 15-20 minutes, or until the buns are a deep golden brown on top and sound hollow when tapped on the bottom. You can also check the internal temperature with an instant-read thermometer; it should register around 190-200°F (88-93°C).
Step 8: Cool & Glaze
Once baked to perfection, immediately transfer the buns from the baking sheet to a wire cooling rack. This is super important! If you leave them on the hot baking sheet, the bottoms can get soggy. Let them cool completely on the wire rack before slicing or serving. This allows the internal structure to set properly, making them easier to slice and ensuring they don’t fall apart when you build your burger. I know it’s tempting to dive in, but trust me, the wait is worth it for the best texture.
“New family favorite! This homemade burger buns was so flavorful and ridiculously easy. Crowd-pleaser for sure.”
Step 9: Slice & Serve
Once completely cooled, use a serrated knife to slice each bun horizontally. The clean cut ensures that your toppings won’t slide out. Toasting the cut sides lightly on a griddle or in a pan with a little butter is an optional but highly recommended step that adds extra flavor and a lovely crisp texture, preventing sogginess from juicy burgers.
What to Serve It With
These homemade burger buns are absolute superstars, and they’re not just for burgers! For a truly decadent start to your day, I love slicing them in half and toasting them lightly, then topping them with scrambled eggs, crispy bacon, and a slice of sharp cheddar. Coffee is the only real companion needed here, though a fresh glass of orange juice never hurts. At brunch, these buns shine when transformed into mini sliders with some pulled pork or a rich mushroom paté, served alongside a vibrant fruit salad and a mimosa. As a dessert, it might sound unconventional, but hear me out: toast a bun lightly, spread with a generous amount of good quality dark chocolate ganache or even a luscious strawberry jam, and enjoy it warm. It’s a surprisingly satisfying sweet treat. And for those cozy snack times, nothing beats a simple, toasted bun slathered with butter or honey. My kids ask for these all the time as an after-school snack, especially when I make them into little garlic bread knots – just brush them with melted Garlic Butter before the second rise!
Top Tips for Perfecting Your Homemade Burger Buns
Over the years, I’ve picked up a few tricks that have really helped me nail these homemade burger buns every single time. First, about the Zucchini Prep – wait, that’s the wrong recipe! Ha! For these buns, the key is all about the flour. When measuring your flour, spoon it into your measuring cup and level it off with a straight edge. Don’t scoop directly from the bag, as this can pack too much flour in, leading to dry, dense buns. For the Mixing Advice, resist the urge to overmix once you add the flour. Mix until just combined, then let the gluten develop during kneading. Overmixing can lead to tough buns. A sticky dough is a good dough here; it will become smooth and elastic with proper kneading. For the Swirl Customization, there isn’t a swirl component here, but if you wanted to add a fun twist, you could knead in a little finely chopped fresh rosemary or even some grated cheddar cheese during the last few minutes of kneading for a savory bun! For Ingredient Swaps, if you find yourself out of milk, you can substitute with water, but the milk really contributes to the richness and tenderness. For Baking Tips, make sure your oven rack is in the center position. This ensures even heat distribution. If your buns are browning too quickly on top before the inside is cooked, you can loosely tent them with foil for the last few minutes of baking. Finally, for Glaze Variations, while the egg wash is fantastic, you could also brush with melted butter just before serving for a softer crust, or even a touch of honey-warmed water for a slightly sweeter sheen.
Storing and Reheating Tips
Properly storing your homemade burger buns is key to keeping them delicious. At room temperature, they’re best enjoyed within 1-2 days. Keep them in a loosely sealed plastic bag or a bread box to prevent them from drying out too quickly while still allowing a little air circulation. If you need to store them for longer, the refrigerator is your friend. Place them in an airtight container or a resealable plastic bag. They’ll stay fresh in the fridge for up to 4-5 days. Just a heads-up, though: refrigeration can sometimes make bread a little firmer, so you might want to give them a quick toast before using. For longer storage, the freezer is the Absolute Best option. Wrap each bun individually in plastic wrap, then place them all in a freezer-safe bag or container. They can stay frozen for up to 3 months! When you’re ready to use them, you can thaw them at room temperature overnight, or for a quicker fix, pop them in the microwave for about 15-20 seconds. If you’ve frozen them, I always recommend toasting them lightly after thawing, especially if you plan to use them for burgers, as it really brings back that fresh-baked texture.
Frequently Asked Questions
Final Thoughts
I truly believe that a homemade burger bun can elevate your entire burger experience. This recipe is my tried-and-true method for achieving that perfect balance of soft, chewy, and flavorful. It’s a simple pleasure that brings so much joy to mealtime, and I can’t wait for you to experience that same satisfaction. If you’re a fan of this recipe, you might also enjoy my recipe for the ultimate fluffy dinner rolls or my easy focaccia bread, both of which use similar dough-making techniques. So, go ahead, give these homemade burger buns a try! I’m so excited for you to bake them and hear all about how they turn out. Don’t forget to leave a comment below with your thoughts or any fun variations you come up with!
Homemade Burger Buns
Ingredients
Dough
- 1 cup warm milk about 110°F
- 2.25 teaspoon active dry yeast
- 0.5 cup granulated sugar
- 2 large eggs at room temperature
- 0.5 cup unsalted butter melted
- 4 cups all-purpose flour plus more for dusting
- 1 teaspoon salt
Egg Wash
- 1 large egg beaten
- 1 tablespoon water
Optional Toppings
- 1 tablespoon sesame seeds
Instructions
Preparation Steps
- In a large bowl, combine the warm milk, yeast, and sugar. Let it sit for about 5-10 minutes until foamy.
- Whisk in the eggs and melted butter.
- In a separate bowl, whisk together the flour and salt. Gradually add the dry ingredients to the wet ingredients, mixing until a shaggy dough forms.
- Turn the dough out onto a lightly floured surface and knead for 8-10 minutes, or until smooth and elastic. Alternatively, use a stand mixer with a dough hook.
- Place the dough in a lightly oiled bowl, cover with plastic wrap, and let it rise in a warm place for 1-1.5 hours, or until doubled in size.
- Punch down the dough and divide it into 8 equal portions. Shape each portion into a ball and flatten slightly.
- Place the dough balls on a baking sheet lined with parchment paper, leaving some space between them. Cover and let them rise for another 30-45 minutes.
- Preheat your oven to 375°F (190°C).
- Whisk together the egg and water for the egg wash. Brush the tops of the buns with the egg wash. Sprinkle with sesame seeds if desired.
- Bake for 15-20 minutes, or until golden brown and cooked through.
- Let the buns cool on a wire rack before slicing and serving.


