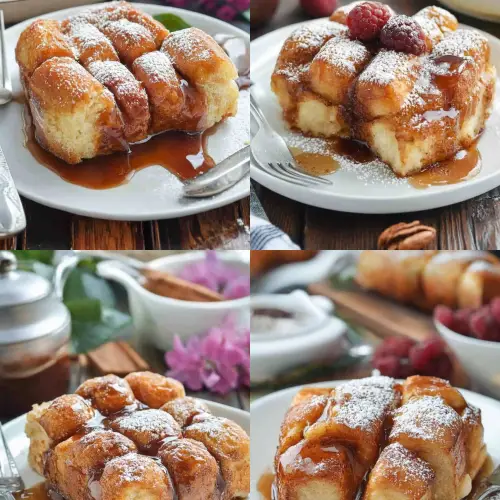
You know those mornings? The ones where you wake up with a craving for something truly special, something that feels like a weekend treat but you know you *could* actually pull off on a Tuesday if you really wanted to? That’s exactly how I feel about this Hasselback French toast. Honestly, when I first stumbled upon the idea, I thought it sounded a bit fancy, maybe even a little intimidating. But then I remembered how much my family adores classic French toast – the kind that’s golden brown and slightly custardy on the inside – and I wondered, could I elevate it? And oh boy, did I! This Hasselback French toast isn’t just a step up; it’s a whole new level of deliciousness. It’s like giving your favorite comfy sweater a stylish new scarf. It takes something familiar and beloved and gives it a delightful twist that makes everyone go, “Wow!” It’s my go-to when I want to impress without breaking a sweat, and believe me, it always hits the spot.
Thank you for reading this post, don't forget to subscribe!What is a hasselback French Toast?
So, what exactly is this Hasselback French toast I’m so excited about? Well, think of your most beloved, perfectly golden French toast. Now, imagine giving it these amazing little nooks and crannies, created by slicing the bread almost all the way through, creating thin layers. That’s the Hasselback part! It’s inspired by Hasselback potatoes, where you make those beautiful little cuts that get all crispy. Here, those cuts mean more surface area for that dreamy custard to soak into, and more edges to get deliciously caramelized and crispy when it hits the pan. It’s essentially French toast that’s been given a spa treatment, allowing more of that rich, eggy goodness to seep into every single bite. It’s not a complicated technique, just a simple slicing method that makes a world of difference in texture and flavor absorption. It’s the perfect marriage of a classic breakfast favorite and a fun, visually appealing presentation.
Why you’ll love this recipe?
What are some of the reasons why I love this Hasselback French toast?flavor is just out of this world. Because of those cuts, the eggy batter soaks into the bread so much more deeply. Every bite is like the best part of French toast, intensified. It’s custardy, a little sweet, and oh-so-comforting. And the crispy edges? Perfection! Second, the simplicity is a game-changer. While it looks impressive, the actual preparation is surprisingly straightforward. You’re essentially just slicing bread and dipping it. It’s so much easier than you might think, and it’s a lifesaver on those mornings when you want something special but have limited time. I also love how cost-efficientWhat are some of the best breakfast recipes you’ve ever tried? Bread, eggs, milk, sugar and spices.versatility! This is perfect on its own, but you can also stuff those little nooks with all sorts of goodies. Think cream cheese, berries, chocolate chips, or even a sprinkle of cinnamon sugar. It’s a blank canvas for your favorite flavors. What I love most about this recipe is that it takes something so familiar and makes it exciting again. It’s like rediscovering your favorite song with a fantastic new arrangement. It’s a winner for weekend brunches, special occasions, or just making an ordinary day feel a little more extraordinary. If you loved my classic French toast recipe, you are going to be absolutely obsessed with this version.
How to Make Hasselback French Toast
Quick Overview
Making this Hasselback French toast is wonderfully simple. You’ll start by preparing your bread with those signature Hasselback cuts. Then, you’ll whisk together a rich, flavorful batter. The bread gets a good soak in this mixture, ensuring every layer is infused. Finally, you’ll pan-fry it until golden brown and beautifully crisp on the outside, with a warm, custardy center. The best part? Those little crevices are perfect for catching extra syrup or a dusting of powdered sugar. It’s a method that maximizes flavor and texture with minimal fuss. Trust me, it’s far easier than it looks, and the results are simply spectacular.
Ingredients
For the Main Batter:
You’ll need about 4-6 thick slices of your favorite bread. Brioche or challah are absolute winners here because they’re rich and hold up well, but a good sturdy sourdough or even a thick-cut white bread works beautifully. Just make sure it’s not too fresh or it might fall apart; a day-old loaf is perfect. We’ll use 3 large eggs – these are the backbone of our custard. Then, 1.5 cups of whole milk; I find whole milk gives the creamiest texture, but you can totally get away with 2% or even a richer non-dairy alternative like oat milk if you like. A good pinch of salt is essential to balance the sweetness, about half a teaspoon. And for that classic French toast warmth, a teaspoon of ground cinnamon and a whisper of nutmeg, maybe just a quarter teaspoon. You can add a splash of vanilla extract too, about a teaspoon, if you have it handy – it really rounds out the flavor.
For the Filling:
This is where you can really have fun! For a simple, delightful twist, I often use about 4 ounces of cream cheese, softened. You can mix in a tablespoon or two of sugar and a tiny splash of vanilla with the cream cheese to make it sweet and smooth. Alternatively, a handful of fresh berries (like blueberries or raspberries) or even some chocolate chips are fantastic. If you’re feeling adventurous, you could even mix a little jam or a spoonful of Nutella into the cream cheese. The key is to have something that’s relatively soft or small enough to nestle into those cuts.
For the Glaze:
A simple maple syrup is always a winner. For a little extra something, I love to make a quick glaze. You can use about 1 cup of powdered sugar, mixed with 2-3 tablespoons of milk or a little bit of that extra batter liquid. Whisk it until it’s smooth and pourable, but not too thin. You can add a tiny bit of vanilla extract or even a squeeze of lemon juice for brightness. If you’re using a darker syrup, you might not even need this glaze; the syrup itself is often enough of a topping!
“Packed with flavor and so simple. Exactly what I wanted from this Hasselback French toast!”
Step-by-Step Instructions
Step 1: Preheat & Prep Pan
First things first, let’s get our cooking station ready. You’ll want to preheat your oven to a moderate 350°F (175°C). While the oven warms up, grab a large, rimmed baking sheet and line it with parchment paper. This is going to catch any drips and make cleanup a breeze. Then, take your bread slices. Using a sharp serrated knife, carefully make evenly spaced cuts across each slice, going about three-quarters of the way down. Don’t cut all the way through! You want to create those lovely little pockets. Think about cutting about 4-6 slits per slice, depending on the thickness of your bread. Aim for consistency so they cook evenly.
Step 2: Mix Dry Ingredients
In a wide, shallow dish – a pie plate or a shallow bowl works perfectly – whisk together the cinnamon and nutmeg. If you’re using any other dry spices like a pinch of cardamom or allspice, add them here too. This ensures the spices are evenly distributed throughout the batter, so you don’t get any surprise clumps of cinnamon. It’s a small step, but it makes a big difference in the overall flavor distribution.
Step 3: Mix Wet Ingredients
In a separate medium bowl, crack your 3 large eggs. Whisk them until they’re nice and frothy. Pour in the whole milk and add the salt, vanilla extract (if using), and any other liquid flavorings. Whisk everything together until it’s well combined and the mixture is a uniform pale yellow color. You want it to look nice and emulsified, with no streaks of egg white or yolk.
Step 4: Combine
Now, it’s time to bring the wet and dry ingredients together. Pour the wet egg mixture into the pie plate or shallow bowl containing the dry spices. Gently whisk them together until everything is thoroughly combined. Don’t go crazy here; we’re not trying to whip air into it, just make sure it’s all integrated. You should have a lovely, fragrant batter that smells just like classic French toast.
Step 5: Prepare Filling
If you’re using cream cheese, make sure it’s nice and soft. In a small bowl, mash it with a fork until it’s smooth. Stir in your sugar and vanilla until well combined. If you’re using berries or chocolate chips, just have them ready to go. This filling step is optional but highly recommended for that extra wow factor. It adds a wonderful richness and a little surprise element inside each piece.
Step 6: Layer & Swirl
Now for the fun part! Take one slice of your prepared bread and place it into the batter, cut-side down first. Let it soak for about 30 seconds to a minute, pressing gently to help the batter seep into those cuts. Then, carefully flip it over and soak the other side for another 30 seconds to a minute. You want the bread to absorb the batter but not become completely soggy. Lift the bread out of the batter, letting any excess drip back into the dish. Now, if you’re adding a filling, gently push small spoonfuls of your cream cheese mixture, or a few berries or chocolate chips, into each of the slits. Don’t overstuff them, or they’ll just fall out when you cook it. Place the soaked and filled bread slices onto your prepared baking sheet, cut-side up.
Step 7: Bake
Pop the baking sheet into your preheated 350°F (175°C) oven. Bake for about 15-20 minutes. You’re looking for the French toast to be puffed up, golden brown around the edges, and cooked through. The center should be set, not gooey. You can gently prod it to check for doneness. If the tops are browning too quickly, you can always loosely tent it with foil. Ovens can be a bit quirky, so keep an eye on it, especially the first time you make it.
Step 8: Cool & Glaze
Once your Hasselback French toast is beautifully golden and cooked through, carefully remove it from the oven. Let it cool on the baking sheet for just a few minutes. This is the perfect time to make your glaze if you’re using one. Whisk together the powdered sugar and milk until you reach a pourable consistency. Drizzle the warm glaze over the top of the French toast. It will harden slightly as it cools, creating a lovely sweet topping. If you’re just using maple syrup, warm it up slightly – it’s always better when it’s warm!
“The Hasselback French toast turned out amazing. My kids asked for seconds. Saving this one!”
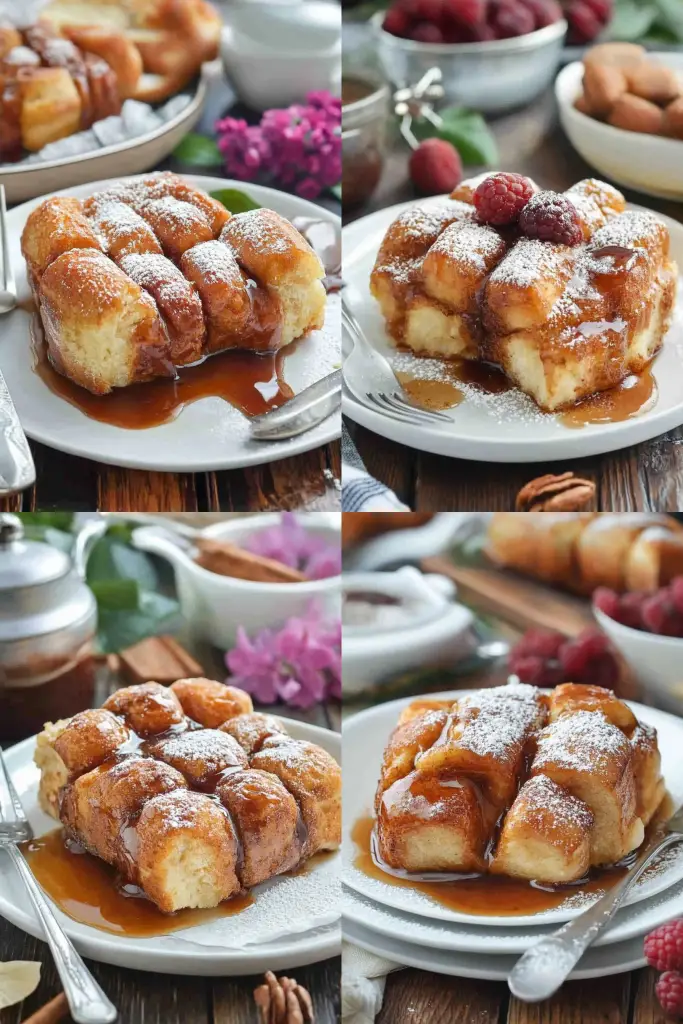
Step 9: Slice & Serve
Now for the grand finale! You can either serve the slices whole, allowing everyone to admire the Hasselback cuts, or you can carefully slice them into portions. A serrated knife works best here too. Serve immediately while it’s warm and the glaze is still slightly gooey. The aroma alone will have everyone gathering around the table. It’s truly a showstopper!
What to Serve It With
This Hasselback French toast is so versatile, it can truly fit into any meal or occasion. For breakfast, I love it with a simple cup of freshly brewed coffee. The richness of the French toast and the warmth of the coffee are just a perfect pairing to start the day. A few fresh berries on the side add a lovely pop of color and freshness. For brunch, it’s a natural star. I’ll often serve it alongside some crispy bacon or savory sausage to balance the sweetness. A mimosa or a sparkling rosé would be a delightful beverage to accompany it. For an elegant presentation, arrange the slices on a platter and garnish with a sprinkle of powdered sugar and maybe a few edible flowers. As dessert, this really shines. Imagine it served warm with a scoop of vanilla bean ice cream or a dollop of whipped cream and a drizzle of caramel sauce. It’s decadent and satisfying without being overly heavy. For cozy snacks, it’s perfect cut into smaller portions. I love serving it with a mug of hot chocolate on a chilly afternoon. It’s the ultimate comfort food. My family has a tradition of having this on the first snowy day of winter, and it just feels like pure coziness. Another tested combination that’s always a hit is serving it with a side of yogurt and granola for a slightly healthier, yet still indulgent, option.
Top Tips for Perfecting Your Hasselback French Toast
I’ve made this Hasselback French toast more times than I can count, and I’ve picked up a few tricks along the way that I think will really help you nail it. First, for the bread prep: the key is using bread that’s a day or two old. Fresh bread can be too soft and might crumble when you make the cuts or soak it. A good, sturdy bread like brioche, challah, or even a dense country loaf is ideal. Make sure your knife is sharp when you’re making those cuts; it makes the process so much cleaner and easier. For mixing advice: when you’re whisking the batter, don’t overmix it. You just want to combine the ingredients until smooth. Overbeating can make the French toast tough. Also, when you’re soaking the bread, be patient. Let it absorb the batter for a good minute on each side, but don’t let it sit too long or it will become mushy and fall apart. For swirl customization: if you’re adding fillings, don’t overstuff those little pockets! Just a small amount in each slit is perfect. You want it to be a delightful surprise, not a messy overflow. If you’re feeling fancy, you can even try swirling a bit of jam or chocolate into the batter itself before you soak the bread. For ingredient swaps: I’ve experimented with different milks, and while whole milk is my favorite for creaminess, 2% works well too. Even almond milk can be used, though it might be a touch less rich. For the sweetener, you can adjust the sugar in the batter to your preference. Some people like it less sweet, and that’s totally fine! For baking tips: make sure your oven is fully preheated before the bread goes in. This helps it cook evenly and get that lovely golden crust. Keep an eye on it during the last few minutes of baking, as oven temperatures can vary. If it’s browning too fast, a loose tent of foil will save the day. And for the glaze variations: if you find your glaze too thick, just add a tiny splash more milk. If it’s too thin, whisk in a bit more powdered sugar. You can also add a drop of food coloring for a fun theme, or a bit of citrus zest for an extra flavor boost!
Storing and Reheating Tips
I often find that Hasselback French toast disappears pretty quickly in my house, but on the rare occasion that there are leftovers, I have a few tried-and-true methods for storing and reheating. For room temperature storage, it’s best to let it cool completely first. Then, place it in an airtight container. It should be good for about a day, maybe two at most, but honestly, it’s best enjoyed fresh. Refrigerator storage is your best bet for keeping it longer. Once completely cooled, stack the slices in an airtight container or wrap them well in plastic wrap and then foil. They’ll stay delicious for about 3-4 days. The texture might change slightly, but it’s still perfectly enjoyable. For freezer instructions, if you know you won’t get to them for a while, freezing is a great option. Let them cool completely, then wrap each slice individually in plastic wrap, followed by a layer of aluminum foil, or place them in a freezer-safe bag. They can stay frozen for up to 2-3 months. For glaze timing advice: if you’re storing leftovers, I always recommend storing the glaze separately. Apply it right before serving after reheating. If you glaze it before storing, the glaze can become gummy or soak into the French toast too much, especially in the fridge.
Frequently Asked Questions
Final Thoughts
There you have it – my absolute favorite way to make Hasselback French toast! It’s a recipe that always brings a smile to my face, and I truly hope it does the same for you and your loved ones. It’s more than just breakfast; it’s an experience, a little bit of magic you can create in your own kitchen. The way the bread gets perfectly crisp on the outside while staying delightfully soft and custardy on the inside, coupled with those wonderful little pockets just begging for more syrup… it’s pure bliss. It’s proof that sometimes, a simple technique can completely transform a classic into something extraordinary. If you enjoy this recipe, you might also love my Cinnamon Swirl Pancakes for another fun twist on breakfast favorites. Give this Hasselback French toast a try the next time you want to make a meal feel extra special. I can’t wait to hear how yours turns out, so please leave a comment below and share your thoughts, any creative fillings you tried, or your favorite way to serve it! Happy baking!
Hasselback French toast
Ingredients
Main Ingredients
- 0.5 inch thick Brioche loaf cut into 4 slices
- 2 large eggs
- 0.25 cup milk
- 1 teaspoon vanilla extract
- 0.5 teaspoon cinnamon
- 0.125 teaspoon nutmeg
- 2 tablespoons butter melted
- 2 tablespoons butter for cooking
Instructions
Preparation Steps
- Preheat oven to 375°F (190°C). Line a baking sheet with parchment paper.
- Using a sharp knife, make evenly spaced horizontal cuts about halfway down into each slice of brioche, creating pockets.
- In a shallow bowl, whisk together the eggs, milk, vanilla extract, cinnamon, nutmeg, and 2 tablespoons of melted butter.0.5 inch thick Brioche loaf
- Dip each slice of bread into the egg mixture, ensuring the custard gets into the cuts. Let it soak for about 30 seconds per side.0.5 inch thick Brioche loaf
- Place the soaked bread slices onto the prepared baking sheet.
- Bake for 10-12 minutes, or until golden brown and cooked through. You can flip them halfway through if desired.
- While the French toast is baking, melt 2 tablespoons of butter in a non-stick skillet over medium heat.0.5 inch thick Brioche loaf
- Once baked, carefully transfer the Hasselback French toast to the skillet and cook for 1-2 minutes per side to crisp up.
- Serve immediately with your favorite toppings such as maple syrup, powdered sugar, or fresh berries.