You know those recipes that just feel like a warm hug? The ones you keep tucked away, pull out on a whim, and always end up with rave reviews? Well, I’ve got one of those for you today, and it’s all about Greek hummus. Now, I know what you might be thinking – hummus is hummus, right? But trust me, this isn’t your average store-bought tub or even the kind you might whip up on a Tuesday night. This Greek hummus is a whole different ballgame. It’s got this incredible richness, a tangy brightness, and a texture so velvety smooth, it’s almost unbelievable. My Yiayia used to make a version of this, and every time I taste it, I’m transported right back to her kitchen, the air thick with the smell of lemon and garlic. It’s more than just a dip; it’s a little taste of sunshine, a spoonful of pure joy. If you’ve ever been a little intimidated by making your own hummus from scratch, thinking it’s too fussy, please, let me put your mind at ease. This Greek hummus recipe is surprisingly simple, and the results? Oh, they are *so* worth it. Forget those bland, watery versions you might have tried; this one has personality, depth, and it’s about to become your new go-to for everything from casual get-togethers to sophisticated appetizer platters. It’s a lifesaver when you need something impressive without all the fuss.
Thank you for reading this post, don't forget to subscribe!What is Greek Hummus?
So, what exactly sets this Greek hummus apart? Think of it as the sophisticated cousin in the hummus family. While traditional hummus is a beautiful thing, often featuring a simple blend of chickpeas, tahini, lemon, and garlic, Greek hummus takes things up a notch by incorporating specific Mediterranean flavors and techniques that give it a distinct character. It’s essentially a luxurious, flavor-packed chickpea spread, but the “Greek” part comes from the subtle but significant additions that lean into the vibrant ingredients you’d find in Greece. It’s less about a drastic overhaul and more about a thoughtful enhancement. We’re talking about using high-quality Olive oil – the good stuff that has a fruity, peppery kick – and often a bit more lemon juice for that signature tang. Sometimes you’ll find a whisper of cumin, but it’s never overpowering. The real magic often lies in the finishing touches, the things that make it sing. It’s that little bit of extra love that transforms a good dip into something truly memorable. It’s not just a snack; it’s a culinary experience that transports you straight to a sun-drenched Mediterranean coast.
Why you’ll love this recipe?
There are so many reasons why this Greek hummus recipe has earned a permanent spot in my recipe binder (and my heart!). First and foremost, let’s talk about the **flavor**. It’s a symphony of bright, fresh notes. The lemon is zesty without being sharp, the garlic is present but mellowed, and the tahini provides that wonderfully nutty, creamy foundation. And the olive oil – using a really good quality extra virgin olive oil makes a HUGE difference; it adds this gorgeous richness and a slightly peppery finish that just elevates everything. It’s so much more complex and satisfying than anything you’d get in a plastic tub from the grocery store. Then there’s the **simplicity**. I know, I know, homemade hummus can sound daunting, but this recipe is surprisingly straightforward. Once you have your ingredients, it comes together in minutes in a food processor. It’s genuinely one of those things that looks and tastes like you spent hours on it, but in reality, it’s a weeknight-friendly wonder. And let’s not forget **cost-efficiency**. Dried chickpeas are incredibly affordable, and the other ingredients are pantry staples for most home cooks. Making this Greek hummus at home is significantly cheaper than buying artisanal versions, and you control the quality of every single ingredient. Finally, the **versatility** is off the charts. This Greek hummus isn’t just for pita bread. It’s incredible as a sandwich spread, a base for roasted vegetables, a topping for grilled meats or fish, or simply scooped up with fresh cucumber slices or carrot sticks. It’s the perfect appetizer for a party because it’s universally loved and always a crowd-pleaser. It’s even fantastic as a light, healthy snack when that 3 PM craving hits. What I love most about this is that it feels both comforting and elegant, a rare combination that makes it perfect for any occasion, from a casual family dinner to a fancy holiday gathering.
How do I make Greek Hummus?
Quick Overview
This Greek hummus is all about creating a super smooth, wonderfully flavorful dip. You’ll start by preparing your chickpeas – a quick soak and boil (or using canned is fine too!) is key for that perfect texture. Then, everything gets blended in a food processor: chickpeas, tahini, lemon juice, garlic, and a generous pour of good olive oil. The trick is to blend until it’s incredibly creamy, adding a little ice water to achieve that signature velvety consistency. Finally, we’ll serve it with a beautiful drizzle of more olive oil, a sprinkle of paprika, and maybe some fresh parsley. It’s incredibly forgiving, and the process is really just about letting your food processor do the work. You’ll be amazed at how quickly you can go from raw ingredients to a show-stopping dip!
Ingredients
For the Main Hummus:
2 cups cooked chickpeas (from about 1 cup dried, or 2 x 15-ounce cans, drained and rinsed well)
1/2 cup good quality tahini (sesame paste) – make sure it’s well-stirred!
1/4 cup freshly squeezed lemon juice (about 1-2 lemons) – always use fresh!
2-3 cloves garlic, minced – adjust to your liking!
1/4 cup ice water, plus more as needed
1/4 cup extra virgin olive oil, plus more for drizzling
1/2 teaspoon salt, or to taste
Optional: A tiny pinch of cumin (don’t overdo it!)
For Serving:
Extra virgin olive oil for drizzling
Paprika or sumac for dusting
Fresh parsley, chopped, for garnish
“New family favorite! This Greek hummus was so flavorful and ridiculously easy. Crowd-pleaser for sure.”
Step-by-Step Instructions
Step 1: Prepare the Chickpeas
If you’re using dried chickpeas, rinse them well and soak them overnight. Drain and rinse again, then cover with fresh water and simmer until very tender, about 1-2 hours. For canned chickpeas, drain and rinse them thoroughly. The goal is to have them super soft so they blend into a creamy paste. Some people like to pinch the skins off their chickpeas for an extra smooth hummus, but honestly, with a good food processor, it’s not always necessary and can be a bit time-consuming. I usually skip this step, and it turns out beautifully!
Step 2: Blend the Aromatics
In the bowl of your food processor, combine the minced garlic and lemon juice. Let this sit for about 5-10 minutes. This little trick mellows out the sharp bite of the raw garlic and allows it to infuse the lemon juice beautifully. It’s a small step, but it makes a noticeable difference in the final flavor profile. If you’re sensitive to raw garlic, this is a lifesaver!
Step 3: Add Chickpeas and Tahini
Add the well-drained chickpeas to the food processor with the lemon-garlic mixture. Add the tahini, salt, and the optional pinch of cumin. Pulse a few times to break down the chickpeas a bit before you start blending continuously.
Step 4: Blend Until Smooth and Creamy
Now, turn the food processor on and let it run. This is where the magic happens! Scrape down the sides of the bowl a few times to ensure everything is incorporated. While the processor is running, slowly drizzle in the 1/4 cup of ice water and the 1/4 cup of olive oil. Keep blending until the mixture is incredibly smooth and creamy. If it seems too thick, add more ice water, one tablespoon at a time, until you reach your desired consistency. I like my Greek hummus quite thick, almost like a paste, but you might prefer it a bit looser. Taste and adjust the salt and lemon juice as needed. You want a lovely balance of creamy, tangy, and savory.
Step 5: Taste and Adjust Seasoning
This is the most crucial step! Dip a clean finger or a spoon in and taste. Does it need more salt? A bit more lemon tang? Maybe another tiny clove of garlic? Don’t be shy! This is your chance to perfect it to your liking. Remember, the flavors will meld a bit as it sits, but it’s best to get it just right at this stage. I’ve learned that the acidity of lemons can vary, so tasting is always key.
Step 6: Serve with Flair
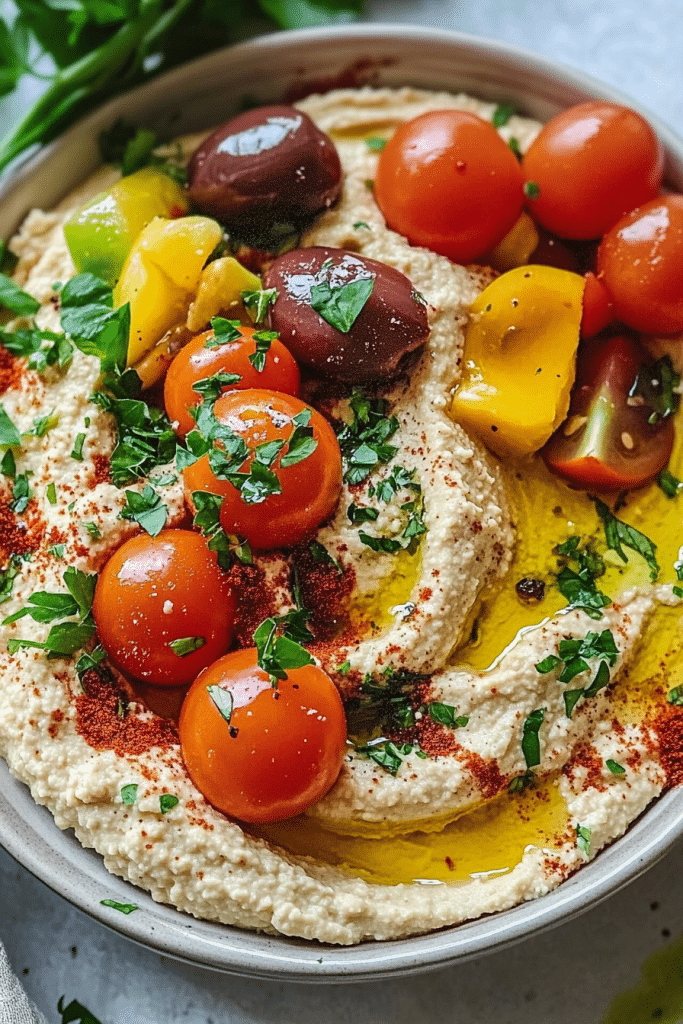
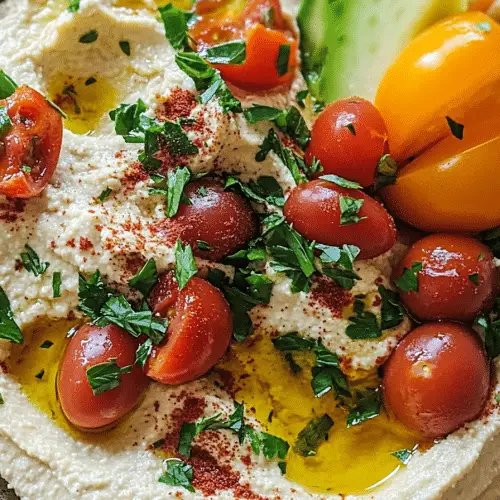
Spoon the Greek hummus into a shallow bowl or platter. Use the back of the spoon to create a little swirl on top – this is the perfect canvas for our final touches. Drizzle generously with your best extra virgin olive oil. Sprinkle with a pinch of vibrant paprika or tangy sumac for a pop of color and flavor. Finally, scatter some freshly chopped parsley over the top. It looks and tastes so much better with these simple garnishes!
Step 7: Chill (Optional, but Recommended)
While you can serve this Greek hummus immediately, I highly recommend chilling it in the refrigerator for at least 30 minutes. This allows the flavors to meld together beautifully and the texture to firm up just slightly. It makes a world of difference, trust me!
Step 8: Enjoy!
Serve your gorgeous, homemade Greek hummus with warm pita bread, fresh vegetables, crackers, or use it as a spread. Get ready for the compliments to roll in!
“Packed with flavor and so simple. Exactly what I wanted from this Greek hummus!”
What to Serve It With
This Greek hummus is the ultimate chameleon in the kitchen! It’s fantastic for pretty much any meal or occasion you can think of. For **Breakfast**, I love spreading a generous dollop on some toasted sourdough or a hearty whole-wheat bread. A sprinkle of za’atar on top and maybe a few sliced tomatoes make for an incredibly satisfying and healthy start to the day. It’s way more exciting than plain toast! When it comes to **Brunch**, this Greek hummus is a star player. It’s perfect as part of a mezze platter with olives, feta, grilled halloumi, and more. I like to arrange it in a beautiful bowl and surround it with colorful crudités like bell pepper strips, cucumber ribbons, and radishes, alongside warm pita triangles. It adds that Mediterranean flair that always feels special. For a lighter **Dessert** option, or when you’re craving something savory but not too heavy after dinner, a small bowl of this Greek hummus with a drizzle of honey and a sprinkle of pistachios can be surprisingly delightful. It hits that spot without being overly sweet. And for those **Cozy Snacks** when you’re curled up on the couch, there’s nothing better than a bowl of this Greek hummus with some crunchy pita chips or fresh snap peas. My kids actually ask for this when they need an after-school snack, and I feel good knowing they’re getting healthy fats and protein. It’s always a hit when we have friends over unexpectedly too; it feels effortless but always looks impressive. I’ve even used it as a flavorful base for roasted chicken, spreading it on the skin before baking, and the results were phenomenal!
Top Tips for Perfecting Your Greek Hummus
Over the years, I’ve learned a few little tricks that take my Greek hummus from good to absolutely spectacular. First, when it comes to the chickpeas, while canned are convenient, if you have the time, cooking dried chickpeas yourself often yields a superior texture. They can be boiled until they are almost falling apart, which makes for an incredibly creamy end product. If you do use canned, *rinse them really well*. Like, rinse until the water runs completely clear. This removes that metallic, canned flavor that can sometimes sneak in. For the tahini, stir it really well before you measure it out. The oil can separate, and you want that rich, nutty paste fully incorporated. A good quality tahini is also paramount; it’s a star ingredient here, so don’t skimp! When it comes to the lemon juice, always, always use fresh. Bottled just doesn’t have that same bright, vibrant flavor, and it can sometimes have a slightly bitter undertone. My secret weapon for the smoothest hummus is the ice water. Adding it gradually while the food processor is running helps to emulsify the mixture, creating that incredibly silky, almost whipped texture that is just divine. Don’t be tempted to use warm water; the cold water is what helps create that luxurious mouthfeel. Another tip I learned the hard way: don’t be afraid to let the food processor run for a good few minutes. For really ultra-smooth hummus, I often let mine go for 5-7 minutes, stopping to scrape down the sides occasionally. Patience here really pays off! And regarding the garlic, while I love a good garlicky punch, if you’re making this for a crowd or want a milder flavor, you can roast the garlic cloves first. Roasting mellows the garlic significantly, making it sweeter and less pungent. You can either roast it whole in the oven until soft, or even sauté it gently in a little olive oil. Taste, taste, taste! This is so important. Hummus is very personal, and what one person loves, another might find too strong or too mild. Adjust the salt, lemon, and garlic until it sings to *you*. Finally, for the serving, don’t just dump it in the bowl. Create a little well or swirl, and be generous with that final drizzle of good olive oil. It’s not just for show; it adds a wonderful richness and mouthfeel that ties everything together. A sprinkle of sumac adds a lovely tanginess that complements the lemon beautifully.
Storing and Reheating Tips
Storing this glorious Greek hummus properly is key to keeping it fresh and delicious. For **Room Temperature** storage, it’s best to serve it within 2-3 hours. Hummus is best enjoyed fresh, and leaving it out for too long can affect its texture and safety, especially with the garlic and lemon. If you’ve just made it and are waiting for guests, keeping it covered in a cool spot is usually fine for a couple of hours. For **Refrigerator Storage**, this is where it shines! Once cooled, transfer the Greek hummus to an airtight container. Before sealing, you can pour a thin layer of olive oil over the top. This acts as a natural barrier and helps prevent the surface from drying out or forming a skin. It will stay wonderfully fresh in the fridge for about 4-5 days. The flavors often even get better on the second day! Always use a clean spoon to serve to avoid introducing bacteria. **Freezer Instructions** are also an option, though I find it’s so good it rarely lasts long enough to consider freezing! If you do want to freeze it, transfer it to a freezer-safe airtight container, again, perhaps with that protective layer of olive oil on top. It can be stored in the freezer for up to 2-3 months. To thaw, transfer the container to the refrigerator overnight. You might notice it has separated a bit after thawing; just give it a good stir or a quick blitz in the food processor with a tablespoon of water to bring it back to its smooth, creamy glory. For **Glaze Timing Advice** (referring to the garnishes), I always add the final olive oil drizzle, paprika, and parsley right before serving, especially if it’s been in the fridge for a while, to keep them looking fresh and vibrant. If you’re taking it to a potluck, you can put the hummus in its container and drizzle the oil on just before you leave, or keep it separate and add it at the destination.
Frequently Asked Questions
Final Thoughts
I truly hope you give this Greek hummus recipe a try. It’s one of those dishes that has brought so much joy and deliciousness to my table, and I just know it will do the same for yours. It’s the perfect example of how a few simple, quality ingredients can come together to create something truly spectacular. The creamy texture, the bright, zesty flavor, the hint of garlic – it’s just perfection in a bowl. It’s more than just a recipe; it’s an invitation to slow down, connect with good food, and share something wonderful with the people you care about. If you love this Greek hummus, you might also enjoy my recipe for Whipped Feta Dip or my Roasted Red Pepper Spread – they have that same Mediterranean vibe and are perfect for entertaining! Please, if you make this, let me know how it turns out in the comments below! I absolutely love hearing about your kitchen adventures and seeing your creations. Don’t forget to rate the recipe if you enjoyed it. Happy cooking, and more importantly, happy eating!
Greek Hummus
Ingredients
Main Ingredients
- 0.43 kg Chickpeas cooked, drained, and rinsed
- 0.12 cup Tahini
- 0.06 cup Fresh Lemon Juice
- 3 cloves Garlic minced
- 0.06 cup Extra Virgin Olive Oil plus more for drizzling
- 0.005 cup Cumin ground
- 0.005 cup Salt
- 0.01 cup Water ice cold, or as needed
Toppings (Optional)
- 0.02 cup Kalamata Olives chopped
- 0.02 cup Feta Cheese crumbled
- 0.005 cup Fresh Parsley chopped
- Paprika for dusting
Instructions
Preparation Steps
- Combine chickpeas, tahini, lemon juice, minced garlic, 0.06 cup olive oil, cumin, and salt in a food processor.
- Process until the mixture is smooth and creamy. You may need to scrape down the sides of the food processor a few times.
- While the food processor is running, gradually add the 0.01 cup ice cold water, one tablespoon at a time, until the hummus reaches your desired consistency.
- Taste and adjust seasoning if needed. Add more salt or lemon juice to your preference.
- Transfer the hummus to a serving bowl. Drizzle generously with extra virgin olive oil.
- Garnish with chopped Kalamata olives, crumbled feta cheese, fresh parsley, and a dusting of paprika, if desired.
- Serve immediately with pita bread, vegetable sticks, or as a spread.