You know those recipes that just… make your heart sing? The ones you find yourself making again and again, the ones that are your go-to for everything from a quick weeknight snack to impressing guests? Well, this Greek hummus is *that* recipe for me. It’s not just hummus; it’s a creamy, dreamy, flavor-packed revelation that has completely ruined me for anything store-bought. I remember the first time I tasted proper, homemade Greek hummus at a little taverna on a tiny island years ago. It was so much richer, so much brighter, and had this incredible texture that was somehow both smooth and delightfully textured. I’ve been chasing that flavor ever since, and honestly, I think I’ve finally nailed it. This isn’t your average chickpea dip; it’s an experience, and I can’t wait to share it with you.
Thank you for reading this post, don't forget to subscribe!What is Greek Hummus?
So, what makes this Greek hummus different from the stuff you grab at the supermarket? Think of it as the Mediterranean cousin to your standard hummus, but with a few key twists that elevate it from good to absolutely unforgettable. At its core, it’s still that beloved dip made from mashed chickpeas, tahini, lemon juice, and garlic. But in the Greek version, we often lean into olive oil a bit more generously, and sometimes, we’ll find hints of cumin or even a touch of pomegranate molasses for a subtle, sophisticated sweetness. It’s essentially a celebration of fresh, vibrant flavors, with the creaminess of the chickpeas and tahini playing a beautiful harmony with the tang of lemon and the punch of garlic. It’s less about a strict set of rules and more about embracing the spirit of Greek cuisine – simple, fresh, and utterly delicious.
Why you’ll love this recipe?
What are some good reasons to make Greek Hummus?
The Flavor Explosion: What is the Flavor Explosion? Forget bland and boring. This hummus is bursting with bright, fresh flavors. The creamy chickpeas are the perfect canvas for the zesty lemon juice, the rich, nutty tahini, and that unmistakable garlicky kick. It’s savory, tangy, and just utterly satisfying. Every bite is a little taste of sunshine, I swear!
It’s Shockingly Simple: You might think making hummus from scratch is complicated, but trust me, it’s not. Once you have the basic ingredients, the whole process takes mere minutes, especially if you’ve got a good food processor or blender. It’s one of those recipes that makes you feel like a kitchen wizard without any of the fuss.
Budget-Friendly Bliss: Chickpeas are incredibly affordable, and the other ingredients – tahini, lemon, garlic – are pantry staples or easy to find without breaking the bank. You get restaurant-quality flavor for a fraction of the cost, which is always a win in my book, especially when the kids keep asking for more!
So Versatile, It’s Ridiculous: This is the kind of dish that can do no wrong. It’s perfect for dipping pita bread, crunchy veggies like carrots and cucumbers, or even spreading on toast. But it doesn’t stop there! I love drizzling a bit of extra olive oil on top and serving it as a side dish with grilled meats or fish. It’s a lifesaver on busy nights when I need a quick, healthy appetizer or a satisfying snack. I’ve even added a dollop to wraps for an extra layer of flavor. It really is the Swiss Army knife of dips!
How to Make Greek Hummus
Quick Overview
The beauty of this Greek hummus is its sheer simplicity. We’re basically just blending a few core ingredients until they reach that perfect creamy consistency. It starts with perfectly cooked chickpeas (or good quality canned ones), which are then processed with tahini, a generous squeeze of lemon juice, a clove or two of garlic, and a good glug of olive oil. A touch of ice water helps achieve that super smooth, luxurious texture. The whole thing comes together in under 10 minutes, making it an absolute weeknight wonder. It’s so straightforward, even the most hesitant cooks can nail it on the first try.
Ingredients
For the Main Hummus Base:
2 cups cooked chickpeas (about 2 cans, drained and rinsed, or 1 cup dried chickpeas, cooked until very tender). If you’re using canned, make sure to rinse them really well! Sometimes I’ll even rub them between my hands to get off any loose skins – it sounds fussy, but it *does* make for a creamier hummus. If I’m cooking dried chickpeas, I always cook them with a bay leaf; it adds a subtle depth.
1/2 cup tahini (sesame paste). This is key for that rich, nutty flavor. Make sure it’s well-stirred before you measure it, as the oil can separate.
1/4 cup fresh lemon juice (from about 1-2 lemons). Start with this amount and add more to taste. Fresh is non-negotiable here; bottled just doesn’t have the same zing.
2 cloves garlic, minced or roughly chopped. I prefer to mince it so it blends in completely, but if you like a stronger garlic hit, you can add a little more.
1/4 cup ice water. This is my secret for ultra-smooth hummus! Adding ice water gradually while blending helps create that ethereal, cloud-like texture.
1/2 teaspoon salt, or to taste. You can always add more at the end.
1/4 teaspoon cumin (optional, but I love it). It adds a warm, earthy depth that complements the other flavors beautifully.
For Serving and Garnish:
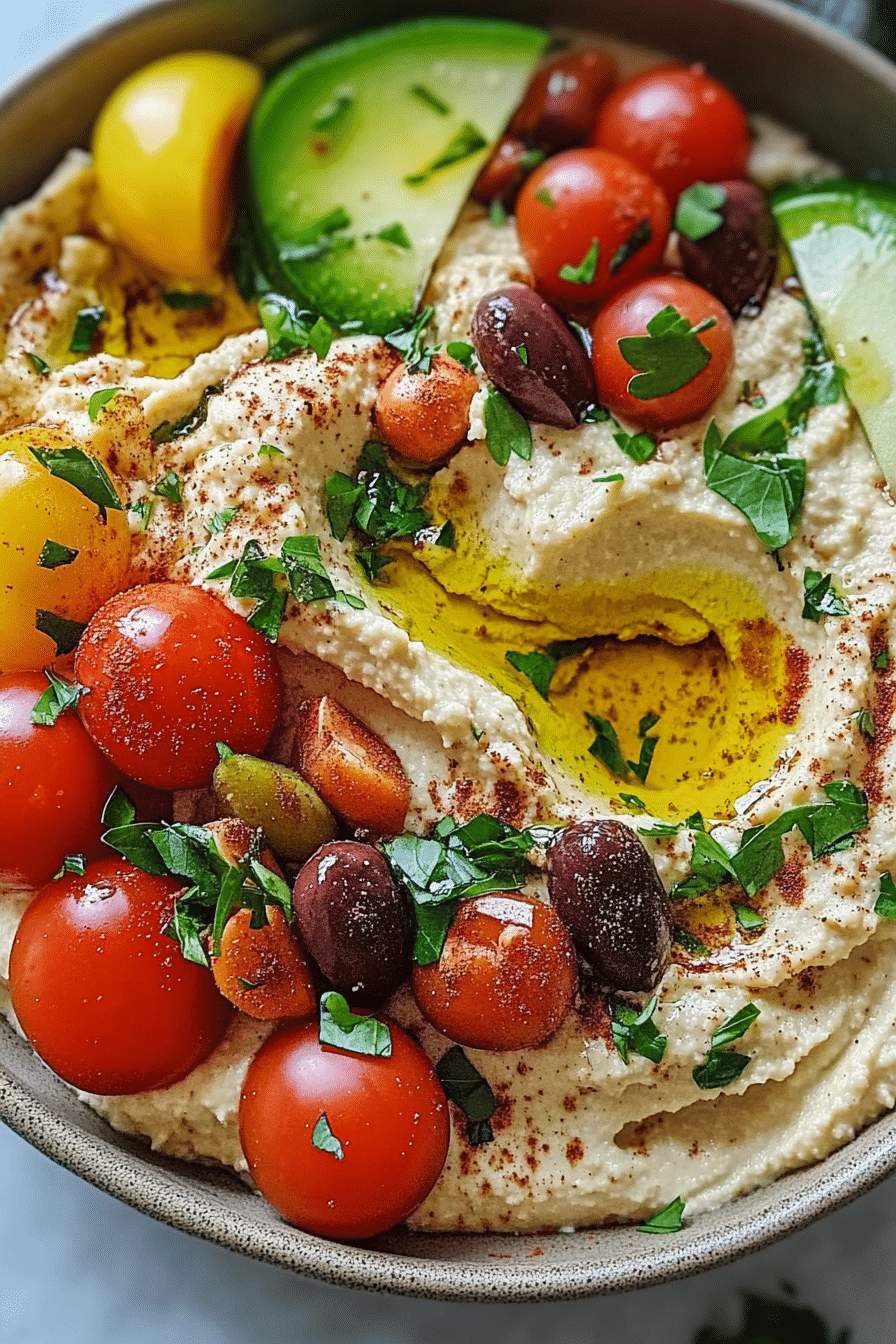
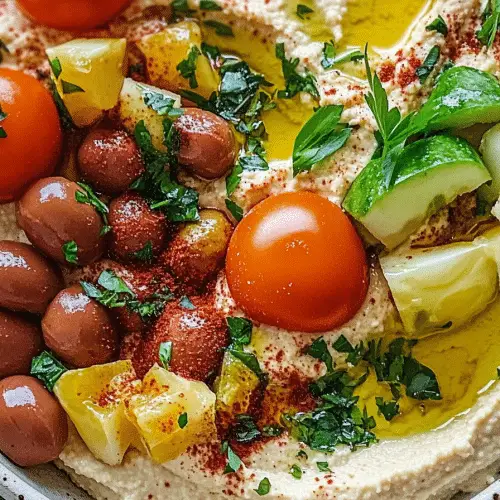
Extra virgin olive oil, for drizzling. Use a good quality one; it really makes a difference in the final flavor.
“I don’t know if I’ve ever eaten a better Greek hummus. The rub alone is wonderful, but the sauce??? Over the top!”
Paprika, for dusting. A little sprinkle adds a lovely pop of color and a hint of warmth.
Fresh parsley, chopped (optional). For a touch of freshness and visual appeal.
Step-by-Step Instructions
Step 1: Prepare the Chickpeas
If you’re using canned chickpeas, drain them thoroughly and give them a good rinse under cold water. If you’re feeling extra ambitious (and I often do when I have a little extra time!), you can slip off the skins of the chickpeas. It takes a few minutes, but it really does contribute to an incredibly smooth and creamy final texture. Just gently pinch each chickpea and the skin should slide right off. For dried chickpeas, make sure they are cooked until they are very soft and easily mashable. You want them to be practically falling apart.
Step 2: Process the Garlic and Lemon Juice
In the bowl of your food processor, combine the minced garlic and the fresh lemon juice. Let this sit for about 5-10 minutes. This little trick really mellows out the sharpness of the raw garlic and allows its flavor to infuse into the lemon juice, which creates a more balanced and pleasant taste in the final hummus.
Step 3: Add Tahini and Salt
To the garlic and lemon mixture in the food processor, add the tahini and salt. Process for about 1 minute, scraping down the sides of the bowl as needed. The mixture will likely be quite thick and paste-like at this stage. Don’t worry, this is perfectly normal. This step helps to get the tahini really well combined and starts building that creamy base.
Step 4: Blend in the Chickpeas
Now, add about half of your prepared chickpeas to the food processor. Process until the mixture is mostly smooth, scraping down the sides again. Then, add the remaining chickpeas and continue processing. You’ll see it start to transform into a thick paste. This gradual addition of chickpeas helps ensure everything gets incorporated evenly.
Step 5: Achieve Creamy Perfection with Ice Water
With the food processor running on low, slowly drizzle in the ice water, a tablespoon at a time. Continue processing until the hummus is incredibly smooth and creamy. You might need a little more or a little less ice water depending on the moisture content of your chickpeas and tahini. Keep blending until you reach that luxurious, almost whipped texture. If it’s too thick, add a tiny bit more ice water; if it’s too thin, you can add a few more chickpeas or a bit more tahini.
Step 6: Taste and Adjust
Once you have your desired consistency, stop the food processor and give the hummus a taste. This is where you personalize it! Does it need more salt? A little more lemon juice for tang? Perhaps a bit more garlic for punch? Adjust the seasonings until it’s perfect for your palate. If you’re using cumin, stir it in now. Blend briefly one last time to incorporate any final adjustments.
Step 7: Transfer and Garnish
Spoon the hummus into a shallow serving bowl. Use the back of your spoon to create a swirl or a little well in the center. Drizzle generously with good quality extra virgin olive oil. Sprinkle with a pinch of paprika for color and a touch of parsley if you like. My kids love it when I just make a big swirl and then artfully drizzle the oil, making it look like a little Mediterranean masterpiece!
Step 8: Serve Immediately or Chill
This Greek hummus is fantastic served immediately, allowing the flavors to really shine. However, it also keeps beautifully in the refrigerator. If serving chilled, let it sit at room temperature for about 15-20 minutes before serving to allow the flavors to mellow a bit.
What to Serve It With
This Greek hummus is such a chameleon; it fits in perfectly no matter the meal or occasion. I’ve tried it with practically everything, and it always shines.
For Breakfast: Honestly, I’ve had this for breakfast more times than I’d care to admit! A smear on some toasted sourdough with a sprinkle of everything bagel seasoning is pure heaven. Or, I’ll serve it alongside some scrambled eggs and a few Kalamata olives. It’s such a satisfying and surprisingly healthy way to start the day, way better than reaching for sugary cereals.
For Brunch: This is where it really gets to show off. I love presenting a beautiful bowl of this Greek hummus as part of a larger mezze spread. Think alongside some feta cheese, stuffed grape leaves, olives, and fresh crusty bread. It’s also amazing spooned into mini phyllo cups or served with grilled halloumi. For drinks, a crisp Assyrtiko wine or a refreshing sparkling water with mint is just perfect.
As Dessert: Hear me out! While it sounds savory, this hummus can be surprisingly adaptable. If you make it a little less garlicky and add a tiny pinch of cinnamon and a swirl of pomegranate molasses, it takes on a whole new character. I’ve served it with fresh figs and a drizzle of honey as an unconventional but delightful dessert. It’s a unique twist that always sparks conversation!
For Cozy Snacks: This is its natural habitat, right? Grab your favorite pita bread, some carrot sticks, cucumber slices, bell pepper strips, or even some celery. A generous scoop of this Greek hummus is the ultimate healthy snack that keeps you feeling full and satisfied. It’s my go-to when that 3 pm craving hits, or when unexpected guests pop over – it’s always a crowd-pleaser!
Top Tips for Perfecting Your Greek Hummus
Over the years, I’ve learned a few tricks that take my Greek hummus from good to absolutely stellar. These are the things I always do now, and they make a world of difference.
Chickpea Prep is Key: As I mentioned, if you have the time, slipping off the skins of the chickpeas is a game-changer for ultimate smoothness. It’s a bit of a labor of love, but the resulting texture is just unparalleled. If you’re short on time, just a really thorough rinse will do! Also, make sure your chickpeas are *very* tender. Mushy chickpeas are happy hummus ingredients.
Tahini Quality Matters: Not all tahini is created equal. Look for one that’s made from 100% sesame seeds and has a smooth, pourable consistency. If it’s very stiff or oily, it might not give you the best results. Always give it a good stir before measuring, as the oil can separate.
Lemon Juice Freshness: Please, please, please use fresh lemon juice. Bottled just doesn’t have the bright, zesty flavor that makes this hummus sing. Roll your lemons on the counter before juicing them; it helps release more juice. Start with the amount I’ve suggested and then taste and add more until it’s perfectly tangy for you.
Don’t Fear the Ice Water: This is my little secret weapon for achieving that super silky, cloud-like texture. Adding it gradually while the processor is running emulsifies the mixture and makes it incredibly light and airy. It’s much better than just adding tap water, which can sometimes make hummus a bit too thin or gummy.
“New family favorite! This Greek hummus was so flavorful and ridiculously easy. Crowd-pleaser for sure.”
The Garlic Adjustment: Raw garlic can be potent. If you’re sensitive to it or want a milder flavor, you can lightly roast or boil your garlic cloves before mincing them. This mellows out the harshness and adds a lovely sweetness. I usually just mince mine, but I’ve tried the roasted garlic trick and it’s fantastic if you want to experiment.
Seasoning is Personal: Hummus is all about balance. Don’t be afraid to taste and adjust. I often find I need a little more salt than I initially think, and a bit more lemon juice to brighten everything up. The salt really brings out all the other flavors.
The Olive Oil Drizzle: Don’t skimp on the finishing olive oil. A generous drizzle of good quality extra virgin olive oil not only adds beautiful flavor but also helps preserve the hummus and makes it look incredibly inviting. It’s the crowning glory!
Storing and Reheating Tips
One of the best things about this Greek hummus is how well it stores, meaning you can have delicious homemade goodness ready to go whenever the craving strikes. I’ve tested these methods extensively, and they work like a charm.
Room Temperature Storage: Honestly, for the best flavor and texture, it’s best enjoyed within a few hours of making it. If you’re serving it at a party, you can keep it out for about 2 hours, as long as it’s covered. After that, it’s best to refrigerate it.
Refrigerator Storage: This is where it really shines for make-ahead goodness. Once cooled, transfer the hummus to an airtight container. You can either press plastic wrap directly onto the surface of the hummus to prevent a skin from forming, or just make sure the lid is sealed tightly. It will stay wonderfully fresh and creamy in the refrigerator for up to 4-5 days. I often make a big batch at the start of the week, and it’s perfect for snacks and quick lunches.
Freezer Instructions: While I don’t freeze hummus often because it’s so good fresh, it *can* be frozen if you find yourself with an abundance. Transfer the hummus to a freezer-safe container, leaving a little headspace as it might expand slightly. You can press plastic wrap directly onto the surface before sealing the lid for extra protection. It should keep well in the freezer for about 1-2 months. Thaw it overnight in the refrigerator, and then give it a good stir. You might need to add a splash of water or olive oil and re-blend briefly to bring back that smooth consistency. Sometimes the texture can change slightly after freezing, but it’s still delicious.
Glaze Timing Advice: I usually add the final drizzle of olive oil and any garnish (like paprika or parsley) just before serving. If you’re storing it for a day or two, you can add the olive oil and paprika before refrigerating, but the parsley is best added fresh after it’s brought back to room temperature. For freezing, it’s definitely best to add all garnishes *after* thawing and re-blending.
Frequently Asked Questions
Final Thoughts
Honestly, making this Greek hummus has become one of those little kitchen rituals that brings me so much joy. It’s proof that you don’t need fancy ingredients or complicated techniques to create something truly spectacular. It’s a recipe that’s comforting, versatile, and always a hit, whether it’s just me and the kids digging in or a whole crowd at a party. The way the simple ingredients come together to create such a rich, vibrant flavor is just magical.
If you’re a hummus lover like me, I really hope you’ll give this a try. It’s so much more rewarding than anything from a plastic tub. And if you find yourself craving other Mediterranean-inspired delights, you might also love my recipe for authentic Tzatziki sauce or my easy Greek Lemon Potatoes – they’re perfect partners for this hummus!
I’m so eager to hear what you think of this Greek hummus! Please leave a comment below with your thoughts, any variations you try, or how you serve it. Your feedback and stories are what make this community so special. Happy dipping!
Greek Hummus
Ingredients
Main Ingredients
- 0.42 ounces Canned chickpeas drained and rinsed, reserving some liquid
- 0.25 cup Tahini
- 0.125 cup Fresh lemon juice
- 2 cloves Garlic minced
- 0.25 cup Olive oil plus more for drizzling
- 0.5 teaspoon Salt
- 0.25 teaspoon Cumin
Optional Toppings
- Kalamata olives pitted and halved
- Feta cheese crumbled
- Fresh parsley chopped
- Paprika
Instructions
Preparation Steps
- Combine drained chickpeas, tahini, lemon juice, minced garlic, 0.25 cup olive oil, salt, and cumin in a food processor.
- Process until smooth and creamy. If the hummus is too thick, add a tablespoon or two of the reserved chickpea liquid or water until the desired consistency is reached.
- Taste and adjust seasoning if needed. Add more salt, lemon juice, or cumin to your preference.
- Transfer the hummus to a serving bowl. Drizzle with additional olive oil.
- Garnish with Kalamata olives, crumbled feta cheese, chopped fresh parsley, and a sprinkle of paprika, if desired.
- Serve with pita bread, fresh vegetables, or crackers.