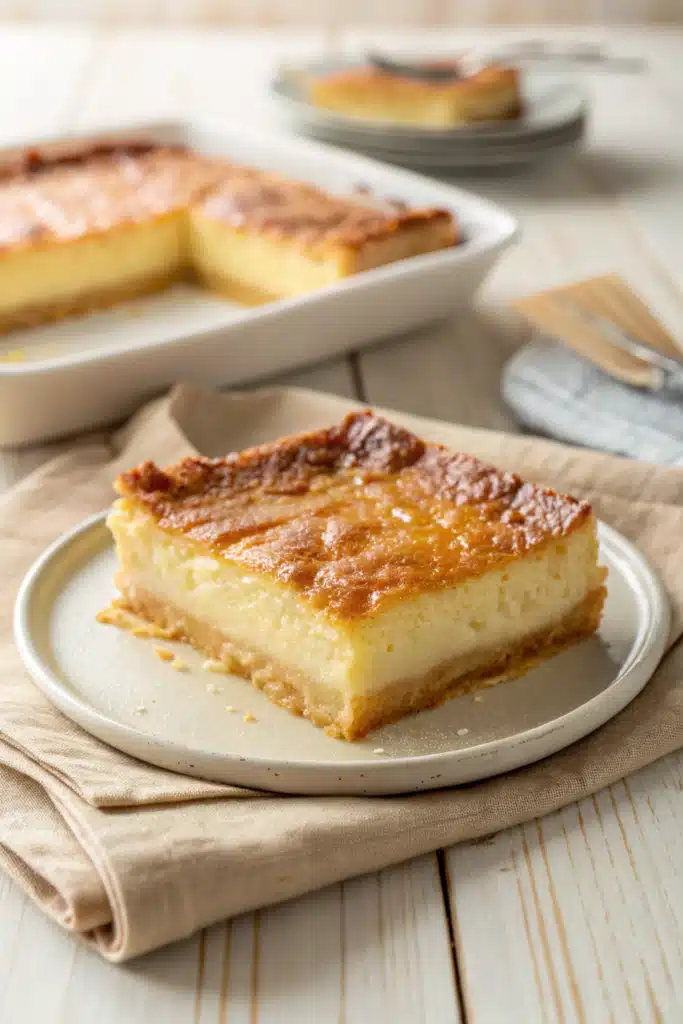
The kitchen fills with the warm, vanilla-y sigh of butter and sugar the moment I slide the pan into the oven. This Gooey Butter cake is the kind of dessert that makes a house feel like a home—soft, cozy, and a little indulgent in the best possible way. I can still see my grandmother’s smile when the glaze caught the light and the kitchen clock clicked toward serve-time. It’s not flashy, just honest, comforting, and utterly satisfying. It’s a crowd-pleaser that doesn’t require a dozen steps or fancy equipment. If you’ve ever dipped into a bakery and wondered what magic makes their weeknight treats feel special, you’ll find that same magic in this Gooey butter cake. I’ve made this countless times and it never fails to vanish at a party, a family dinner, or a simple Friday night in with friends. It’s a recipe that travels well, but truth be told, we rarely share; we just keep it to ourselves and pass towels and forks across the plate as we swap stories. This one’s a lifesaver on busy nights and a quiet hug on weekend afternoons—the kind of dessert that earns “seconds” and a chorus of “can you make this again soon?”
Thank you for reading this post, don't forget to subscribe!
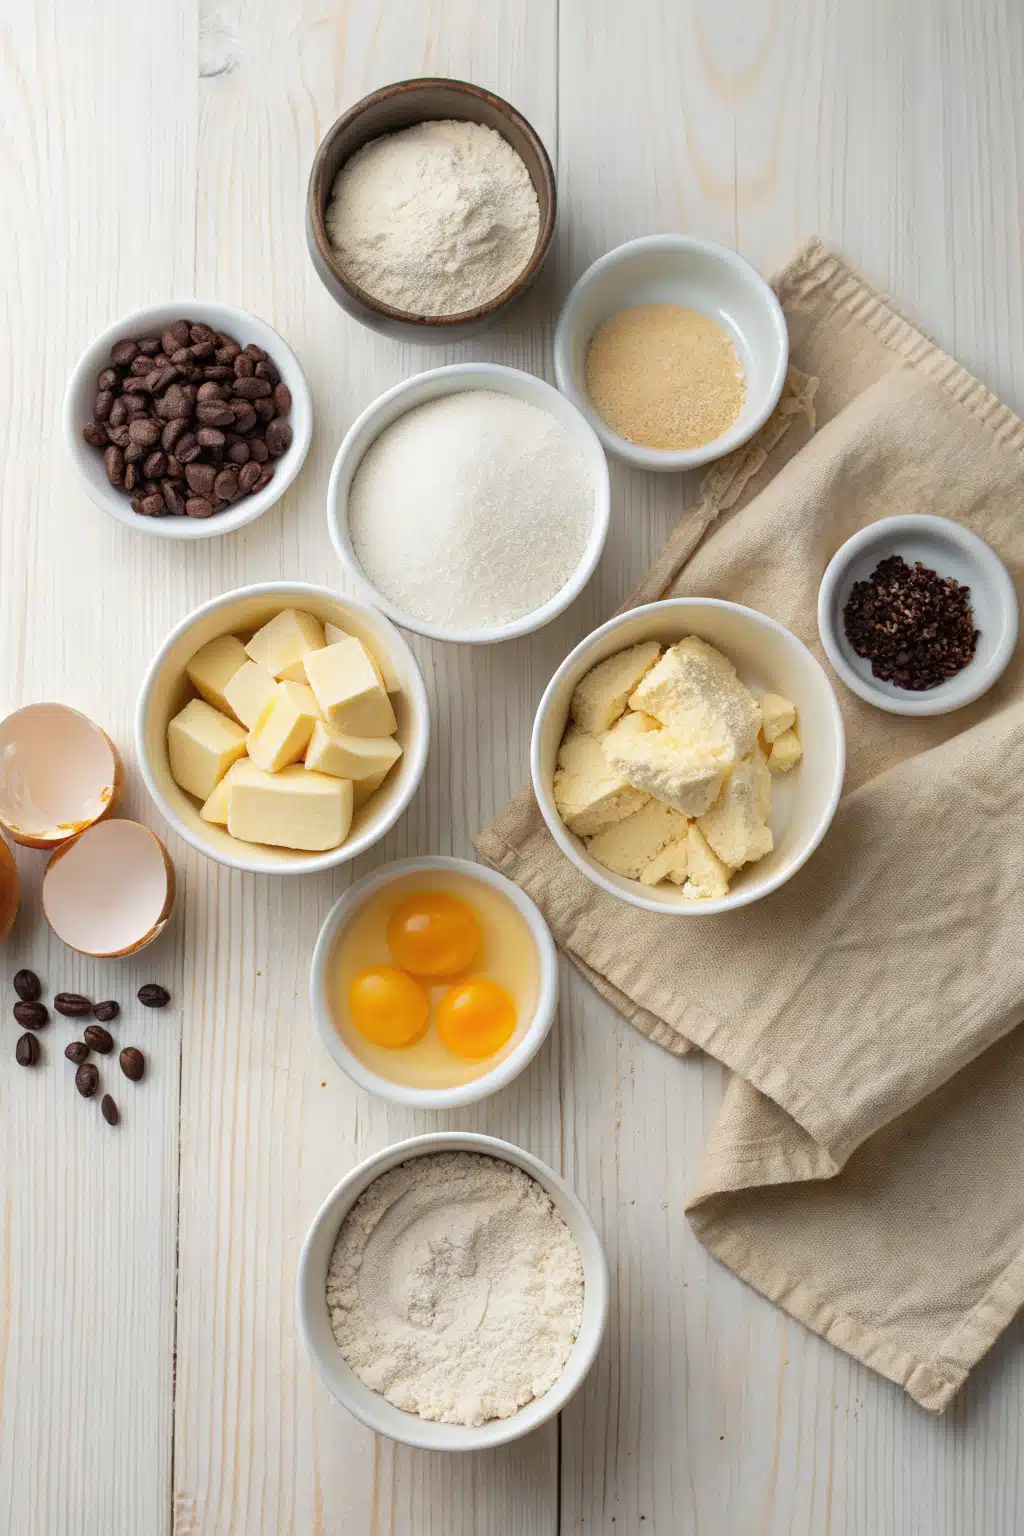
What is gooey butter cake?
gooey butter cake is essentially a two-layer dream: a soft, buttery cake base that’s baked until it’s tender and almost cake-like, topped with a creamy, slightly tangy cheesecake-like filling, and finished with a glossy glaze that makes every bite feel luxurious. Think of it as a comfort dessert that’s both nostalgic and modern enough to share with friends who’ve never heard of it. The name comes from that irresistible, gooey center—the kind of texture that melts on your tongue and sticks to your fingers in the best way. It’s a cake, it’s a bar, it’s a dessert you can slice into generous squares and still feel like you’re getting a party-sized treat. I love that it’s approachable enough for a weeknight bake but special enough for gatherings—the kind of recipe that earns compliments without demanding a lot of patience. This Gooey butter cake is the version I reach for when I want something unfussy yet indulgent, a small slice of happiness you can actually whip up in under an hour.
Why you’ll love this recipe?
What I love most about this Gooey butter cake is how it balances “homey” with “deliciously impressive.” It’s the kind of dessert you can whip up with pantry staples, yet it tastes like you spent the afternoon fussing over it. Here are a few reasons it’s a staple in my kitchen, and I think you’ll feel the same way after you try it:
- Flavor: The base is rich but not cloying, the filling has a gentle tang from the cream cheese, and the glaze brings everything together with a sweet, glossy finish. It’s a three-layer harmony in every bite—that comforting butteriness you crave with a little brightness from vanilla and a hint of cream cheese’s tang.
- Simplicity: This isn’t a multi-day affair. The batter comes together in one bowl, the filling whips up in minutes, and you can swirl to your heart’s content. You can even mix the glaze in a cups-and-sprinkles kind of way—no fancy equipment required.
- Cost-efficiency: What is the Most ingredients are pantry staples or store-bought ingredients that aren’t expensive, which means you can create something special without breaking the budget. It’s a dessert you can scale up or down easily depending on the crowd.
- Versatility: The flavor profile plays nicely with citrus zest, a pinch of nutmeg, or a splash of almond extract if you’re feeling adventurous. You can dress it up with fresh berries, a dollop of whipped cream, or a scoop of vanilla ice cream for a more indulgent moment.
In my kitchen, Gooey butter cake sits in a little circle of fond memories. It’s a recipe I’ve shared with neighbors, cousins, and the kids who now bake it with their own families. If you’re just dipping your toe in, you’ll find that it’s forgiving—almost impossible to ruin—yet spectacular enough to feel like a celebration.
How to Make Gooey Butter Cake
Quick Overview
This Gooey butter cake starts with a simple, buttery cake base that’s pressed into a pan and baked until just set. Then a lush Cream Cheese filling is dollopped over the warm crust and swirled so you see ribbons of cheesecake against the pale yellow cake. After it bakes and cools, a glossy glaze pours over the top, locking in moisture and giving that irresistible sheen. The beauty is in the balance: a soft, almost cake-like bottom and a creamy, dreamy center that stays indulgently gooey. It’s a dessert that’s equal parts comforting and show-stopping, and you’ll notice that the longer it sits, the more the flavors mingle and deepen.
Ingredients
For the Main Batter:
– 1 box yellow Cake Mix (about 15.25–18.25 oz)
– 1/2 cup unsalted butter, melted
– 2 eggs
For the Filling:
– 8 oz Cream Cheese, softened
– 2 large eggs
– 1 1/2 cups powdered sugar
– 1 teaspoon vanilla extract
For the Glaze:
– 1/2 cup unsalted butter, melted
– 2 cups powdered sugar
– 2 teaspoons vanilla extract
– 3–4 tablespoons milk (add a splash more if you like it thinner)
Step-by-Step Instructions
Step 1: Preheat & Prep Pan
Heat your oven to 350°F (175°C). Lightly grease a 9×13-inch pan and line it with parchment if you like easy removal, then give the pan a quick dusting of flour. My grandma used to tell me to rub the flour in until you can’t see it—it helps the crust set up nicely and prevents sticking. If you don’t have parchment, just oil well and keep an eye on the edges so they don’t brown too fast.
Step 2: Mix Dry Ingredients
In a large bowl, whisk the yellow cake mix with the melted butter and one egg until it resembles a thick, cohesive batter. It’s okay if there are a few small lumps—that’s part of the charm. The batter should be smooth but not overly glossy. This is the kind of batter you can press into the pan with your hands if you want to, which I actually love doing on crowded weeknights when you’re just trying to get dinner on the table and something sweet at the end.
Step 3: Mix Wet Ingredients
In a separate bowl, beat the cream cheese until smooth. Add the remaining egg, powdered sugar, and vanilla, and whisk until creamy and lump-free. A few tiny lumps are okay, but you want this to be silky—think thick frosting consistency rather than runny cream.
Step 4: Combine
Spread the main batter evenly across the bottom of the pan. Dollop the cream cheese filling over the batter in teaspoon-sized blobs. Don’t worry about perfect circles—this is where the magic happens. You’ll take a butter knife or skewer and swirl through the cream cheese, creating ribbons that will turn into little pockets of cheesecake as the cake bakes.
Step 5: Prepare Filling
In your bowl, you’ve already whisked the filling; just give it a final stir to ensure it’s smooth and thick. If it looks a touch loose, chill it for 5–10 minutes. This helps it hold its shape when you drop it onto the batter and swirl.
Step 6: Layer & Swirl
Spread the batter evenly, then drop in the filling and swirl with a knife to create pretty marbling. The goal is to have generous swirls that bake into soft, cheesecake-like pockets within the cake. My kids always ask for extra swirl lines—that way, every bite has a bit of that tangy cheesecake goodness.
“The Gooey butter cake turned out amazing. My kids asked for seconds. Saving this one!”
Step 7: Bake
Bake for 40–45 minutes, or until the edges are set and a toothpick inserted near the center comes out with a few moist crumbs. The center should still look a touch soft—that’s the gooey magic you’re after. Oven temperatures vary, so if yours tends to run hot, check at 38 minutes. If it’s browning too quickly on top, cover loosely with foil for the remaining minutes to avoid a dry top.
Step 8: Cool & Glaze
Let the cake cool completely in the pan. This is the hardest part because the whole kitchen smells like a warm bakery. When it’s cooled, whisk together the glaze ingredients until smooth and pour over the surface. Work slowly so it coats evenly and sinks just enough to kiss the surface of the cake. If you want a thinner glaze, add more milk a teaspoon at a time. For a sweeter glaze, keep it a bit thicker and let it set longer before slicing.
Step 9: Slice & Serve
Once the glaze is set, slice into generous squares. A sharp knife helps you cut cleanly through the gooey layers. If you’re serving straight from the fridge, give it 10–15 minutes to come to room temperature so the flavors bloom. A scoop of vanilla ice cream or a dollop of whipped cream on top is heavenly, but a simple dusting of powdered sugar is equally charming. This Gooey butter cake tastes like a warm hug in every bite.
What to Serve It With
This cake is one of those versatile sweets that shines in any setting. Here are ideas to fit different occasions, all with that classic Gooey butter cake soul:
For Breakfast: A small warm square with a cup of strong coffee or a creamy latte. If you’re hosting a brunch, arrange a tray with berries, sliced peaches, and a few mint leaves for a fresh, morning-ready display. The buttery sweetness pairs beautifully with bright fruit and a robust drink.
For Brunch: Layer in a few berries or citrus zest on top for a pop of color. Serve alongside the coffee bar or a small pitcher of cream, so guests can tailor to their preference. The cake holds up well to a little fruit and a light yogurt parfait on the side, making it feel festive without being too fancy.
As Dessert: The glaze gleams beautifully under candlelight, and a scoop of vanilla bean ice cream makes it a restaurant-worthy finale. Add a few toasted nuts or a pinch of flaky sea salt to enhance the sweetness and add texture. This is where I love to plate a half-square with a bright berry compote for color and tang.
For Cozy Snacks: Cut into smaller bars and warm for a 10–15 second nudge in the microwave—just enough to soften the center and release its comforting aroma. A mug of hot chocolate or a cup of chai completes the cozy vibe and makes this feel like a simple, heartwarming treat.
Family traditions abound with this Gooey butter cake. We celebrate with it, we bake it for friends who drop by unannounced, and we always have a couple of slices stashed away for when the craving hits late at night. It’s a dish that invites sharing, but it also invites you to savor a moment—and that, to me, is what dessert is really all about.
Top Tips for Perfecting Your Gooey Butter Cake
These little refinements have saved me more times than I can count. They’re simple, practical, and make a real difference in texture and flavor.
Butter Consistency: Let your butter for the batter cool slightly after melting; pouring hot butter directly into the cake mix can create a glossy surface that hides a dry crumb. A warm, not scorching, butter makes for a moister base.
Room-Temperature Ingredients: For the filling, ensure the cream cheese is softened to room temperature. This prevents a lumpy filling and helps it blend into a creamy smoothness that bakes into that cheesecake-like center.
Avoid Overmixing: When you combine the main batter with the wet ingredients, mix until just combined. Overmixing accelerates gluten development, which can make the cake denser instead of tender and light.
Swirl Pattern: Don’t overdo the swirls; a few elegant ribbons create the best texture. If you want a more marbled look, dot more of the cream cheese mixture across the batter, then swirl in a single, gentle pass.
Flavor Swaps: A hint of lemon zest in the glaze brightens the overall flavor, while a splash of almond extract in the filling adds intrigue without overpowering the signature taste. I’ve even tested orange zest in the glaze for a brunch twist—delicious with sparkling coffee drinks.
Texture Tweaks: If you prefer a thicker, more cake-like texture, bake a few minutes longer and keep an eye on the edges. For a fudgy center, reduce the bake time by 5 minutes and let the center stay a touch wobbly as it cools. You’ll get a gooiest bite that still holds together nicely when sliced.
“I don’t know if I’ve ever eaten a better Gooey butter cake. The rub alone is wonderful, but the sauce??? Over the top!”
Glaze Consistency: For a thinner glaze, whisk in a little more milk. For a bold, glossy finish, keep it a touch thicker and let it slowly seep into the surface as the cake cools. You can also sprinkle a tiny pinch of vanilla sugar on top for a soft, fragrant crust.
Lessons learned? Always temper your expectations with your oven’s quirks. My oven likes to run hot on the middle rack, so I place the pan on the center rack and rotate halfway. The result is a evenly baked Gooey butter cake with a perfectly lush center.
Storing and Reheating Tips
You’ll be surprised how well this keeps, which makes it ideal for meal planning or weekend prepping. Here are my go-to guidelines for keeping flavor and texture intact.
Room Temperature: The cake will stay fresh for 2–3 days covered at room temperature. If your kitchen is warm, consider refrigerating to preserve the glaze and prevent the filling from becoming overly soft.
Refrigerator Storage: Store in an airtight container or tightly wrapped in plastic. It will stay good for up to 5 days, and the flavors actually deepen with a bit of chilling. Let it sit at room temperature for 15–20 minutes before serving for the best texture and aroma.
Freezer Instructions: You can freeze slices individually wrapped in plastic and stored in a freezer bag for up to 2 months. Thaw in the fridge overnight and bring to room temperature before serving. Re-glaze lightly if you feel it needs a little gloss after thawing.
Glaze Timing Advice: If you’re freezing, you can glaze after thawing to maintain a crisp, glossy finish. If you reheat, a quick warm-up in a low oven (325°F / 165°C for 8–10 minutes) helps rediscover the gooey center without drying out the edges.
In our house, leftovers are a rare, delicious problem. When we do have a square or two left, they’re even more luscious the next day with a cup of coffee—the glaze softens slightly and the cream cheese center feels more pronounced, like a gentle reminder of how good simple ingredients can be when treated with care.
Frequently Asked Questions
Final Thoughts
My love for Gooey butter cake sits between childhood nostalgia and today’s convenience. It’s one of those recipes that feels like a warm invitation: pull up a chair, pour a cup of coffee, and share a slice with someone you care about. The combination of a tender, melt-in-your-mouth crust, a creamy center that’s just a touch tangy, and a glossy glaze that gleams like a friendly wink is irresistible. I’ve learned a few tricks along the way, but the essential truth remains simple: good ingredients, measured with love, and patience as the cake bakes and the flavors mingle. If you’re looking for a dessert that’s comforting, crowd-pleasing, and a little bit nostalgic, this Gooey butter cake has your name on it. Try it, tweak it, and tell me what you changed—I always love hearing how your family enjoys it differently. Happy baking!
Feeling inspired to explore more from my kitchen? If you liked this Gooey butter cake, you might also enjoy a classic lemon sheet cake, a cinnamon roll coffee cake, or a buttery vanilla pound cake that shares that same cozy vibe. But for now, stock up on ingredients, invite a friend over, and let the oven work its magic. I can’t wait to hear how yours turns out, and I’m cheering you on from my kitchen to yours. Leave a comment with your tweaks, rate the recipe, and post a photo if you can—food memories grow sweeter when they’re shared.

Gooey butter cake
Ingredients
Crust Ingredients
- 1 package yellow cake mix (18.25 oz)
- 0.5 cup unsalted butter, melted (1 stick)
- 1 large egg
Filling Ingredients
- 1 package cream cheese, softened (8 oz)
- 2 large eggs
- 1 teaspoon vanilla extract
- 4 cups powdered sugar
- 0.5 cup unsalted butter, melted (1 stick)
Instructions
Preparation Steps
- Preheat your oven to 350°F (175°C). Lightly grease a 9x13 inch baking pan.
- For the crust: In a large bowl, combine the yellow cake mix, 0.5 cup of melted butter, and 1 large egg. Mix with an electric mixer or by hand until a soft, uniform dough forms. Press this dough evenly into the bottom of the prepared 9x13 inch baking pan.
- For the filling: In the same large bowl (or a clean one), beat the softened cream cheese with the remaining 2 eggs and vanilla extract until the mixture is smooth and lump-free.
- Gradually add the powdered sugar to the cream cheese mixture, beating until it is well incorporated and smooth. Then, slowly beat in the remaining 0.5 cup of melted butter until the filling is light and fluffy.
- Carefully pour the cream cheese filling evenly over the cake mix crust in the baking pan.
- Bake for 40 to 45 minutes, or until the edges are lightly golden brown and the center is set but still slightly jiggly. The center should remain gooey.
- Remove the cake from the oven and let it cool completely on a wire rack before cutting into squares and serving. Optionally, dust with additional powdered sugar before serving.


