You know those nights? The ones where the wind is howling outside, you’ve had a ridiculously long day, and all you want is a hug in a mug? Yeah, me too. And for the longest time, my go-to for those moments was a super decadent, super calorie-laden Hot Chocolate. It was delicious, don’t get me wrong, but it always left me feeling a little guilty. Then, I stumbled upon this skinny hot chocolate recipe, and let me tell you, it’s been a game-changer. It tastes just as rich and comforting as the “real” thing, but without all the heavy stuff. It’s the perfect way to satisfy that sweet craving when you’re trying to be a little more mindful, or honestly, any time you just want something warm and lovely. It’s like a secret weapon against the cold and a bad mood, all rolled into one. Forget those watery, bland versions you might have tried; this skinny hot chocolate is the real deal, and I can’t wait to share it with you!
Thank you for reading this post, don't forget to subscribe!What is skinny hot chocolate?
So, what exactly makes this Hot Chocolate “skinny”? Think of it as a lighter, yet equally delicious, take on the classic comfort drink. Instead of relying on heavy cream or whole milk, we’re using ingredients that deliver that same creamy, velvety texture and deep chocolate flavor, but with fewer calories and less fat. It’s essentially a carefully crafted blend of milk (or a dairy-free alternative), good quality cocoa powder, a touch of sweetener, and a secret ingredient or two that makes it taste incredibly decadent. It’s not about sacrificing flavor; it’s about being smart with our ingredients. It’s that comforting, familiar taste you love, made in a way that feels good and doesn’t weigh you down. It’s the kind of drink that makes you sigh with contentment after the very first sip. It’s pure coziness, bottled up.
Why you’ll love this recipe?
Why is skinny hot chocolate so popular?flavorIs chocolatey goodness?simple it is to whip up. Seriously, you can have a warm mug in your hands in less than 10 minutes. This is a lifesaver on busy weeknights when everyone’s clamoring for something warm and comforting before bed. And let’s talk about cost-efficiency. The ingredients are super basic and likely already in your pantry, making it a super budget-friendly treat. Unlike some recipes that call for fancy Chocolate Bars or expensive liqueurs, this one relies on simple, accessible items. Plus, it’s incredibly versatile! I’ll get to that more later, but you can easily customize it to your liking. Compared to a store-bought mix, which can sometimes taste artificial, this homemade version is pure, unadulterated chocolate bliss. It’s the kind of recipe that makes you feel like a kitchen wizard because it’s so easy to get amazing results. It’s a little bit of magic, made simple.
How to Make Skinny Hot Chocolate
Quick Overview
This skinny hot chocolate is all about simple, delicious magic. You’ll whisk together your dry ingredients, then gently heat them with your milk of choice until it’s warm and perfectly smooth. The whole process is so straightforward, making it an ideal weeknight treat or a quick pick-me-up. It’s designed to be fuss-free, so you can enjoy that cozy warmth without spending ages in the kitchen. The result is a luxuriously creamy, deeply chocolatey beverage that feels like a decadent indulgence, but it’s actually incredibly light and satisfying.
Ingredients
For the Main Drink:
Here’s what you’ll need to make your cozy cup of goodness. I always try to use good quality cocoa powder here; it makes a world of difference! Unsweetened Dutch-processed cocoa powder is my personal favorite for a smoother, richer flavor, but regular unsweetened will work too. For the milk, I usually go with 2% or skim, but if you’re dairy-free, unsweetened almond milk, soy milk, or oat milk work beautifully. Almond milk, in particular, makes it surprisingly creamy! For the sweetener, I opt for a touch of pure maple syrup or a couple of drops of liquid stevia. It adds just enough sweetness without being overwhelming. You can totally adjust this to your preference, of course. A tiny pinch of salt is non-negotiable for me – it really wakes up the chocolate flavor! And for that extra bit of richness and velvety texture without the heavy calories? A teaspoon of cornstarch whisked in with the dry ingredients does wonders; it’s my secret weapon!
For Optional Toppings:
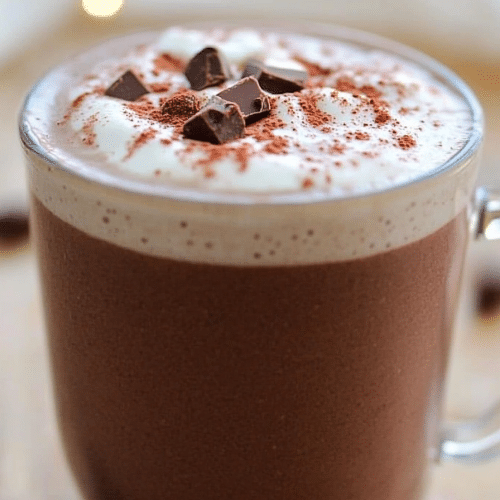
This is where you can really have some fun! A dollop of light Whipped Cream (the spray kind is fine in a pinch, or you can whip your own with a tiny bit of sweetener), a sprinkle of cinnamon or nutmeg, a few dark chocolate shavings, or even a swirl of sugar-free caramel sauce can take it to the next level. My kids love adding a few mini marshmallows, and I sometimes sprinkle a little extra cocoa powder on top. The possibilities are endless, and they’re all delicious ways to personalize your skinny hot chocolate.
“Made the Easy Skinny Hot Chocolate tonight and wow — perfect weeknight dinner. Will definitely make again!”
Step-by-Step Instructions
Step 1: Gather and Measure Your Ingredients
Before you even turn on the stove, get all your ingredients measured out and ready to go. This makes the whole process smooth and prevents any last-minute scrambling. Have your milk, cocoa powder, sweetener, cornstarch, and salt all measured into little bowls or directly into your saucepan. This is especially important if you’re making a single serving and might get distracted!
Step 2: Whisk Dry Ingredients Together
In a medium saucepan (off the heat, for now!), whisk together the unsweetened cocoa powder, cornstarch, and the pinch of salt. Make sure there are no lumps of cocoa powder. This step is crucial for ensuring a smooth, lump-free drink later on. The cornstarch will help thicken the hot chocolate and give it a lovely, velvety texture.
Step 3: Gradually Add Milk
Slowly pour in about a quarter of your milk to the saucepan with the dry ingredients. Whisk vigorously until you have a smooth, thick paste. This step is key to avoiding lumps! Once you have a smooth paste, gradually whisk in the remaining milk until everything is well combined.
Step 4: Add Sweetener and Heat
Stir in your chosen sweetener (maple syrup, stevia, or your preferred option). Place the saucepan over medium heat. Stir constantly as the mixture heats up. You don’t want to boil it vigorously, just bring it to a gentle simmer.
Step 5: Simmer and Thicken
Continue to cook, stirring constantly, until the hot chocolate has thickened slightly and is steaming. This usually takes about 5-7 minutes. You’ll notice it coats the back of a spoon nicely. Be careful not to let it boil over – it happens fast!
Step 6: Taste and Adjust
Once it’s reached your desired thickness and temperature, carefully taste it. This is your chance to adjust the sweetness. Need it a little sweeter? Add a touch more sweetener. Not chocolatey enough? A tiny bit more cocoa powder (whisked well!) can do the trick, though this is rare. Remember, flavors can intensify slightly as it cools a bit.
Step 7: Pour and Garnish
Pour your hot, luscious skinny hot chocolate into your favorite mug. Now for the fun part: toppings! Add a swirl of light whipped cream, a dash of cinnamon, or whatever your heart desires. If you’re adding marshmallows, try to do it right away so they get nice and melty.
Step 8: Enjoy Immediately
This skinny hot chocolate is best enjoyed immediately while it’s warm and comforting. Sip it slowly, savor the flavor, and let it warm you from the inside out. Ahh, pure bliss!
“The Easy Skinny Hot Chocolate turned out amazing. My kids asked for seconds. Saving this one!”
What to Serve It With
This skinny hot chocolate is honestly a star on its own, but it also plays wonderfully with a few other things! For breakfast, I love to pair a smaller mug with a couple of these delightful whole wheat pancakes or a simple bowl of overnight oats. It feels like a treat without derailing my morning. It’s also fantastic alongside a light, fluffy omelet. For brunch, imagine serving this alongside some delicate lemon blueberry scones or a beautiful fruit platter. It adds a touch of elegance without being too heavy. For a more decadent brunch, it’s divine with some mini banana bread muffins. As dessert, this is pure magic. It’s the perfect after-dinner indulgence when you want something sweet but not overwhelmingly rich. Serve it with a few sugar-free cookies or a small portion of fruit salad. It’s also wonderful with a piece of dark chocolate bark. For cozy snacks, and this is my favorite time to have it, it’s perfect with a good book and a quiet moment. I sometimes pair it with a few light, airy rice cakes topped with a thin layer of almond butter. Or, if I’m feeling a bit more indulgent (but still keeping it light!), a couple of these crunchy homemade granola bars are just the thing. My family also loves to have it on movie nights, served in big, cozy mugs with a tiny sprinkle of nutmeg on top. It’s become our go-to for staying warm and happy during family time!
Top Tips for Perfecting Your Skinny Hot Chocolate
I’ve made this skinny hot chocolate so many times, I’ve practically got it down to a science, and I’ve definitely learned a few things along the way! First, regarding the cocoa powder: don’t skimp here! A good quality unsweetened cocoa powder makes a massive difference. If you can, try Dutch-processed for a smoother, less bitter flavor. Always sift your cocoa powder if you notice any clumps; it’ll save you a headache later. For mixing, that initial paste you make with the cocoa, cornstarch, and a bit of milk is non-negotiable. It’s the secret to that silky smooth texture. If you skip it and just dump everything in at once, you’ll likely end up with little cocoa bits floating around, and nobody wants that! Stirring constantly over medium heat is also key. It prevents the bottom from scorching and ensures the cornstarch activates properly to thicken the drink. I learned this the hard way after a few slightly burnt batches in my early days! When it comes to sweetener, start with the recommended amount and then taste. Everyone’s palate is different, and the type of milk you use can also affect sweetness. If you’re using a plant-based milk that’s naturally a bit sweeter, you might need less added sweetener. I’ve tested this with a few different liquid sweeteners, and while maple syrup is my favorite for its subtle flavor, a good quality liquid stevia works wonders if you’re watching sugar intake even more closely. Just remember a little stevia goes a long way! For thickening, that teaspoon of cornstarch is perfect for a standard mug, but if you prefer a thicker, almost pudding-like consistency, you can try 1.5 teaspoons. Just make sure to whisk it in really well with the dry ingredients so it disperses evenly. When it comes to flavor, don’t be afraid to play! A tiny dash of vanilla extract stirred in right at the end adds a beautiful depth of flavor. A pinch of cinnamon or a whisper of chili powder can add a lovely warmth and complexity. I even tried adding a drop of peppermint extract once, and it was surprisingly delicious for a festive twist! Remember, the goal is a comforting, rich-tasting hot chocolate that still feels light. It’s all about balance and using simple, effective techniques to get the best results.
Storing and Reheating Tips
This skinny hot chocolate is truly at its best when it’s fresh and piping hot, but sometimes life gets in the way, and you might have leftovers. If you find yourself with some, don’t fret! For room temperature storage, I honestly wouldn’t recommend leaving it out for more than an hour or two, especially if you’ve added any dairy or lighter toppings. It’s best to get it into the fridge fairly quickly to maintain its quality and safety. Refrigerator storage is your best bet for leftovers. Pour any cooled hot chocolate into an airtight container or a jar with a lid. It should keep well in the fridge for about 2 to 3 days. The cornstarch might cause it to thicken up a bit more as it chills, which is perfectly normal. To reheat, simply pour the cold hot chocolate back into a saucepan over low to medium heat. Stir it frequently as it warms up. You might need to add a splash of milk to loosen it up if it’s gotten too thick. Alternatively, you can microwave it in a microwave-safe mug, stirring every 30 seconds or so, until heated through. Be patient; you don’t want to scorch it! If you’re planning to freeze it, I’d suggest doing so before you add any cream or perishable toppings. Pour the cooled hot chocolate into freezer-safe containers or even ice cube trays if you want to make smaller portions for adding to other drinks. It can stay in the freezer for up to a month. To thaw, transfer it to the refrigerator overnight, then reheat as directed. For the glaze, if you’re using something like a whipped cream topping, it’s definitely best to add that *after* reheating. If you made a more permanent glaze (like a chocolate drizzle), you can apply it before storing, but be aware it might affect the texture slightly upon reheating.
Frequently Asked Questions
Final Thoughts
So there you have it – my go-to skinny hot chocolate recipe! It’s proof that you don’t need to overdo it on calories or fat to enjoy a truly decadent and comforting drink. This recipe has brought so much warmth and cheer into my home, and I really hope it does the same for you. It’s perfect for those chilly evenings, a little pick-me-up during a busy day, or even a special treat for the kids that you can feel good about. If you loved this recipe, you might also enjoy my recipe for healthy chocolate chip cookies or my lightened-up gingerbread latte for more guilt-free indulgence! Give this skinny hot chocolate a try, and please, please let me know what you think in the comments below! I’d love to hear about your favorite toppings or any fun variations you come up with. Happy sipping!

skinny hot chocolate
Ingredients
Main Ingredients
- 1.5 cups fat free milk
- 1 cup ice
- 4 tbsp Ovaltine Rich Chocolate or Chocolate Malt flavor
- 1 tbsp unsweetened cocoa powder
- 2 tbsp fat free whipped topping optional, for blending or topping
- 0.01 tsp peppermint extract optional
Instructions
Preparation Steps
- Pour the milk and ice into your blender.
- Add in the ovaltine, cocoa powder, and whipped topping (optional – you could also leave this for the top instead).
- Blend 3-4 minutes until the ice is completely chopped and the mixture is thick and icy.
- Pour into two glasses, and serve immediately with an extra dollop of whipped topping if desired.


