Oh, you guys. I have something truly special to share with you today. It’s one of those recipes that feels like a warm hug on a hot day, a little slice of pure joy that my family has been devouring for years. We’re talking about raspberry coconut popsicles. Now, I know what you might be thinking – popsicles? But trust me, these are not your average, icy-sweet, neon-colored freezer pops. These are creamy, dreamy, bursting-with-flavor little masterpieces that taste like a tropical vacation in every single bite. If you’ve ever loved those fancy Ice Cream bars with swirls of fruit and creamy goodness, imagine that, but even better because you made them yourself, with ingredients you can feel great about. This recipe has saved me on more than one sweltering afternoon when the kids are bouncing off the walls and a simple trip to the store feels like an expedition. They’re so incredibly easy, it almost feels like cheating, but the results are always, always phenomenal. They’re our go-to for a reason, and I just know they’re going to become a summer staple in your home too.
Thank you for reading this post, don't forget to subscribe!What is a Raspberry Coconut Popsicle?
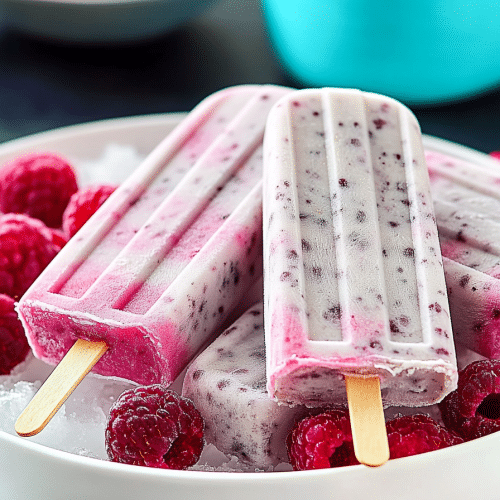
So, what exactly are these magical raspberry coconut popsicles? Think of them as the perfect blend of two incredibly delicious worlds. On one hand, you have the bright, slightly tart, wonderfully vibrant flavor of fresh raspberries. On the other, you have the rich, creamy, tropical embrace of coconut milk. Together, they create this symphony of taste that’s both refreshing and decadent. It’s essentially a creamy coconut milk base, generously swirled with a luscious raspberry puree, all frozen into perfect little popsicle shapes. The “ice” in popsicle is really more of a creamy, dreamy texture thanks to the full-fat coconut milk we’re using. They’re not super sweet, letting the natural fruitiness of the raspberries and the subtle sweetness of the coconut really shine. It’s the kind of treat that feels indulgent but is actually packed with good stuff, making them a guilt-free pleasure for everyone. I always tell people it’s like biting into a cloud that’s been kissed by sunshine and berries.
Why you’ll love this recipe?
Why do I keep coming back to these raspberry coconut popsicles?flavor is just out of this world. The combination of tart raspberries and creamy coconut is a match made in heaven. It’s sweet without being cloying, and refreshing without being watery. You get those beautiful pops of raspberry zing against the smooth, velvety coconut, and it’s just… perfection. Secondly, the simplicity. Seriously, you need minimal ingredients and almost no special equipment. If you can blend a few things and pour them into molds, you’re basically done! This is a lifesaver on busy weeknights or when you’re trying to keep little hands busy on a Saturday. Thirdly, they’re incredibly cost-effective. Buying gourmet popsicles can really add up, but making these at home is so much more budget-friendly, especially when raspberriesversatility! While the raspberry and coconut combo is my absolute favorite, you can easily swap out the fruit or even the creamy base for endless variations. They’re also fantastic for everyone – my toddler adores them, and even my picky teenager will happily munch on them. What I love most about this recipe is that it feels like a special treat without all the fuss or the hefty price tag. It’s the kind of dessert that makes you feel like you’ve accomplished something magical in the kitchen, and it truly disappears in minutes at my house!
How to Make Raspberry Coconut Popsicles
Quick Overview
Making these raspberry coconut popsicles is a dream! You’ll start by creating a vibrant raspberry puree, then whip up a luscious, creamy coconut base. The magic happens when you swirl these two together in your popsicle molds, creating beautiful patterns. Then, just freeze! That’s it. No complicated steps, no fancy techniques. It’s designed to be as straightforward as possible so you can spend less time in the kitchen and more time enjoying the sunshine. This method ensures you get a wonderfully creamy texture, not icy, and those gorgeous swirls of fruit that make them look as good as they taste. It’s truly one of the easiest ways to create a stunning and delicious frozen treat.
Ingredients
For the Raspberry Swirl:
2 cups fresh or frozen raspberries (if using frozen, let them thaw slightly)
2 tablespoons honey or maple syrup (adjust to your sweetness preference)
1 tablespoon fresh lemon juice (this brightens the raspberry flavor!)
A tiny pinch of salt (optional, but it really makes the flavors pop)
For the Creamy Coconut Base:
2 cans (13.5 oz each) full-fat coconut milk, chilled overnight in the fridge (this is key for creaminess!)
1/2 cup powdered sugar or your preferred sweetener (adjust to taste)
1 teaspoon pure vanilla extract
A pinch of salt
“Packed with flavor and so simple. Exactly what I wanted from this Easy Raspberry Coconut Popsicles!”
For the Optional Coconut Drizzle:
2 tablespoons melted coconut oil
1 tablespoon shredded unsweetened coconut (for sprinkling)
Step-by-Step Instructions
Step 1: Prepare the Raspberry Swirl
In a blender or food processor, combine the raspberries, honey or maple syrup, lemon juice, and a tiny pinch of salt if you’re using it. Blend until you have a smooth, vibrant puree. If you prefer a super-smooth texture with no seeds, you can strain this puree through a fine-mesh sieve, pressing down with a spoon. I sometimes skip this step because I don’t mind the little seeds, and it saves a bit of time! Set this beautiful raspberry mixture aside. It should be thick enough to swirl, not too watery.
Step 2: Prepare the Creamy Coconut Base
Open your chilled cans of coconut milk. You’ll notice that the thick, creamy part has separated from the liquid. Scoop out the thick cream from the top into a mixing bowl. You can reserve the liquid for smoothies or other recipes. Add the powdered sugar (or your sweetener of choice), vanilla extract, and a pinch of salt to the Coconut Cream. Whisk everything together until it’s smooth and well combined. You want it to be creamy and luscious, like a thick pudding. Taste it – this is where you can adjust the sweetness. I usually find 1/2 cup is perfect, but your raspberries might be tarter or sweeter!
Step 3: Assemble the Popsicles
Now for the fun part! Grab your popsicle molds. Spoon alternating dollops of the coconut base and the raspberry puree into each mold. Don’t be afraid to get a little creative here! You can layer them, put a big blob of raspberry in the middle and then fill around it, or just randomly drop spoonfuls. The key is to not fill them completely to the top; leave a little room for expansion as they freeze.
Step 4: Swirl and Insert Sticks
Once your molds are filled with the alternating colors, take a chopstick, skewer, or knife and gently swirl the colors together. You can do a few figure-eights or a simple swirl motion to create those gorgeous marbled patterns. Don’t over-swirl, or you’ll end up with a uniform pinkish color! Once you’re happy with the swirl, insert your popsicle sticks. If your molds don’t have built-in holders, you can stand them on a small baking sheet in the freezer for about 30-60 minutes until they’re partially frozen, then insert the sticks so they stand up straight.
Step 5: Freeze Until Solid
Carefully transfer the filled popsicle molds to the freezer. Let them freeze completely until they are solid. This usually takes at least 4-6 hours, but I often leave them overnight to be sure. The fuller the mold and the colder your freezer, the faster they’ll freeze.
Step 6: Unmold and Enjoy!
When you’re ready to enjoy your raspberry coconut popsicles, run the outside of the mold under warm water for a few seconds. This will help loosen the popsicles. Gently pull them out. If you’re adding the optional coconut drizzle, melt the coconut oil, dip the tip of the popsicle into it, and then immediately sprinkle with shredded coconut before the chocolate hardens. Enjoy your delicious, homemade treat immediately!
“Made the Easy Raspberry Coconut Popsicles tonight and wow — perfect weeknight dinner. Will definitely make again!”
What to Serve It With
These raspberry coconut popsicles are pretty much a star on their own, but they can definitely set the stage for other delicious moments too. For a casual breakfast treat, especially on a weekend, I love serving one alongside a fresh cup of coffee or a glass of cold milk. It feels like such a treat to start the day! For brunch, they make a stunning dessert. I like to arrange them on a pretty platter with some fresh berries and maybe a small dollop of Whipped Cream. They look so elegant and feel so celebratory! As an after-dinner dessert, they’re a lighter, more refreshing option than a heavy cake or pie, especially after a big meal. They’re perfect for cleansing the palate with their bright flavors. And for those cozy snacks when you’re just lounging around, they’re pure, unadulterated happiness. I often serve them with a side of something crunchy, like a few almond cookies or even just some toasted coconut flakes. My kids love having them after a long day of playing outside, and it’s always a hit at summer BBQs. They’re just universally loved!
Top Tips for Perfecting Your Raspberry Coconut Popsicles
I’ve made these raspberry coconut popsicles more times than I can count, and over the years, I’ve picked up a few tricks that really make a difference. First, for the Raspberry swirl, using good quality raspberries is key. If you’re using frozen ones, make sure they’re ripe and flavorful. Blending them with a touch of lemon juice really elevates the taste and prevents it from being flat. And don’t be afraid to strain them if you’re not a fan of seeds – it makes for a super smooth texture! For the coconut base, the chilled, full-fat coconut milk is non-negotiable for that amazing creaminess. If you use light coconut milk or the carton kind, you’ll end up with more of an icy texture, which isn’t quite the same magic. Whisking everything together until it’s truly smooth, not lumpy, is important for a velvety mouthfeel. When you’re swirling, the trick is not to overdo it. A few gentle passes with a skewer are all you need to create those beautiful marbled patterns. Too much mixing and you’ll lose the distinct colors and textures. If you’re worried about the sticks not standing up, my tried-and-true method is to partially freeze the molds first. Just pop them in the freezer for about 45 minutes to an hour until they’re firm but not rock solid, then insert your sticks. They’ll stay perfectly upright! For ingredient swaps, if raspberries aren’t your favorite, strawberries, blueberries, or even mango puree work beautifully in this base. You could even try a different creamy element, like a good quality cashew cream for a dairy-free alternative, though coconut is hard to beat for this flavor profile! Always taste and adjust sweetness before freezing, as cold temperatures mute flavors a bit. And remember, patience is key for freezing – giving them enough time to set completely ensures you won’t end up with mushy popsicles!
Storing and Reheating Tips
Storing these raspberry coconut popsicles is pretty straightforward, but a few things can help keep them tasting their best. For room temperature, they’re best enjoyed immediately after unmolding! If you need to store them briefly, keep them in a single layer in an airtight container in the freezer. They should be fine for a few days, but the texture might start to change slightly as ice crystals form. For refrigerator storage, this isn’t really applicable since they’re frozen treats! They need to stay frozen to maintain their shape and texture. The freezer is your best friend here. When it comes to freezer instructions, wrap each individual popsicle tightly in plastic wrap or parchment paper, then place them in a freezer-safe bag or airtight container. This double-wrapping helps prevent freezer burn. Properly stored, they can last for about 2-3 months, though they’re usually devoured long before then! The flavors might fade a little after that long, but they’ll still be safe to eat. As for glaze timing, if you’re doing a chocolate or coconut drizzle, it’s best to do that just before serving for the freshest, crispiest coating. If you try to freeze them with the glaze already on, it can become brittle or melt unevenly. So, glaze ’em right before you eat ’em!
Frequently Asked Questions
Final Thoughts
So there you have it – my absolute favorite raspberry coconut popsicles! I truly hope you get a chance to try them. They’re such a simple yet incredibly satisfying way to enjoy the flavors of summer, and they bring such a smile to my face every time I make them. They’re proof that you don’t need a complicated recipe or tons of ingredients to create something truly special and delicious. Whether you’re looking for a healthy-ish treat for the kids, a refreshing dessert for a hot day, or just a little burst of happiness for yourself, these popsicles are the answer. If you give them a whirl, please, please come back and let me know how they turned out in the comments below! I love hearing your feedback and seeing your creations. And if you’re already dreaming up other flavor combinations, I can’t wait to hear those ideas too! Happy freezing, and enjoy every delicious bite!
Raspberry Coconut Popsicles
Ingredients
Main Ingredients
- 0.5 cup lite coconut milk
- 0.5 cup unsweetened almond milk
- 0.75 cup fresh raspberries
- 2 tablespoons chia seeds
- 1 tablespoon sweetened shredded coconut
- 8 drops Nu-Naturals liquid stevia or sugar/honey to taste
Instructions
Preparation Steps
- Combine the lite coconut milk, unsweetened almond milk, raspberries, chia seeds, sweetened shredded coconut, and liquid stevia in a large container.
- Mix all ingredients well until combined. Close the container and refrigerate for at least 2 hours to allow the chia seeds to expand and thicken the mixture.
- Once the mixture has thickened, pour it evenly into 4 popsicle molds. Insert popsicle sticks and freeze overnight (or for at least 8 hours) until solid.


